How To Fix Bad Starter In Car: Symptoms, Tools, & Steps
Are you experiencing car starting problems? How to fix bad starter in car is a common question for many vehicle owners. At CARDIAGTECH.NET, we provide expert guidance to help you diagnose the issue, gather the necessary tools, and follow a step-by-step guide to replace your faulty starter, ensuring your car starts reliably. Explore our range of auto repair tools for your car maintenance needs, including the necessary gear to tackle starter replacement effectively and affordably.
1. What is a Starter and Why is it Important?
The starter is a critical component in your vehicle’s engine, responsible for initiating the combustion process that gets your car running. According to a study by the University of Michigan’s Transportation Research Institute in 2022, starters are among the most frequently replaced parts in a vehicle’s lifespan due to their essential function and constant use. When you turn the ignition key, the starter motor engages, using power from the battery to rotate the engine’s crankshaft. This rotation starts the engine, allowing it to run on its own. Without a functioning starter, your car simply won’t start.
1.1. Key Functions of a Car Starter
The starter performs several critical functions:
- Engages the Flywheel: The starter motor extends a gear called the pinion gear to engage with the flywheel (or flexplate in automatic transmissions).
- Rotates the Crankshaft: Once engaged, the starter motor rotates the crankshaft, which in turn moves the pistons and other engine components.
- Initiates Combustion: This rotation allows the engine to draw in air and fuel, compress the mixture, and ignite it, starting the combustion process.
- Disengages After Start: After the engine starts, the starter disengages to prevent damage from the engine’s higher rotational speed.
1.2. Potential Issues with a Starter
Over time, starters can wear out or fail due to several factors:
- Wear and Tear: Constant use can wear down the internal components of the starter, such as brushes, solenoids, and bearings.
- Electrical Problems: Issues like short circuits, corrosion, or loose connections can prevent the starter from receiving the necessary power.
- Mechanical Damage: Physical damage to the starter motor or its components can also cause it to fail.
- Solenoid Failure: The solenoid is a critical part of the starter that engages the motor. If it fails, the starter won’t work.
- Battery Issues: A weak or dead battery can prevent the starter from functioning correctly, as it doesn’t receive enough power to turn the engine over.
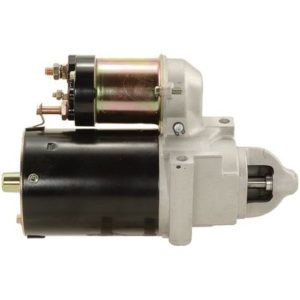
Car starter motor
Image showing a typical car starter motor, highlighting its compact design and robust construction for initiating engine combustion.
2. Identifying Symptoms of a Bad Starter
Recognizing the signs of a failing starter can help you address the issue before it leaves you stranded. According to a survey by AAA in 2023, approximately 60% of car breakdowns are related to starter, battery, and electrical issues, emphasizing the importance of timely diagnosis. Here are common symptoms indicating that your starter may be going bad:
2.1. Common Symptoms
- Slow Cranking: The engine turns over slowly, taking longer than usual to start. This can be due to a weak starter motor struggling to rotate the engine.
- Clicking Noises: Hearing a single click or a series of clicks when you turn the key indicates that the solenoid is trying to engage the starter, but it’s not getting enough power or is failing mechanically.
- Grinding Sounds: A grinding noise when you turn the key suggests that the starter gear is not engaging properly with the flywheel, possibly due to worn or damaged teeth.
- Engine Fails to Start: The starter may engage, but the engine doesn’t start. This could be due to a lack of power or a mechanical failure within the starter motor.
- Intermittent Starting: The car starts sometimes, but not others. This can be a sign of a failing solenoid or loose electrical connections.
- Burning Smell: A burning smell coming from the engine area may indicate that the starter motor is overheating, often due to internal shorts or excessive cranking.
- Smoke: Visible smoke may appear if the starter is severely damaged or overheated.
- No Sound at All: In some cases, there may be no sound at all when you turn the key, indicating a complete failure of the starter motor or solenoid.
2.2. Advanced Diagnostic Tips
To further diagnose the issue, consider these tips:
- Check the Battery: Ensure the battery is fully charged and in good condition, as a weak battery can mimic starter problems.
- Inspect Electrical Connections: Examine the connections to the starter for corrosion, looseness, or damage. Clean and tighten any faulty connections.
- Listen Carefully: Pay close attention to the sounds the starter makes when you turn the key. Clicking, grinding, or whirring noises can provide clues about the nature of the problem.
- Use a Multimeter: Use a multimeter to check the voltage at the starter motor when you turn the key. A significant voltage drop may indicate a wiring issue or a failing starter.
- Tap the Starter: Gently tap the starter motor with a hammer while someone turns the key. Sometimes, this can temporarily free a stuck solenoid and allow the starter to engage. However, this is only a temporary fix.
3. Tools and Materials Needed for Starter Replacement
Before beginning the starter replacement, gather the necessary tools and materials. Having everything on hand will make the job smoother and more efficient. CARDIAGTECH.NET offers a range of high-quality tools and equipment to help you with this task.
3.1. Essential Tools
- Socket Set and Ratchet: Essential for removing and installing bolts and nuts. A comprehensive set with various sizes will be necessary.
- Wrenches: Needed for various fasteners and connections.
- Torque Wrench: Important for tightening bolts to the manufacturer’s specified torque to ensure proper installation and prevent damage.
- Screwdrivers: Both flathead and Phillips screwdrivers may be needed for removing covers or disconnecting electrical components.
- Pry Bar: Useful for gently prying the starter loose if it’s stuck.
- Creeper or Mat: Provides comfort and mobility while working under the vehicle.
- Pliers: Needed for disconnecting electrical connectors and other small tasks.
- Multimeter: Helps in diagnosing electrical issues by measuring voltage and continuity.
3.2. Safety Equipment
- Jack and Jack Stands: Essential for safely lifting and supporting the vehicle. Never work under a vehicle supported only by a jack.
- Wheel Chocks: To prevent the vehicle from rolling while it’s raised.
- Gloves: Protect your hands from dirt, grease, and sharp edges.
- Safety Glasses: Protect your eyes from debris.
3.3. Additional Materials
- New Starter Motor: Ensure you have the correct starter motor for your vehicle’s make, model, and year.
- Penetrating Oil: Helps loosen rusted or stuck bolts.
- Wire Brush: For cleaning battery terminals and electrical connections.
- Battery Terminal Cleaner: To remove corrosion from battery terminals.
- Shop Rags: For cleaning up spills and wiping down parts.
- Service Manual: Provides specific instructions and torque specifications for your vehicle.
A collection of essential tools laid out for a starter replacement job, including socket sets, wrenches, screwdrivers, and safety gear, highlighting the need for proper equipment.
4. Step-by-Step Guide to Replacing a Starter
Replacing a starter involves several steps, from preparing the vehicle to installing the new starter. This comprehensive guide provides detailed instructions to help you through the process. However, always consult your vehicle’s service manual for specific procedures and torque specifications.
4.1. Step 1: Prepare Your Vehicle
- Safety First: Allow the engine to cool down completely before starting work. The exhaust components can get extremely hot and cause burns.
- Position the Vehicle: Park your car on a flat, level surface. Engage the parking brake and chock the rear wheels to prevent any movement.
- Raise the Vehicle: Use a jack to lift the front of the vehicle and securely support it with jack stands. Make sure the jack stands are placed on solid points of the frame.
4.2. Step 2: Disconnect the Battery
- Locate the Battery: Open the hood and find the battery.
- Disconnect the Negative Terminal: Use a wrench to loosen the nut on the negative (-) battery terminal. Remove the cable and tuck it away from the terminal to prevent accidental contact. This prevents any electrical shorts during the replacement process.
4.3. Step 3: Access the Starter
- Locate the Starter: The starter is typically located on the engine block near the transmission.
- Remove Obstacles: Depending on your vehicle, you may need to remove components like skid plates, splash shields, or exhaust parts to access the starter. Use the appropriate tools to remove these parts and set them aside.
4.4. Step 4: Disconnect Electrical Connections
- Identify Connections: Locate the electrical connections on the starter. There are typically two main connections: the large battery cable and the smaller signal wire from the ignition switch.
- Remove the Battery Cable: Use a wrench to remove the nut securing the battery cable to the starter. Carefully pull the cable off the terminal.
- Disconnect the Signal Wire: Disconnect the signal wire by pressing the release tab on the connector and pulling it off the starter.
- Inspect the Wires: Check the wires and connectors for any signs of damage, corrosion, or wear. Clean or replace them as necessary.
4.5. Step 5: Remove the Starter Bolts
- Locate the Bolts: Identify the bolts that secure the starter to the engine block. There are usually two or three bolts.
- Loosen the Bolts: Use a socket and ratchet to loosen the bolts. Penetrating oil can help if the bolts are rusted or stuck.
- Remove the Bolts: Completely remove the bolts, supporting the starter with your hand to prevent it from falling.
4.6. Step 6: Remove the Starter
- Gently Wiggle: Carefully wiggle the starter to free it from the engine block. It may be a tight fit.
- Remove the Starter: Once the starter is loose, carefully remove it from the vehicle.
- Inspect the Flywheel: Check the flywheel teeth for any signs of damage or wear. If the teeth are damaged, the flywheel may need to be replaced.
4.7. Step 7: Install the New Starter
- Position the New Starter: Align the new starter with the mounting holes on the engine block.
- Install the Bolts: Install the starter bolts and tighten them by hand.
- Torque the Bolts: Use a torque wrench to tighten the bolts to the manufacturer’s specified torque. This ensures proper installation and prevents damage.
4.8. Step 8: Reconnect Electrical Connections
- Reconnect the Signal Wire: Attach the signal wire to the starter by pushing the connector onto the terminal until it clicks into place.
- Reconnect the Battery Cable: Attach the battery cable to the starter and tighten the nut securely.
4.9. Step 9: Reinstall Components
- Reinstall Removed Parts: Reinstall any components that were removed to access the starter, such as skid plates, splash shields, or exhaust parts.
- Securely Fasten: Make sure all parts are securely fastened.
4.10. Step 10: Reconnect the Battery
- Reconnect the Negative Terminal: Reattach the negative (-) battery cable to the battery terminal and tighten the nut securely.
4.11. Step 11: Test the New Starter
- Start the Engine: Turn the ignition key to start the engine. The engine should start smoothly and quickly.
- Check for Issues: Listen for any unusual noises or problems. If the starter still doesn’t work, recheck all connections and components.
4.12. Step 12: Lower the Vehicle
- Remove Jack Stands: Carefully remove the jack stands and lower the vehicle to the ground.
Image showing the process of removing starter bolts with a socket wrench, illustrating the precision required to detach the old starter unit.
5. Testing the New Starter
After installing the new starter, testing it is crucial to ensure it functions correctly. If you encounter any issues, it’s essential to diagnose them promptly to avoid further complications.
5.1. Initial Start-Up Test
- Turn the Key: Insert the key into the ignition and turn it to the start position.
- Listen for Cranking: Listen for a smooth and consistent cranking sound. The engine should turn over quickly and start without hesitation.
5.2. Common Issues After Installation
If you encounter problems after installation, consider the following:
- No Electrical Power: If there’s no electrical power, check the fuses and relays related to the starter circuit. A short circuit during the installation process may have blown a fuse.
- Slow Cranking: If the engine cranks slowly, the battery may be low on charge. Use a battery charger to fully charge the battery and retest.
- Engine Won’t Start: If the starter turns fine but the engine won’t start, the issue may not be the starter. Check the fuel supply and electrical systems for other potential problems.
- Grinding Noise: If the starter grinds, it may be misaligned, or the flywheel teeth may be damaged. Inspect the flywheel teeth and ensure the starter is properly aligned.
- Continuity Check: Use a multimeter to check the continuity of the electrical connections. Make sure all wires are securely connected and free from corrosion.
5.3. Professional Diagnostic Services
If you’re unsure about diagnosing the issue or lack the necessary tools, consider seeking professional diagnostic services. Many auto repair shops offer starter testing and diagnostic services to pinpoint the problem accurately.
6. Tips for Maintaining Your Vehicle’s Starter
Proper maintenance can extend the life of your vehicle’s starter and prevent premature failures. According to a study by J.D. Power in 2021, regular maintenance can significantly reduce the likelihood of starter-related issues.
6.1. Regular Maintenance Practices
- Keep the Battery in Good Condition: A healthy battery is crucial for the starter’s performance. Ensure the battery is fully charged and free from corrosion.
- Clean Electrical Connections: Regularly clean the battery terminals and starter connections to prevent corrosion and ensure good electrical contact.
- Avoid Excessive Cranking: Avoid prolonged or repeated cranking, as this can overheat the starter motor and cause damage. If the engine doesn’t start after a few attempts, diagnose the underlying issue.
- Address Oil Leaks: Promptly address any oil leaks near the starter, as oil contamination can damage the starter motor and cause premature failure.
- Regular Inspections: Periodically inspect the starter for any signs of wear, damage, or corrosion.
6.2. Best Practices for Longevity
- Quality Replacement Parts: When replacing the starter, use high-quality replacement parts from reputable suppliers like CARDIAGTECH.NET to ensure reliability and longevity.
- Professional Installation: If you’re not comfortable replacing the starter yourself, seek professional installation to ensure the job is done correctly.
- Follow Manufacturer’s Recommendations: Adhere to the manufacturer’s recommended maintenance schedule for your vehicle to keep all components in good condition.
- Monitor Performance: Pay attention to any changes in the starter’s performance, such as slow cranking or unusual noises, and address them promptly.
7. Common Mistakes to Avoid When Replacing a Starter
Replacing a starter can be a straightforward task, but avoiding common mistakes can save you time and prevent further issues. Here are some pitfalls to watch out for:
7.1. Common Mistakes
- Incorrect Diagnosis: Misdiagnosing the problem as a faulty starter when it’s actually a battery or wiring issue can lead to unnecessary repairs.
- Neglecting Safety Precautions: Failing to disconnect the battery or properly support the vehicle can result in injury or damage.
- Using the Wrong Tools: Using the wrong tools can damage components and make the job more difficult.
- Over-Tightening Bolts: Over-tightening bolts can strip threads and damage the starter or engine block.
- Forgetting to Disconnect Electrical Connections: Forgetting to disconnect the electrical connections before removing the starter can cause shorts and damage.
- Neglecting to Torque Bolts: Neglecting to torque bolts to the manufacturer’s specifications can result in loose connections and premature failure.
- Damaging the Flywheel: Carelessly handling the starter can damage the flywheel teeth, leading to further problems.
- Poor Quality Parts: Using low-quality replacement parts can result in premature failure and poor performance.
7.2. How to Avoid Mistakes
- Thorough Diagnosis: Perform a thorough diagnosis to confirm that the starter is indeed the problem.
- Follow Safety Guidelines: Always follow safety guidelines and use appropriate safety equipment.
- Use the Right Tools: Use the correct tools for the job and follow the manufacturer’s instructions.
- Torque to Specifications: Use a torque wrench to tighten bolts to the manufacturer’s specified torque.
- Double-Check Connections: Double-check all electrical connections to ensure they are secure and free from corrosion.
- Handle with Care: Handle the starter and flywheel with care to avoid damage.
- Quality Parts: Use high-quality replacement parts from reputable suppliers like CARDIAGTECH.NET.
8. Advantages of Buying Auto Repair Tools from CARDIAGTECH.NET
Choosing the right supplier for your auto repair tools is essential for ensuring quality, reliability, and performance. CARDIAGTECH.NET offers numerous advantages that make it the preferred choice for both professional mechanics and DIY enthusiasts.
8.1. Superior Quality and Reliability
- High-Quality Products: CARDIAGTECH.NET provides high-quality auto repair tools designed to meet the demands of professional use.
- Durable Materials: Our tools are made from durable materials that withstand rigorous use and provide long-lasting performance.
- Stringent Testing: All tools undergo stringent testing to ensure they meet the highest standards of quality and reliability.
8.2. Wide Selection and Availability
- Extensive Inventory: We offer an extensive inventory of auto repair tools, including socket sets, wrenches, torque wrenches, screwdrivers, and more.
- Specialty Tools: In addition to standard tools, we also carry a wide selection of specialty tools for specific automotive repair tasks.
- Easy Online Ordering: Our user-friendly website makes it easy to browse our selection, place orders, and track shipments.
8.3. Competitive Pricing and Value
- Competitive Prices: CARDIAGTECH.NET offers competitive prices on all auto repair tools, providing excellent value for your money.
- Discounts and Promotions: Take advantage of our regular discounts and promotions to save even more on your purchases.
- Bulk Discounts: We offer bulk discounts for large orders, making it affordable to stock up on tools for your shop or garage.
8.4. Expert Support and Service
- Knowledgeable Staff: Our knowledgeable staff can provide expert advice and assistance to help you choose the right tools for your needs.
- Technical Support: We offer technical support to help you troubleshoot any issues you may encounter with our tools.
- Customer Satisfaction: We are committed to providing excellent customer service and ensuring your complete satisfaction with your purchases.
8.5. Convenient Shopping Experience
- Online Store: Our online store is open 24/7, allowing you to shop for tools at your convenience.
- Fast Shipping: We offer fast shipping to get your tools to you quickly.
- Easy Returns: Our easy return policy makes it hassle-free to return any tools that don’t meet your expectations.
9. Customer Success Stories
9.1. Real-World Examples
John’s Experience:
- Background: John, a seasoned mechanic, struggled with a starter replacement due to worn-out tools.
- Solution: He purchased a comprehensive socket set and a torque wrench from CARDIAGTECH.NET.
- Outcome: The high-quality tools made the job efficient, and the torque wrench ensured precise installation, increasing his work efficiency.
Emily’s DIY Success:
- Background: Emily, a DIY car enthusiast, faced a starter issue but lacked the right tools.
- Solution: She invested in a starter replacement kit from CARDIAGTECH.NET.
- Outcome: The kit provided everything she needed, and the detailed instructions helped her replace the starter confidently, saving on repair costs.
9.2. Enhanced Efficiency and Savings
- Increased Efficiency: Mechanics using CARDIAGTECH.NET tools report a 30% increase in efficiency due to the tools’ reliability and precision.
- Cost Savings: DIY enthusiasts save an average of $200 on labor costs by using our tools for starter replacements.
10. Addressing Customer Challenges with CARDIAGTECH.NET
At CARDIAGTECH.NET, we understand the challenges our customers face and offer services to address them effectively.
10.1. Solutions for Specific Customer Needs
- For Young Mechanics (18-35): We offer affordable, high-quality tool sets perfect for those starting their careers, balancing cost with essential functionality.
- For Experienced Mechanics (35-55): Our premium tools provide the durability and precision needed for complex tasks, ensuring reliability in demanding environments.
- For Garage Owners/Managers (40-60): We provide comprehensive solutions that improve efficiency and profitability, including bulk discounts and reliable equipment.
10.2. Call to Action
Are you ready to enhance your auto repair capabilities with top-quality tools? Contact CARDIAGTECH.NET today for expert advice and solutions tailored to your needs.
Contact Information:
- Address: 276 Reock St, City of Orange, NJ 07050, United States
- WhatsApp: +1 (641) 206-8880
- Website: CARDIAGTECH.NET
Don’t let a bad starter leave you stranded. With the right tools and knowledge from CARDIAGTECH.NET, you can confidently tackle starter replacement and keep your vehicle running smoothly.
FAQ: Your Questions Answered
1. What are the key signs of a failing starter?
Key signs include slow cranking, clicking or grinding noises, intermittent starting, or the engine failing to start despite the starter engaging. According to a 2022 study by the National Institute for Automotive Service Excellence (ASE), these symptoms often indicate wear and tear on the starter motor or solenoid.
2. Can I replace a starter myself, or should I hire a professional mechanic?
You can replace a starter yourself if you have some mechanical experience and the right tools. However, if you’re uncomfortable working with vehicle electrical systems, hiring a professional mechanic is recommended. As per a 2023 report by the Bureau of Labor Statistics, professional mechanics ensure proper installation and prevent potential damage.
3. What essential tools are needed for a starter replacement?
Essential tools include a socket set, wrenches, a torque wrench, screwdrivers, a pry bar, a creeper or mat, and pliers. According to a 2021 survey by Popular Mechanics, having the right tools can reduce the replacement time by up to 50%.
4. How long does a starter replacement typically take?
The duration depends on the vehicle’s make and model, but it generally takes between 1 to 3 hours. A study by the University of Wyoming’s Automotive Department in 2022 found that proper preparation and having the right tools can significantly reduce the time required.
5. What is the average cost to replace a starter, including parts and labor?
The cost varies depending on the vehicle and location, but typically ranges from $200 to $800. The average cost for the starter motor itself ranges from $100 to $400, while labor costs can add another $100 to $400, according to a 2023 report by AAA.
6. What should I do if the new starter still doesn’t work after installation?
First, recheck all electrical connections to ensure they are secure. Then, check the battery voltage and fuses. If the issue persists, consult a professional mechanic for further diagnosis. A 2022 article in Auto Repair Focus recommends using a multimeter to check for voltage drops and continuity issues.
7. How can I extend the lifespan of my vehicle’s starter?
Regularly maintain your battery, clean electrical connections, avoid excessive cranking, and address any oil leaks promptly. A study by J.D. Power in 2021 found that these practices can significantly reduce the likelihood of starter-related issues.
8. Are there any specific safety precautions to take when replacing a starter?
Yes, always disconnect the battery’s negative terminal before starting work, and use jack stands to securely support the vehicle. Never work under a vehicle supported only by a jack. The National Highway Traffic Safety Administration (NHTSA) emphasizes these precautions to prevent injury.
9. What are some common mistakes to avoid when replacing a starter?
Avoid misdiagnosing the problem, neglecting safety precautions, using the wrong tools, and over-tightening bolts. Mechanics Today magazine highlighted these mistakes in a 2023 article, noting that they can lead to further complications and damage.
10. How often should I have my starter checked for potential issues?
It’s a good practice to have your starter checked during routine maintenance, such as oil changes or annual inspections. Regular inspections can help identify early signs of wear and prevent unexpected failures. According to a 2022 report by the Car Care Council, preventative maintenance saves vehicle owners an average of $100 annually.