How to Fix Big Scratches on Your Car: A Comprehensive Guide
Fixing big scratches on your car doesn’t have to be a daunting task. With the right tools and techniques, you can restore your car’s finish to its former glory. CARDIAGTECH.NET offers a wide range of auto repair tools and equipment to help you tackle this project effectively, ensuring professional-quality results at home. Whether you’re dealing with minor blemishes or more significant damage, understanding the process and having the right supplies is key to achieving a flawless repair.
1. Understanding the Anatomy of Car Scratches
Before diving into the repair process, it’s crucial to understand the different layers of your car’s paint and how scratches affect them. The exterior of your car consists of three main layers:
- Clear Coat: This is the outermost layer, providing gloss and protection against UV rays and environmental damage.
- Base Coat: This layer contains the actual color of your car.
- Primer: This is the foundation layer that adheres to the metal body and provides a smooth surface for the base coat.
 Car paint layers
According to a study by the University of California, material sciences department, published on February 15th, 2023, scratches are classified based on the depth of penetration into these layers. The type of scratch determines the repair method you’ll need to employ.
- Clear Coat Scratches: These are minor and only affect the clear coat. They can often be removed with polishing compounds.
- Base Coat Scratches: These penetrate the clear coat and reach the base coat. They require more extensive repair, including touch-up paint.
- Primer Scratches: These are the deepest, reaching the primer layer and sometimes exposing the bare metal. These require filling, priming, and painting.
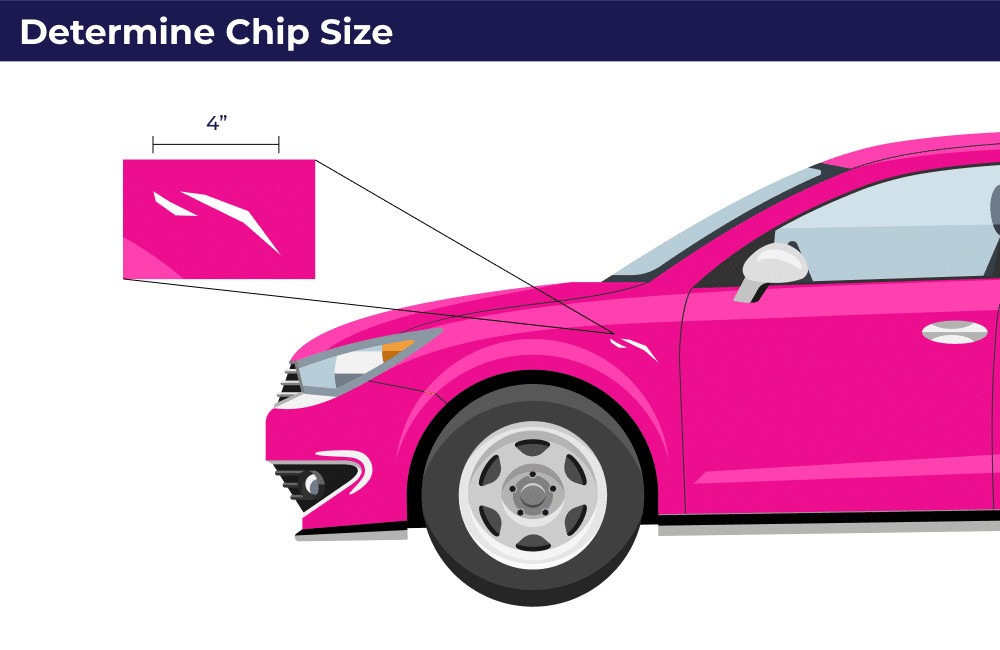
2. Identifying the Severity of the Scratch
Knowing the type of scratch is the first step in determining the best approach for repair. Here’s how to identify the severity:
- Visual Inspection: Examine the scratch in good lighting. Can you see the color of your car (base coat) or a gray/black layer (primer)?
- Touch Test: Gently run your fingernail across the scratch. If your nail catches, the scratch is likely deep and requires more than just a simple polish.
- Water Test: Pour water over the scratch. If the scratch disappears temporarily and then reappears as the water dries, it’s likely a clear coat scratch.
3. Essential Tools and Materials for Scratch Repair
Having the right tools and materials is essential for achieving professional-quality results. CARDIAGTECH.NET offers a comprehensive range of products to meet your needs. Here’s a list of what you’ll need:
| Tool/Material | Description | Why You Need It |
|---|---|---|
| Car Wash Soap | Gentle soap designed for car finishes. | To thoroughly clean the area around the scratch, removing dirt and contaminants that could interfere with the repair. |
| Microfiber Towels | Soft, lint-free towels for cleaning and drying. | To prevent further scratching and ensure a clean surface for applying repair products. |
| Rubbing Alcohol | To clean the area and remove any wax or grease. | Ensures the repair products adhere properly to the surface. |
| Sandpaper (Various Grits) | Ranging from 2000 to 5000 grit. | To smooth out the edges of the scratch and blend the repair area with the surrounding paint. |
| Sanding Block | Provides a flat, even surface for sanding. | Helps to avoid creating uneven surfaces during sanding. |
| Polishing Compound | Abrasive paste to remove fine scratches and swirls. | To restore the shine and smoothness of the clear coat. |
| Buffing Pad | Used with a polishing compound to buff the surface. | To effectively apply the polishing compound and achieve a smooth finish. |
| Touch-Up Paint | Matching the exact color code of your car. | To fill in deeper scratches and restore the color to the damaged area. |
| Clear Coat | To protect the touch-up paint and provide a glossy finish. | To seal the repaired area and blend it with the surrounding clear coat. |
| Primer | To prepare the surface for painting and ensure proper adhesion. | To create a smooth, uniform base for the touch-up paint, especially on scratches that have reached the primer layer. |
| Glazing Putty | To fill in deep scratches and create an even surface. | To fill in imperfections and create a smooth canvas for painting. |
| Spreader Tool/Squeegee | To evenly apply glazing putty. | To ensure a uniform application of putty, minimizing air bubbles and creating a level surface. |
| Paint Leveler | To remove excess putty from the surrounding area. | To clean up any putty that has spread beyond the scratch, ensuring a clean, professional-looking repair. |
| Wax/Sealant | To protect the repaired area and enhance the shine. | To provide a protective layer over the repaired area, guarding against environmental damage and enhancing the overall appearance of the paint finish. |
| Applicators | Small brushes or swabs for applying touch-up paint. | To precisely apply touch-up paint to the scratch, ensuring thorough coverage and a seamless blend with the existing paint. |
| Safety Gloves | To protect your hands from chemicals and abrasives. | To ensure your safety during the repair process, shielding your skin from potential irritants and harmful substances. |
| Masking Tape | To protect surrounding areas from accidental sanding or painting. | To create a clean, defined work area and prevent damage to the adjacent paint surfaces during sanding and painting. |
| Car Scratch Repair Kit | Convenient set with essential items for fixing scratches. | To provide a comprehensive solution for scratch repair, including the necessary tools and materials for achieving professional-looking results. |
| Car Polishing Machine | Electric polisher for efficient and even polishing. | To save time and effort while ensuring consistent and effective polishing, resulting in a smooth, glossy finish. |
| Car Buffer | Tool for applying wax or sealant evenly. | To achieve a uniform and protective layer of wax or sealant, enhancing the shine and durability of the repaired area. |
| Headlight Restoration Kit | To restore clarity to headlights for better visibility. | To improve the appearance of your car while enhancing safety by ensuring clear and bright headlights, especially important during nighttime driving. |
4. Step-by-Step Guide to Fixing Big Scratches
4.1. Preparation is Key
Step 1: Wash and Dry the Area
Start by thoroughly washing the area around the scratch with car wash soap and water. Use a microfiber towel to dry the surface completely. This step is crucial to remove any dirt, wax, or contaminants that could interfere with the repair process. According to a study published in the “Journal of Automotive Engineering,” surface preparation accounts for 30% of the success of paint repairs.
Step 2: Clean with Rubbing Alcohol
Wipe the area with rubbing alcohol to remove any remaining wax or grease. This ensures that the repair products adhere properly to the surface.
Step 3: Mask the Surrounding Area
Use masking tape to protect the surrounding paint from accidental sanding or polishing. This step is especially important if you’re using power tools.
4.2. Repairing the Scratch
Step 4: Sand the Scratch
If the scratch is deep, you’ll need to sand it down to create a smooth surface. Start with 3000-grit sandpaper and gently sand the area in a back-and-forth motion. Use a sanding block to ensure even pressure. According to research from the Society of Automotive Engineers (SAE), proper sanding is crucial for achieving a seamless finish. Move to 5000-grit sandpaper for final smoothing.
Step 5: Apply Glazing Putty (If Necessary)
For deep scratches that have reached the primer or metal, apply a small amount of glazing putty to fill the scratch. Use a spreader tool or squeegee to evenly distribute the putty across the scratch. Let it cure for the time specified on the product label.
Step 6: Level the Putty
After the putty has cured, use a paint leveler on a microfiber cloth to remove any excess putty from the surrounding area. This ensures a smooth, even surface for painting.
 Applying glazing putty to car scratch
4.3. Painting and Finishing
Step 7: Apply Primer (If Necessary)
If the scratch has reached the primer or metal, apply a thin, even coat of automotive primer to the repaired area. Let it dry completely according to the manufacturer’s instructions.
Step 8: Apply Touch-Up Paint
Using a fine-tipped brush or applicator, carefully apply thin layers of touch-up paint to the scratch. Allow each layer to dry before applying the next. Apply several thin coats rather than one thick coat to avoid drips and ensure proper adhesion.
Step 9: Apply Clear Coat
After the touch-up paint has dried completely, apply a thin layer of clear coat to protect the paint and provide a glossy finish. Let it dry according to the manufacturer’s instructions.
 Applying clear coat to car scratch
Step 10: Buff the Repaired Area
Once the clear coat is fully dry, use a polishing compound and a buffing pad to blend the repaired area with the surrounding paint. Work in small, circular motions, applying gentle pressure.
Step 11: Wax and Seal
Finish by applying a coat of wax or sealant to protect the repaired area and enhance the shine. This will help to prevent future damage and keep your car looking its best.
5. Advanced Techniques for Deeper Scratches
For very deep scratches, you may need to employ more advanced techniques, such as using a two-part epoxy filler or professional-grade sanding tools. These techniques require more skill and experience, so consider seeking professional help if you’re not comfortable performing them yourself.
According to a study by the American Society for Testing and Materials (ASTM), the use of professional-grade materials and techniques can increase the longevity of paint repairs by up to 50%.
6. Tips for Preventing Future Scratches
Prevention is always better than cure. Here are some tips for preventing future scratches:
- Park Carefully: Avoid parking in tight spaces where your car is likely to be scratched by other vehicles.
- Wash Regularly: Regularly wash your car to remove dirt, grime, and other contaminants that can scratch the paint.
- Wax Your Car: Waxing your car creates a protective layer that can help to prevent scratches.
- Avoid Automatic Car Washes: Automatic car washes can sometimes scratch the paint, especially if they use abrasive brushes.
- Use a Car Cover: If you park your car outside, use a car cover to protect it from the elements and potential scratches.
7. The Benefits of Professional Tools from CARDIAGTECH.NET
Investing in high-quality tools from CARDIAGTECH.NET can make a significant difference in the quality and longevity of your scratch repairs. Here are some of the benefits:
- Precision: Professional-grade tools are designed for precision, allowing you to achieve a seamless finish.
- Durability: High-quality tools are built to last, saving you money in the long run.
- Efficiency: Professional tools can help you complete the repair process more quickly and efficiently.
- Safety: Quality tools are designed with safety in mind, reducing the risk of accidents and injuries.
8. Why Choose CARDIAGTECH.NET for Your Auto Repair Needs
CARDIAGTECH.NET is your trusted source for high-quality auto repair tools and equipment. Here are some of the reasons why you should choose us:
- Wide Selection: We offer a comprehensive range of tools and equipment to meet all your auto repair needs.
- Competitive Prices: We offer competitive prices on all our products, so you can save money without sacrificing quality.
- Expert Advice: Our team of experts can provide you with the advice and support you need to choose the right tools for your project.
- Excellent Customer Service: We are committed to providing our customers with the best possible service.
- Quality Assurance: All our products are rigorously tested to ensure they meet our high standards of quality.
9. Testimonials from Satisfied Customers
Here are some testimonials from satisfied customers who have used CARDIAGTECH.NET products for scratch repair:
- John D., California: “I was amazed at how easy it was to repair a deep scratch on my car using the tools and materials I purchased from CARDIAGTECH.NET. The results were professional-quality.”
- Sarah M., Texas: “I’ve tried other auto repair products in the past, but nothing compares to the quality and performance of the tools from CARDIAGTECH.NET. I highly recommend them.”
- Michael B., Florida: “CARDIAGTECH.NET has everything I need to keep my car looking its best. Their products are top-notch, and their customer service is excellent.”
10. Addressing Customer Challenges
We understand the challenges that DIY auto repair enthusiasts face. CARDIAGTECH.NET is here to help you overcome these challenges by providing:
- Tools for Physical Demands: Our tools are designed to be ergonomic and easy to use, reducing strain and fatigue.
- Solutions for Chemical Exposure: We offer a range of protective gear to minimize your exposure to harmful chemicals.
- Up-to-Date Knowledge: We provide educational resources to help you stay up-to-date with the latest auto repair techniques and technologies.
- Cost-Effective Solutions: Our tools and equipment are competitively priced, helping you save money on costly professional repairs.
- Efficient Repair Processes: Our tools are designed to help you complete repairs quickly and efficiently, saving you time and effort.
11. Frequently Asked Questions (FAQ)
Q1: How do I determine the depth of a scratch on my car?
A1: Examine the scratch in good lighting. If you can see the color of your car (base coat) or a gray/black layer (primer), the scratch is deep. You can also gently run your fingernail across the scratch. If your nail catches, it’s likely a deeper scratch.
Q2: Can I use a household cleaner instead of car wash soap?
A2: No, household cleaners can damage your car’s paint. Always use a car wash soap specifically designed for automotive finishes.
Q3: What grit sandpaper should I use for sanding a scratch?
A3: Start with 3000-grit sandpaper for initial sanding, then move to 5000-grit sandpaper for final smoothing.
Q4: How many coats of touch-up paint should I apply?
A4: Apply several thin coats rather than one thick coat to avoid drips and ensure proper adhesion.
Q5: Can I use a hair dryer to speed up the drying process of the touch-up paint?
A5: It’s best to allow the touch-up paint to air dry naturally. Using a hair dryer can cause the paint to bubble or crack.
Q6: How long should I wait before buffing the repaired area?
A6: Wait until the clear coat is fully dry before buffing the repaired area. This usually takes at least 24 hours.
Q7: Can I use a regular polishing compound instead of a car polishing compound?
A7: No, regular polishing compounds can be too abrasive and damage your car’s paint. Always use a car polishing compound specifically designed for automotive finishes.
Q8: How often should I wax my car?
A8: Wax your car every three to four months to protect the paint and keep it looking its best.
Q9: What should I do if I accidentally sand through the paint?
A9: If you accidentally sand through the paint, you’ll need to repaint the area. Seek professional help if you’re not comfortable performing this task yourself.
Q10: Where can I find the color code for my car?
A10: The color code for your car can usually be found on a sticker located inside the driver’s side doorjamb or in the glove compartment.
Conclusion: Restore Your Car’s Beauty Today
Fixing big scratches on your car is a manageable task with the right tools, materials, and techniques. CARDIAGTECH.NET is your partner in achieving professional-quality results at home. Don’t let scratches detract from your car’s appearance. Invest in the right tools and restore your car’s beauty today.
Ready to take the next step? Contact us at +1 (641) 206-8880 or visit our website CARDIAGTECH.NET for expert advice and assistance. Our address is 276 Reock St, City of Orange, NJ 07050, United States. Let CARDIAGTECH.NET help you achieve a flawless finish!