How to Fix a Broken Car Door Handle Inside
Having a broken car door handle inside can be a frustrating issue, but it’s often a repair that can be tackled at home with the right tools and guidance, and CARDIAGTECH.NET is here to provide the solutions. This comprehensive guide will walk you through the process of diagnosing the problem, sourcing replacement parts, and performing the repair, ensuring your vehicle is back to its functional best with the help of auto repair tools, diagnostic equipment, and automotive hand tools. With the proper auto repair equipment and a bit of know-how, you’ll be able to handle this repair efficiently and effectively.
1. Understanding the Problem: Diagnosing a Broken Interior Door Handle
Before diving into the repair process, it’s crucial to understand why your interior car door handle might be broken. Identifying the root cause will help you select the correct replacement part and prevent future issues.
-
Common Causes of Failure:
- Wear and Tear: Over time, the internal mechanisms of the door handle can wear out due to repeated use. This is especially common in older vehicles.
- Broken Linkage: The door handle is connected to the door latch via a series of rods, cables, or linkages. These components can break or become disconnected.
- Plastic Components: Many modern car door handles include plastic parts that can become brittle and break, especially in extreme temperatures.
- Faulty Latch Mechanism: Sometimes, the problem isn’t the handle itself, but the latch mechanism inside the door.
- Accidents or Force: Applying excessive force to the handle, such as during an accident or when the door is frozen shut, can cause it to break.
-
Symptoms of a Broken Interior Door Handle:
- Handle Moves Freely Without Engaging: The handle feels loose and doesn’t seem to connect to anything.
- Resistance When Pulling the Handle: The handle feels stiff or requires excessive force to move.
- Clicking or Grinding Noises: Unusual sounds when operating the handle can indicate a problem with the internal components.
- Door Won’t Open from the Inside: This is the most obvious symptom, making it difficult or impossible to exit the vehicle.
2. Gathering Your Tools and Materials
Before you begin, ensure you have all the necessary tools and materials. This will make the repair process smoother and more efficient. CARDIAGTECH.NET provides all the tools needed for a successful repair.
-
Essential Tools:
- Screwdriver Set: Include both Phillips head and flathead screwdrivers of various sizes.
- Socket Set: A set of metric sockets is essential for removing bolts and nuts.
- Pliers: Needle-nose pliers can be helpful for disconnecting small linkages.
- Trim Removal Tools: These plastic tools help to remove interior panels without causing damage.
- Multimeter: Useful for testing electrical connections if the door has power locks or windows.
- Work Gloves: Protect your hands from sharp edges and grease.
- Safety Glasses: Protect your eyes from debris.
-
Additional Materials:
- Replacement Door Handle: Purchase a new door handle assembly that matches your vehicle’s make, model, and year.
- Replacement Clips: Interior panels are often held in place by plastic clips, which can break during removal. Have extras on hand.
- Penetrating Oil: Applying penetrating oil to stubborn bolts can make them easier to remove.
- Shop Rags: Keep rags handy for wiping away grease and dirt.
- Car Repair Manual: A repair manual specific to your vehicle can provide detailed instructions and diagrams.
-
Where to Buy:
- CARDIAGTECH.NET: Offers a wide selection of high-quality automotive tools and diagnostic equipment. Call +1 (641) 206-8880 for assistance.
- Local Auto Parts Stores: NAPA, AutoZone, and Advance Auto Parts are reliable sources for replacement parts and tools.
- Online Retailers: Amazon and eBay offer a vast selection of automotive parts, but be sure to verify the seller’s reputation and the part’s compatibility with your vehicle.
3. Step-by-Step Guide to Fixing a Broken Interior Door Handle
This section provides a detailed, step-by-step guide on how to replace a broken interior car door handle. Always refer to your vehicle’s repair manual for specific instructions and safety precautions.
3.1. Preparing the Vehicle
- Park the Vehicle: Park your car on a level surface and engage the parking brake.
- Gather Your Tools: Place all your tools and materials within easy reach.
- Protect the Work Area: Use a fender cover or old blanket to protect the exterior of the door.
3.2. Removing the Interior Door Panel
-
Locate and Remove Screws:
- Most door panels are held in place by screws, which are often hidden behind plastic covers or in the armrest.
- Use a small flathead screwdriver to gently pry off any covers and reveal the screws.
- Remove all visible screws and store them in a safe place.
- According to a study by the National Highway Traffic Safety Administration (NHTSA), properly securing screws and fasteners is critical for maintaining the structural integrity of vehicle components.
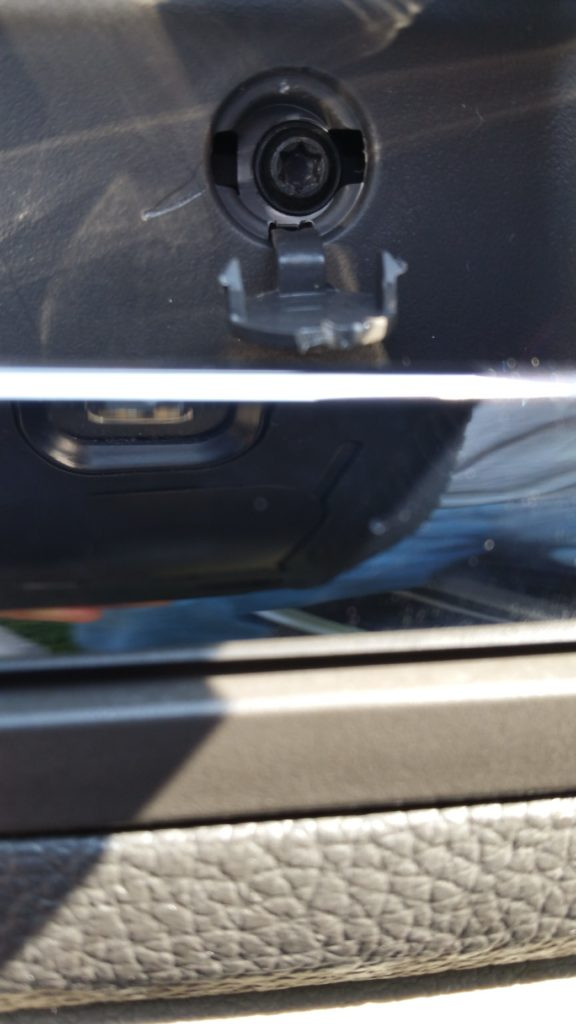
Revealing Hidden Screw That Holds Door Handle Trim on to the Door
Alt Text: Unveiling a hidden screw that secures the car door handle trim, essential for accessing the door’s interior components.
-
Detach the Panel Clips:
- Once the screws are removed, the door panel is typically held in place by plastic clips.
- Use a trim removal tool to gently pry the panel away from the door frame.
- Insert the tool between the panel and the door, and carefully work your way around the perimeter.
- Be patient and apply steady pressure to avoid breaking the clips.
- If a clip breaks, replace it with a new one before reinstalling the panel.
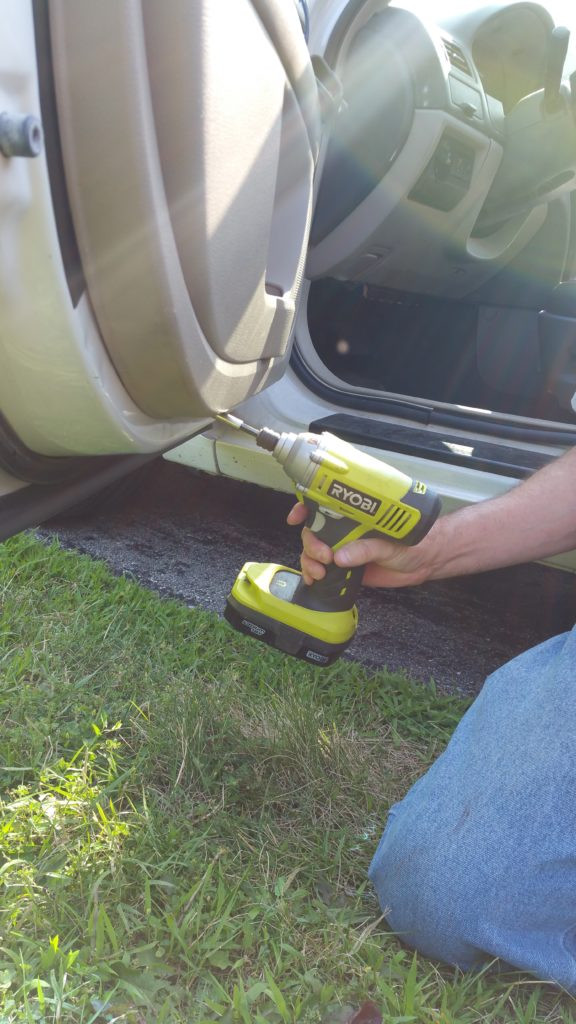 Releasing screws and clips from the inner door panel
Alt Text: Releasing screws and clips securing the car’s inner door panel, a crucial step for accessing internal mechanisms.
-
Disconnect Electrical Connectors:
- After the panel is loose, you’ll need to disconnect any electrical connectors for the power windows, door locks, and speakers.
- Gently squeeze the release tabs on the connectors and pull them apart.
- Make a note of which connector goes where to ensure proper reassembly.
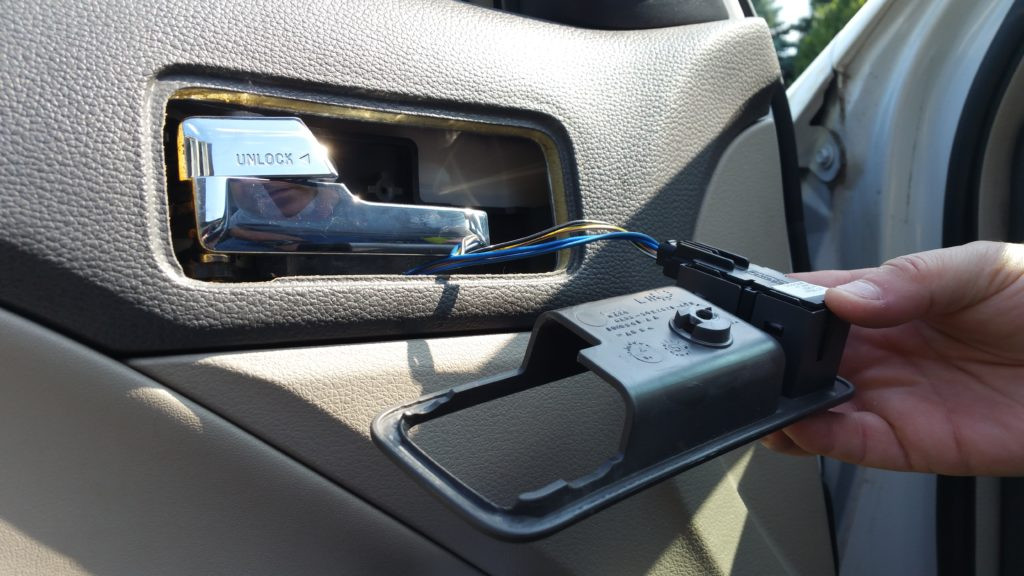 Removing Door Handle Trim and unplugging Door Lock Switch
Alt Text: Disconnecting the door lock switch during trim removal in a car repair.
-
Remove the Door Panel:
- With all screws, clips, and connectors detached, carefully lift the door panel up and away from the door frame.
- Set the panel aside in a safe place to avoid damage.
3.3. Accessing the Door Handle Assembly
-
Remove the Water Shield:
- Behind the door panel, you’ll typically find a plastic water shield that protects the interior components from moisture.
- Carefully peel back the water shield, taking care not to tear it.
- If the adhesive is old and brittle, you may need to replace it with new adhesive tape.
-
Locate the Door Handle Assembly:
- The door handle assembly is usually located behind the inner door frame, near where the handle is positioned on the outside.
- It may be partially obscured by other components, so take your time to identify it.
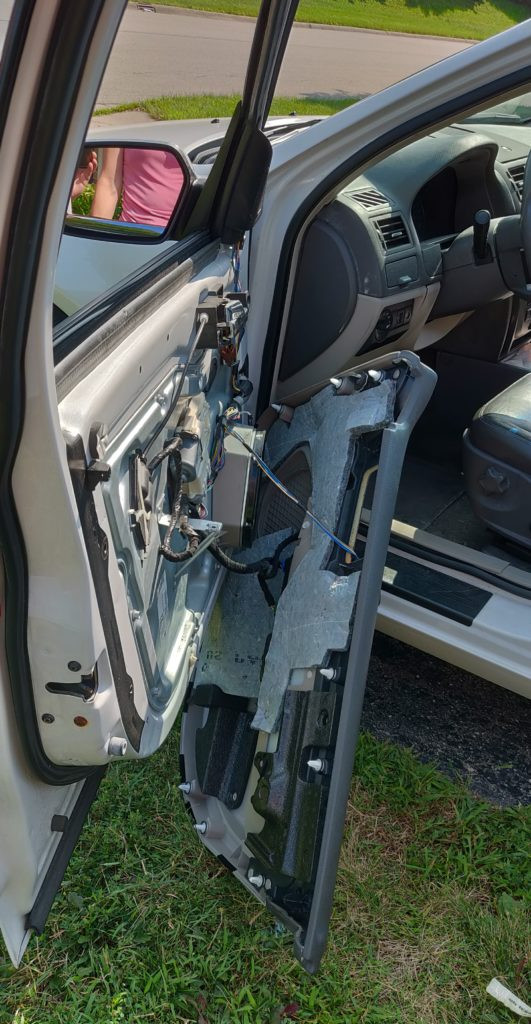 Inner door panel removed to access door handle assembly
Alt Text: Accessing the door handle assembly after removing the inner door panel of a vehicle.
3.4. Removing the Old Door Handle
-
Disconnect the Linkage:
- The door handle is connected to the door latch via a rod, cable, or linkage.
- Carefully disconnect this linkage from the handle assembly.
- Depending on the design, you may need to use pliers or a small screwdriver to release the connection.
-
Remove Mounting Hardware:
- The door handle assembly is typically held in place by screws or bolts.
- Remove the mounting hardware using the appropriate socket or screwdriver.
-
Remove the Old Handle:
- With the linkage and mounting hardware removed, carefully remove the old door handle assembly from the door.
- Take note of its orientation for easy installation of the new handle.
 OFFENDING BROKEN DOOR HANDLE ASSEMBLY!! Looks innocent, does it not?
Alt Text: A broken car door handle assembly, seemingly harmless but dysfunctional.
3.5. Installing the New Door Handle
-
Connect the New Handle:
- Align the new door handle assembly with the mounting holes in the door.
- Install the mounting hardware and tighten it securely.
-
Reconnect the Linkage:
- Reconnect the linkage to the new door handle assembly.
- Ensure the connection is secure and that the linkage moves freely.
-
Test the Handle:
- Before reassembling the door panel, test the new door handle to ensure it operates correctly.
- Make sure the door opens and closes smoothly from the inside.
3.6. Reassembling the Door Panel
-
Reinstall the Water Shield:
- Carefully reattach the water shield to the door, ensuring it is properly sealed to prevent moisture intrusion.
-
Reconnect Electrical Connectors:
- Reconnect all electrical connectors for the power windows, door locks, and speakers.
- Ensure each connector is securely attached.
-
Reattach the Door Panel:
- Align the door panel with the door frame and press it into place, engaging the plastic clips.
- Ensure all clips are securely fastened.
-
Reinstall Screws:
- Reinstall all screws that were removed earlier, tightening them securely but not over-tightening.
3.7. Final Checks and Adjustments
-
Test All Functions:
- Test the power windows, door locks, and speakers to ensure they are functioning correctly.
-
Inspect the Door Panel:
- Inspect the door panel to ensure it is properly aligned and securely attached.
-
Clean the Work Area:
- Remove any tools, materials, and debris from the work area.
4. Advanced Troubleshooting: When the New Handle Doesn’t Fix the Problem
Sometimes, replacing the door handle doesn’t solve the issue. Here are some advanced troubleshooting steps to consider:
-
Check the Door Latch Mechanism:
- The problem may lie with the door latch mechanism inside the door.
- Inspect the latch for damage or wear.
- Try lubricating the latch with a silicone-based lubricant.
- If the latch is faulty, you may need to replace it.
-
Inspect the Linkage:
- Examine the rods, cables, or linkages that connect the handle to the latch.
- Look for any signs of damage, such as kinks, bends, or breaks.
- Replace any damaged linkage components.
-
Check for Obstructions:
- Sometimes, foreign objects can obstruct the door latch mechanism.
- Use a flashlight to inspect the inside of the door for any obstructions.
- Remove any obstructions that you find.
-
Consult a Professional:
- If you’ve tried all of the above steps and the door still won’t open, it may be time to consult a professional mechanic.
- A professional can diagnose the problem and perform the necessary repairs.
- CARDIAGTECH.NET can connect you with qualified mechanics in your area; call us at +1 (641) 206-8880.
5. Safety Precautions
Working on car repairs can be dangerous if proper safety precautions are not followed. Here are some important safety tips to keep in mind:
-
Disconnect the Battery:
- Before working on any electrical components, disconnect the negative terminal of the battery to prevent electrical shock.
-
Wear Safety Glasses:
- Always wear safety glasses to protect your eyes from debris.
-
Use Gloves:
- Wear work gloves to protect your hands from sharp edges and grease.
-
Work in a Well-Ventilated Area:
- When using chemicals or solvents, work in a well-ventilated area to avoid inhaling harmful fumes.
-
Use Jack Stands:
- If you need to lift the vehicle, always use jack stands to support it. Never work under a vehicle that is only supported by a jack.
-
Follow Instructions:
- Always follow the instructions in your vehicle’s repair manual and any instructions that come with replacement parts.
-
Dispose of Waste Properly:
- Dispose of used oil, fluids, and parts properly, following local regulations.
6. Maintaining Your Car Door Handles
To prevent future problems with your car door handles, consider these maintenance tips:
-
Lubricate Regularly:
- Apply a silicone-based lubricant to the door handle mechanisms and linkages periodically.
- This will help to keep them moving smoothly and prevent wear.
-
Avoid Excessive Force:
- Avoid using excessive force when opening or closing the door.
- If the door is frozen shut, use a de-icer to thaw it before attempting to open it.
-
Inspect Regularly:
- Periodically inspect your car door handles for any signs of wear or damage.
- Address any issues promptly to prevent them from becoming more serious.
-
Protect from the Elements:
- Park your car in a garage or under a carport to protect it from the elements.
- Exposure to extreme temperatures and moisture can damage the door handle mechanisms.
7. Cost Considerations
The cost of repairing a broken interior car door handle can vary depending on several factors, including:
-
Replacement Part Cost:
- The cost of a new door handle assembly can range from $20 to $200, depending on the vehicle’s make, model, and year.
- Generic aftermarket parts are typically less expensive than OEM (Original Equipment Manufacturer) parts.
-
Labor Costs:
- If you choose to have a professional mechanic perform the repair, labor costs can range from $50 to $200 per hour.
- The total labor cost will depend on the complexity of the repair and the mechanic’s hourly rate.
-
Tool Costs:
- If you don’t already have the necessary tools, you may need to purchase them.
- A basic set of tools can cost anywhere from $50 to $200.
- CARDIAGTECH.NET offers professional-grade tools that provide excellent value and durability.
-
DIY vs. Professional Repair:
- Doing the repair yourself can save you money on labor costs, but it requires time, effort, and the right tools.
- If you’re not comfortable working on cars, it’s best to leave the repair to a professional.
Cost Comparison Table
| Item | DIY Cost | Professional Repair Cost |
|---|---|---|
| Replacement Door Handle | $20 – $200 | $20 – $200 |
| Labor | $0 | $50 – $200 per hour |
| Tools (if needed) | $50 – $200 | $0 |
| Total Estimated Cost | $70 – $400 | $70 – $600+ |
8. Why Choose CARDIAGTECH.NET for Your Auto Repair Needs
When it comes to auto repair, having the right tools and equipment can make all the difference. CARDIAGTECH.NET is your trusted partner for high-quality automotive tools, diagnostic equipment, and expert advice.
-
Wide Selection of Tools:
- CARDIAGTECH.NET offers a comprehensive range of tools for all types of auto repairs, from basic hand tools to advanced diagnostic equipment.
- Our tools are sourced from leading manufacturers and are built to withstand the rigors of professional use.
-
Diagnostic Equipment:
- Our diagnostic equipment can help you quickly and accurately identify the cause of your car problems.
- We offer a variety of scanners, code readers, and other diagnostic tools to suit your needs.
-
Expert Advice:
- Our team of experienced technicians is available to provide expert advice and support.
- We can help you choose the right tools for your repair and guide you through the repair process.
- Contact us at +1 (641) 206-8880 for personalized assistance.
-
Quality and Reliability:
- At CARDIAGTECH.NET, we are committed to providing our customers with the highest quality tools and equipment.
- Our products are rigorously tested to ensure they meet our strict standards for performance and reliability.
-
Customer Satisfaction:
- We are dedicated to providing exceptional customer service and ensuring your satisfaction.
- If you’re not happy with your purchase, we offer a hassle-free return policy.
9. Customer Testimonials
Here are some testimonials from satisfied CARDIAGTECH.NET customers:
- John D., Mechanic: “I’ve been using CARDIAGTECH.NET tools for years, and they never let me down. The quality is excellent, and the prices are competitive.”
- Sarah L., DIY Enthusiast: “I was struggling to diagnose a problem with my car, but the CARDIAGTECH.NET diagnostic scanner helped me pinpoint the issue quickly. I highly recommend their products.”
- Mike R., Shop Owner: “CARDIAGTECH.NET has been a valuable partner for my shop. Their tools are reliable, and their customer service is top-notch.”
10. Call to Action
Don’t let a broken car door handle keep you stranded. With the right tools and guidance from CARDIAGTECH.NET, you can fix it yourself and save money.
- Visit CARDIAGTECH.NET today to explore our wide selection of automotive tools and diagnostic equipment.
- Call us at +1 (641) 206-8880 for expert advice and personalized assistance.
- Contact us via WhatsApp for immediate support and inquiries.
- Visit our location at 276 Reock St, City of Orange, NJ 07050, United States.
Let CARDIAGTECH.NET be your trusted partner for all your auto repair needs. Get the tools you need to get back on the road quickly and safely.
FAQ: Fixing a Broken Car Door Handle
Here are some frequently asked questions about fixing a broken car door handle:
1. How do I know if my car door handle is broken?
- If the handle moves freely without engaging, feels stiff, makes unusual noises, or the door won’t open from the inside, it’s likely broken.
2. Can I fix a broken car door handle myself?
- Yes, with the right tools and guidance, you can often fix a broken car door handle yourself.
3. What tools do I need to fix a broken car door handle?
- You’ll need a screwdriver set, socket set, pliers, trim removal tools, and possibly a multimeter.
4. Where can I buy a replacement car door handle?
- You can buy a replacement door handle from CARDIAGTECH.NET, local auto parts stores, or online retailers.
5. How much does it cost to replace a car door handle?
- The cost can range from $20 to $200 for the part, plus labor costs if you hire a professional.
6. How long does it take to replace a car door handle?
- The repair can take anywhere from 30 minutes to a few hours, depending on your experience and the complexity of the repair.
7. What are the common causes of a broken car door handle?
- Common causes include wear and tear, broken linkage, plastic components breaking, or a faulty latch mechanism.
8. Can I drive my car with a broken door handle?
- It depends on the severity of the break. If the door cannot be opened from the inside, it could be a safety hazard.
9. How do I prevent my car door handle from breaking again?
- Lubricate the handle regularly, avoid excessive force, inspect it periodically, and protect it from the elements.
10. What if the new door handle doesn’t fix the problem?
- Check the door latch mechanism, inspect the linkage, check for obstructions, or consult a professional mechanic.
By following this comprehensive guide and utilizing the resources available at CARDIAGTECH.NET, you can confidently tackle the repair of a broken interior car door handle and keep your vehicle in top condition. Contact us today at +1 (641) 206-8880 or visit our website to learn more about our products and services.