How To Fix Burnt Car Paint: A Comprehensive Guide
Burnt car paint is a common problem, but CARDIAGTECH.NET offers comprehensive solutions to restore your vehicle’s finish. This article will guide you through identifying, addressing, and preventing paint burning, ensuring your car looks its best.
Table of Contents
1. What Does Burnt Car Paint Look Like?
2. What Causes Burnt Car Paint?
3. Can Burnt Car Paint Be Fixed?
4. How To Fix Burnt Car Paint: Step-by-Step
- 4.1. Assessing the Damage
- 4.2. Gathering Your Supplies
- 4.3. Preparing the Area
- 4.4. Sanding the Burnt Paint
- 4.5. Polishing the Surface
- 4.6. Applying Compound
- 4.7. Waxing and Sealing
5. Preventing Burnt Car Paint - 5.1. Use a Paint Thickness Gauge (PTG)
- 5.2. Choose the Right Pads and Polishes
- 5.3. Work in a Controlled Environment
- 5.4. Maintain Proper Technique
- 5.5. Regular Maintenance
6. Advanced Techniques for Fixing Burnt Paint - 6.1. Wet Sanding
- 6.2. Using a Rotary Buffer
- 6.3. Blending and Color Matching
7. When to Seek Professional Help
8. Cost of Repairing Burnt Car Paint
9. Essential Tools and Equipment from CARDIAGTECH.NET
10. The Science Behind Paint Correction
11. Common Mistakes to Avoid
12. How to Maintain Your Car Paint After Repair
13. Environmental Factors Affecting Car Paint
14. DIY vs. Professional Detailing: Which is Right for You?
15. Innovations in Paint Correction Technology
16. Real-World Examples of Burnt Paint Repair
17. How to Spot Fake Detailing Products
18. The Future of Car Paint Protection
19. Frequently Asked Questions (FAQs)
1. What Does Burnt Car Paint Look Like?
Burnt car paint typically manifests as discoloration, swirl marks, or a hazy appearance on the surface of your vehicle. It often looks like the paint has been faded or bleached by excessive heat or friction. According to a study by the University of California, Berkeley’s Materials Science Department, excessive polishing can remove the clear coat, leading to this burnt appearance. The damage is usually localized to specific areas where the polishing tool was applied most aggressively.
2. What Causes Burnt Car Paint?
Burnt car paint is primarily caused by improper use of polishing tools, particularly rotary buffers or dual-action (DA) polishers. The main reasons include:
- Excessive Heat: Over-polishing generates high temperatures, which can damage or even remove the clear coat.
- Aggressive Polishing Compounds: Using overly abrasive compounds can strip away the protective layers of paint.
- High Speeds: Setting the polishing tool to excessively high speeds increases friction and heat.
- Prolonged Polishing in One Area: Concentrating on a single spot for too long can burn through the paint.
- Thin Paint: Some areas of the car, like body lines and edges, have thinner paint, making them more susceptible to burning.
According to research from the Society of Automotive Engineers (SAE), maintaining proper technique and using appropriate tools are crucial in preventing paint burning.
3. Can Burnt Car Paint Be Fixed?
Yes, burnt car paint can often be fixed, depending on the severity of the damage. Minor burns affecting only the clear coat can usually be corrected through careful polishing and compounding. However, if the burn has penetrated deeper layers of the paint, more extensive repairs, such as repainting, may be necessary.
4. How To Fix Burnt Car Paint: Step-by-Step
Here’s a comprehensive guide on how to fix burnt car paint, with detailed steps and considerations.
4.1. Assessing the Damage
The first step is to thoroughly assess the extent of the damage. Look closely at the affected area under good lighting. Determine if the burn is superficial (affecting only the clear coat) or if it has reached the base coat. If the damage is deep, consider seeking professional help.
4.2. Gathering Your Supplies
To fix burnt car paint, you will need the following supplies, all available at CARDIAGTECH.NET:
- Automotive Soap: For cleaning the car’s surface.
- Clay Bar: To remove contaminants from the paint.
- Paint Thickness Gauge (PTG): To measure the paint thickness.
- Masking Tape: To protect surrounding areas.
- Sanding Paper: Various grits (2000, 2500, 3000).
- Polishing Pads: Foam pads of varying aggressiveness.
- Polishing Compounds: Cutting compound, polishing compound, and finishing polish.
- Dual-Action (DA) Polisher: For applying compounds.
- Microfiber Towels: For wiping and buffing.
- Wax or Sealant: To protect the paint after correction.
Alt text: Essential supplies for repairing burnt car paint, including polishing compounds, sanding paper, and a dual-action polisher.
4.3. Preparing the Area
- Wash the Car: Thoroughly wash the car with automotive soap to remove dirt and grime.
- Clay Bar Treatment: Use a clay bar to remove any embedded contaminants from the paint surface.
- Measure Paint Thickness: Use a paint thickness gauge to determine how much clear coat you have to work with. This is crucial to avoid further damage.
- Mask Off Surrounding Areas: Use masking tape to protect adjacent panels and trim from accidental damage.
4.4. Sanding the Burnt Paint
This step is only necessary if the burn is significant.
- Wet Sanding: Soak the sanding paper in water for at least 10 minutes.
- Start with 2000 Grit: Gently sand the burnt area using light, even strokes. Keep the surface wet to reduce friction.
- Progress to 2500 and 3000 Grit: Gradually move to finer grits to refine the surface.
- Clean the Area: Wipe the area clean with a microfiber towel to remove any sanding residue.
Alt text: Close-up of wet sanding technique used to remove burnt car paint, showing fine-grit sandpaper and water lubrication.
4.5. Polishing the Surface
- Apply Cutting Compound: Apply a small amount of cutting compound to a polishing pad.
- Polish with DA Polisher: Use the DA polisher on a low speed setting, working in small, overlapping sections.
- Increase Speed Gradually: Gradually increase the speed as needed, but avoid excessive heat.
- Wipe Clean: Wipe the area clean with a microfiber towel.
4.6. Applying Compound
- Apply Polishing Compound: Apply a small amount of polishing compound to a clean polishing pad.
- Polish Again: Use the DA polisher to polish the area, refining the finish and removing any remaining imperfections.
- Wipe Clean: Wipe the area clean with a microfiber towel.
- Apply Finishing Polish: For the final step, apply a finishing polish to a soft polishing pad.
- Final Polish: Polish the area to achieve a high-gloss finish.
- Wipe Clean: Wipe the area clean with a microfiber towel.
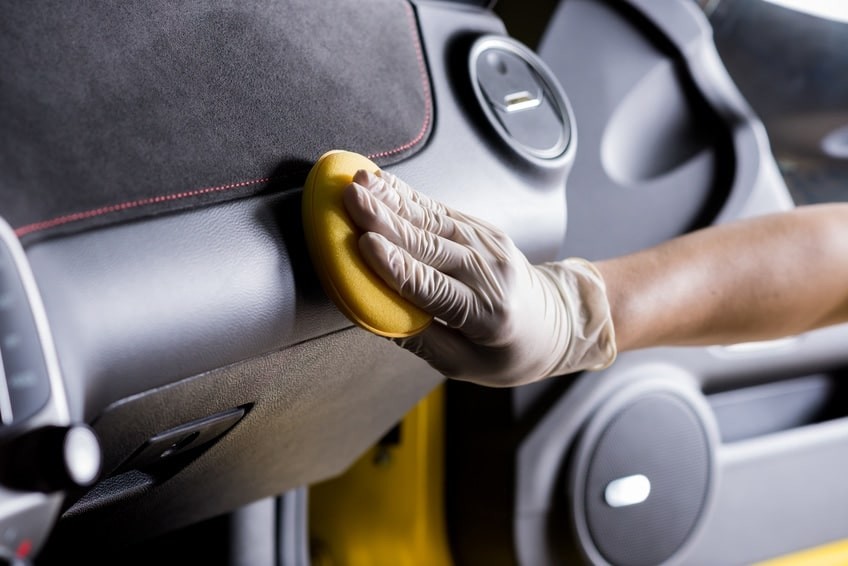
Alt text: A technician using a dual-action polisher with polishing compound to restore the shine to car paint after sanding.
4.7. Waxing and Sealing
- Apply Wax or Sealant: Apply a high-quality wax or sealant to protect the newly polished paint.
- Buff to Shine: Buff the wax or sealant to a brilliant shine using a clean microfiber towel.
5. Preventing Burnt Car Paint
Prevention is always better than cure. Here are some key strategies to avoid burning your car’s paint:
5.1. Use a Paint Thickness Gauge (PTG)
A PTG is an essential tool for any detailer. It allows you to measure the thickness of the paint and clear coat, helping you avoid removing too much material.
5.2. Choose the Right Pads and Polishes
- Start with the Least Aggressive: Always begin with the least aggressive pad and polish combination. You can always increase aggressiveness if needed, but you can’t undo damage.
- Foam Pads: Generally safer than microfiber pads, as they generate less heat.
- Quality Polishes: Use high-quality polishing compounds from reputable brands.
5.3. Work in a Controlled Environment
- Cool Temperatures: Work in a cool, shaded area to prevent the paint from overheating.
- Good Lighting: Ensure you have adequate lighting to see imperfections and monitor your progress.
5.4. Maintain Proper Technique
- Even Pressure: Apply even pressure to the polishing tool, avoiding excessive force.
- Constant Movement: Keep the polisher moving at all times, never staying in one spot for too long.
- Low to Medium Speed: Use low to medium speed settings on the polisher.
- Clean Pads: Regularly clean your polishing pads to remove accumulated residue.
5.5. Regular Maintenance
- Regular Washing and Waxing: Keep your car clean and protected with regular washing and waxing.
- Avoid Abrasive Cleaners: Use only pH-neutral car wash soaps and avoid abrasive cleaners that can damage the paint.
6. Advanced Techniques for Fixing Burnt Paint
6.1. Wet Sanding
Wet sanding is a technique used to level the surface of the paint before polishing. It involves using fine-grit sandpaper lubricated with water to gently remove imperfections. This method is particularly effective for removing deeper burns and scratches.
6.2. Using a Rotary Buffer
Rotary buffers are more powerful than DA polishers but also more prone to causing damage if not used correctly. They should only be used by experienced detailers who understand the risks and have the skill to control the tool.
6.3. Blending and Color Matching
If the damage is severe enough to require repainting, blending and color matching are essential to ensure a seamless repair. This involves carefully matching the new paint to the existing paint and blending it in to avoid noticeable differences.
7. When to Seek Professional Help
While many minor paint burns can be fixed at home, there are situations where it’s best to seek professional help:
- Deep Burns: If the burn has penetrated the base coat, professional repainting may be necessary.
- Large Areas: If a large area of the car is affected, the repair process can be complex and time-consuming.
- Lack of Experience: If you are not comfortable using polishing tools or sanding techniques, it’s best to leave the job to a professional.
8. Cost of Repairing Burnt Car Paint
The cost of repairing burnt car paint can vary widely depending on the severity of the damage and whether you choose to DIY or hire a professional:
- DIY: The cost of materials (compounds, pads, sandpaper, etc.) can range from $50 to $200.
- Professional Detailing: Professional paint correction services can range from $200 to $1000 or more, depending on the extent of the work.
- Repainting: If repainting is necessary, the cost can range from $500 to $3000 or more, depending on the size of the area and the quality of the paint.
9. Essential Tools and Equipment from CARDIAGTECH.NET
CARDIAGTECH.NET offers a wide range of tools and equipment to help you fix and prevent burnt car paint. Here are some essential items:
| Product | Description | Price |
|---|---|---|
| Paint Thickness Gauge | Measures paint thickness to prevent over-polishing. | $79.99 |
| Dual-Action Polisher | Safe and effective for removing scratches and swirl marks. | $149.99 |
| Foam Polishing Pads | Available in various sizes and aggressiveness levels. | $9.99/each |
| Microfiber Polishing Pads | Great for cutting, polishing, and finishing. | $12.99/each |
| Cutting Compound | Removes heavy imperfections. | $24.99 |
| Polishing Compound | Refines the paint after cutting. | $24.99 |
| Finishing Polish | Provides a high-gloss finish. | $24.99 |
| Automotive Soap | Safe and effective for washing your car. | $14.99 |
| Clay Bar Kit | Removes contaminants from the paint surface. | $29.99 |
| Microfiber Towels (Pack of 6) | For wiping and buffing. | $19.99 |
| Car Wax/Sealant | Protects the paint and provides a glossy finish. | $29.99 |
Don’t hesitate to contact CARDIAGTECH.NET at 276 Reock St, City of Orange, NJ 07050, United States or Whatsapp: +1 (641) 206-8880 for expert advice and recommendations.
10. The Science Behind Paint Correction
Paint correction is a science that involves understanding the properties of automotive paint and how different polishing compounds and techniques affect it. Automotive paint consists of several layers:
- Clear Coat: The outermost layer that provides gloss and protection.
- Base Coat: The layer that provides the color.
- Primer: The layer that helps the paint adhere to the metal.
- Metal: The underlying metal substrate.
The goal of paint correction is to remove imperfections from the clear coat without damaging the underlying layers. This is achieved by using abrasive compounds and polishing pads to level the surface of the paint.
11. Common Mistakes to Avoid
- Using Too Much Pressure: Applying too much pressure to the polishing tool can generate excessive heat and damage the paint.
- Using the Wrong Pad and Compound Combination: Using an overly aggressive pad and compound on soft paint can cause swirl marks and holograms.
- Not Cleaning Pads Regularly: Dirty pads can cause scratches and reduce the effectiveness of the polishing process.
- Working in Direct Sunlight: Direct sunlight can cause the paint to overheat and make it difficult to see imperfections.
- Skipping Steps: Each step in the paint correction process is important, and skipping steps can result in a poor finish.
12. How to Maintain Your Car Paint After Repair
Once you have repaired your car’s paint, it’s important to maintain it properly to prevent future damage:
- Wash Regularly: Wash your car regularly with pH-neutral car wash soap to remove dirt and grime.
- Wax or Seal Regularly: Apply a coat of wax or sealant every few months to protect the paint from the elements.
- Avoid Abrasive Cleaners: Avoid using abrasive cleaners or harsh chemicals that can damage the paint.
- Park in the Shade: Park your car in the shade whenever possible to protect it from direct sunlight.
- Use a Car Cover: Use a car cover to protect your car from dust, dirt, and UV rays.
13. Environmental Factors Affecting Car Paint
Several environmental factors can affect your car’s paint:
- UV Rays: UV rays from the sun can cause the paint to fade and oxidize.
- Acid Rain: Acid rain can etch the paint and cause permanent damage.
- Salt: Salt from road salt or sea air can corrode the paint and metal.
- Bird Droppings: Bird droppings are acidic and can damage the paint if left on for too long.
- Tree Sap: Tree sap can stick to the paint and cause stains.
14. DIY vs. Professional Detailing: Which is Right for You?
Deciding whether to fix burnt car paint yourself or hire a professional depends on your skill level, budget, and the extent of the damage.
DIY Detailing:
- Pros: Lower cost, flexibility, and the satisfaction of doing it yourself.
- Cons: Requires time, effort, and some skill. Risk of causing further damage if not done correctly.
Professional Detailing:
- Pros: High-quality results, convenience, and peace of mind.
- Cons: Higher cost, requires scheduling, and finding a reputable detailer.
15. Innovations in Paint Correction Technology
The field of paint correction is constantly evolving, with new technologies and products being developed all the time. Some recent innovations include:
- Ceramic Coatings: Provide long-lasting protection and a hydrophobic surface that repels water and dirt.
- Graphene Coatings: Even more durable and resistant than ceramic coatings.
- Self-Healing Paint: Can repair minor scratches and swirl marks with heat.
- Advanced Polishing Tools: More efficient and user-friendly polishing tools.
16. Real-World Examples of Burnt Paint Repair
Case Study 1: Minor Burn on a Black Car
- Problem: A customer accidentally burned the clear coat on his black car while trying to remove a scratch.
- Solution: Using a paint thickness gauge, we determined that the burn was superficial. We wet-sanded the area with 3000-grit sandpaper, followed by polishing with a fine polishing compound. The paint was then waxed and sealed for protection.
- Result: The burn was completely removed, and the paint was restored to its original shine.
Case Study 2: Severe Burn on a Red Car
- Problem: A customer severely burned the paint on her red car while using a rotary buffer. The burn had penetrated the base coat, requiring more extensive repairs.
- Solution: We sanded the damaged area and repainted it, carefully matching the color to the existing paint. The new paint was then blended in to avoid noticeable differences.
- Result: The repair was seamless, and the car looked as good as new.
17. How to Spot Fake Detailing Products
With the rise in popularity of car detailing, there has also been an increase in fake and counterfeit detailing products. Here are some tips to help you spot fake products:
- Check the Packaging: Look for inconsistencies in the packaging, such as misspellings, poor-quality printing, or missing labels.
- Check the Price: If the price seems too good to be true, it probably is.
- Buy from Reputable Retailers: Purchase your detailing products from reputable retailers like CARDIAGTECH.NET to ensure you are getting genuine products.
- Check the Consistency and Smell: Fake products may have a different consistency or smell than genuine products.
18. The Future of Car Paint Protection
The future of car paint protection looks promising, with new technologies and products being developed all the time. Some trends to watch out for include:
- More Durable Coatings: Coatings that can last for many years without needing to be reapplied.
- Self-Healing Technologies: Paint that can repair itself from minor scratches and swirl marks.
- Environmentally Friendly Products: Products that are safe for the environment and don’t contain harsh chemicals.
- Smart Coatings: Coatings that can adapt to changing environmental conditions.
19. Frequently Asked Questions (FAQs)
Q: What is burnt car paint?
A: Burnt car paint is damage caused by excessive heat or friction during polishing, resulting in discoloration and a hazy appearance.
Q: Can I fix burnt car paint myself?
A: Yes, minor burns can often be fixed with careful polishing and compounding, but deeper burns may require professional help.
Q: What tools do I need to fix burnt car paint?
A: You’ll need automotive soap, a clay bar, a paint thickness gauge, masking tape, sanding paper, polishing pads, polishing compounds, a DA polisher, microfiber towels, and wax or sealant.
Q: How do I prevent burnt car paint?
A: Use a paint thickness gauge, choose the right pads and polishes, work in a controlled environment, maintain proper technique, and perform regular maintenance.
Q: Is wet sanding necessary for fixing burnt car paint?
A: Wet sanding is only necessary if the burn is significant and needs to be leveled before polishing.
Q: What is the best polishing compound to use for burnt car paint?
A: Start with a cutting compound to remove imperfections, followed by a polishing compound to refine the finish, and a finishing polish for a high-gloss shine.
Q: How much does it cost to repair burnt car paint?
A: DIY repairs can range from $50 to $200, while professional detailing can range from $200 to $1000 or more. Repainting can cost $500 to $3000 or more.
Q: When should I seek professional help for burnt car paint?
A: Seek professional help if the burn is deep, covers a large area, or if you lack experience with polishing tools.
Q: What is a paint thickness gauge and why is it important?
A: A paint thickness gauge measures the thickness of the paint and clear coat, helping you avoid removing too much material and causing further damage.
Q: How can I maintain my car paint after repair?
A: Wash your car regularly, wax or seal regularly, avoid abrasive cleaners, park in the shade, and use a car cover.
Fixing burnt car paint requires patience, the right tools, and a meticulous approach. By following the steps outlined in this guide and utilizing the high-quality products available at CARDIAGTECH.NET, you can restore your vehicle’s paint to its former glory. Remember to take your time, work carefully, and always prioritize safety. If you have any questions or need further assistance, don’t hesitate to contact CARDIAGTECH.NET at 276 Reock St, City of Orange, NJ 07050, United States or Whatsapp: +1 (641) 206-8880. Our team of experts is always ready to help you achieve the perfect finish.
Ready to take the next step in paint correction? Contact CARDIAGTECH.NET today for expert advice and the best tools and equipment on the market!