How To Fix Car Blower Motor: A Detailed Guide
Fixing your car’s blower motor can seem daunting, but with the right guidance, it’s achievable. At CARDIAGTECH.NET, we provide expert insights and solutions to keep your vehicle running smoothly. Learn how to diagnose, repair, or replace your car blower motor and ensure your car’s climate control system is functioning optimally. Discover the tools and techniques needed to restore your vehicle’s comfort.
1. Understanding the Car Blower Motor
The blower motor is a crucial component of your car’s heating and air conditioning system. It’s responsible for pushing air through the vents, providing you with warm or cool air as needed. When this motor fails, it can lead to discomfort and inconvenience, particularly in extreme weather conditions.
1.1. What is the Blower Motor?
The blower motor is essentially a fan powered by an electric motor. It’s usually located behind the dashboard, and it forces air across the heater core or evaporator core, depending on whether you need heat or air conditioning.
1.2. Key Functions of the Blower Motor
The primary functions of the blower motor include:
- Circulating air for heating
- Circulating air for cooling
- Defogging the windshield
1.3. Symptoms of a Failing Blower Motor
Recognizing the signs of a failing blower motor early can save you time and money. Common symptoms include:
- No Airflow: The most obvious sign is when no air comes out of the vents, regardless of the fan speed setting.
- Weak Airflow: Airflow is significantly weaker than usual, even at the highest setting.
- Intermittent Operation: The blower motor works sometimes but not others.
- Unusual Noises: Grinding, squealing, or rattling sounds coming from behind the dashboard.
- Burning Smell: A burning odor can indicate that the motor is overheating or that there is an electrical issue.
2. Diagnosing Blower Motor Issues
Before attempting to fix your car blower motor, it’s essential to accurately diagnose the problem. This involves a systematic approach to identify the root cause of the issue.
2.1. Preliminary Checks
Start with these basic checks to rule out simple problems:
- Check the Fuses: Locate the fuse box (usually under the dashboard or in the engine compartment) and check the fuse for the blower motor. A blown fuse is often the culprit.
- Inspect the Blower Motor Resistor: The blower motor resistor controls the fan speed. If it fails, the blower motor may only work on one speed (usually high) or not at all.
2.2. Tools Needed for Diagnosis
To perform a thorough diagnosis, you’ll need the following tools:
- Multimeter: For testing voltage and continuity.
- Test Light: A simple tool to check for power.
- Wiring Diagram: To understand the electrical circuit of the blower motor.
- Basic Hand Tools: Screwdrivers, pliers, and sockets.
2.3. Step-by-Step Diagnostic Process
Follow these steps to diagnose your blower motor issue:
- Check the Fuse: Use a test light or multimeter to verify that the fuse is intact. If it’s blown, replace it with a new fuse of the same amperage.
- Test the Blower Motor Resistor: Locate the blower motor resistor (usually near the blower motor). Use a multimeter to test the resistor for continuity. If any of the terminals show no continuity, the resistor is likely faulty.
- Check for Power at the Blower Motor: Use a multimeter to check for voltage at the blower motor connector when the fan is turned on. If there’s no voltage, the problem could be in the wiring or the switch.
- Ground the Blower Motor: If there is power, ground the blower motor directly to the chassis. If the motor runs, the issue is a bad ground connection.
- Inspect the Wiring: Check for damaged or corroded wires and connectors. Repair or replace any faulty wiring.
2.4. Using a Multimeter for Testing
A multimeter is an invaluable tool for diagnosing electrical issues. Here’s how to use it:
- Voltage Testing: Set the multimeter to the DC voltage setting. Connect the black lead to a good ground and the red lead to the point you want to test. Turn on the ignition and the blower fan. The multimeter should display the battery voltage (around 12-14 volts) if power is reaching that point.
- Continuity Testing: Set the multimeter to the continuity setting (usually indicated by a diode symbol or a speaker icon). Disconnect the component you want to test. Touch the two leads together; the multimeter should beep or display a reading close to zero, indicating continuity. If there’s no beep or the reading is very high, there’s no continuity.
3. Repairing the Blower Motor
Once you’ve diagnosed the issue, you can proceed with the repair. Depending on the problem, this might involve replacing the blower motor resistor, repairing wiring, or rebuilding the blower motor itself.
3.1. Replacing the Blower Motor Resistor
The blower motor resistor is a common failure point. Here’s how to replace it:
- Locate the Resistor: The resistor is usually located near the blower motor housing, often accessible from under the dashboard.
- Disconnect the Electrical Connector: Remove the connector from the resistor.
- Remove the Resistor: Unscrew or unclip the resistor from its mounting.
- Install the New Resistor: Install the new resistor in the same location and secure it.
- Reconnect the Electrical Connector: Plug the connector back into the resistor.
- Test the Blower Motor: Turn on the ignition and test the blower motor at all speeds to ensure it’s working correctly.
3.2. Wiring Repair
Damaged wiring can cause a variety of issues. Here’s how to repair it:
- Inspect the Wiring: Look for frayed, cracked, or corroded wires.
- Disconnect the Battery: Always disconnect the negative battery terminal before working on electrical components.
- Repair or Replace Wires: Use electrical tape, heat shrink tubing, or wire connectors to repair damaged wires. Replace wires that are too damaged to repair.
- Secure the Wiring: Use zip ties or wire looms to secure the wiring and prevent it from rubbing against other components.
- Reconnect the Battery: Reconnect the negative battery terminal and test the blower motor.
3.3. Rebuilding the Blower Motor
Rebuilding a blower motor can be a cost-effective alternative to buying a new one, especially if the motor is otherwise in good condition. This typically involves replacing the brushes.
- Remove the Blower Motor: Disconnect the electrical connector and remove the blower motor from its housing.
- Inspect the Motor: Check the motor for any signs of damage or wear.
- Disassemble the Motor: Carefully disassemble the motor, noting the position of each component.
- Replace the Brushes: The brushes are small carbon blocks that make contact with the commutator. Over time, they wear down and need to be replaced. Solder the new brushes in place.
- Clean the Commutator: Use electrical contact cleaner to clean the commutator, the part of the motor that the brushes contact.
- Lubricate the Bearings: Apply a small amount of grease to the motor’s bearings.
- Reassemble the Motor: Reassemble the motor, making sure all components are properly aligned.
- Test the Motor: Connect the motor to a power source and test it to make sure it’s running smoothly.
- Reinstall the Blower Motor: Reinstall the blower motor in its housing and reconnect the electrical connector.
3.4. Step-by-Step Guide to Brush Replacement
Replacing the brushes is a common repair for blower motors. Here’s a detailed guide:
- Remove the Blower Motor: Follow the steps in Section 3.3 to remove the blower motor from your car.
- Access the Brushes: The brushes are typically located on the end of the motor, behind a protective cover. Remove the cover to access the brushes.
- Remove the Old Brushes: The brushes are held in place by springs. Use a small screwdriver or pick to carefully release the springs and remove the old brushes.
- Install the New Brushes: Insert the new brushes into the brush holders, making sure they are oriented correctly.
- Secure the Springs: Use a small screwdriver or pick to compress the springs and hold the brushes in place.
- Reassemble the Motor: Reassemble the motor, making sure all components are properly aligned.
- Test the Motor: Connect the motor to a power source and test it to make sure it’s running smoothly.
- Reinstall the Blower Motor: Reinstall the blower motor in its housing and reconnect the electrical connector.
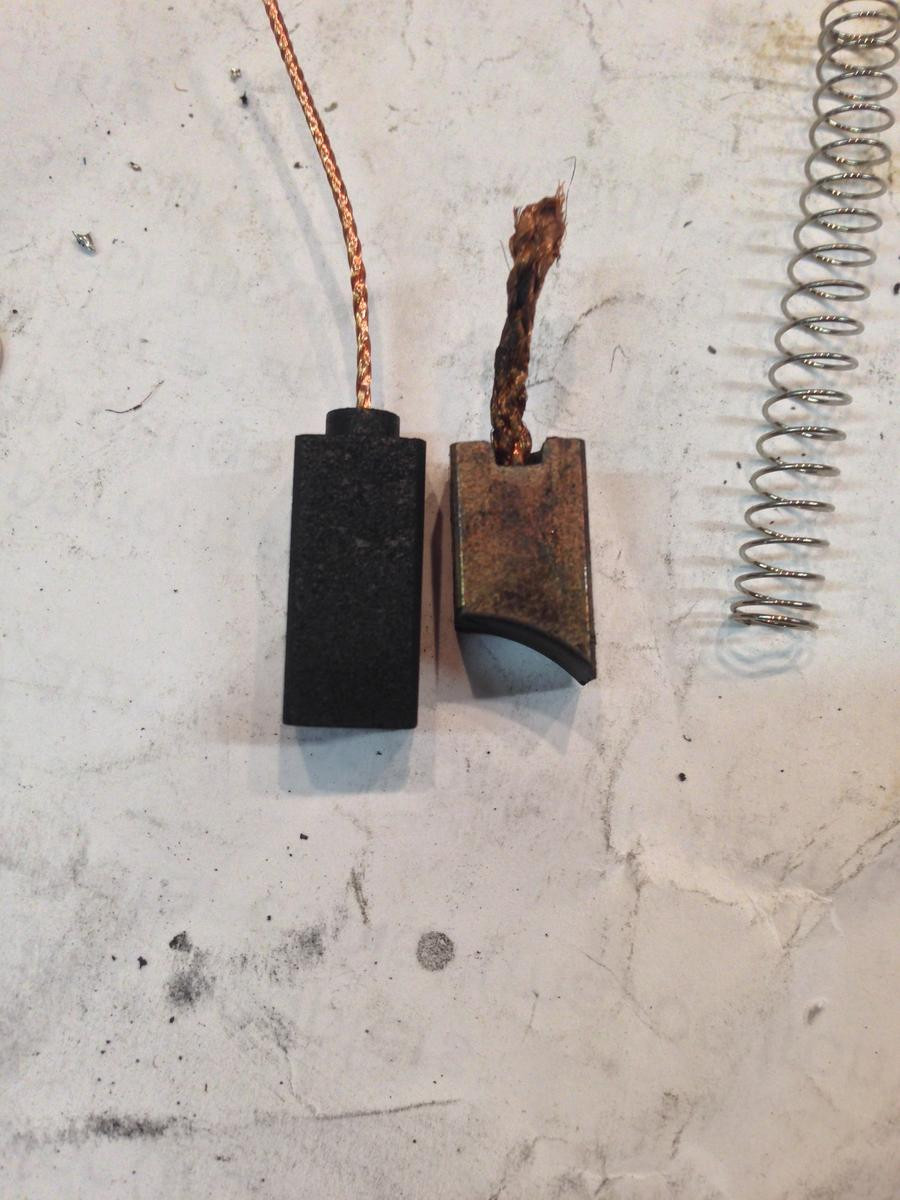
Old brushes compared to new brushes, highlighting the wear and tear
3.5. Tools and Materials Needed for Repair
- New blower motor resistor or brushes
- Soldering iron and solder
- Electrical contact cleaner
- Grease
- Screwdrivers
- Pliers
- Multimeter
- Wire strippers and crimpers
- Electrical tape or heat shrink tubing
4. Replacing the Blower Motor
If the blower motor is severely damaged or worn, it might be more practical to replace it altogether. This is a straightforward process that can restore your car’s climate control system to optimal performance.
4.1. Choosing a Replacement Blower Motor
When selecting a replacement blower motor, consider the following:
- OEM vs. Aftermarket: OEM (Original Equipment Manufacturer) parts are made by the same company that made the original part for your car. Aftermarket parts are made by other companies and can be more affordable.
- Quality: Read reviews and choose a reputable brand to ensure quality and reliability.
- Compatibility: Make sure the replacement blower motor is compatible with your car’s make, model, and year.
4.2. Step-by-Step Replacement Guide
- Disconnect the Battery: Disconnect the negative battery terminal to prevent electrical shock.
- Locate the Blower Motor: The blower motor is usually located under the dashboard on the passenger side.
- Remove the Access Panel: Remove the access panel to expose the blower motor.
- Disconnect the Electrical Connector: Disconnect the electrical connector from the blower motor.
- Remove the Blower Motor: Unscrew or unclip the blower motor from its mounting.
- Install the New Blower Motor: Install the new blower motor in the same location and secure it.
- Reconnect the Electrical Connector: Plug the connector back into the blower motor.
- Reinstall the Access Panel: Reinstall the access panel.
- Reconnect the Battery: Reconnect the negative battery terminal.
- Test the Blower Motor: Turn on the ignition and test the blower motor at all speeds to ensure it’s working correctly.
4.3. Tips for a Smooth Replacement
- Take Pictures: Take pictures of the blower motor and wiring before you remove anything. This will help you remember how everything goes back together.
- Label Connectors: Label any connectors that you disconnect to avoid confusion.
- Use Penetrating Oil: If any screws or bolts are stuck, use penetrating oil to loosen them.
- Check for Obstructions: Make sure there are no obstructions in the blower motor housing that could interfere with the new motor.
5. Maintaining Your Car Blower Motor
Proper maintenance can extend the life of your car blower motor and prevent costly repairs.
5.1. Regular Inspections
Inspect the blower motor and related components regularly. Look for any signs of damage or wear, such as:
- Cracked or frayed wiring
- Corroded connectors
- Loose mounting hardware
- Debris in the blower motor housing
5.2. Cleaning the Blower Motor
Dust and debris can accumulate in the blower motor housing, reducing airflow and causing the motor to work harder. Clean the blower motor periodically to maintain optimal performance.
- Remove the Blower Motor: Follow the steps in Section 4.2 to remove the blower motor.
- Clean the Housing: Use a vacuum cleaner or compressed air to remove any dust and debris from the blower motor housing.
- Clean the Blower Motor Fan: Use a soft brush or cloth to clean the blower motor fan blades.
- Reinstall the Blower Motor: Reinstall the blower motor in its housing and reconnect the electrical connector.
5.3. Preventing Common Issues
- Use High-Quality Air Filters: Replace your car’s air filters regularly to prevent dust and debris from entering the blower motor housing.
- Avoid Overloading the System: Avoid running the blower motor at high speeds for extended periods, as this can cause it to overheat.
- Address Issues Promptly: If you notice any symptoms of a failing blower motor, address the issue promptly to prevent further damage.
6. Advanced Troubleshooting
Sometimes, blower motor problems can be more complex and require advanced troubleshooting techniques.
6.1. Using Scan Tools
A scan tool can help diagnose electrical issues by reading diagnostic trouble codes (DTCs) from your car’s computer. This can provide valuable information about the blower motor circuit and related components.
- Connect the Scan Tool: Plug the scan tool into your car’s OBD-II port (usually located under the dashboard).
- Read DTCs: Turn on the ignition and use the scan tool to read any stored DTCs.
- Interpret the Codes: Consult a repair manual or online database to interpret the DTCs and identify the problem.
- Clear the Codes: After repairing the issue, clear the DTCs from your car’s computer.
6.2. Checking the Blower Motor Relay
The blower motor relay is an electrical switch that controls power to the blower motor. If the relay fails, the blower motor may not work at all.
- Locate the Relay: Consult your car’s wiring diagram to locate the blower motor relay.
- Test the Relay: Use a multimeter to test the relay for continuity. You can also swap the relay with a known good relay to see if that fixes the problem.
- Replace the Relay: If the relay is faulty, replace it with a new relay of the same type.
6.3. Diagnosing Control Module Issues
In some cars, the blower motor is controlled by a computer module. If this module fails, it can cause a variety of issues.
- Check for DTCs: Use a scan tool to check for DTCs related to the control module.
- Inspect the Wiring: Check the wiring and connectors to the control module for any signs of damage or corrosion.
- Test the Module: If possible, test the control module using a specialized diagnostic tool.
- Replace the Module: If the control module is faulty, it may need to be replaced and reprogrammed by a qualified technician.
7. Cost Considerations
Understanding the costs associated with fixing your car blower motor can help you make informed decisions about repair or replacement.
7.1. Cost of Parts
- Blower Motor Resistor: $20 – $100
- Blower Motor: $50 – $300
- Blower Motor Relay: $10 – $50
- Brushes: $5 – $20
7.2. Labor Costs
Labor costs can vary depending on the complexity of the repair and the hourly rate of the mechanic. Replacing a blower motor can take anywhere from 1 to 3 hours, with labor rates typically ranging from $75 to $150 per hour.
7.3. DIY vs. Professional Repair
Deciding whether to repair your car blower motor yourself or hire a professional depends on your skills, experience, and available tools. DIY repairs can save you money on labor costs, but they can also be time-consuming and require a certain level of mechanical expertise. Professional repairs offer the convenience of expert service, but they can be more expensive.
7.4. Factors Affecting Repair Costs
- Vehicle Make and Model: Some vehicles have more complex blower motor systems, which can increase repair costs.
- Location: Labor rates can vary depending on your geographic location.
- Parts Availability: If parts are difficult to find, they may be more expensive.
- Additional Damage: If there is additional damage to the wiring or other components, this can increase repair costs.
8. Safety Precautions
Working on your car’s electrical system can be dangerous if proper safety precautions are not followed.
8.1. Disconnecting the Battery
Always disconnect the negative battery terminal before working on any electrical components. This will prevent electrical shock and protect your car’s electrical system from damage.
8.2. Using Proper Tools
Use insulated tools to prevent electrical shock. Wear safety glasses to protect your eyes from debris.
8.3. Handling Electrical Components
Handle electrical components with care. Avoid touching exposed wires or connectors.
8.4. Working in a Well-Ventilated Area
If you are working with chemicals, such as electrical contact cleaner, work in a well-ventilated area to avoid inhaling harmful fumes.
9. Case Studies
Real-world examples can provide valuable insights into common blower motor problems and their solutions.
9.1. Case Study 1: Blower Motor Only Works on High
A customer complained that their blower motor only worked on the highest speed setting. After diagnosing the problem, it was determined that the blower motor resistor was faulty. Replacing the resistor fixed the issue and restored normal fan speed control.
9.2. Case Study 2: No Airflow from Vents
A customer reported that no air was coming out of the vents, regardless of the fan speed setting. After checking the fuses and blower motor resistor, it was found that the blower motor itself had failed. Replacing the blower motor resolved the problem.
9.3. Case Study 3: Unusual Noises from Blower Motor
A customer complained of a loud grinding noise coming from behind the dashboard. Upon inspection, it was discovered that the blower motor bearings were worn out. Rebuilding the blower motor with new bearings eliminated the noise.
10. CARDIAGTECH.NET Solutions
At CARDIAGTECH.NET, we understand the challenges you face when repairing your car. That’s why we offer a range of high-quality tools and equipment to help you get the job done right.
10.1. Recommended Tools
- Professional Multimeter: A reliable multimeter is essential for diagnosing electrical issues.
- Scan Tools: A scan tool can help you read diagnostic trouble codes and identify problems quickly.
- Wiring Repair Kits: Our wiring repair kits include everything you need to repair damaged wires and connectors.
- Blower Motor Replacement Tools: We offer a variety of tools to make blower motor replacement easier, including socket sets, pliers, and screwdrivers.
10.2. Contact Us for Expert Advice
If you’re not sure where to start or need help diagnosing a complex issue, our team of experienced technicians is here to assist you. Contact us via WhatsApp at +1 (641) 206-8880 or visit our website at CARDIAGTECH.NET for expert advice and support.
10.3. Why Choose CARDIAGTECH.NET?
- Quality Products: We offer only the highest quality tools and equipment.
- Expert Support: Our team of experienced technicians is here to help you every step of the way.
- Competitive Prices: We offer competitive prices on all of our products.
- Fast Shipping: We ship orders quickly so you can get back on the road as soon as possible.
11. Real Customer Testimonials
“I was having trouble with my car’s blower motor, and CARDIAGTECH.NET helped me diagnose the problem and find the right parts. Their customer service was excellent, and I was able to fix my car quickly and easily.” – John D.
“I’ve been using CARDIAGTECH.NET for years, and I’ve always been impressed with the quality of their products and the knowledge of their staff. They’re my go-to source for all my automotive repair needs.” – Mary S.
12. Call to Action
Is your car’s blower motor giving you trouble? Don’t wait until it’s too late. Contact CARDIAGTECH.NET today for expert advice and high-quality tools to get your car back on the road. Our team of experienced technicians can help you diagnose the problem and find the right parts to fix it.
Reach out to us via:
- WhatsApp: +1 (641) 206-8880
- Website: CARDIAGTECH.NET
- Address: 276 Reock St, City of Orange, NJ 07050, United States
Let CARDIAGTECH.NET be your trusted partner in automotive repair.
FAQ: How to Fix Car Blower Motor
-
What are the common symptoms of a failing car blower motor?
- No airflow from the vents
- Weak airflow, even at the highest setting
- Intermittent operation
- Unusual noises (grinding, squealing, rattling)
- Burning smell
-
How do I diagnose a blower motor problem?
- Check the fuses
- Inspect the blower motor resistor
- Check for power at the blower motor
- Ground the blower motor
- Inspect the wiring
-
What tools do I need to diagnose and repair a blower motor?
- Multimeter
- Test light
- Wiring diagram
- Basic hand tools (screwdrivers, pliers, sockets)
- Soldering iron and solder
- Electrical contact cleaner
- Grease
-
What is a blower motor resistor, and how do I replace it?
- The blower motor resistor controls the fan speed. To replace it, locate the resistor (usually near the blower motor), disconnect the electrical connector, remove the resistor, install the new resistor, reconnect the connector, and test the blower motor.
-
Is it better to repair or replace a blower motor?
- It depends on the extent of the damage. If the motor is only slightly worn, rebuilding it with new brushes may be sufficient. If the motor is severely damaged, replacing it is usually the best option.
-
How much does it cost to replace a blower motor?
- The cost can range from $50 to $300 for the part and $75 to $150 per hour for labor.
-
Can I replace a blower motor myself, or should I hire a professional?
- If you have experience working on cars and have the necessary tools, you can replace the blower motor yourself. Otherwise, it’s best to hire a professional.
-
How can I maintain my car’s blower motor?
- Regularly inspect the blower motor and related components
- Clean the blower motor housing to remove dust and debris
- Use high-quality air filters
- Avoid overloading the system
-
What safety precautions should I take when working on my car’s electrical system?
- Disconnect the negative battery terminal
- Use insulated tools
- Handle electrical components with care
- Work in a well-ventilated area
-
Where can I find high-quality tools and equipment for repairing my car’s blower motor?
- Visit CARDIAGTECH.NET or contact us via WhatsApp at +1 (641) 206-8880 for expert advice and support.
This comprehensive guide provides you with the knowledge and tools you need to fix your car blower motor effectively. Whether you choose to repair or replace the motor, remember to prioritize safety and use high-quality parts and equipment. With CARDIAGTECH.NET, you can be confident that you’re getting the best possible solutions for your automotive repair needs.
