How to Fix Car Interior Fabric: A Comprehensive Guide
Fixing car interior fabric can seem daunting, but with the right tools and techniques, it’s achievable. CARDIAGTECH.NET provides comprehensive guidance and quality tools to restore your car’s interior. Learn the methods for car upholstery repair, automotive fabric restoration, and other car interior fixes to maintain your vehicle’s value and comfort.
1. Understanding the Need for Fabric Repair
Why is car interior fabric repair important?
Maintaining your car’s interior fabric is vital for preserving its aesthetic appeal and overall value. According to a study by the University of Michigan Transportation Research Institute, a clean and well-maintained interior can increase a car’s resale value by up to 15%. Moreover, addressing minor damages promptly can prevent them from escalating into more significant, costly repairs.
What types of damage can occur to car interior fabric?
Car interior fabric is susceptible to various types of damage, including:
- Tears and Rips: Caused by sharp objects or wear and tear.
- Stains: Resulting from spills of food, drinks, or other substances.
- Burns: Often from cigarettes or other heat sources.
- Fading: Due to prolonged exposure to sunlight.
- Wear and Discoloration: General aging and usage.
What tools and materials are needed for car interior fabric repair?
To effectively repair your car’s interior fabric, you’ll typically need:
- Fabric Repair Kit: Includes color-matching fibers, adhesive, and tools.
- Upholstery Cleaner: For removing stains and dirt.
- Scissors or Cutter: To trim loose threads.
- Tweezers: For precise application of repair fibers.
- Backing Fabric: To reinforce damaged areas.
- Mixing Jar and Ball: For blending repair fibers.
- Clear Hairspray: To protect the repaired area.
CARDIAGTECH.NET offers a range of high-quality tools and materials that are essential for effective fabric repair.
2. DIY vs. Professional Car Interior Fabric Repair
What are the pros and cons of DIY car interior fabric repair?
DIY car interior fabric repair offers several advantages:
- Cost Savings: You can save hundreds or even thousands of dollars compared to professional services.
- Skill Development: You gain valuable skills and knowledge about your car’s interior.
- Convenience: You can perform repairs at your own pace and schedule.
However, there are also potential drawbacks:
- Time and Effort: DIY repairs require a significant investment of your time and effort.
- Varying Outcomes: The quality of the repair depends on your skill level and the materials used.
- Potential for Mistakes: Incorrect techniques can worsen the damage.
What are the cost savings associated with DIY fabric repair?
DIY fabric repair can result in substantial cost savings. Here’s a comparison of professional vs. DIY costs for common types of fabric damage:
| Fabric Car Interior Damage | Professional Repair Cost Range | DIY Repair Cost Range |
|---|---|---|
| Fabric Scratches and Scuffs | $150 – $300 | $19.95 – $50 (DIY Fabric Repair Kit from CARDIAGTECH.NET + other materials needed) |
| Worn Fabric and Discoloration | $150 – $1,000 | Varies depending on the extent of damage and materials needed |
| Fabric Cuts, Rips, and Tears | $200 – $1,000 | Varies depending on the size and complexity of the repair; DIY kits and backing fabric from CARDIAGTECH.NET can significantly reduce costs |
| Fabric Burn Marks and Holes | $200 – $1,000 | Similar to cuts and tears; using CARDIAGTECH.NET’s repair fibers and adhesive can provide a cost-effective solution |
| Fabric Depressed Damages | $500 – $2,000 | This may require additional filling materials; however, a DIY approach with CARDIAGTECH.NET tools can still be more economical than professional repair |
When is it best to seek professional help?
While DIY repair is suitable for minor damages, it’s best to seek professional help for:
- Extensive Damage: Large tears or significant burns.
- Complex Repairs: Damage that requires specialized tools or techniques.
- Valuable Vehicles: If you’re concerned about maintaining the car’s original condition and value.
3. Essential Tools and Kits for Fabric Repair
What should a comprehensive fabric repair kit include?
A comprehensive fabric repair kit should include:
- Color-Matching Repair Fibers: To blend with the original fabric.
- Fabric Adhesive: Strong and flexible to bond fibers to the fabric.
- Backing Fabric: To provide support and strength to the repair.
- Tweezers: For precise application of fibers.
- Mixing Jar and Ball: To blend colors effectively.
- Applicator Tools: Spatulas or small brushes for even application.
CARDIAGTECH.NET offers high-quality fabric repair kits that include all these essential components, ensuring you have everything you need for a successful repair.
How do you choose the right fabric repair kit for your car’s interior?
Consider the following factors when selecting a fabric repair kit:
- Color Matching: Ensure the kit includes a variety of colors that can be mixed to match your car’s fabric.
- Fabric Type: Choose a kit suitable for the specific type of fabric in your car (e.g., nylon, polyester, or blends).
- Adhesive Quality: Opt for a kit with a strong, flexible adhesive that will withstand temperature changes and wear.
- Tool Quality: Ensure the kit includes durable and precise tools for effective application.
What are some recommended tools for detailed fabric work?
For detailed fabric work, consider these tools:
- Upholstery Needles: For sewing backing fabric in larger repairs.
- Seam Ripper: For removing old or damaged threads.
- Fabric Scissors: For precise cutting of repair materials.
- Steamer: For removing wrinkles and refreshing fabric.
CARDIAGTECH.NET provides a wide range of specialized tools designed to make fabric repair easier and more effective.
4. Step-by-Step Guide to Repairing Fabric Scratches and Scuffs
How do you prepare the damaged area?
- Clean the Area: Use an upholstery cleaner to remove dirt and debris from the damaged area.
- Trim Loose Threads: Carefully trim any loose threads or jagged bits with scissors.
- Ensure Dryness: Make sure the area is completely dry before proceeding.
What is the process for mixing and shaking repair fibers?
- Fill the Mixing Jar: Add the color fibers to the empty jar.
- Add Mixing Ball: Place the metal ball into the jar.
- Shake Vigorously: Screw on the lid and shake for at least 30 seconds to blend the colors.
- Create a Sifter: Remove the metal ball and secure a mesh to the jar with a rubber band.
How do you apply fabric glue and repair fibers?
- Apply a Thin Layer of Glue: Work from the outside to the center, avoiding air bubbles.
- Sift Repair Fibers: Hold the mixing jar upside down and gently tap to sift fibers onto the adhesive.
- Pack Down Fibers: Gently pack down the fibers with a spatula to ensure even coverage.
- Duplicate Fabric Patterns: Use the spatula to replicate any patterns in the original fabric.
What is the drying and finishing process?
- Allow Drying Time: Let the area dry for 24 hours.
- Remove Excess Fibers: Blow off any excess fibers.
- Protect the Repaired Area: Spray a clear hairspray over the area to protect it from wear.
5. Repairing Worn Fabric and Discoloration
How do you identify worn fabric and discoloration?
Worn fabric often appears faded, thin, or rough to the touch. Discoloration can manifest as uneven color patches or a general fading of the original color.
What are the specific materials needed for this type of repair?
In addition to the standard fabric repair kit, you may need:
- Fabric Dye: To restore the original color.
- Color Matching Guide: To accurately blend repair fibers.
- UV Protectant Spray: To prevent further fading.
What are the steps to repair worn fabric and discoloration?
- Prepare the Area: Clean the area and trim any loose threads.
- Mix and Match Repair Fibers: Use the color matching guide to find the right color.
- Apply Fabric Glue: Apply glue to the damaged area, under, and along the edges.
- Sift Repair Fibers: Cover the glue completely with fibers and gently pack them down.
- Allow to Dry: Let the area dry for 24 hours and blow off excess fibers.
- Apply UV Protectant: Spray the area with UV protectant to prevent further fading.
6. Fixing Fabric Cuts, Rips, and Tears
What preparation is required for fabric cuts, rips, and tears?
- Clean the Damaged Area: Remove any dirt or debris.
- Trim Loose Threads: Cut away any frayed edges.
- Assess the Damage: Determine if backing fabric is needed for reinforcement.
How do you insert and secure backing fabric?
- Cut Backing Fabric: Cut a piece of backing fabric with rounded edges, larger than the damaged area.
- Insert Backing Fabric: Use a spatula to insert the fabric behind the tear.
- Sew if Necessary: For large tears, sew the backing fabric to the original fabric for added strength.
What is the process for applying glue and repair fibers to cuts and tears?
- Apply Fabric Glue: Apply glue to the damaged area and along the edges.
- Sift Repair Fibers: Cover the glue completely with fibers and gently pack them down.
- Allow to Dry: Let the area dry for 24 hours and blow off excess fibers.
7. Repairing Fabric Burn Marks and Holes
How do you prepare the damaged area for burn repair?
- Trim Burn Marks: Carefully trim any jagged bits or burn marks with scissors.
- Clean the Area: Use a household cleaner to remove any residue.
- Fill Depressions: If padding is missing, insert cotton balls or cotton batting to fill the area.
What materials are specifically needed for burn mark and hole repair?
- Cotton Balls or Batting: To fill any depressions.
- Household Cleaner: To remove burn residue.
What steps are involved in repairing burns and holes in car fabric?
- Insert Backing Fabric: Cut and insert backing fabric behind the damaged area.
- Apply Fabric Glue: Apply glue to the damaged area and along the edges.
- Sift Repair Fibers: Cover the glue completely with fibers and gently pack them down.
- Allow to Dry: Let the area dry for 24 hours and blow off excess fibers.
8. Dealing with Fabric Depressed Damages
How do you identify and assess fabric depressed damages?
Depressed damages often involve missing padding or significant indentations in the fabric.
What specialized materials are needed for depressed damage repair?
- Foam or Cloth Pieces: To fill in the depressed area.
- Foam Adhesive: To secure the filler in place.
What are the detailed steps to repair fabric depressed damages?
- Prepare the Area: Clean the area and trim any loose threads.
- Fill the Depression: Insert foam or cloth pieces to fill the depressed area, avoiding overfilling.
- Secure the Filler: Use fabric glue or foam adhesive to secure the filler in place.
- Insert Backing Fabric: Cut and insert backing fabric behind the damaged area.
- Apply Fabric Glue: Apply glue to the damaged area and along the edges.
- Sift Repair Fibers: Cover the glue completely with fibers and gently pack them down.
- Allow to Dry: Let the area dry for 24 hours and blow off excess fibers.
9. Maintaining Your Car Fabric Interior Damage-Free
What are some preventative measures to avoid fabric damage?
- Park in Shaded Areas: To prevent sun damage.
- Vacuum Regularly: To remove dirt and debris.
- Avoid Eating and Drinking Inside the Car: To prevent stains.
- Invest in Quality Window Tint: To protect from UV rays.
- Be Careful with Sharp Objects: To avoid tears and rips.
How does parking in shaded areas prevent damage?
Car parked in a shaded area
Parking in shaded areas minimizes direct sun exposure, which can fade and damage car fabric interiors over time.
What cleaning practices can help maintain fabric integrity?
- Vacuum Regularly: Use a vacuum with an upholstery attachment to remove dirt and debris.
- Spot Clean Stains: Address stains immediately with an appropriate upholstery cleaner.
- Use Fabric Protectants: Apply fabric protectants to repel stains and protect against wear.
What products are recommended for regular fabric maintenance?
- Upholstery Cleaner: For spot cleaning stains.
- Fabric Protectant Spray: To protect against stains and UV damage.
- Leather Conditioner: If your car has leather accents, use a leather conditioner to keep them supple.
CARDIAGTECH.NET offers a range of maintenance products designed to keep your car’s interior in top condition.
10. Advanced Techniques and Tips
How do you match fabric colors perfectly?
- Use a Color Matching Guide: Refer to a color matching guide included in your repair kit.
- Mix Small Amounts: Mix small amounts of repair fibers to achieve the desired color.
- Test the Color: Test the color on an inconspicuous area before applying it to the damaged area.
What are some advanced techniques for blending repairs seamlessly?
- Feather the Edges: Feather the edges of the repaired area to blend it with the surrounding fabric.
- Replicate Fabric Patterns: Use a spatula or applicator tool to replicate any patterns in the original fabric.
- Use a Steamer: Use a steamer to remove wrinkles and blend the repaired area seamlessly.
How do you handle repairs on delicate or vintage fabrics?
- Use Gentle Cleaners: Use gentle, pH-neutral cleaners to avoid damaging delicate fabrics.
- Test Cleaners First: Test cleaners on an inconspicuous area before applying them to the damaged area.
- Consider Professional Help: For valuable or irreplaceable fabrics, consider seeking professional help.
11. Real-World Examples and Case Studies
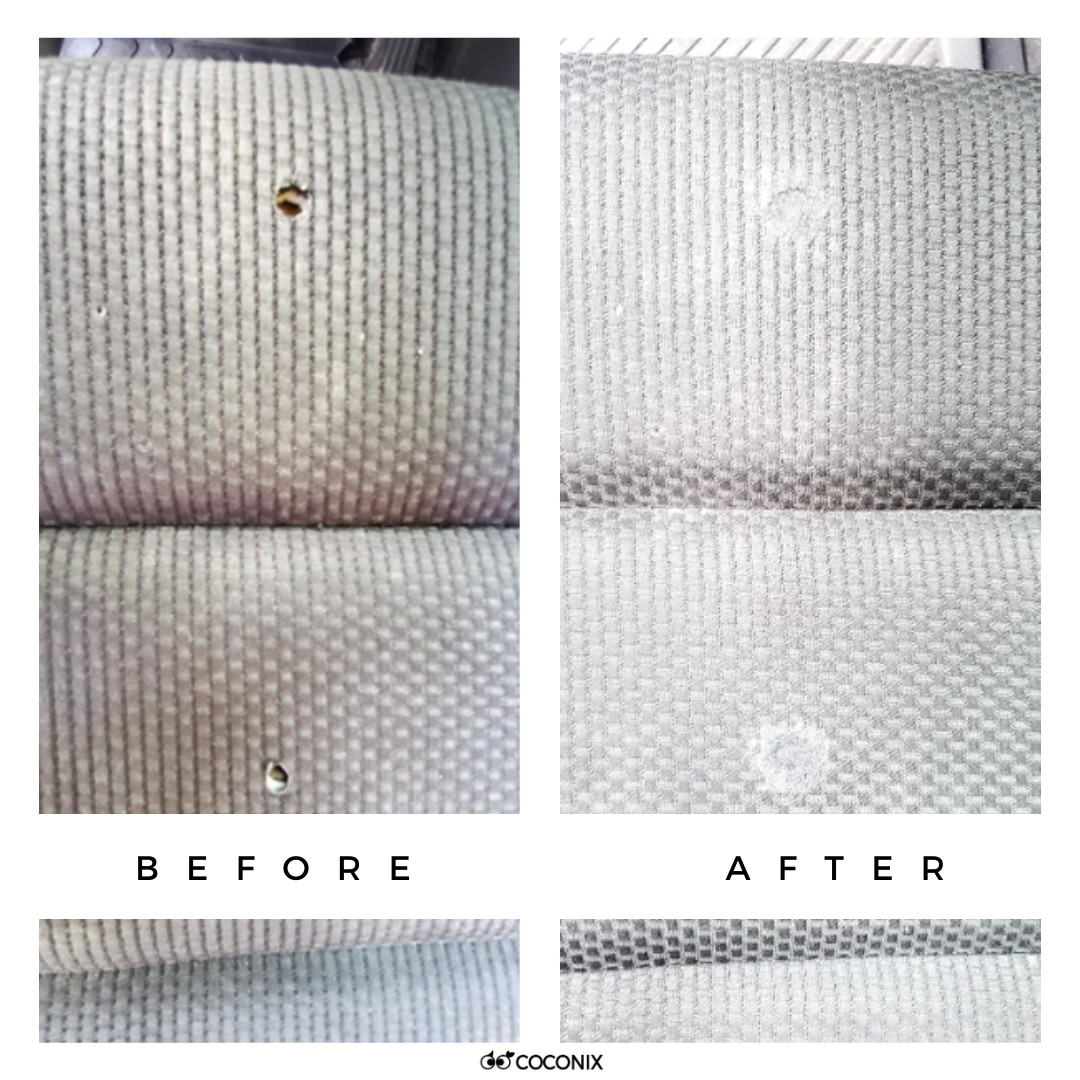
Can you share examples of successful DIY fabric repairs?
Many DIY enthusiasts have successfully repaired their car’s interior fabric using the techniques outlined above. For example, a small burn hole in a car seat was effectively repaired using a fabric repair kit from CARDIAGTECH.NET, restoring the seat to its original condition.
Are there any before-and-after photos of common fabric repairs?
Below is a before and after image of a DIY fabric car interior repair:
What are some customer testimonials about fabric repair products?
Customers have praised CARDIAGTECH.NET’s fabric repair kits for their ease of use and effectiveness. One customer noted, “The color-matching fibers were perfect, and the adhesive was strong and flexible. My car seat looks like new again “
12. Addressing Common Mistakes and Pitfalls
What are common mistakes to avoid when repairing car fabric?
- Using Too Much Glue: Applying too much glue can result in a stiff, unnatural repair.
- Not Matching Colors Properly: Inaccurate color matching can make the repair stand out.
- Skipping Preparation Steps: Neglecting to clean and prepare the area can compromise the repair.
How do you fix a poorly executed fabric repair?
- Remove Old Materials: Carefully remove any old glue or fibers with a seam ripper or tweezers.
- Clean the Area: Clean the area thoroughly with an upholstery cleaner.
- Start Over: Follow the correct repair steps, paying close attention to color matching and glue application.
What are some troubleshooting tips for difficult repairs?
- Consult a Professional: If you’re unsure about any step, consult a professional.
- Practice First: Practice the repair on an inconspicuous area before attempting it on the damaged area.
- Take Your Time: Don’t rush the repair; take your time to ensure a high-quality result.
13. Cost Analysis: DIY vs. Professional Repair
What is the typical cost breakdown for professional fabric repair?
Professional fabric repair costs can vary depending on the extent of the damage and the type of fabric. Here’s a general cost breakdown:
- Minor Repairs (Scratches, Scuffs): $150 – $300
- Moderate Repairs (Tears, Burns): $200 – $1,000
- Extensive Repairs (Depressed Damages): $500 – $2,000
How do DIY costs compare for different types of repairs?
DIY costs are significantly lower. Here’s a comparison:
| Repair Type | DIY Cost Range |
|---|---|
| Scratches and Scuffs | $20 – $50 (for a repair kit from CARDIAGTECH.NET) |
| Tears and Burns | $30 – $100 (depending on the need for backing fabric and additional materials) |
| Depressed Damages | $50 – $200 (including filler materials and specialized tools) |
What factors influence the cost of fabric repair?
- Extent of Damage: More extensive damage requires more materials and labor.
- Type of Fabric: Delicate or rare fabrics may require specialized techniques and materials.
- Location: Labor costs vary by location.
14. Fabric Repair and Vehicle Value
How does fabric repair affect a car’s resale value?
A well-maintained interior can significantly increase a car’s resale value. Addressing fabric damage promptly can prevent it from escalating and preserve the car’s overall condition.
What are the key areas to focus on for maximum impact on value?
- Seats: Repair any tears, stains, or burns.
- Carpets: Clean or replace stained or worn carpets.
- Door Panels: Repair any damaged or loose fabric.
Can you quantify the impact of interior condition on resale value?
According to Kelley Blue Book, a car with a clean and well-maintained interior can fetch up to 10-15% more than a similar car with a damaged or neglected interior.
15. Choosing the Right Products from CARDIAGTECH.NET
What fabric repair products does CARDIAGTECH.NET offer?
CARDIAGTECH.NET offers a range of high-quality fabric repair products, including:
- Fabric Repair Kits: Comprehensive kits with color-matching fibers, adhesive, and tools.
- Upholstery Cleaners: Effective cleaners for removing stains and dirt.
- Backing Fabrics: Durable fabrics for reinforcing damaged areas.
- Specialized Tools: Upholstery needles, seam rippers, and fabric scissors.
How do you select the best product for your specific repair needs?
- Assess the Damage: Determine the type and extent of the damage.
- Consider Fabric Type: Choose products suitable for your car’s fabric.
- Read Product Reviews: See what other customers have to say about the products.
Are there any product bundles or discounts available?
CARDIAGTECH.NET frequently offers product bundles and discounts. Check the website for current promotions.
16. FAQ: Common Questions About Fabric Repair
What is the best way to clean car upholstery?
Use an upholstery cleaner and a soft brush to gently scrub the fabric. Vacuum the area to remove any residue.
How do you remove stubborn stains from car fabric?
Try a specialized stain remover or a mixture of baking soda and water. Apply to the stain, let it sit for a few minutes, and then blot with a clean cloth.
Can you repair a cigarette burn in car upholstery?
Yes, cigarette burns can be repaired using a fabric repair kit. Follow the steps outlined above for repairing burns and holes.
How do you prevent car seats from fading?
Use a UV protectant spray and park in shaded areas to minimize sun exposure.
What is the best adhesive for fabric repair?
Use a fabric adhesive that is strong, flexible, and designed for upholstery repair.
How long does it take for fabric glue to dry?
Most fabric glues take 24 hours to dry completely.
Can you dye car upholstery?
Yes, you can dye car upholstery using a fabric dye designed for automotive use. Follow the manufacturer’s instructions carefully.
How do you repair a sagging headliner?
A sagging headliner can be repaired by reapplying adhesive to the fabric. Remove the headliner, clean the fabric and backing, apply adhesive, and reattach the fabric.
What is the best way to protect car seats from wear and tear?
Use seat covers to protect the original fabric from wear and tear.
How do you remove pet hair from car upholstery?
Use a vacuum with an upholstery attachment or a lint roller to remove pet hair.
17. How to Contact CARDIAGTECH.NET for Assistance
What are the different ways to get in touch with CARDIAGTECH.NET?
You can reach CARDIAGTECH.NET through the following channels:
- Address: 276 Reock St, City of Orange, NJ 07050, United States
- WhatsApp: +1 (641) 206-8880
- Website: CARDIAGTECH.NET
What kind of support can you expect from CARDIAGTECH.NET?
CARDIAGTECH.NET provides expert support and guidance for all your fabric repair needs. You can expect assistance with product selection, repair techniques, and troubleshooting.
Is there a customer service hotline or email address available?
Yes, you can contact CARDIAGTECH.NET via WhatsApp at +1 (641) 206-8880 or visit their website at CARDIAGTECH.NET for more information.
18. Actionable Steps to Start Your Fabric Repair Project
What are the first steps to take before starting a repair?
- Assess the Damage: Determine the type and extent of the damage.
- Gather Materials: Collect the necessary tools and materials.
- Prepare the Area: Clean and prepare the damaged area.
Where can you purchase the recommended tools and kits?
You can purchase the recommended tools and kits from CARDIAGTECH.NET.
How can you ensure a successful repair outcome?
- Follow Instructions Carefully: Follow the repair steps outlined above.
- Take Your Time: Don’t rush the repair; take your time to ensure a high-quality result.
- Seek Help if Needed: Consult a professional or contact CARDIAGTECH.NET for assistance.
Don’t let damaged car interior fabric detract from your vehicle’s value and comfort. With the right tools and techniques from CARDIAGTECH.NET, you can restore your car’s interior and maintain its pristine condition. Contact CARDIAGTECH.NET today at +1 (641) 206-8880 or visit CARDIAGTECH.NET to get started on your fabric repair project! Our team is ready to help you select the best tools and provide expert advice.