How To Fix Car Paint Chip With Rust Effectively
Car paint chips, whether caused by rocks, hail, or other road debris, not only detract from your vehicle’s appearance but can also lead to further damage if left unattended. These chips expose the underlying metal to moisture and air, accelerating the formation of rust. CARDIAGTECH.NET offers solutions to tackle this issue head-on, ensuring your car remains protected and looking its best. Knowing how to repair these blemishes and utilizing appropriate products can restore your car’s aesthetics and guard against corrosion. For professional-grade tools and expert advice, reach out to CARDIAGTECH.NET.
1. Understanding the Threat: Why Fix Car Paint Chips with Rust?
Paint chips on your car might seem like minor cosmetic issues, but they can quickly turn into significant problems if rust begins to form. Understanding the importance of addressing these chips promptly is crucial for maintaining your vehicle’s integrity and value.
1.1. The Cosmetic Impact
- Aesthetics: Paint chips diminish the overall appearance of your car, making it look older and less cared for.
- First Impressions: Visible damage can affect how others perceive your vehicle, which can be important for personal and professional reasons.
1.2. The Structural Impact
- Rust Formation: When paint chips expose the metal underneath, it becomes vulnerable to rust, which can weaken the car’s body.
- Spreading Damage: Rust can spread from the initial chip, causing more extensive damage to surrounding areas.
1.3. The Financial Impact
- Depreciation: Rust and visible damage significantly reduce your car’s resale value.
- Repair Costs: Addressing rust early prevents more costly repairs down the road, such as panel replacements or extensive body work.
1.4. Addressing the Root Cause
- Protection: Repairing paint chips creates a protective barrier against moisture and other environmental factors that cause rust.
- Prevention: Regular maintenance and prompt repairs can prevent future chips from turning into rust problems.
1.5. Utilizing Expert Solutions
- CARDIAGTECH.NET: Offers a range of tools and products designed to effectively repair paint chips and prevent rust.
- Professional Advice: CARDIAGTECH.NET provides expert guidance on the best techniques and products for your specific car and situation.
By understanding these impacts and taking proactive steps, you can maintain your car’s appearance, structural integrity, and value. Trust CARDIAGTECH.NET to provide the tools and knowledge you need to tackle paint chips and rust effectively.
Cosmetic Damage
Alt: Close-up of paint chips on a car, highlighting the cosmetic damage and potential for rust formation.
2. Identifying the Enemy: Assessing Paint Chips and Rust
Before diving into the repair process, it’s essential to properly assess the extent of the damage. Identifying the size and severity of the paint chip, as well as any existing rust, will determine the best course of action.
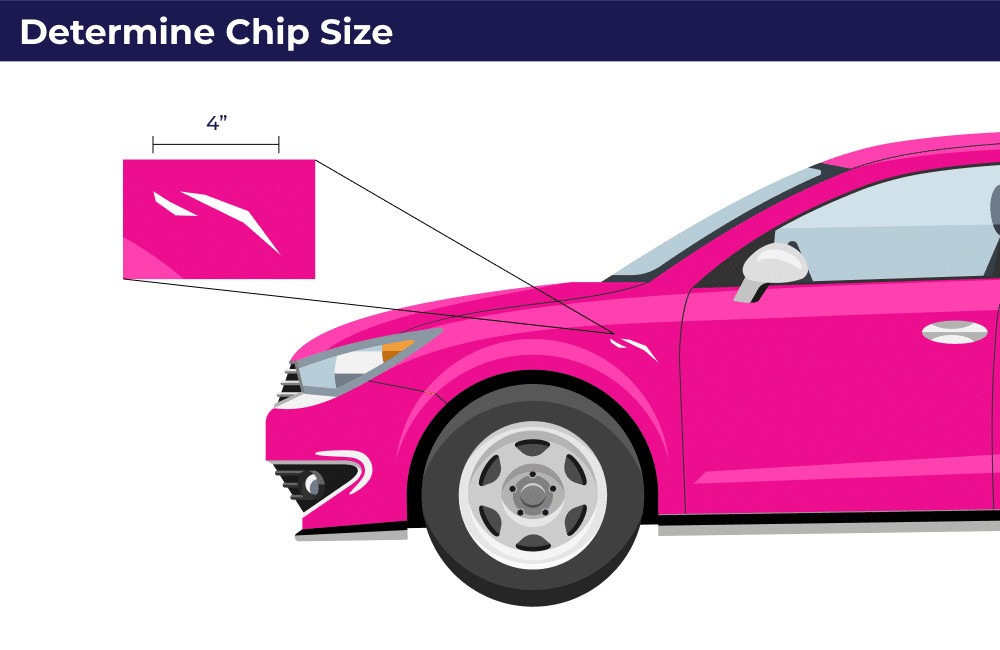
2.1. Size Matters
- Small Chips: Smaller than a dime, these are typically easier to fix and may not always require primer.
- Medium Chips: Up to the size of a quarter, these may need primer to ensure proper adhesion.
- Large Chips: Larger than a quarter, these require careful attention and possibly professional intervention, especially if rust is present.
2.2. Rust Assessment
- Surface Rust: A light coating of rust on the surface can often be removed with a rust eraser or converter.
- Deep Rust: Significant rust that has penetrated deeper into the metal may require more aggressive methods, such as sanding or chemical treatments.
- Perforation: If the rust has eaten through the metal, professional repair is necessary to ensure structural integrity.
2.3. Identifying Spread
- Flaking Paint: Check for any flaking paint around the chip, as this indicates that the damage is spreading.
- Underlying Rust: Look for rust underneath the paint, which can cause further flaking and damage.
2.4. Gathering Information
- Tools and Products: Based on your assessment, gather the necessary tools and products, such as sandpaper, rust remover, primer, paint, and clear coat.
- Safety Gear: Always wear gloves and eye protection when working with chemicals and power tools.
2.5. Seeking Professional Advice
- When to Consult: If you’re unsure about the severity of the rust or the best way to proceed, consult with a professional at CARDIAGTECH.NET.
- Expert Solutions: CARDIAGTECH.NET can provide expert advice and high-quality products to address even the most challenging rust issues.
By thoroughly assessing the paint chip and rust, you can ensure that you choose the right repair method and prevent further damage to your vehicle. Trust CARDIAGTECH.NET to guide you through this process with expert advice and top-notch products.
3. Preparing for Battle: Gathering the Right Tools and Materials
Before you start fixing car paint chips with rust, make sure you have all the necessary tools and materials. Having everything on hand will make the process smoother and more efficient.
3.1. Essential Tools
- Sanding Supplies:
- Sandpaper: Various grits (e.g., 320, 600, 1000, 2000 grit) for removing rust and smoothing surfaces.
- Sanding Block: Provides a flat, even surface for sanding.
- Sanding Pen: For precise sanding in small areas.
- Cleaning Supplies:
- Soap and Water: For general cleaning.
- Rubbing Alcohol: To remove grease and oil.
- Rust Remover: Chemical solution or gel to dissolve rust.
- Tack Cloth: To remove dust and particles.
- Application Tools:
- Small Brushes: For applying primer, paint, and clear coat.
- Touch-Up Paint Pen: For small chips and scratches.
- Microfiber Cloths: For polishing and waxing.
- Applicator Pads: For applying wax and polish.
- Safety Gear:
- Gloves: To protect your hands from chemicals.
- Eye Protection: Safety glasses or goggles to prevent debris from entering your eyes.
- Respirator: To avoid inhaling harmful fumes from paints and chemicals.
- Miscellaneous:
- Masking Tape: To protect surrounding areas.
- Razor Blade or Utility Knife: For trimming excess paint.
- Heat Gun or Hair Dryer: To speed up drying times (use with caution).
3.2. Essential Materials
- Primer: Automotive primer to prepare the surface for paint.
- Paint: Touch-up paint that matches your car’s color code.
- Clear Coat: To protect the paint and provide a glossy finish.
- Polishing Compound: To smooth out imperfections in the paint.
- Wax: To protect the paint and enhance its shine.
- Rust Converter: To neutralize rust and prevent it from spreading.
3.3. Sourcing Quality Supplies
- CARDIAGTECH.NET: Offers a wide range of high-quality tools and materials for car paint chip repair.
- Auto Parts Stores: Local auto parts stores are also a good source for these items.
- Online Retailers: Websites like Amazon and specialized automotive sites offer a variety of options.
3.4. Stocking Up for Success
- Comprehensive Kits: Consider purchasing a comprehensive paint chip repair kit, which includes many of the necessary items.
- Extra Supplies: It’s always a good idea to have extra supplies on hand, such as additional sandpaper and cleaning solutions.
By gathering the right tools and materials, you’ll be well-prepared to tackle paint chips and rust effectively. Trust CARDIAGTECH.NET to provide the quality supplies you need for a successful repair.
4. Clearing the Path: Removing Rust and Cleaning the Area
Before you can start repairing car paint chips, it’s crucial to remove any rust and thoroughly clean the affected area. This ensures that the new paint adheres properly and prevents future corrosion.
4.1. Safety First
- Protective Gear: Wear gloves, eye protection, and a respirator to protect yourself from chemicals and debris.
- Ventilation: Work in a well-ventilated area to avoid inhaling harmful fumes.
4.2. Initial Cleaning
- Wash the Area: Use soap and water to remove any dirt, grease, or debris from the area around the paint chip.
- Dry Thoroughly: Make sure the area is completely dry before proceeding.
4.3. Rust Removal Methods
- Mechanical Removal:
- Sanding: Use sandpaper (e.g., 320 grit for heavy rust, 600 grit for lighter rust) to gently sand away the rust. Use a sanding block for even pressure.
- Wire Brush: A small wire brush can be effective for removing loose rust particles.
- Rust Eraser: For small areas of surface rust, a rust eraser can be a convenient option.
- Chemical Removal:
- Rust Remover: Apply a rust remover solution or gel to the affected area, following the manufacturer’s instructions.
- Rust Converter: After removing the rust, apply a rust converter to neutralize any remaining rust and prevent it from spreading.
- Electrolytic Rust Removal:
- DIY Method: For more advanced rust removal, consider using an electrolytic rust removal process, which involves submerging the rusted part in an electrolyte solution and applying a small electrical current.
4.4. Final Cleaning
- Rubbing Alcohol: After removing the rust, use rubbing alcohol to clean the area and remove any residual chemicals or particles.
- Tack Cloth: Use a tack cloth to wipe away any remaining dust or debris.
4.5. Ensuring a Clean Surface
- Inspection: Carefully inspect the area to ensure that all rust has been removed and the surface is clean and smooth.
- Repeat if Necessary: If necessary, repeat the rust removal and cleaning process to achieve a clean, rust-free surface.
4.6. Expert Advice
- CARDIAGTECH.NET: Offers expert advice on the best rust removal methods for your specific situation.
- Professional Products: CARDIAGTECH.NET provides high-quality rust removers, converters, and cleaning solutions to ensure a thorough and effective cleaning process.
By following these steps, you can effectively remove rust and prepare the area for paint repair, ensuring a long-lasting and professional-looking result. Trust CARDIAGTECH.NET to provide the tools and knowledge you need to tackle rust removal with confidence.
 Rust Removal
Alt: Close-up of a car paint chip with rust being removed using a sanding pen, highlighting the precision and care required for effective rust removal.
5. Laying the Foundation: Applying Primer for Optimal Adhesion
Applying primer is a crucial step in the car paint chip repair process, especially when dealing with rust. Primer provides a smooth, adhesive surface for the paint to bond to, ensuring a long-lasting and durable repair.
5.1. Why Use Primer?
- Adhesion: Primer creates a strong bond between the metal surface and the paint, preventing chipping and peeling.
- Rust Prevention: Primer helps to seal the metal and prevent future rust formation.
- Smooth Surface: Primer fills in minor imperfections and creates a smooth, even surface for the paint.
- Color Uniformity: Primer helps to create a uniform base color, ensuring that the paint color is consistent across the repaired area.
5.2. Choosing the Right Primer
- Automotive Primer: Use an automotive-specific primer that is designed for use on metal surfaces.
- Rust-Inhibiting Primer: If you’re dealing with rust, choose a primer that contains rust-inhibiting properties.
- Acrylic or Epoxy Primer: Acrylic primers are easy to use and dry quickly, while epoxy primers offer superior durability and corrosion resistance.
5.3. Applying the Primer
- Shake Well: Shake the primer can thoroughly before use to ensure proper mixing.
- Apply Thin Coats: Apply several thin coats of primer, rather than one thick coat, to prevent drips and runs.
- Spray Technique: Hold the primer can about 8-12 inches from the surface and use a smooth, even spraying motion.
- Coverage: Make sure to cover the entire area of the paint chip, as well as a small area around the chip to blend the repair seamlessly.
- Drying Time: Allow the primer to dry completely between coats, following the manufacturer’s instructions.
- Sanding: Once the primer is dry, use fine-grit sandpaper (e.g., 600 grit) to lightly sand the surface and create a smooth, even base.
5.4. Troubleshooting
- Drips and Runs: If you experience drips or runs, allow the primer to dry completely and then sand the affected area smooth.
- Uneven Coverage: If the primer coverage is uneven, apply another thin coat to even out the surface.
5.5. Expert Tips
- Masking: Use masking tape to protect surrounding areas from overspray.
- Temperature and Humidity: Apply primer in a dry, well-ventilated area with moderate temperature and humidity for best results.
- CARDIAGTECH.NET: Offers expert advice on choosing the right primer and applying it effectively.
- Quality Products: CARDIAGTECH.NET provides high-quality automotive primers that are designed for optimal adhesion and rust prevention.
By following these steps and utilizing quality products, you can lay a solid foundation for your car paint chip repair, ensuring a long-lasting and professional-looking result. Trust CARDIAGTECH.NET to provide the expert guidance and top-notch products you need for success.
6. The Perfect Match: Selecting and Applying the Right Paint
Choosing and applying the right paint is crucial for a seamless car paint chip repair. The goal is to match the existing paint color perfectly and apply it in a way that blends seamlessly with the surrounding area.
6.1. Finding Your Car’s Paint Code
- Location: The paint code is typically located on a sticker in the driver’s side door jamb, glove box, or under the hood.
- Format: The paint code is usually a combination of letters and numbers.
- Online Resources: If you can’t find the paint code on your car, you can use online resources or consult with an automotive paint specialist to identify the correct color.
6.2. Obtaining Touch-Up Paint
- Dealership: Your car’s dealership is a reliable source for touch-up paint that matches your car’s original color.
- Auto Parts Stores: Many auto parts stores can mix touch-up paint to match your car’s paint code.
- Online Retailers: Online retailers offer a wide variety of touch-up paints, but be sure to verify the color match before purchasing.
6.3. Application Techniques
- Touch-Up Paint Pen: For small chips and scratches, a touch-up paint pen is a convenient and precise option.
- Small Brush: For larger chips, use a small brush to apply the paint.
- Thin Coats: Apply several thin coats of paint, rather than one thick coat, to prevent drips and runs.
- Layering: Allow each coat of paint to dry completely before applying the next coat.
- Blending: Blend the paint into the surrounding area to create a seamless transition.
6.4. Expert Tips
- Test the Color: Before applying the paint to your car, test it on a piece of paper or cardboard to ensure a proper match.
- Shake Well: Shake the paint can thoroughly before use to ensure proper mixing.
- Clean the Area: Make sure the area is clean and dry before applying the paint.
- Masking: Use masking tape to protect surrounding areas from overspray.
- Temperature and Humidity: Apply paint in a dry, well-ventilated area with moderate temperature and humidity for best results.
- CARDIAGTECH.NET: Offers expert advice on selecting and applying the right paint for your car.
- Quality Products: CARDIAGTECH.NET provides high-quality touch-up paints that are designed for a perfect color match and long-lasting durability.
6.5. Addressing Color Mismatch
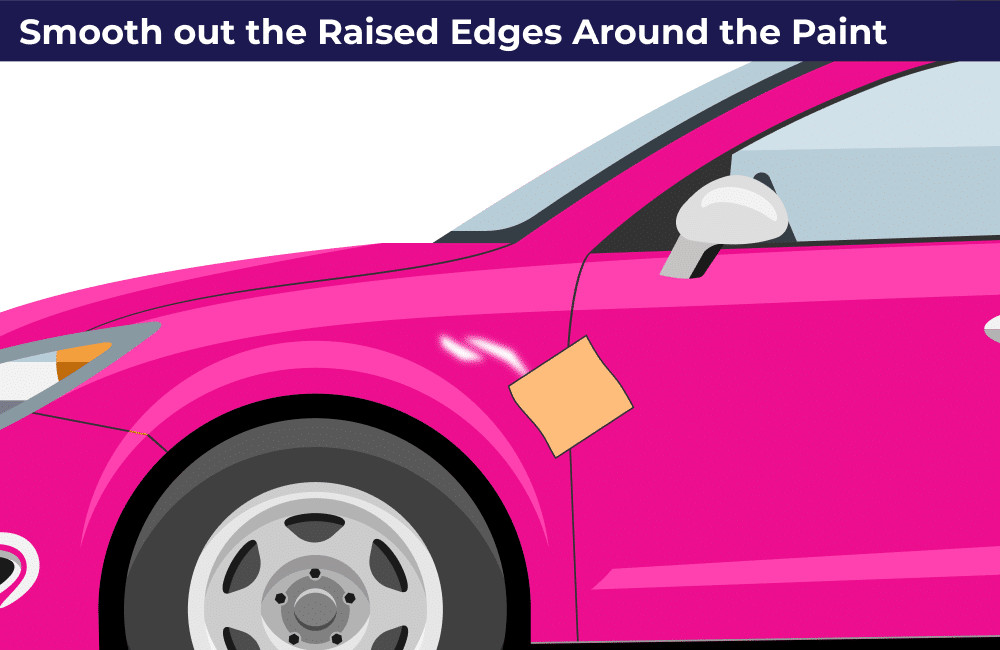
- Sanding: If the paint color is slightly off, you can use fine-grit sandpaper (e.g., 2000 grit) to lightly sand the area and blend the paint into the surrounding area.
- Polishing: After sanding, use a polishing compound to restore the shine to the paint.
By following these steps and utilizing quality products, you can achieve a perfect color match and a seamless repair. Trust CARDIAGTECH.NET to provide the expert guidance and top-notch products you need for success.
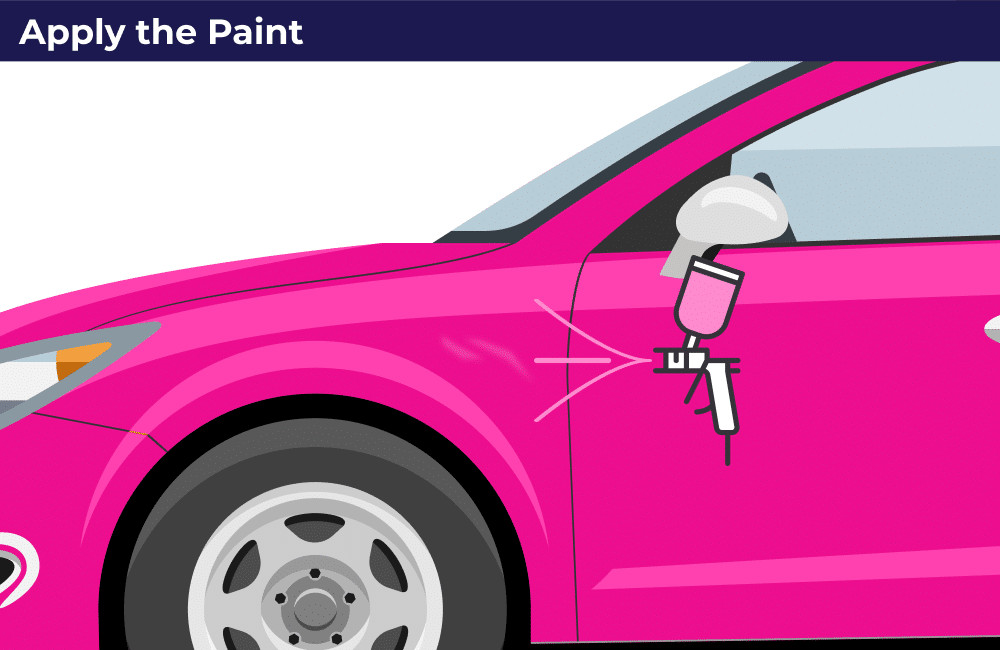 Apply the Paint
Alt: Applying touch-up paint to a car paint chip with a fine brush, illustrating the precision needed for a seamless color match and finish.
7. Sealing the Deal: Applying Clear Coat for Protection and Shine
Applying a clear coat is an essential final step in the car paint chip repair process. The clear coat protects the paint, provides a glossy finish, and helps to blend the repair seamlessly with the surrounding area.
7.1. Why Use Clear Coat?
- Protection: Clear coat protects the paint from UV rays, scratches, and other environmental damage.
- Gloss: Clear coat provides a glossy, showroom-like finish.
- Blending: Clear coat helps to blend the repair seamlessly with the surrounding area.
7.2. Choosing the Right Clear Coat
- Acrylic Clear Coat: Acrylic clear coats are easy to use and dry quickly.
- Polyurethane Clear Coat: Polyurethane clear coats offer superior durability and scratch resistance.
- Two-Part Clear Coat: Two-part clear coats provide the best possible durability and gloss, but they require mixing and special application equipment.
7.3. Applying the Clear Coat
- Shake Well: Shake the clear coat can thoroughly before use to ensure proper mixing.
- Apply Thin Coats: Apply several thin coats of clear coat, rather than one thick coat, to prevent drips and runs.
- Spray Technique: Hold the clear coat can about 8-12 inches from the surface and use a smooth, even spraying motion.
- Coverage: Make sure to cover the entire area of the paint chip, as well as a small area around the chip to blend the repair seamlessly.
- Drying Time: Allow the clear coat to dry completely between coats, following the manufacturer’s instructions.
7.4. Sanding and Polishing
- Wet Sanding: After the clear coat is dry, use fine-grit sandpaper (e.g., 2000 grit) to lightly wet sand the surface and remove any imperfections.
- Polishing Compound: Use a polishing compound to restore the shine to the clear coat.
- Buffing: Use a buffing pad and a power buffer to achieve a smooth, glossy finish.
7.5. Expert Tips
- Masking: Use masking tape to protect surrounding areas from overspray.
- Temperature and Humidity: Apply clear coat in a dry, well-ventilated area with moderate temperature and humidity for best results.
- CARDIAGTECH.NET: Offers expert advice on choosing the right clear coat and applying it effectively.
- Quality Products: CARDIAGTECH.NET provides high-quality clear coats that are designed for optimal protection and shine.
By following these steps and utilizing quality products, you can seal the deal on your car paint chip repair, ensuring a long-lasting and professional-looking result. Trust CARDIAGTECH.NET to provide the expert guidance and top-notch products you need for success.
8. Achieving Perfection: Polishing and Waxing for a Flawless Finish
Polishing and waxing are the final touches that transform a good paint chip repair into a flawless one. These steps ensure that the repaired area blends seamlessly with the rest of the car’s paint, providing a smooth, glossy, and protected finish.
8.1. Polishing: Smoothing Imperfections
- Purpose: Polishing removes minor imperfections, such as swirl marks and light scratches, from the clear coat.
- Polishing Compound: Use a high-quality polishing compound designed for automotive finishes.
- Application: Apply a small amount of polishing compound to a polishing pad or microfiber cloth.
- Technique: Use a circular motion to gently rub the polishing compound into the clear coat.
- Buffing: Use a clean microfiber cloth to buff away the excess polishing compound.
- Power Buffer: For larger areas, a power buffer can be used to speed up the polishing process.
8.2. Waxing: Protection and Shine
- Purpose: Waxing protects the paint from UV rays, water spots, and other environmental damage, while also enhancing its shine.
- Wax Type: Choose a high-quality car wax that is appropriate for your car’s paint finish.
- Application: Apply a thin, even coat of wax to the entire car, following the manufacturer’s instructions.
- Drying Time: Allow the wax to dry completely, typically about 15-30 minutes.
- Buffing: Use a clean microfiber cloth to buff away the excess wax, revealing a glossy, protected finish.
8.3. Expert Tips
- Clean Surface: Make sure the car’s surface is clean and dry before polishing and waxing.
- Clay Bar: Use a clay bar to remove any embedded contaminants from the paint before polishing.
- Multiple Coats: Apply multiple thin coats of wax for maximum protection.
- Maintenance: Regularly wash and wax your car to maintain its shine and protect the paint.
- CARDIAGTECH.NET: Offers expert advice on polishing and waxing techniques.
- Quality Products: CARDIAGTECH.NET provides high-quality polishing compounds and car waxes that are designed for a flawless finish.
8.4. Addressing Common Issues
- Swirl Marks: If you notice swirl marks after polishing, try using a finer polishing compound or a different polishing technique.
- Hazy Finish: If the finish looks hazy after waxing, try using a cleaner wax or a different buffing technique.
By following these steps and utilizing quality products, you can achieve a flawless finish on your car paint chip repair, ensuring that it blends seamlessly with the rest of the car’s paint. Trust CARDIAGTECH.NET to provide the expert guidance and top-notch products you need for success.
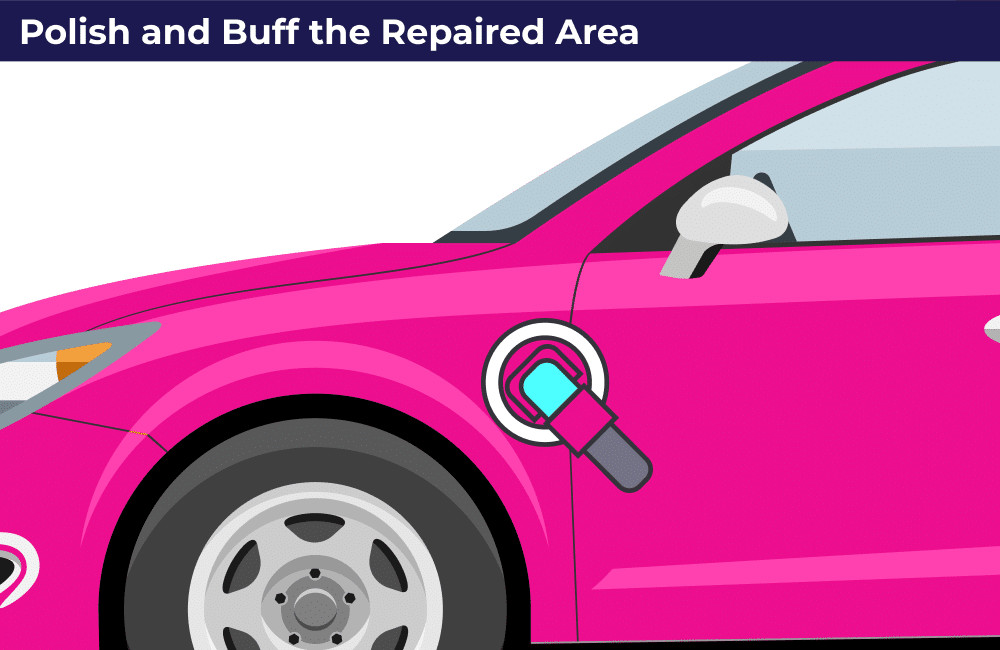 Polish and Buff the Repaired Area
Alt: A car detailer polishing a freshly painted area with a power buffer, emphasizing the effort to blend the repair seamlessly into the original paintwork.
9. Prevention is Key: Protecting Your Car from Future Paint Chips
While knowing how to fix car paint chips with rust is valuable, preventing them in the first place is even better. Here are several strategies to minimize the risk of paint chips and keep your car looking its best.
9.1. Safe Driving Habits
- Maintain Distance: Keep a safe distance from other vehicles, especially trucks and construction vehicles that may kick up rocks and debris.
- Avoid Gravel Roads: Whenever possible, avoid driving on gravel roads, which are a major source of paint chips.
- Slow Down: Slow down on rough roads and in construction zones to reduce the risk of flying debris.
9.2. Paint Protection Film (PPF)
- What is PPF? Paint protection film is a clear, self-adhesive film that is applied to the car’s paint to protect it from scratches, chips, and other damage.
- Application: PPF can be applied to the entire car or just to high-impact areas, such as the hood, fenders, and bumpers.
- Benefits: PPF provides excellent protection against paint chips and other damage, while also preserving the car’s original paint finish.
9.3. Ceramic Coating
- What is Ceramic Coating? Ceramic coating is a liquid polymer that is applied to the car’s paint to provide a protective layer.
- Benefits: Ceramic coating provides excellent protection against UV rays, water spots, and other environmental damage, while also making the car easier to clean.
- Durability: Ceramic coatings can last for several years, providing long-lasting protection.
9.4. Regular Washing and Waxing
- Washing: Regularly wash your car to remove dirt, debris, and other contaminants that can damage the paint.
- Waxing: Wax your car every few months to protect the paint and enhance its shine.
9.5. Parking Strategies
- Choose Carefully: Choose your parking spot carefully, avoiding areas where your car is likely to be hit by other vehicles or exposed to flying debris.
- Covered Parking: Whenever possible, park in a covered garage or carport to protect your car from the elements.
9.6. Expert Recommendations
- CARDIAGTECH.NET: Offers expert advice on paint protection strategies.
- Quality Products: CARDIAGTECH.NET provides high-quality paint protection films, ceramic coatings, and car care products.
- Professional Installation: Consider having paint protection film or ceramic coating professionally installed for best results.
By implementing these prevention strategies, you can significantly reduce the risk of paint chips and keep your car looking its best for years to come. Trust CARDIAGTECH.NET to provide the expert guidance and top-notch products you need to protect your investment.
10. When to Call in the Pros: Recognizing the Limits of DIY Repair
While many car paint chips and minor rust spots can be effectively repaired at home, there are situations where professional help is necessary. Recognizing these limits is crucial for ensuring a proper and lasting repair.
10.1. Extensive Rust Damage
- Perforation: If the rust has eaten through the metal, creating holes or weakening the structure, professional repair is essential.
- Large Areas: Extensive surface rust may require specialized tools and techniques to remove effectively.
- Structural Components: Rust on critical structural components, such as frame rails or suspension parts, should be addressed by a qualified mechanic.
10.2. Deep Scratches and Gouges
- Exposed Metal: Deep scratches that expose bare metal require careful preparation and painting to prevent rust.
- Multiple Layers: Repairing deep scratches may involve multiple layers of primer, paint, and clear coat to achieve a smooth, even finish.
- Color Matching: Achieving a perfect color match can be challenging with deep scratches, often requiring professional color mixing and blending.
10.3. Large Paint Chips
- Size Matters: Large paint chips, especially those larger than a quarter, can be difficult to repair seamlessly.
- Blending: Blending the new paint with the surrounding area requires skill and experience.
- Equipment: Professional body shops have specialized equipment, such as spray guns and paint booths, to achieve a flawless finish.
10.4. Complex Paint Finishes
- Metallic and Pearl: Metallic and pearl paint finishes are notoriously difficult to match and repair.
- Multi-Stage Paints: Multi-stage paint finishes, such as those found on luxury cars, require specialized techniques and equipment.
- Professional Expertise: Repairing these finishes often requires the expertise of a skilled automotive painter.
10.5. Lack of Experience or Confidence
- DIY Limitations: If you lack experience or confidence in your ability to perform a proper repair, it’s best to seek professional help.
- Preventing Further Damage: Attempting a repair without the necessary skills and knowledge can lead to further damage and more costly repairs down the road.
- Peace of Mind: A professional repair provides peace of mind, knowing that the job has been done correctly.
10.6. Finding a Qualified Professional
- Recommendations: Ask friends, family, or online communities for recommendations.
- Online Reviews: Check online reviews to assess the reputation and quality of local body shops.
- Certifications: Look for shops that are certified by reputable organizations, such as I-CAR or ASE.
- CARDIAGTECH.NET: Can provide referrals to qualified professionals in your area.
By recognizing the limits of DIY repair and seeking professional help when necessary, you can ensure that your car receives the proper care and attention it deserves. Trust CARDIAGTECH.NET to provide the expert guidance and resources you need to make informed decisions about your car’s paint repair.
Don’t let paint chips and rust diminish your car’s appearance and value. CARDIAGTECH.NET is here to help with expert advice and quality tools. Contact us today at +1 (641) 206-8880 or visit our website CARDIAGTECH.NET for a consultation. Located at 276 Reock St, City of Orange, NJ 07050, United States, we are ready to assist you in maintaining your vehicle’s pristine condition. Let’s work together to keep your car looking its best.
Frequently Asked Questions (FAQs)
1. What causes car paint chips with rust?
Car paint chips are primarily caused by road debris such as rocks, gravel, and salt, which can impact the car’s surface while driving. Rust occurs when the exposed metal reacts with oxygen and moisture, leading to corrosion.
2. Can I fix car paint chips with rust myself, or do I need a professional?
Small paint chips with minimal surface rust can often be repaired DIY with the right tools and materials. However, larger chips, deep scratches, or extensive rust damage typically require professional attention to ensure proper repair and prevent further corrosion.
3. What tools do I need to fix car paint chips with rust?
Essential tools include sandpaper (various grits), a sanding block, rust remover, primer, touch-up paint, clear coat, polishing compound, wax, microfiber cloths, and safety gear like gloves and eye protection.
4. How do I remove rust from a car paint chip?
Remove loose rust particles with a wire brush or sandpaper. Apply a rust remover or converter to neutralize the rust, following the product instructions. Clean the area thoroughly with rubbing alcohol before proceeding with the repair.
5. How do I match the paint color for my car?
Locate the paint code on your car (usually on the driver’s side door jamb or in the owner’s manual). Use this code to purchase matching touch-up paint from a dealership, auto parts store, or online retailer. Always test the paint in an inconspicuous area before applying it to the damaged area.
6. Is it necessary to use primer before applying touch-up paint?
Yes, primer is essential for promoting adhesion and preventing future rust formation, especially if the paint chip exposes bare metal. Apply a thin, even coat of automotive primer to the cleaned and sanded area before painting.
7. How do I apply touch-up paint to a car paint chip?
Apply thin, even coats of touch-up paint to the primed area using a fine-tipped brush or a touch-up paint pen. Allow each coat to dry completely before applying the next. Blend the edges of the paint with the surrounding area for a seamless finish.
8. What is clear coat, and why is it necessary?
Clear coat is a transparent layer applied over the touch-up paint to protect it from UV rays, scratches, and environmental damage. It also enhances the paint’s shine and provides a smooth, glossy finish.
9. How do I polish and wax the repaired area?
After the clear coat has dried, use a polishing compound to smooth out any imperfections and restore the paint’s shine. Apply wax to protect the paint and enhance its appearance. Use a microfiber cloth to buff the area to a high gloss.
10. How can I prevent future car paint chips with rust?
Maintain a safe distance from other vehicles, avoid driving on gravel roads, and consider applying paint protection film or ceramic coating to vulnerable areas. Regularly wash and wax your car to protect the paint and prevent rust formation.
By addressing these FAQs and understanding the repair process, you can effectively fix car paint chips with rust and maintain your vehicle’s appearance and value. Contact CARDIAGTECH.NET for expert advice and quality products to keep your car looking its best.