How To Fix Car Paint Damage: A Comprehensive Guide
Fixing car paint damage can restore your vehicle’s appearance and protect it from further deterioration. At CARDIAGTECH.NET, we provide the tools and knowledge you need to tackle everything from minor scratches to extensive road rash. Learn the best techniques for paint repair and discover how to achieve professional results. Improve your vehicle’s aesthetics with advanced automotive repair solutions and professional paint correction tools.
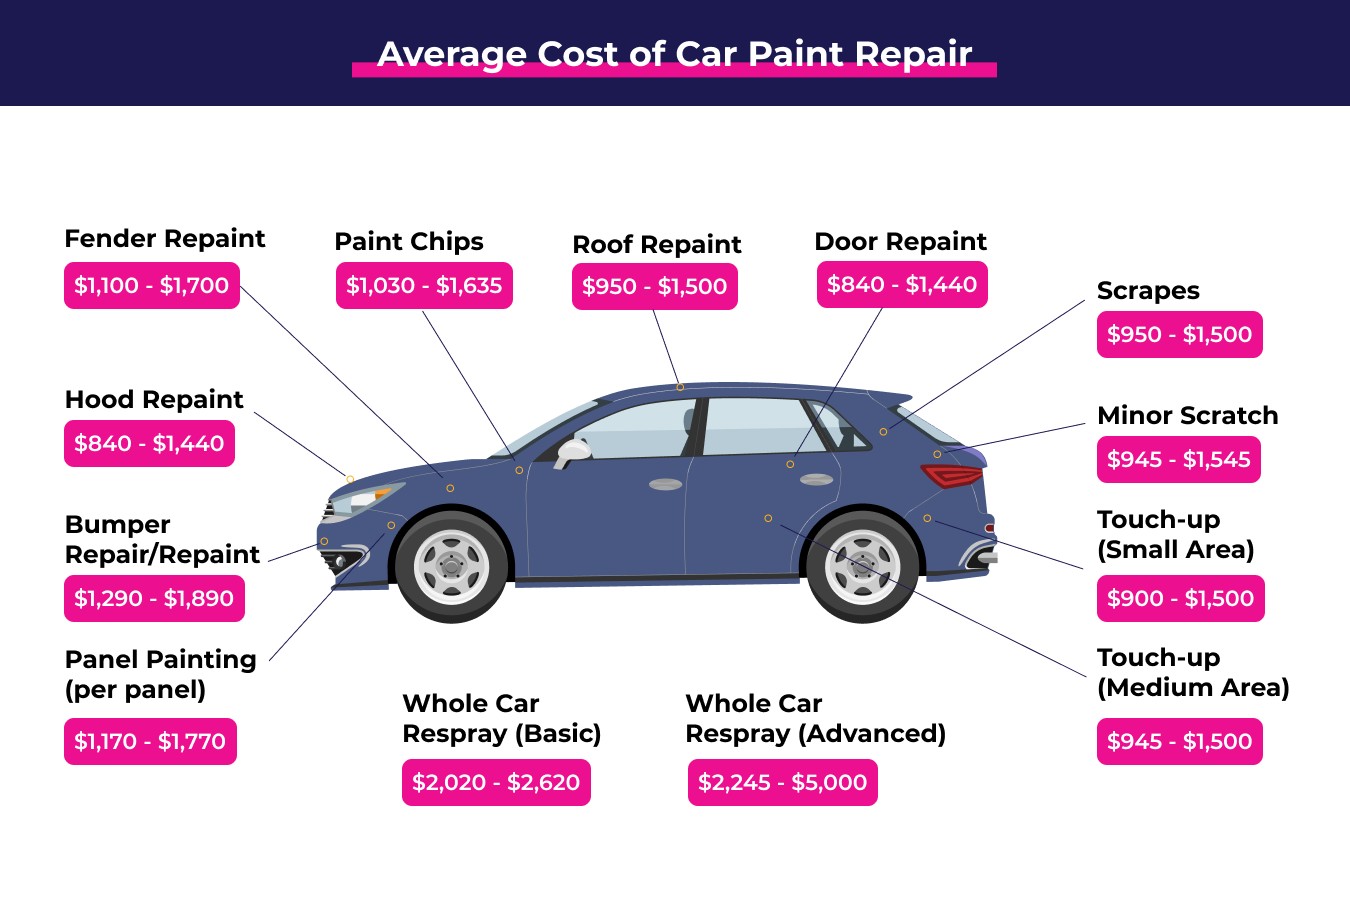
1. What are the main types of car paint damage and how do I identify them?
Car paint damage comes in several forms, each requiring a specific approach for repair. Identifying the type of damage is the first step in choosing the right repair method.
- Peeling or Cracked Paint: This occurs when the clear coat weakens, often due to prolonged sun exposure or poor respraying. According to a study by the University of California, Davis, darker colored cars are more prone to this issue because they absorb more heat, leading to quicker deterioration of the clear coat.
- Scratches: These can range from light surface scratches that only affect the clear coat to deeper scratches that penetrate the paint layers. You can tell if a scratch is only in the clear coat if it temporarily disappears when wet.
- Scrapes: These are common on front bumpers due to their proximity to the road and curbs. They often involve paint transfer or damage to the plastic bumper itself.
- Dents: While not paint damage per se, dents often accompany scratches or paint cracking. Addressing the dent is usually necessary before repairing the paint.
- Paint Chips: These can occur on door edges or as road rash on the hood and front bumper, typically caused by small rocks and debris.
2. How do I fix peeling or cracked paint on my car?
The only effective way to fix peeling or cracked paint is to have the area sanded down and resprayed.
This process involves removing the damaged paint, preparing the surface, and applying new paint and clear coat. Sanding ensures a smooth surface for the new paint to adhere to, while a proper respray provides a uniform and durable finish.
- Professional Body Shop: This is the most thorough but also the most expensive option. Body shops have the facilities and expertise to perform a high-quality respray.
- Mobile Spray Paint Service: This can be a more convenient and potentially less expensive option, but the quality may vary. Ensure the service uses high-quality paints and clear coats.
Is it worth it? If the peeling is due to sun damage on an older car with high mileage, it might not be worth the expense. However, addressing the issue can prevent further deterioration and maintain the vehicle’s appearance.
3. How do I repair surface scratches on my car’s clear coat?
Surface scratches that don’t penetrate beyond the clear coat can often be repaired with simple methods.
First, ensure the scratch is not just transfer residue. If it is, a light rubbing compound or soapy sponge should remove it. For actual scratches, follow these steps:
- Clean the Area: Wash the area around the scratch with soap and water to remove any dirt or debris.
- Apply Rubbing Compound: Use a gentle rubbing compound like Meguiar’s ScratchX. According to product reviews, this compound is effective for removing light scratches without damaging the surrounding paint.
- Buff the Scratch: Use a soft t-shirt cloth or microfiber cloth to rub the compound into the scratch. Apply firm pressure in a circular motion.
- Polish the Area: After removing the scratch, polish the area with car wax to restore the shine.
- Inspect and Repeat: Check the area to ensure the scratch is gone. If necessary, repeat the process.
CARDIAGTECH.NET offers a range of high-quality rubbing compounds and polishing cloths designed to help you achieve a professional finish. Consider our scratch repair kits for a complete solution.
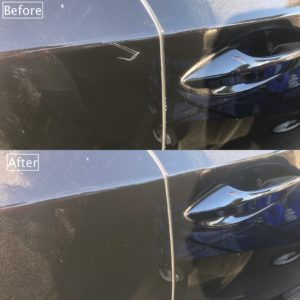
Surface scratch repair using rubbing compound
Surface scratch repair showcasing a before-and-after comparison near the door handle of an OC Nissan, illustrating the effectiveness of rubbing compound application.
4. How do I fix deep scratches that go past the clear coat?
Deep scratches require a more involved repair process, as they affect multiple layers of the paint.
To fully restore the paint, the damaged panel needs to be sanded down and resprayed. This is best done by a professional.
- Sanding: The area around the scratch is sanded to create a smooth surface and remove any rough edges.
- Priming: A primer is applied to help the new paint adhere to the surface.
- Painting: The panel is painted with a color-matched paint.
- Clear Coat: A clear coat is applied to protect the paint and provide a glossy finish.
Cost: The average cost for respraying a panel is around $350, according to estimates from automotive repair shops in California. The cost can increase if the scratch spans multiple panels or is located on a horizontal surface like the hood, which requires a dust-free environment.
Alternative: A skilled touch-up company like PaintCraft can hide the scratch effectively in many cases, especially on darker colored cars. However, touch-up may not be as effective on bright silver cars due to the metallic flakes in the paint.
5. How can I repair scrapes on my car’s bumper?
Bumper scrapes are a common issue, especially on modern cars with low front bumpers.
Paint touch-up is often an effective solution. You can do it yourself or hire a mobile touch-up company.
- Clean the Area: Wash the bumper to remove dirt and debris.
- Sand the Scrape: Use fine-grit sandpaper to smooth out any rough edges.
- Apply Primer: Apply a thin layer of automotive primer to the affected area.
- Apply Touch-Up Paint: Use a high-quality touch-up paint that matches your car’s color code. Dr. Colorchip is a recommended product for this type of repair.
- Blend the Paint: Use a blending solution to remove excess paint and blend the touch-up paint with the surrounding area.
- Apply Clear Coat: Apply a clear coat to protect the paint and provide a glossy finish.
Dr. Colorchip System: This system is designed for easy and effective paint chip and scrape repair. It includes a blending solution that allows you to remove excess paint, resulting in a smoother finish. According to user reviews, it can improve the appearance of scrapes by 80-95%.
Severe Damage: If the plastic of the bumper is severely damaged, or if there is damage to the metal underneath, the bumper may need to be replaced.
6. What is the best way to handle dents on my car?
Dents can often be repaired without needing to repaint the area, using a technique called Paintless Dent Repair (PDR).
- Find a Dent Technician: Ask your local car dealership for a referral. However, avoid going through the dealership for the repair, as they often double the price.
- Mobile Service: Dent technicians are typically mobile and will come to your location.
- Cost: The cost is usually around $75 per panel, not per dent.
Crease Dents: Dents on a crease in the design of your car are more difficult to repair and require an experienced technician.
7. How can I fix paint chips on my car’s door edge?
Chips on the door edge are relatively easy to fix with a touch-up kit.
- Clean the Area: Clean the door edge to remove dirt and debris.
- Apply Touch-Up Paint: Use a touch-up paint that matches your car’s color.
- Apply Multiple Coats: Apply several thin coats of paint, allowing each coat to dry before applying the next.
- Sand Lightly: After the paint is dry, lightly sand the area with fine-grit sandpaper to smooth out any imperfections.
- Apply Clear Coat: Apply a clear coat to protect the paint and provide a glossy finish.
Recommended Product: Dr. Colorchip is a highly recommended touch-up kit for door edge chips.
8. How do I repair road rash (multiple small chips) on my car’s hood and bumper?
Road rash, which consists of many small chips on the hood and front bumper, requires a specific approach.
- Clean the Area: Wash the area thoroughly to remove dirt and debris.
- Apply Touch-Up Paint: Use Dr. Colorchip touch-up paint, which is designed to stick in the chips but not the existing finish.
- Use Blending Solution: Apply the blending solution to remove excess paint, leaving a smooth finish.
- Apply Clear Coat: Apply a clear coat to protect the paint.
Why Dr. Colorchip? Dr. Colorchip is designed specifically for this type of damage. Its blending solution allows you to remove excess paint easily, resulting in a cleaner, more professional look. It is used by professionals on high-end vehicles.
9. What are the general options for dealing with car paint damage?
When it comes to car paint damage, you generally have four options:
- Body Shop: The most expensive and thorough option.
- Mobile Repair Technician: A more convenient and potentially less expensive option.
- Do It Yourself: The least expensive option, but requires time and effort.
- Forget About It: The least desirable option, as it can lead to further damage and reduce the car’s value.
When is it worth it? It may not be worth spending money on aesthetics if your car has more than 75,000 miles, has major mechanical issues, or if you’re facing financial difficulties. However, repairing paint damage can prevent rust, maintain your car’s appearance, and increase its resale value.
10. Where can I find high-quality tools and materials for car paint repair?
For all your car paint repair needs, visit CARDIAGTECH.NET.
We offer a wide range of products, including:
- Rubbing Compounds
- Polishing Cloths
- Touch-Up Paints
- Clear Coats
- Sanding Materials
- Primers
We also offer expert advice and support to help you choose the right products and techniques for your specific needs.
Contact us today for a consultation and let us help you restore your car’s paint to its original glory.
- Address: 276 Reock St, City of Orange, NJ 07050, United States
- WhatsApp: +1 (641) 206-8880
- Website: CARDIAGTECH.NET
1. Understanding Car Paint: Layers and Types
Before diving into fixing car paint damage, it’s crucial to understand the composition of car paint. What is the anatomy of car paint? Understanding the structure and types of paint will help you choose the right repair methods.
1.1. Layers of Car Paint
Car paint typically consists of four layers, each serving a specific purpose:
- Primer: The base layer that adheres to the metal body of the car, providing a smooth surface for subsequent layers and preventing rust. According to research from the National Institute of Standards and Technology (NIST), a high-quality primer can significantly extend the life of the paint job by preventing corrosion.
- Base Coat: This layer provides the color and aesthetic appeal. It can be a solid color, metallic, or pearlescent.
- Clear Coat: The top layer that protects the base coat from UV rays, scratches, and environmental damage. It provides a glossy finish and enhances the paint’s durability. A study by BASF Coatings GmbH found that clear coats with advanced UV absorbers can reduce paint fading by up to 50%.
1.2. Types of Car Paint
There are several types of car paint, each with its own properties and application methods:
| Type of Paint | Description | Advantages | Disadvantages |
|---|---|---|---|
| Lacquer | Fast-drying and provides a smooth finish. | Easy to apply and buff. | Not very durable and prone to chipping. |
| Enamel | More durable than lacquer and resistant to chemicals. | Better durability and chemical resistance. | Slower drying time. |
| Acrylic | A versatile option that can be used as a base coat or a topcoat. | Good color retention and durability. | Requires multiple coats for best results. |
| Urethane | Highly durable and resistant to scratches and UV rays. | Excellent durability and UV resistance. | More difficult to apply and requires specialized equipment. |
CARDIAGTECH.NET offers a variety of paint types and tools to suit your repair needs. Contact us at +1 (641) 206-8880 for expert advice on choosing the right products.
2. Essential Tools and Materials for Car Paint Repair
Having the right tools and materials is crucial for achieving professional results when fixing car paint damage. What tools do I need? Here’s a comprehensive list:
2.1. Cleaning and Preparation
- Car Wash Soap: To clean the area before and after repairs.
- Microfiber Cloths: Soft cloths for washing, drying, and buffing.
- Detailing Clay: To remove contaminants from the paint surface. According to a study by the International Detailing Association (IDA), using detailing clay can improve the adhesion of touch-up paint by up to 30%.
- Masking Tape: To protect surrounding areas from accidental damage.
- Grease and Wax Remover: To remove any grease or wax that could interfere with paint adhesion.
2.2. Sanding and Smoothing
- Sandpaper (Various Grits): For smoothing out scratches and imperfections. Common grits include 400, 600, 800, 1000, 1500, and 2000.
- Sanding Block: To ensure even sanding.
- Wet/Dry Sandpaper: For wet sanding, which helps to reduce scratches and create a smoother surface.
2.3. Paint Application
- Touch-Up Paint: Matching your car’s color code for small repairs.
- Primer: To provide a base for the touch-up paint.
- Clear Coat: To protect the touch-up paint and provide a glossy finish.
- Paint Brushes: Small brushes for applying touch-up paint.
- Spray Gun: For larger repairs requiring a respray.
2.4. Polishing and Buffing
- Rubbing Compound: To remove scratches and imperfections.
- Polishing Compound: To restore the paint’s shine.
- Car Wax: To protect the paint and provide a glossy finish.
- Buffing Pad: To use with a polishing machine for efficient buffing.
- Polishing Machine: For professional-grade polishing and buffing.
CARDIAGTECH.NET offers a wide range of high-quality tools and materials for car paint repair. Visit our website CARDIAGTECH.NET or contact us at +1 (641) 206-8880 for more information.
3. Step-by-Step Guide to Fixing Minor Scratches
Minor scratches, such as those that only affect the clear coat, can often be repaired at home with the right tools and techniques. How do I fix minor scratches? Follow these steps:
3.1. Cleaning the Area
Start by thoroughly cleaning the area around the scratch.
- Wash the Car: Use car wash soap and water to remove any dirt, debris, or contaminants.
- Dry the Area: Use a clean microfiber cloth to dry the area thoroughly.
- Inspect the Scratch: Examine the scratch to determine its depth. If it disappears when wet, it is likely a minor scratch in the clear coat.
3.2. Applying Rubbing Compound
Rubbing compound is designed to remove minor imperfections from the clear coat.
- Apply Rubbing Compound: Apply a small amount of rubbing compound to a clean microfiber cloth.
- Buff the Scratch: Gently buff the scratch in a circular motion, applying moderate pressure.
- Continue Buffing: Continue buffing until the scratch begins to fade. This may take several minutes.
3.3. Polishing the Area
After using rubbing compound, it’s important to polish the area to restore the paint’s shine.
- Apply Polishing Compound: Apply a small amount of polishing compound to a clean microfiber cloth.
- Polish the Area: Gently polish the area in a circular motion, using light pressure.
- Continue Polishing: Continue polishing until the paint’s shine is restored.
3.4. Applying Wax
Waxing the area will protect the paint and provide a glossy finish.
- Apply Wax: Apply a thin layer of car wax to a clean microfiber cloth.
- Wax the Area: Gently wax the area in a circular motion, using light pressure.
- Buff the Wax: Allow the wax to dry for a few minutes, then buff the area with a clean microfiber cloth to remove any excess wax.
CARDIAGTECH.NET offers a variety of high-quality rubbing compounds, polishing compounds, and car waxes. Visit our website CARDIAGTECH.NET or contact us at +1 (641) 206-8880 for more information.
4. Repairing Deeper Scratches: A Comprehensive Approach
Deeper scratches that penetrate the clear coat and base coat require a more involved repair process. What is the repair process? Here’s how to tackle them:
4.1. Cleaning and Preparing the Area
- Wash the Car: Use car wash soap and water to clean the area around the scratch.
- Dry the Area: Use a clean microfiber cloth to dry the area thoroughly.
- Mask the Area: Use masking tape to protect the surrounding paint from accidental damage.
4.2. Sanding the Scratch
Sanding is necessary to smooth out the edges of the scratch and create a surface for the touch-up paint to adhere to.
- Choose Sandpaper: Start with 400-grit sandpaper to smooth out the rough edges of the scratch.
- Wet Sand: Wet the sandpaper and the area around the scratch with water.
- Sand the Scratch: Gently sand the scratch in a back-and-forth motion, using light pressure.
- Progress to Finer Grit: Switch to 600-grit sandpaper and repeat the sanding process. Continue progressing to finer grits (800, 1000, 1500, and 2000) until the scratch is smooth and the edges are feathered.
4.3. Applying Primer
Primer helps the touch-up paint adhere to the surface and provides a uniform base.
- Apply Primer: Apply a thin layer of automotive primer to the sanded area, using a small brush or a spray can.
- Allow to Dry: Allow the primer to dry completely, according to the manufacturer’s instructions.
4.4. Applying Touch-Up Paint
Touch-up paint should match your car’s color code for a seamless repair.
- Apply Touch-Up Paint: Apply a small amount of touch-up paint to the primed area, using a small brush or a touch-up pen.
- Apply Multiple Coats: Apply several thin coats of paint, allowing each coat to dry before applying the next. This helps to build up the paint to the level of the surrounding paint.
4.5. Blending the Paint
Blending the touch-up paint with the surrounding paint helps to create a seamless repair.
- Wet Sand: Use 2000-grit sandpaper to gently wet sand the edges of the touch-up paint, blending it with the surrounding paint.
- Apply Rubbing Compound: Apply a small amount of rubbing compound to a clean microfiber cloth and buff the area to remove any sanding marks.
- Apply Polishing Compound: Apply a small amount of polishing compound to a clean microfiber cloth and polish the area to restore the paint’s shine.
4.6. Applying Clear Coat
Clear coat protects the touch-up paint and provides a glossy finish.
- Apply Clear Coat: Apply a thin layer of clear coat to the repaired area, using a small brush or a spray can.
- Allow to Dry: Allow the clear coat to dry completely, according to the manufacturer’s instructions.
- Wet Sand: Use 2000-grit sandpaper to gently wet sand the clear coat, smoothing out any imperfections.
- Apply Rubbing Compound: Apply a small amount of rubbing compound to a clean microfiber cloth and buff the area to remove any sanding marks.
- Apply Polishing Compound: Apply a small amount of polishing compound to a clean microfiber cloth and polish the area to restore the paint’s shine.
- Apply Wax: Apply a thin layer of car wax to the repaired area, using a clean microfiber cloth, to protect the paint and provide a glossy finish.
CARDIAGTECH.NET offers a wide range of high-quality touch-up paints, primers, clear coats, and sanding materials. Visit our website CARDIAGTECH.NET or contact us at +1 (641) 206-8880 for more information.
5. Addressing Scrapes and Paint Transfer
Scrapes and paint transfer often occur on bumpers and other areas of the car. How do I handle scrapes and paint transfer? Here’s how to address them effectively:
5.1. Cleaning the Area
- Wash the Car: Use car wash soap and water to clean the area around the scrape.
- Dry the Area: Use a clean microfiber cloth to dry the area thoroughly.
5.2. Removing Paint Transfer
Paint transfer occurs when your car’s paint rubs against another object, leaving residue on your car’s surface.
- Apply Rubbing Compound: Apply a small amount of rubbing compound to a clean microfiber cloth.
- Buff the Area: Gently buff the affected area in a circular motion, using moderate pressure.
- Check for Transfer: Check the cloth to see if the paint transfer is being removed.
- Continue Buffing: Continue buffing until the paint transfer is completely removed.
5.3. Repairing Scrapes
If the scrape has damaged the paint, you’ll need to repair it using touch-up paint.
- Sand the Scrape: Use 400-grit sandpaper to smooth out any rough edges.
- Apply Primer: Apply a thin layer of automotive primer to the sanded area, using a small brush or a spray can.
- Allow to Dry: Allow the primer to dry completely, according to the manufacturer’s instructions.
- Apply Touch-Up Paint: Apply a small amount of touch-up paint to the primed area, using a small brush or a touch-up pen.
- Apply Multiple Coats: Apply several thin coats of paint, allowing each coat to dry before applying the next.
- Blend the Paint: Use 2000-grit sandpaper to gently wet sand the edges of the touch-up paint, blending it with the surrounding paint.
- Apply Rubbing Compound: Apply a small amount of rubbing compound to a clean microfiber cloth and buff the area to remove any sanding marks.
- Apply Polishing Compound: Apply a small amount of polishing compound to a clean microfiber cloth and polish the area to restore the paint’s shine.
- Apply Wax: Apply a thin layer of car wax to the repaired area, using a clean microfiber cloth, to protect the paint and provide a glossy finish.
CARDIAGTECH.NET offers a wide range of high-quality rubbing compounds, touch-up paints, and primers. Visit our website CARDIAGTECH.NET or contact us at +1 (641) 206-8880 for more information.
6. Fixing Paint Chips: A Detailed Guide
Paint chips can be caused by rocks, road debris, or other impacts. How do I fix paint chips? Here’s a detailed guide to repairing them:
6.1. Cleaning the Area
- Wash the Car: Use car wash soap and water to clean the area around the paint chip.
- Dry the Area: Use a clean microfiber cloth to dry the area thoroughly.
6.2. Removing Loose Paint
Remove any loose or flaking paint from the chip.
- Use a Pick: Use a small pick or the edge of a razor blade to gently remove any loose paint from the chip.
- Be Careful: Be careful not to damage the surrounding paint.
6.3. Applying Touch-Up Paint
Apply touch-up paint to the chip, using a small brush or a touch-up pen.
- Apply Touch-Up Paint: Apply a small amount of touch-up paint to the chip, filling it completely.
- Allow to Dry: Allow the paint to dry completely, according to the manufacturer’s instructions.
- Apply Multiple Coats: Apply several thin coats of paint, allowing each coat to dry before applying the next. This helps to build up the paint to the level of the surrounding paint.
6.4. Blending the Paint
Blend the touch-up paint with the surrounding paint to create a seamless repair.
- Wet Sand: Use 2000-grit sandpaper to gently wet sand the edges of the touch-up paint, blending it with the surrounding paint.
- Apply Rubbing Compound: Apply a small amount of rubbing compound to a clean microfiber cloth and buff the area to remove any sanding marks.
- Apply Polishing Compound: Apply a small amount of polishing compound to a clean microfiber cloth and polish the area to restore the paint’s shine.
6.5. Applying Clear Coat
Apply clear coat to protect the touch-up paint and provide a glossy finish.
- Apply Clear Coat: Apply a thin layer of clear coat to the repaired area, using a small brush or a spray can.
- Allow to Dry: Allow the clear coat to dry completely, according to the manufacturer’s instructions.
- Wet Sand: Use 2000-grit sandpaper to gently wet sand the clear coat, smoothing out any imperfections.
- Apply Rubbing Compound: Apply a small amount of rubbing compound to a clean microfiber cloth and buff the area to remove any sanding marks.
- Apply Polishing Compound: Apply a small amount of polishing compound to a clean microfiber cloth and polish the area to restore the paint’s shine.
- Apply Wax: Apply a thin layer of car wax to the repaired area, using a clean microfiber cloth, to protect the paint and provide a glossy finish.
CARDIAGTECH.NET offers a wide range of high-quality touch-up paints, clear coats, and sanding materials. Visit our website CARDIAGTECH.NET or contact us at +1 (641) 206-8880 for more information.
7. Paintless Dent Repair (PDR): An Overview
Paintless Dent Repair (PDR) is a technique used to remove dents from a vehicle’s body without affecting the paint finish. What is Paintless Dent Repair? Here’s what you need to know:
7.1. How PDR Works
PDR involves using specialized tools to gently massage and manipulate the metal back to its original shape. The tools are inserted through access points in the vehicle’s body, such as door frames or window openings.
7.2. When to Use PDR
PDR is most effective for small to medium-sized dents that have not stretched the metal or damaged the paint. It is a cost-effective and time-saving alternative to traditional body repair methods.
7.3. Finding a PDR Technician
- Ask for Referrals: Ask your local car dealership or body shop for a referral to a reputable PDR technician.
- Check Reviews: Read online reviews to find a technician with a proven track record of quality work.
- Get a Quote: Get a quote from several technicians before choosing one.
7.4. The PDR Process
- Assessment: The technician will assess the dent and determine if PDR is the appropriate repair method.
- Access: The technician will gain access to the back of the dent, either through existing openings or by removing panels.
- Manipulation: The technician will use specialized tools to gently massage the metal back to its original shape.
- Finishing: The technician will use a variety of techniques to smooth out any imperfections and restore the panel to its original condition.
CARDIAGTECH.NET can provide you with referrals to trusted PDR technicians in your area. Contact us at +1 (641) 206-8880 for more information.
8. Maintaining Your Car’s Paint: Prevention Tips
Preventing car paint damage is just as important as knowing how to fix it. How do I prevent car paint damage? Here are some tips to help you maintain your car’s paint:
8.1. Regular Washing
Wash your car regularly to remove dirt, debris, and contaminants that can damage the paint.
- Use Car Wash Soap: Use a high-quality car wash soap that is designed to protect the paint.
- Wash in the Shade: Wash your car in the shade to prevent the soap from drying on the paint.
- Use a Microfiber Mitt: Use a microfiber wash mitt to gently clean the paint.
- Rinse Thoroughly: Rinse the car thoroughly with water to remove all traces of soap.
- Dry with a Microfiber Cloth: Dry the car with a clean microfiber cloth to prevent water spots.
8.2. Waxing
Waxing your car protects the paint from UV rays, scratches, and environmental damage.
- Apply Wax: Apply a thin layer of car wax to a clean microfiber cloth.
- Wax the Car: Gently wax the car in a circular motion, using light pressure.
- Buff the Wax: Allow the wax to dry for a few minutes, then buff the car with a clean microfiber cloth to remove any excess wax.
8.3. Parking Strategically
Park your car in shaded areas or garages to protect it from the sun’s UV rays.
- Avoid Direct Sunlight: Avoid parking your car in direct sunlight for extended periods of time.
- Use a Car Cover: Use a car cover to protect the paint from the sun, rain, and other environmental elements.
8.4. Addressing Damage Promptly
Address any paint damage promptly to prevent it from spreading or worsening.
- Inspect Regularly: Inspect your car’s paint regularly for any scratches, chips, or other damage.
- Repair Immediately: Repair any damage immediately to prevent it from leading to rust or other problems.
CARDIAGTECH.NET offers a wide range of high-quality car wash soaps, waxes, and car covers to help you maintain your car’s paint. Visit our website CARDIAGTECH.NET or contact us at +1 (641) 206-8880 for more information.
9. Professional vs. DIY Car Paint Repair
Deciding whether to tackle car paint repair yourself or hire a professional depends on several factors. What are the pros and cons of each approach?
9.1. Professional Car Paint Repair
-
Pros:
- High-Quality Results: Professionals have the expertise and equipment to achieve high-quality results.
- Time-Saving: Hiring a professional saves you time and effort.
- Warranty: Many professional repair shops offer a warranty on their work.
-
Cons:
- Cost: Professional car paint repair can be expensive.
- Inconvenience: You may need to leave your car at the repair shop for several days.
9.2. DIY Car Paint Repair
-
Pros:
- Cost-Effective: DIY car paint repair is much less expensive than hiring a professional.
- Convenience: You can repair the damage at your own pace and on your own schedule.
-
Cons:
- Time-Consuming: DIY car paint repair can be time-consuming and require a lot of effort.
- Quality: The quality of the repair may not be as good as a professional repair.
- Learning Curve: There is a learning curve involved in DIY car paint repair.
9.3. Factors to Consider
- Severity of Damage: Minor scratches and chips can often be repaired DIY, while more extensive damage may require professional attention.
- Skill Level: If you have experience with car paint repair, you may be able to tackle more complex repairs.
- Budget: If you have a limited budget, DIY car paint repair may be the best option.
- Time Availability: If you have limited time, hiring a professional may be the best option.
CARDIAGTECH.NET can help you decide whether to tackle car paint repair yourself or hire a professional. Contact us at +1 (641) 206-8880 for expert advice.
10. FAQ: Car Paint Damage Repair
Here are some frequently asked questions about car paint damage repair:
1. How do I find my car’s paint code?
Your car’s paint code is typically located on a sticker inside the driver’s side doorjamb, in the glove compartment, or under the hood. The sticker will usually have the word “Color” or “Paint” followed by a code consisting of letters and numbers.
2. What is the best touch-up paint for car paint chips?
Dr. Colorchip is widely regarded as one of the best touch-up paints for car paint chips. It is designed to be easy to use and provide a seamless repair.
3. Can I use a household cleaner to wash my car?
No, you should never use a household cleaner to wash your car. Household cleaners can damage the paint and remove the wax.
4. How often should I wax my car?
You should wax your car every three to six months to protect the paint and provide a glossy finish.
5. Can I repair rust spots on my car myself?
Yes, you can repair small rust spots on your car yourself. However, if the rust is extensive, it is best to hire a professional.
6. What is the best way to remove tree sap from my car’s paint?
You can remove tree sap from your car’s paint by using a specialized tree sap remover or by gently rubbing the area with rubbing alcohol.
7. Can I use a clay bar on my car’s paint?
Yes, you can use a clay bar on your car’s paint to remove contaminants and create a smooth surface.
8. What is the best way to protect my car’s paint from bird droppings?
You should remove bird droppings from your car’s paint as soon as possible. You can use a specialized bird dropping remover or by gently washing the area with soap and water.
9. How do I prevent swirl marks on my car’s paint?
You can prevent swirl marks on your car’s paint by using a high-quality wash mitt, drying towel, and waxing products.
10. What should I do if I spill gasoline on my car’s paint?
If you spill gasoline on your car’s paint, you should immediately wash the area with soap and water. Gasoline can damage the paint if left on for an extended period of time.
CARDIAGTECH.NET is your trusted partner for all your car paint damage repair needs. Contact us today at +1 (641) 206-8880 or visit our website CARDIAGTECH.NET for expert advice and high-quality products. Our address is 276 Reock St, City of Orange, NJ 07050, United States. We are here to help you restore your car’s paint to its original glory and maintain its value