How To Fix Car Paint Sun Damage Effectively
Are you grappling with faded, cracked, or peeling car paint due to sun exposure? CARDIAGTECH.NET understands the frustration and offers solutions! Repairing sun-damaged car paint involves sanding, priming, painting, and clear coating. Restore your vehicle’s aesthetic appeal and protect it from further damage with top-notch auto repair tools. Invest in quality auto paint restoration for a lasting finish.
Table of Contents
- Understanding Car Paint Sun Damage
- 1.1. Types of Sun Damage
- 1.2. Factors Contributing to Sun Damage
- Assessing the Damage
- 2.1. Visual Inspection
- 2.2. Tools for Damage Assessment
- Essential Tools and Materials
- 3.1. Sandpaper
- 3.2. Primer
- 3.3. Automotive Paint
- 3.4. Clear Coat
- 3.5. Other Necessary Supplies
- Step-by-Step Guide to Repairing Sun-Damaged Car Paint
- 4.1. Preparing the Area
- 4.2. Sanding the Damaged Area
- 4.3. Applying the Primer
- 4.4. Painting the Damaged Area
- 4.5. Applying Clear Coat
- 4.6. Polishing and Buffing
- Advanced Techniques for Severe Damage
- 5.1. Using Body Filler
- 5.2. Blending Techniques
- Preventive Measures to Protect Car Paint
- 6.1. Regular Washing and Waxing
- 6.2. Using Car Covers
- 6.3. Parking in Shaded Areas
- 6.4. Applying Paint Protection Film (PPF)
- Professional vs. DIY Repair
- 7.1. Cost Comparison
- 7.2. Quality and Longevity
- Common Mistakes to Avoid
- 8.1. Improper Sanding
- 8.2. Incorrect Paint Matching
- 8.3. Skipping the Clear Coat
- Latest Products and Innovations in Car Paint Repair
- 9.1. Self-Healing Paints
- 9.2. Ceramic Coatings
- Maintaining Your Car’s Paint After Repair
- 10.1. Regular Maintenance Tips
- 10.2. Addressing Minor Scratches and Swirl Marks
- Tools Available at CARDIAGTECH.NET
- 11.1. Sanding Tools
- 11.2. Spray Guns
- 11.3. Polishing and Buffing Machines
- Customer Success Stories
- 12.1. Before and After Photos
- 12.2. Testimonials
- Expert Tips for a Flawless Finish
- 13.1. Achieving a Smooth Surface
- 13.2. Ensuring Color Accuracy
- FAQ: Addressing Common Questions About Car Paint Sun Damage
1. Understanding Car Paint Sun Damage
Sun damage to car paint is a prevalent issue that affects vehicles of all makes and models. Prolonged exposure to ultraviolet (UV) rays can cause a range of problems, from fading and discoloration to cracking and peeling. Understanding the types of sun damage and the factors that contribute to it is essential for effective repair and prevention.
1.1. Types of Sun Damage
The sun’s relentless UV rays can wreak havoc on your car’s paint job. Here are the primary types of sun damage you might encounter:
- Fading: This is one of the most common signs of sun damage. The paint loses its original vibrancy and appears dull or washed out. Darker colors, such as red and black, are particularly susceptible to fading.
- Discoloration: UV rays can cause chemical reactions in the paint, leading to discoloration. This may manifest as yellowing, spotting, or an uneven color tone across different panels of the car.
- Oxidation: Oxidation occurs when the paint’s clear coat breaks down due to UV exposure and other environmental factors. This results in a chalky or hazy appearance on the surface of the car.
- Cracking: Prolonged sun exposure can cause the paint to become brittle and develop cracks. These cracks may start as fine lines but can eventually widen and deepen, compromising the integrity of the paint.
- Peeling: In severe cases of sun damage, the paint can start to peel away from the car’s surface. This is often preceded by cracking and indicates significant degradation of the paint layers.
1.2. Factors Contributing to Sun Damage
Several factors can exacerbate sun damage to car paint. Knowing these factors can help you take proactive measures to protect your vehicle:
- Geographic Location: Areas with high UV indices, such as desert regions and high-altitude locations, experience more intense sunlight. Cars in these regions are at a higher risk of sun damage.
- Paint Color: As mentioned earlier, darker colors tend to absorb more heat and UV radiation, making them more prone to fading and damage.
- Frequency of Exposure: Cars that are frequently parked outdoors without protection are more likely to suffer from sun damage compared to those stored in garages or covered parking spaces.
- Quality of Paint: The quality of the original paint job plays a crucial role in its resistance to sun damage. High-quality paints with UV inhibitors offer better protection.
- Maintenance Practices: Regular washing and waxing can help protect the paint by removing contaminants and adding a protective layer. Neglecting maintenance can accelerate sun damage.
2. Assessing the Damage
Before diving into the repair process, it’s essential to accurately assess the extent of the sun damage. A thorough evaluation will help you determine the best course of action and the necessary materials.
2.1. Visual Inspection
Start with a detailed visual inspection of your car’s paint. Look for the following:
- Faded Areas: Check for areas where the paint looks dull or lighter than the surrounding areas. Pay close attention to horizontal surfaces like the hood, roof, and trunk, as these are typically the most exposed to the sun.
- Cracks and Peeling: Inspect the paint for any signs of cracking or peeling. These are indicators of severe damage that will require more extensive repair work.
- Oxidation: Look for a chalky or hazy film on the paint surface. This is a sign of oxidation, which can often be removed with polishing.
- Overall Condition: Evaluate the general condition of the paint. Note any other issues, such as scratches, swirl marks, or rust spots, as these may need to be addressed during the repair process.
2.2. Tools for Damage Assessment
While a visual inspection is a good starting point, certain tools can help you assess the damage more accurately:
- Paint Thickness Gauge: This tool measures the thickness of the paint layers, allowing you to determine if the paint has been worn thin by sun damage or previous repairs.
- Magnifying Glass: A magnifying glass can help you identify fine cracks and other subtle signs of damage that may not be visible to the naked eye.
- Swirl Finder Light: This specialized light highlights swirl marks and other imperfections in the paint, making it easier to assess the overall condition.
- Color Matching Tool: A color matching tool can help you determine the exact shade of your car’s paint, ensuring a seamless repair.
3. Essential Tools and Materials
To effectively repair sun-damaged car paint, you’ll need a range of tools and materials. Investing in high-quality products will ensure a professional-looking finish and long-lasting results.
3.1. Sandpaper
Sandpaper is crucial for removing the damaged paint layer and preparing the surface for priming and painting. Here’s what you’ll need:
- Grit Selection: Start with a coarser grit (e.g., 400-grit) to remove the damaged paint, then move to finer grits (e.g., 800-grit, 1200-grit, 2000-grit) to smooth the surface.
- Types of Sandpaper: Choose sandpaper specifically designed for automotive use. Wet/dry sandpaper is ideal, as it can be used with water to reduce friction and prevent clogging.
- Sanding Block: Using a sanding block or pad ensures even pressure and prevents uneven sanding.
3.2. Primer
Primer is an essential component of the repair process, as it helps the paint adhere to the surface and improves the overall durability of the paint job.
- Types of Primer: Opt for an automotive-specific primer that is compatible with your car’s paint type. Epoxy primers offer excellent corrosion resistance, while urethane primers provide a smooth base for the paint.
- Application Method: You can apply primer with a paintbrush, spray can, or spray gun. A spray gun provides the most even coverage and professional finish.
- Number of Coats: Apply multiple thin coats of primer, allowing each coat to dry completely before applying the next. This ensures proper adhesion and a smooth surface.
3.3. Automotive Paint
Selecting the right automotive paint is crucial for a seamless repair.
- Color Matching: Use a color matching tool or consult with an automotive paint supplier to find the exact shade of your car’s paint.
- Types of Paint: Automotive paints come in various formulations, including lacquer, enamel, and urethane. Urethane paints are the most durable and offer excellent UV resistance.
- Application Technique: Apply the paint in thin, even layers, using smooth, overlapping strokes. Allow each coat to dry before applying the next.
3.4. Clear Coat
Clear coat protects the newly painted area and gives it a glossy finish.
- Types of Clear Coat: Choose a clear coat that is compatible with your automotive paint. Two-part urethane clear coats are highly durable and offer excellent UV protection.
- Application Method: Apply the clear coat with a spray gun for the best results. Use smooth, even strokes and apply multiple thin coats.
- Drying Time: Follow the manufacturer’s instructions for drying time. Allow the clear coat to dry completely before polishing and buffing.
3.5. Other Necessary Supplies
In addition to the above materials, you’ll need the following:
- Masking Tape and Paper: To protect surrounding areas from overspray.
- Tack Cloth: To remove dust and contaminants from the surface before painting.
- Wax and Grease Remover: To clean the surface and ensure proper adhesion.
- Polishing Compound: To remove swirl marks and imperfections from the clear coat.
- Buffing Pad: To buff the clear coat and achieve a glossy finish.
- Microfiber Cloths: For cleaning and polishing.
- Safety Gear: Including gloves, safety glasses, and a respirator mask.
4. Step-by-Step Guide to Repairing Sun-Damaged Car Paint
With the right tools and materials, you can effectively repair sun-damaged car paint and restore your vehicle’s appearance. Here’s a detailed step-by-step guide:
4.1. Preparing the Area
Proper preparation is essential for a successful repair.
- Wash the Car: Start by thoroughly washing your car to remove dirt, grime, and any other contaminants. Use a car wash soap and a soft sponge or microfiber cloth.
- Dry the Car: Dry the car completely with a clean microfiber cloth.
- Mask the Area: Use masking tape and paper to protect the surrounding areas from overspray. Be precise and cover any areas you don’t want to paint.
- Clean the Surface: Use a wax and grease remover to clean the area you’ll be repairing. This ensures proper adhesion of the primer and paint.
- Tack Cloth: Wipe the area with a tack cloth to remove any remaining dust or particles.
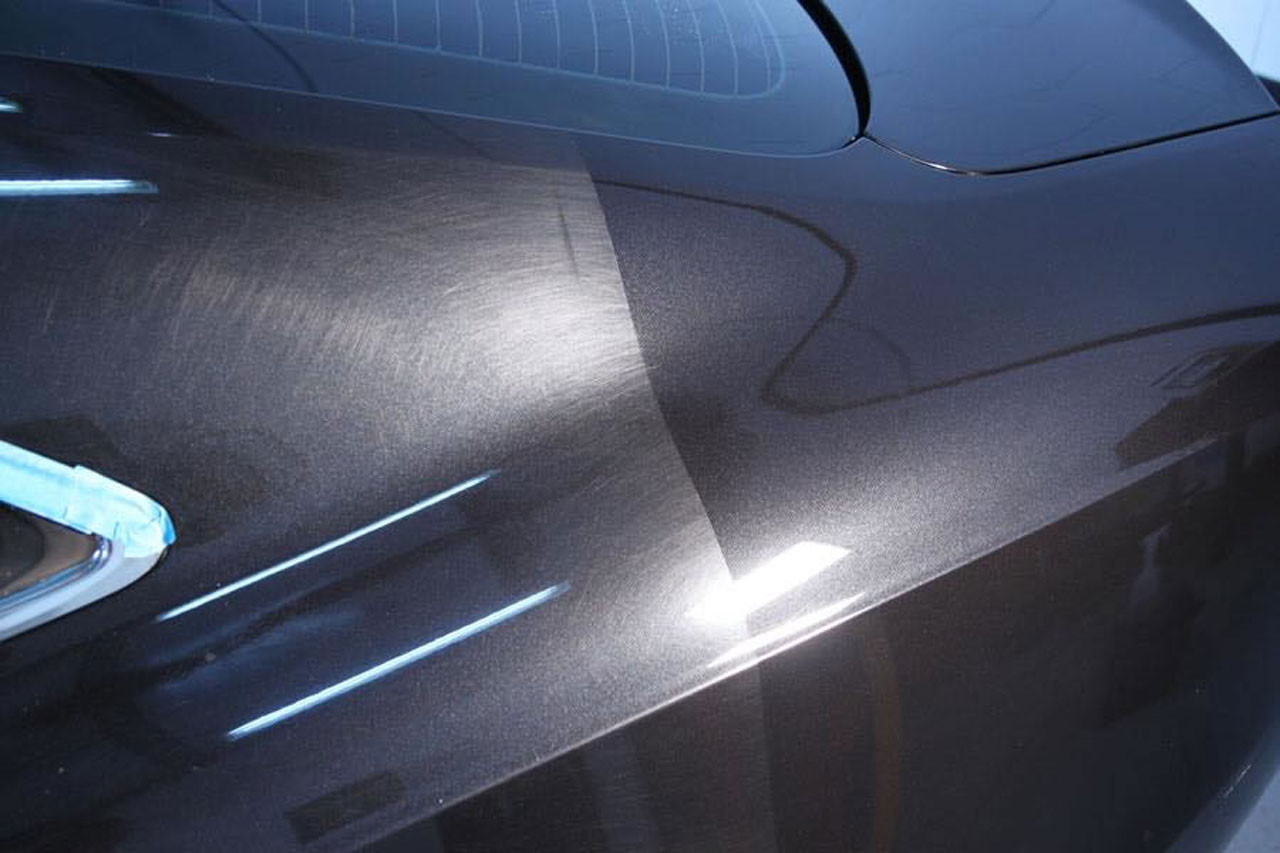
4.2. Sanding the Damaged Area
Sanding removes the damaged paint and prepares the surface for the next steps.
Alt text: Sanding sun-damaged car paint with fine-grit sandpaper, preparing the surface for repair
- Initial Sanding: Start with a coarser grit sandpaper (e.g., 400-grit) to remove the damaged paint layer. Gently rub the surface in circular motions.
- Feathering: Feather the edges of the sanded area to blend it smoothly with the surrounding paint.
- Progressive Sanding: Move to finer grits (e.g., 800-grit, 1200-grit, 2000-grit) to smooth the surface. Use wet/dry sandpaper with water for best results.
- Final Cleaning: Clean the sanded area with a wax and grease remover and wipe with a tack cloth.
4.3. Applying the Primer
Primer creates a smooth base for the paint and ensures proper adhesion.
Alt text: Applying automotive primer with a spray gun to a sanded car surface, ensuring even coverage
- First Coat: Apply a thin, even coat of primer to the sanded area. Hold the spray gun or can about 8-10 inches from the surface and use smooth, overlapping strokes.
- Drying Time: Allow the primer to dry completely according to the manufacturer’s instructions.
- Second Coat (Optional): If necessary, apply a second thin coat of primer for better coverage.
- Sanding the Primer: Once the primer is dry, lightly sand it with a fine-grit sandpaper (e.g., 2000-grit) to smooth out any imperfections.
- Final Cleaning: Clean the primed area with a tack cloth.
4.4. Painting the Damaged Area
Painting restores the color and appearance of your car’s paint.
Alt text: Spray painting a car panel with automotive paint using a professional spray gun
- First Coat: Apply a thin, even coat of automotive paint to the primed area. Use smooth, overlapping strokes and maintain a consistent distance from the surface.
- Drying Time: Allow the paint to dry completely according to the manufacturer’s instructions.
- Subsequent Coats: Apply additional thin coats of paint until you achieve full coverage and a seamless color match.
- Blending: Blend the edges of the painted area with the surrounding paint to create a smooth transition.
- Final Cleaning: Allow the final coat of paint to dry completely before moving on to the clear coat.
4.5. Applying Clear Coat
Clear coat protects the paint and provides a glossy finish.
Alt text: Applying glossy clear coat to a freshly painted car surface for protection and shine
- First Coat: Apply a thin, even coat of clear coat to the painted area. Use smooth, overlapping strokes and maintain a consistent distance from the surface.
- Drying Time: Allow the clear coat to dry completely according to the manufacturer’s instructions.
- Subsequent Coats: Apply additional thin coats of clear coat for added protection and gloss.
- Final Drying: Allow the final coat of clear coat to dry completely before polishing and buffing.
4.6. Polishing and Buffing
Polishing and buffing remove imperfections and enhance the shine of the clear coat.
- Wet Sanding (Optional): If there are any imperfections in the clear coat, lightly wet sand it with a fine-grit sandpaper (e.g., 3000-grit).
- Polishing: Apply a polishing compound to a polishing pad and use a polishing machine to remove swirl marks and imperfections.
- Buffing: Apply a buffing compound to a buffing pad and use a buffing machine to enhance the shine of the clear coat.
- Final Cleaning: Clean the polished and buffed area with a microfiber cloth.
- Waxing: Apply a coat of wax to protect the paint and enhance the shine.
5. Advanced Techniques for Severe Damage
For more severe sun damage, such as deep cracks or peeling paint, you may need to use advanced techniques to restore the surface.
5.1. Using Body Filler
Body filler can be used to fill in deep cracks and imperfections before sanding and painting.
- Cleaning: Clean the damaged area thoroughly with a wax and grease remover.
- Mixing: Mix the body filler according to the manufacturer’s instructions.
- Application: Apply the body filler to the damaged area, filling in any cracks or imperfections.
- Drying: Allow the body filler to dry completely.
- Sanding: Sand the body filler with progressively finer grits of sandpaper until it is smooth and flush with the surrounding surface.
- Priming and Painting: Follow the steps for priming, painting, and clear coating as described above.
5.2. Blending Techniques
Blending techniques help create a seamless transition between the repaired area and the surrounding paint.
- Feathering: Feather the edges of the painted area by gradually reducing the amount of paint applied towards the edges.
- Blending Clear Coat: Apply clear coat to a larger area than the painted area to blend the edges smoothly.
- Polishing and Buffing: Use a polishing compound and buffing machine to blend the clear coat and create a uniform shine.
6. Preventive Measures to Protect Car Paint
Preventing sun damage is always better than repairing it. Here are some preventive measures you can take to protect your car’s paint:
6.1. Regular Washing and Waxing
Regular washing and waxing can help protect the paint by removing contaminants and adding a protective layer.
- Washing: Wash your car at least every two weeks to remove dirt, grime, and other contaminants.
- Waxing: Apply a coat of wax every three to six months to protect the paint from UV rays and environmental factors.
6.2. Using Car Covers
Car covers provide a physical barrier against the sun’s rays and can help prevent fading and damage.
- Material: Choose a car cover made from a breathable, UV-resistant material.
- Fit: Ensure the car cover fits snugly to prevent it from blowing off in the wind.
6.3. Parking in Shaded Areas
Parking in shaded areas can significantly reduce your car’s exposure to the sun.
- Garages: Park your car in a garage whenever possible.
- Shaded Parking Spots: Look for parking spots under trees or awnings.
6.4. Applying Paint Protection Film (PPF)
Paint Protection Film (PPF) is a transparent film that can be applied to your car’s paint to protect it from scratches, chips, and UV damage.
- Installation: Have PPF professionally installed for the best results.
- Maintenance: Regularly clean and maintain the PPF to ensure its longevity.
7. Professional vs. DIY Repair
Deciding whether to repair sun-damaged car paint yourself or hire a professional depends on the severity of the damage and your skill level.
7.1. Cost Comparison
DIY repairs are generally less expensive than professional repairs. However, the cost of materials can add up, and you may need to invest in specialized tools.
- DIY Costs: The cost of sandpaper, primer, paint, clear coat, and other supplies can range from $100 to $300.
- Professional Costs: Professional paint repair can cost anywhere from $500 to $2000, depending on the extent of the damage and the quality of the materials used.
7.2. Quality and Longevity
Professional repairs typically offer higher quality and longer-lasting results due to the expertise and equipment used.
- DIY Quality: The quality of DIY repairs depends on your skill level and attention to detail.
- Professional Quality: Professionals have the experience and equipment to ensure a seamless repair and a durable finish.
8. Common Mistakes to Avoid
Avoiding common mistakes can help you achieve a professional-looking finish and prevent further damage to your car’s paint.
8.1. Improper Sanding
Improper sanding can damage the paint and create an uneven surface.
- Using the Wrong Grit: Always start with a coarser grit and gradually move to finer grits.
- Applying Too Much Pressure: Use light, even pressure when sanding to avoid gouging the paint.
- Skipping Sanding Steps: Don’t skip sanding steps, as each grit plays a crucial role in smoothing the surface.
8.2. Incorrect Paint Matching
Incorrect paint matching can result in a noticeable color difference between the repaired area and the surrounding paint.
- Using the Wrong Color Code: Always use the correct color code for your car’s paint.
- Failing to Blend: Blend the edges of the painted area to create a smooth transition.
8.3. Skipping the Clear Coat
Skipping the clear coat can leave the paint unprotected and vulnerable to damage.
- Applying the Clear Coat: Always apply a clear coat to protect the paint and provide a glossy finish.
- Using the Right Clear Coat: Choose a clear coat that is compatible with your automotive paint.
9. Latest Products and Innovations in Car Paint Repair
The automotive paint industry is constantly evolving, with new products and innovations designed to improve the repair process and enhance the durability of paint finishes.
9.1. Self-Healing Paints
Self-healing paints contain polymers that can repair minor scratches and swirl marks.
- How They Work: When the paint is scratched, the polymers react to heat or UV light and fill in the scratch, restoring the surface.
- Benefits: Self-healing paints offer increased durability and a longer-lasting finish.
9.2. Ceramic Coatings
Ceramic coatings are a durable, hydrophobic layer that protects the paint from scratches, UV damage, and chemical contaminants.
- Application: Ceramic coatings are typically applied by professionals and can last for several years.
- Benefits: Ceramic coatings provide excellent protection and make it easier to clean your car.
10. Maintaining Your Car’s Paint After Repair
Maintaining your car’s paint after repair is essential for preserving its appearance and preventing further damage.
10.1. Regular Maintenance Tips
Follow these regular maintenance tips to keep your car’s paint looking its best:
- Wash Regularly: Wash your car at least every two weeks to remove dirt, grime, and contaminants.
- Wax Periodically: Apply a coat of wax every three to six months to protect the paint from UV rays and environmental factors.
- Use a Car Cover: Use a car cover when parking outdoors to protect the paint from the sun and other elements.
- Park in Shaded Areas: Park your car in shaded areas whenever possible to reduce its exposure to the sun.
10.2. Addressing Minor Scratches and Swirl Marks
Minor scratches and swirl marks can be removed with polishing compounds and buffing machines.
- Polishing: Apply a polishing compound to a polishing pad and use a polishing machine to remove swirl marks and imperfections.
- Buffing: Apply a buffing compound to a buffing pad and use a buffing machine to enhance the shine of the clear coat.
11. Tools Available at CARDIAGTECH.NET
CARDIAGTECH.NET offers a wide range of high-quality tools for repairing sun-damaged car paint. Here are some of the products you can find on our website:
11.1. Sanding Tools
- Sanding Blocks: Ensure even pressure and prevent uneven sanding.
- Wet/Dry Sandpaper: Designed for automotive use, ideal for sanding with water.
- Random Orbital Sanders: Electric sanders for efficient and even sanding.
11.2. Spray Guns
- HVLP Spray Guns: High Volume Low Pressure spray guns for even and efficient paint application.
- Air Compressors: Provide the necessary air pressure for spray guns.
- Spray Gun Cleaning Kits: Keep your spray guns clean and in good working condition.
11.3. Polishing and Buffing Machines
- Dual Action Polishers: Reduce the risk of swirl marks and holograms.
- Rotary Buffers: For more aggressive polishing and buffing.
- Polishing Pads: Various types of pads for different polishing and buffing tasks.
12. Customer Success Stories
See how our products have helped customers restore their car’s paint and protect it from further damage.
12.1. Before and After Photos
- Faded Red Paint: Before: Dull, faded red paint. After: Vibrant, glossy red paint after using CARDIAGTECH.NET products.
- Cracked Clear Coat: Before: Cracked and peeling clear coat. After: Smooth, glossy clear coat after repair.
12.2. Testimonials
- John D.: “I was amazed at how easy it was to repair the sun damage on my car using the tools from CARDIAGTECH.NET. The paint looks like new!”
- Sarah M.: “The spray gun I bought from CARDIAGTECH.NET made all the difference. It provided even coverage and a professional-looking finish.”
13. Expert Tips for a Flawless Finish
Follow these expert tips to achieve a flawless finish when repairing sun-damaged car paint:
13.1. Achieving a Smooth Surface
- Proper Sanding: Use progressively finer grits of sandpaper to smooth the surface.
- Multiple Thin Coats: Apply multiple thin coats of primer, paint, and clear coat to avoid drips and uneven coverage.
- Wet Sanding: Lightly wet sand the clear coat with a fine-grit sandpaper to remove imperfections.
13.2. Ensuring Color Accuracy
- Color Matching: Use a color matching tool or consult with an automotive paint supplier to find the exact shade of your car’s paint.
- Blending: Blend the edges of the painted area with the surrounding paint to create a smooth transition.
- Test Panel: Test the paint color on a small, inconspicuous area before applying it to the entire surface.
14. FAQ: Addressing Common Questions About Car Paint Sun Damage
Here are some frequently asked questions about car paint sun damage and its repair:
Q1: What causes car paint to fade in the sun?
A: Car paint fades due to prolonged exposure to ultraviolet (UV) rays, which break down the chemical bonds in the paint and cause it to lose its color and vibrancy.
Q2: How can I prevent sun damage to my car’s paint?
A: You can prevent sun damage by regularly washing and waxing your car, using a car cover, parking in shaded areas, and applying paint protection film (PPF).
Q3: Is it possible to repair sun-damaged car paint myself?
A: Yes, it is possible to repair sun-damaged car paint yourself with the right tools, materials, and techniques. However, professional repairs typically offer higher quality and longer-lasting results.
Q4: What tools do I need to repair sun-damaged car paint?
A: You will need sandpaper, primer, automotive paint, clear coat, masking tape, wax and grease remover, polishing compound, buffing pad, and microfiber cloths.
Q5: How do I match the color of my car’s paint when repairing sun damage?
A: Use a color matching tool or consult with an automotive paint supplier to find the exact shade of your car’s paint.
Q6: What is the purpose of clear coat?
A: Clear coat protects the paint from UV rays and environmental factors and provides a glossy finish.
Q7: How often should I wax my car to protect it from sun damage?
A: Apply a coat of wax every three to six months to protect the paint from UV rays and environmental factors.
Q8: What is paint protection film (PPF)?
A: Paint Protection Film (PPF) is a transparent film that can be applied to your car’s paint to protect it from scratches, chips, and UV damage.
Q9: Can ceramic coatings protect my car’s paint from sun damage?
A: Yes, ceramic coatings provide a durable, hydrophobic layer that protects the paint from scratches, UV damage, and chemical contaminants.
Q10: Where can I find high-quality tools for repairing sun-damaged car paint?
A: You can find a wide range of high-quality tools for repairing sun-damaged car paint at CARDIAGTECH.NET.
Facing sun-damaged car paint challenges? Contact CARDIAGTECH.NET today at 276 Reock St, City of Orange, NJ 07050, United States or Whatsapp: +1 (641) 206-8880. Let our experts guide you to the perfect tools for an immaculate finish, ensuring your car looks its best. Don’t wait, restore your car’s beauty now! Visit CARDIAGTECH.NET.