How To Fix Car Seat Recliner Handle Effectively
Fixing a car seat recliner handle involves diagnosing the issue, repairing or replacing parts, and ensuring smooth operation. If your car seat recliner handle is not working, CARDIAGTECH.NET can help you diagnose and fix the problem effectively. Addressing car seat repair and automotive seat maintenance issues promptly enhances vehicle safety and comfort.
1. Understanding the Car Seat Recliner Mechanism
The car seat recliner mechanism is a critical component for adjusting the seat’s angle, ensuring driver and passenger comfort. It typically consists of a handle, a cable or linkage system, and a locking mechanism that secures the seat in the desired position. Understanding these components is the first step in learning how to fix a car seat recliner handle.
1.1. Common Issues with Recliner Handles
Several issues can cause a car seat recliner handle to malfunction. These include:
- Broken or Loose Handle: The handle itself may break or become loose, preventing it from properly engaging the recliner mechanism.
- Cable or Linkage Problems: The cable or linkage connecting the handle to the locking mechanism can stretch, break, or become disconnected.
- Faulty Locking Mechanism: The locking mechanism may fail due to wear, corrosion, or damage.
- Dirt and Debris: Accumulation of dirt and debris can hinder the movement of the recliner mechanism.
- Spring Failure: The spring that helps the seat return to its upright position may break or lose tension.
1.2. Safety Considerations
Before attempting any repairs, it’s essential to prioritize safety. Disconnect the car’s battery to prevent electrical accidents, and wear safety glasses and gloves to protect yourself from injury. Ensure the vehicle is parked on a level surface and the parking brake is engaged.
2. Tools and Materials Needed
Having the right tools and materials on hand can make the repair process smoother and more efficient. Here’s a list of essential items:
- Socket Set: For removing seat bolts and other fasteners.
- Screwdrivers: Both flathead and Phillips head screwdrivers will be necessary.
- Pliers: For gripping and manipulating cables and linkages.
- Wrench Set: To handle various nuts and bolts.
- Penetrating Oil: To loosen corroded or stuck parts.
- Replacement Parts: Such as recliner handles, cables, or locking mechanisms.
- Cleaning Supplies: Including a brush, vacuum, and upholstery cleaner.
- Work Gloves: To protect your hands.
- Safety Glasses: To protect your eyes.
- Multimeter: For testing electrical components (if applicable).
- Torque Wrench: To ensure bolts are tightened to the correct specifications.
- Service Manual: Provides specific instructions and torque specifications for your vehicle.
3. Step-by-Step Guide to Fixing a Car Seat Recliner Handle
Follow these detailed steps to diagnose and repair your car seat recliner handle:
3.1. Removing the Seat
- Disconnect the Battery: Use a wrench to disconnect the negative terminal of the car battery. This prevents any accidental electrical issues during the repair.
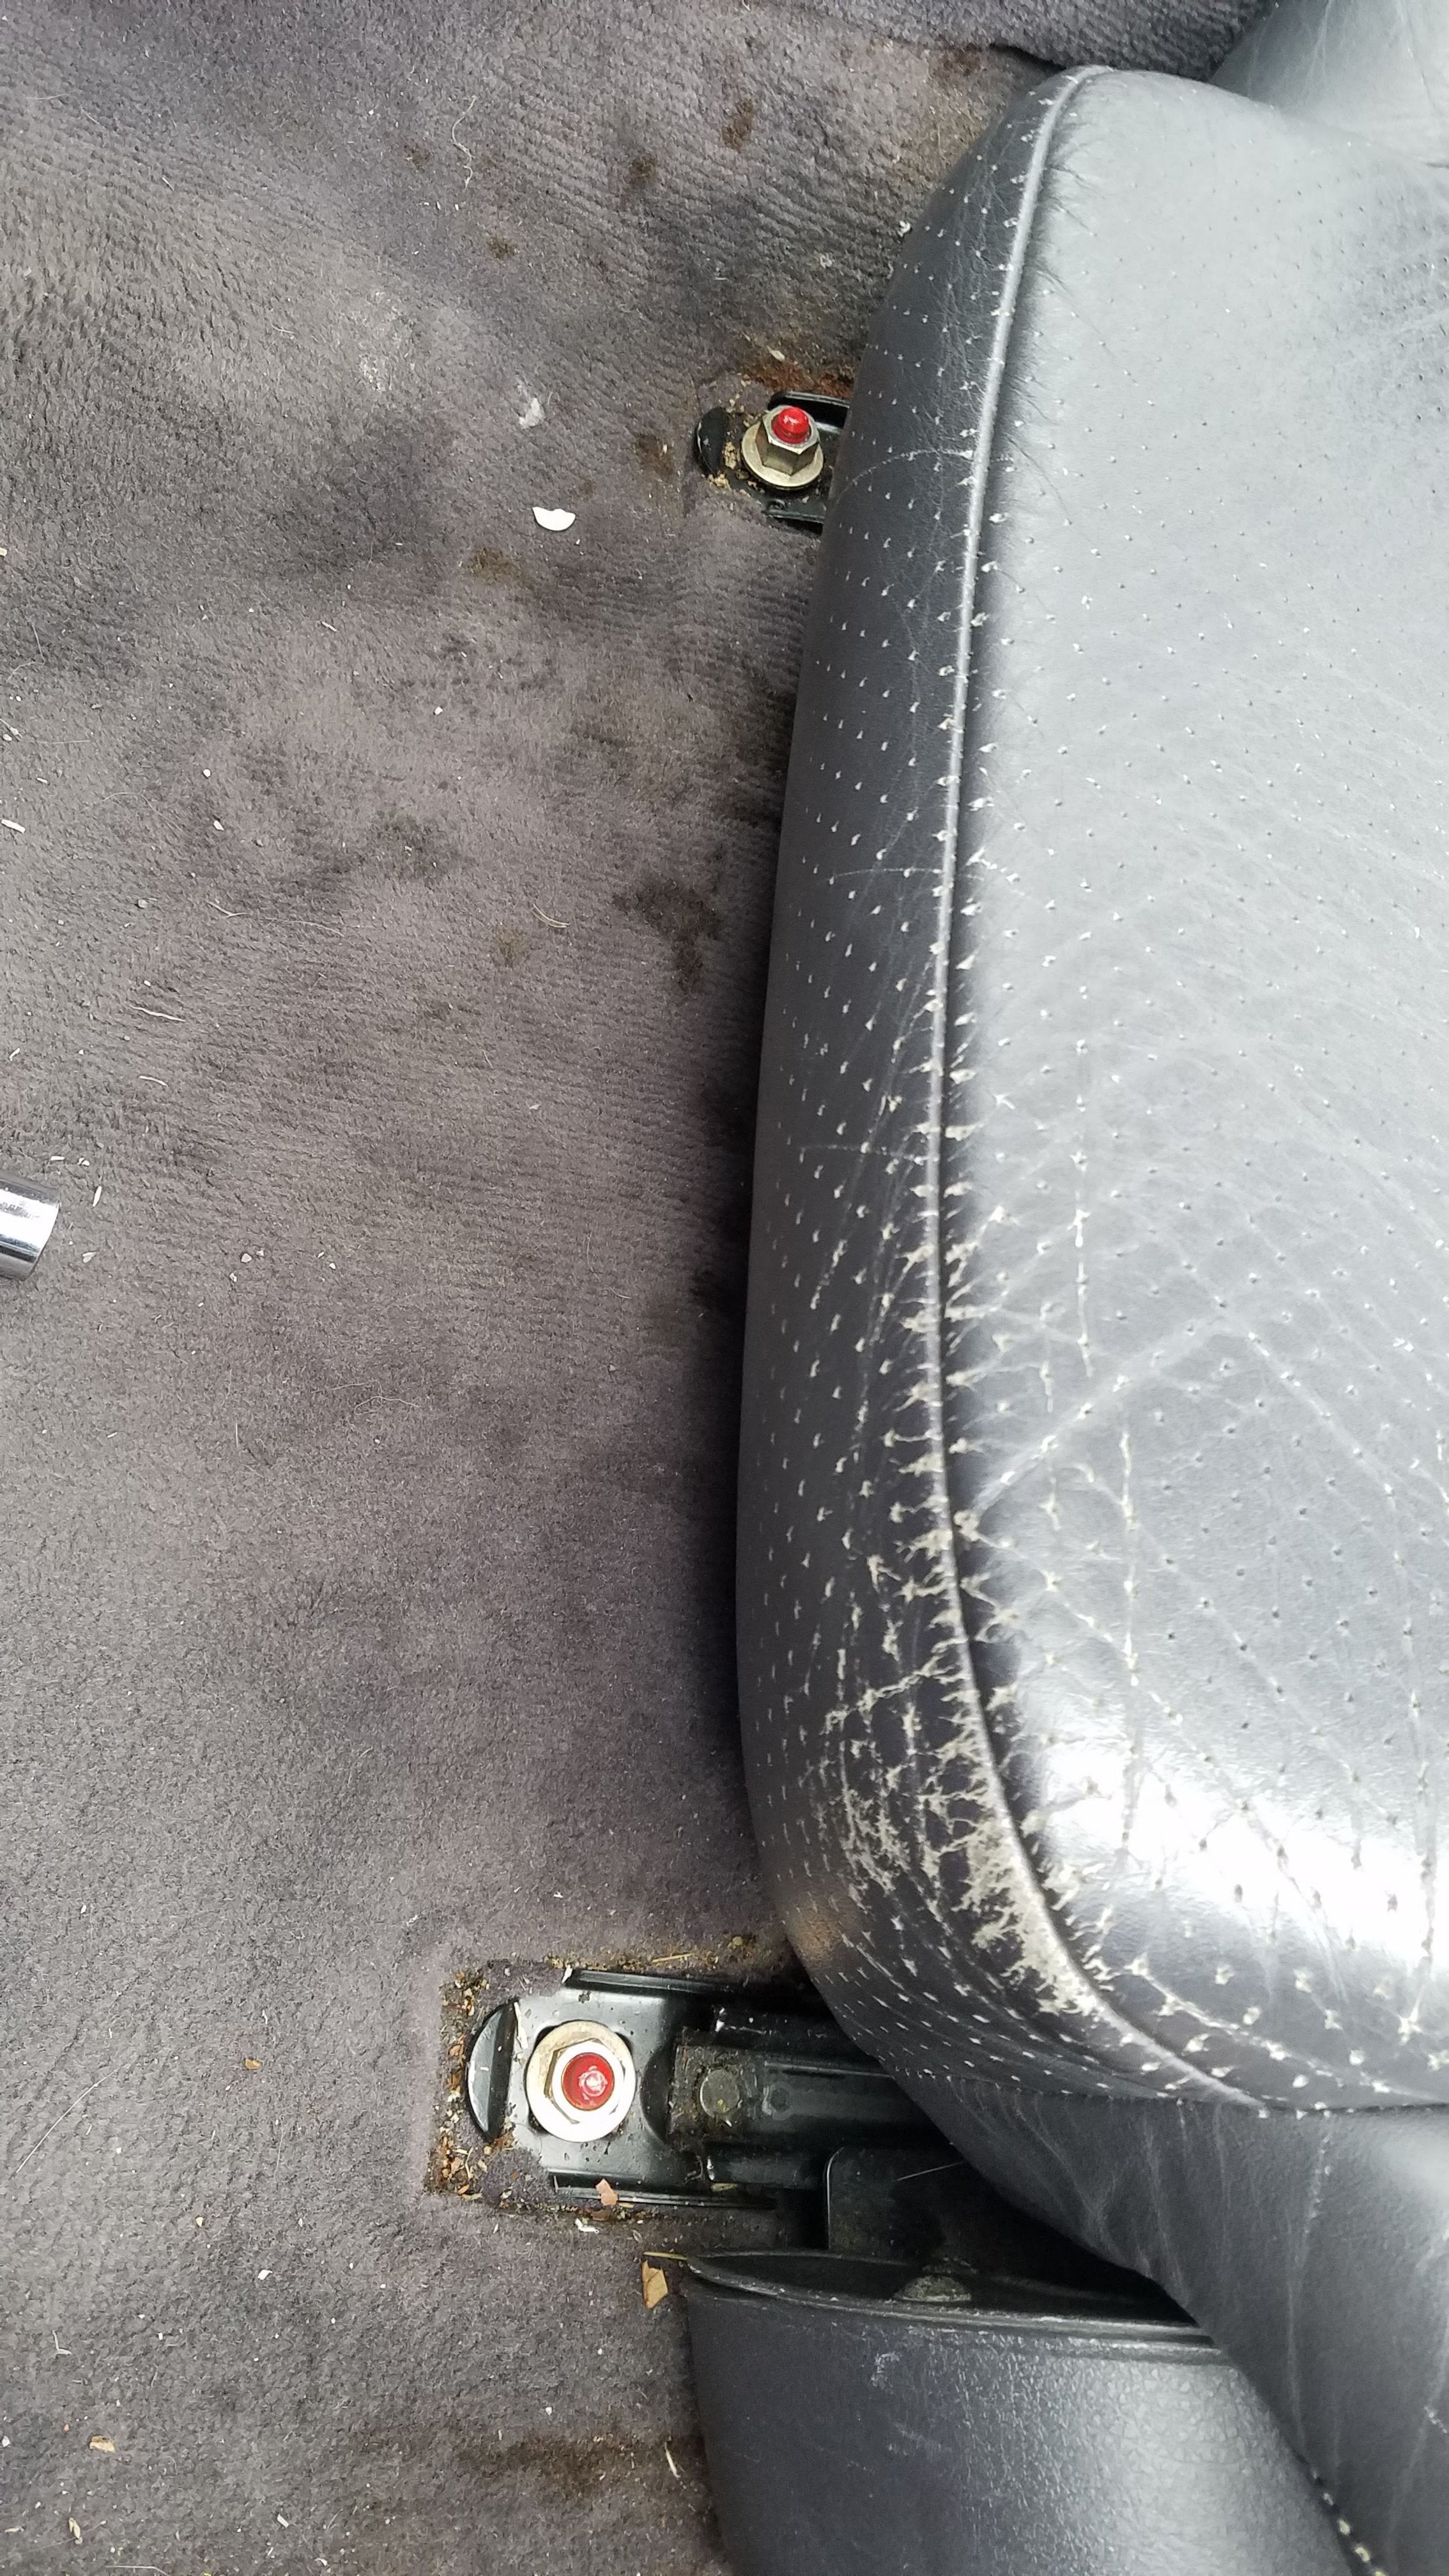
- Locate the Seat Bolts: Typically, four bolts secure the seat to the floor. These are usually located at the corners of the seat.
- Remove the Bolts: Use a socket set to remove the bolts. You may need to slide the seat forward or backward to access all the bolts.
- Disconnect Electrical Connectors: If your seat has electrical functions (such as power recline or heating), disconnect the wiring harnesses. Be gentle to avoid damaging the connectors.
- Remove the Seat: Carefully lift the seat out of the vehicle. It may be heavy, so get assistance if needed.
Car seat bolts location
3.2. Accessing the Recliner Mechanism
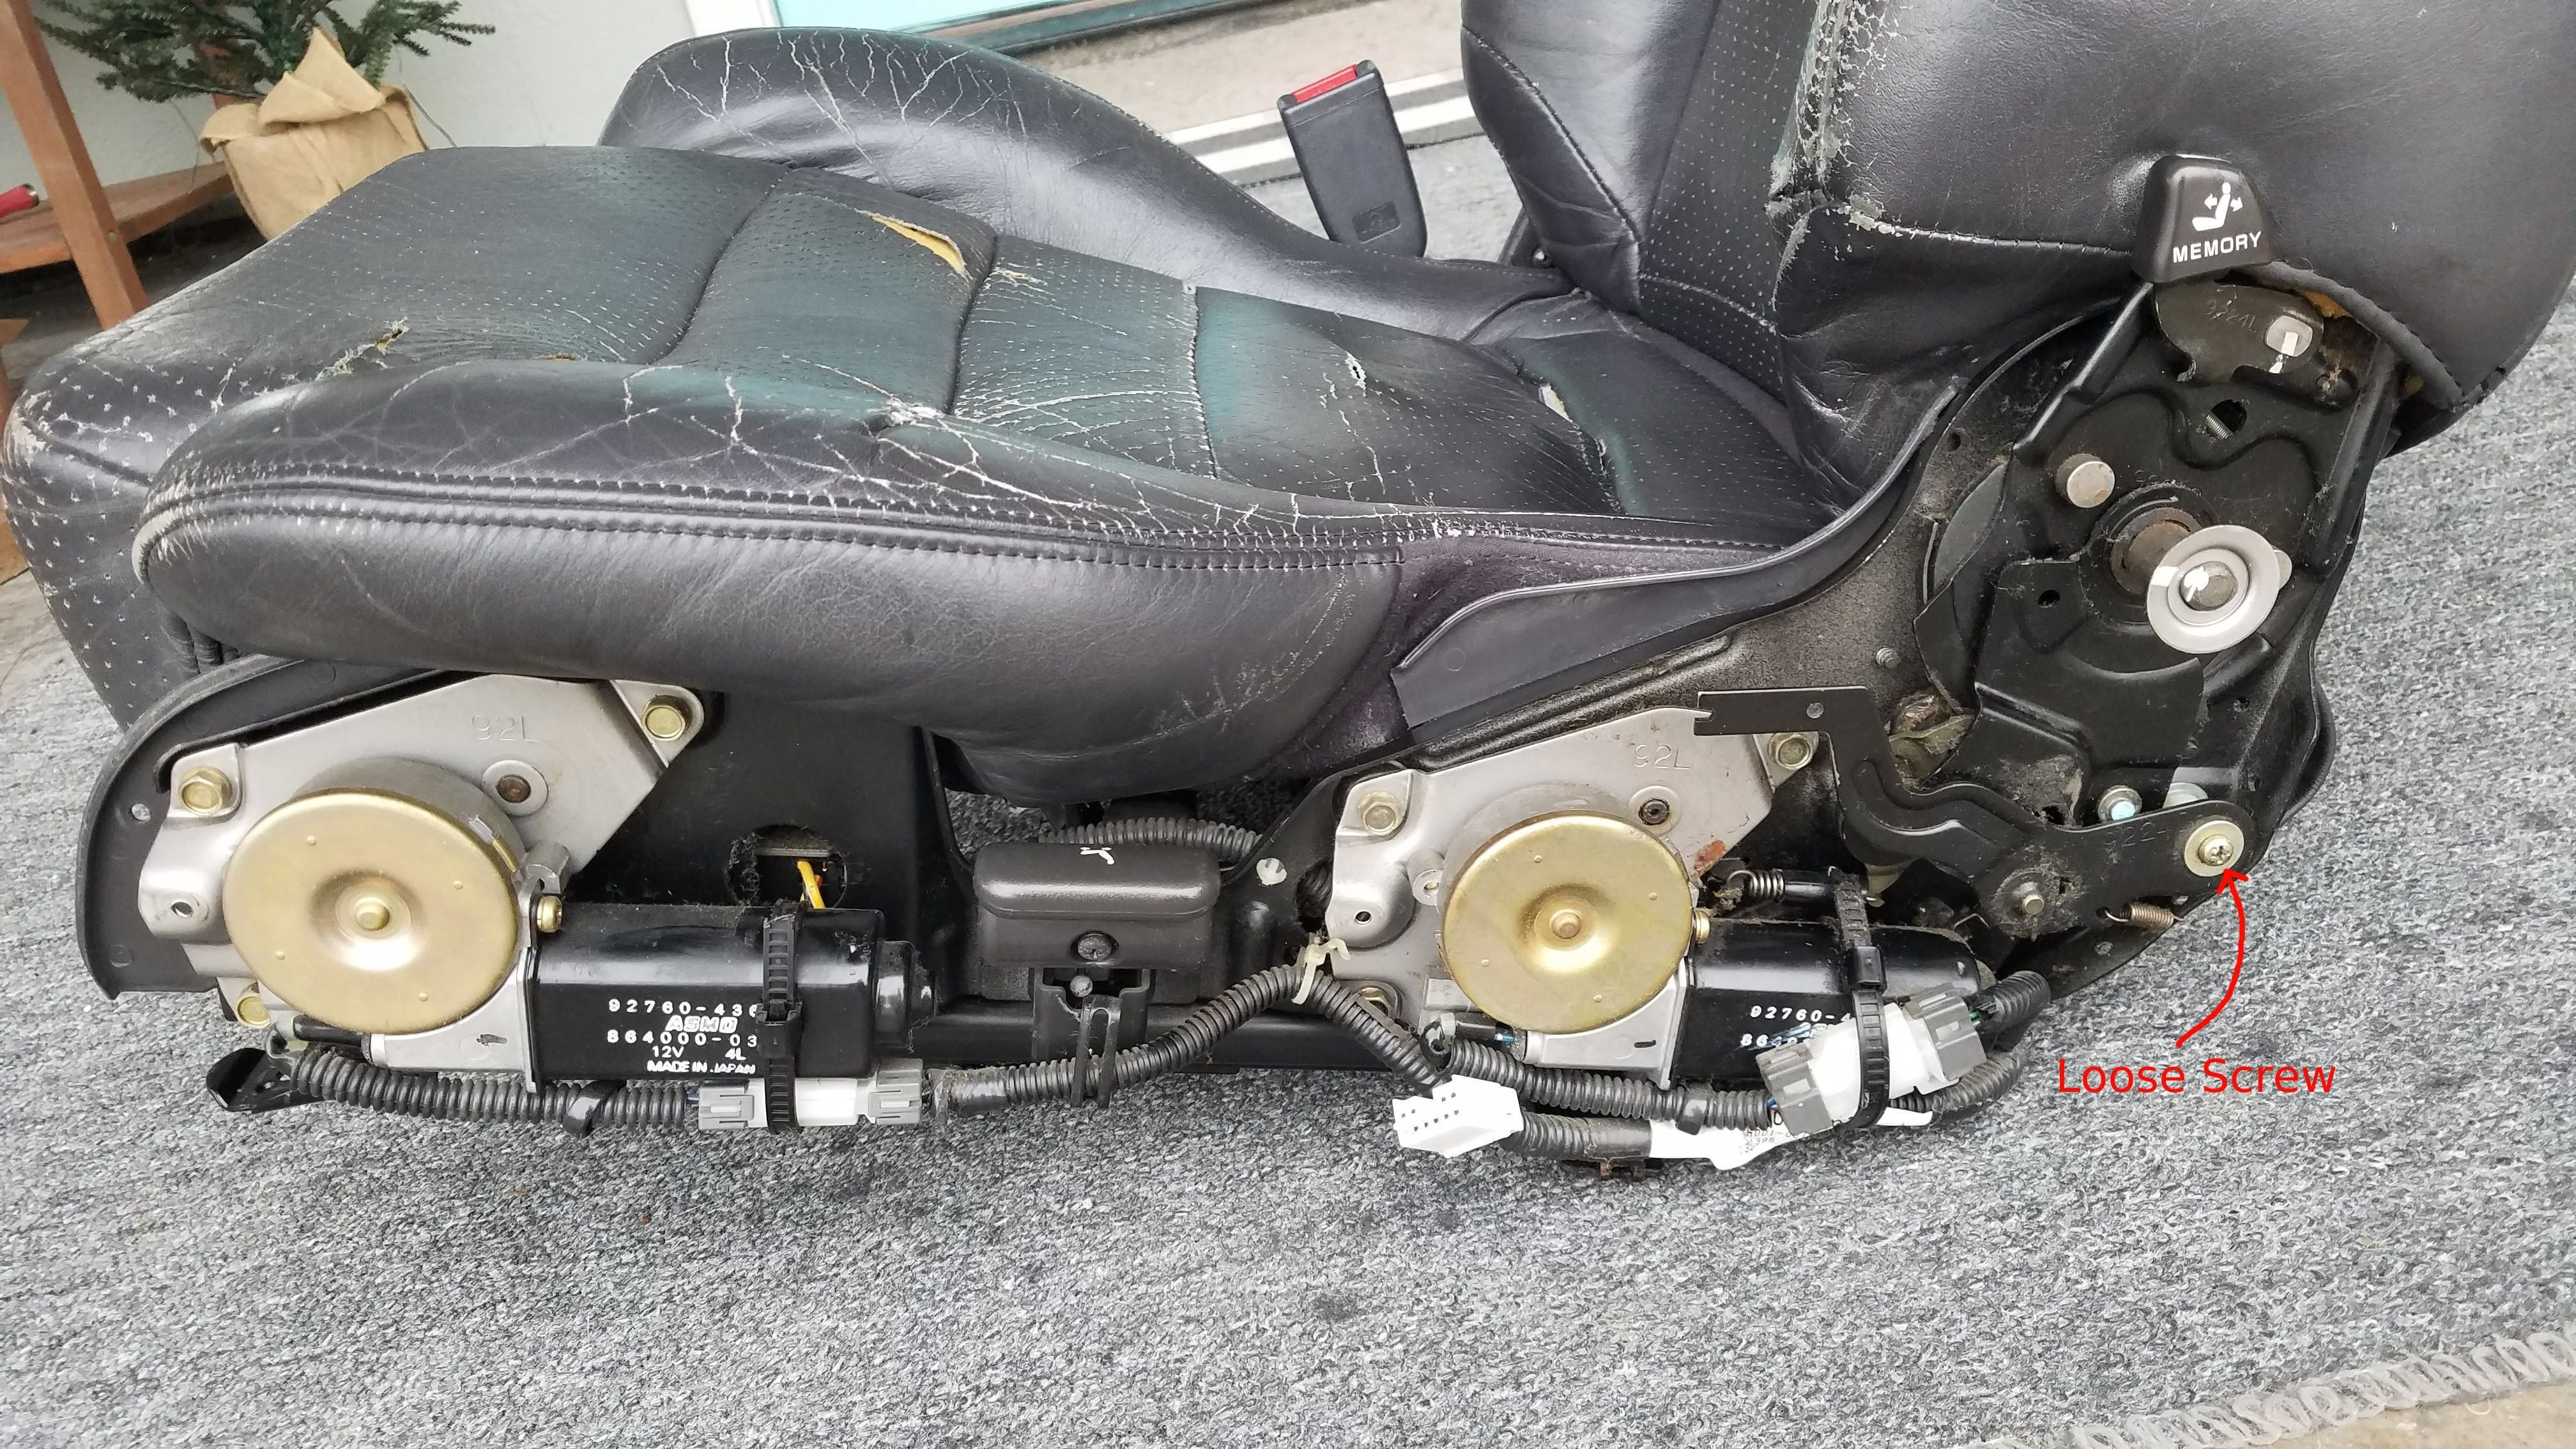
- Remove Plastic Covers: Plastic covers usually conceal the sides of the seat where the recliner mechanism is located. Remove any screws or clips holding these covers in place.
- Detach the Handle: Unscrew or unclip the recliner handle from the mechanism. Note how it is attached for reassembly.
- Inspect the Mechanism: Once the covers are off, inspect the recliner mechanism for any obvious damage, such as broken cables, loose linkages, or corroded parts.
 Removing plastic covers from car seat
3.3. Diagnosing the Problem
- Check the Handle: Ensure the handle is not broken or stripped. If it is, it will need to be replaced.
- Inspect Cables and Linkages: Look for any signs of damage to the cables or linkages. Cables can stretch or break, while linkages can become disconnected.
- Examine the Locking Mechanism: Check the locking mechanism for any signs of wear, corrosion, or damage. Make sure it moves freely.
- Test the Spring: If the seat does not return to its upright position, the spring may be the issue. Check for breaks or loss of tension.
3.4. Repairing or Replacing Components
Depending on the diagnosis, you may need to repair or replace certain components:
- Replacing the Handle: If the handle is broken, purchase a replacement handle that is compatible with your car model. Install the new handle by reversing the removal process.
- Replacing Cables or Linkages: If the cable or linkage is damaged, replace it with a new one. Ensure the new cable or linkage is properly connected to the handle and locking mechanism.
- Repairing the Locking Mechanism: If the locking mechanism is faulty, try cleaning and lubricating it with penetrating oil. If this does not resolve the issue, you may need to replace the entire mechanism.
- Replacing the Spring: If the spring is broken or has lost tension, replace it with a new one. Ensure the new spring is properly seated and provides adequate tension.
3.5. Reassembling the Seat
- Reattach the Handle: Reattach the recliner handle to the mechanism, ensuring it is securely fastened.
- Replace Plastic Covers: Reinstall the plastic covers, securing them with screws or clips.
- Reconnect Electrical Connectors: If your seat has electrical functions, reconnect the wiring harnesses.
- Reinstall the Seat: Carefully place the seat back into the vehicle, aligning it with the bolt holes.
- Reinstall the Bolts: Reinstall the bolts, tightening them with a torque wrench to the manufacturer’s specified torque.
- Reconnect the Battery: Reconnect the negative terminal of the car battery.
- Test the Recliner: Test the recliner handle to ensure it is working properly. Adjust the seat to different positions to confirm smooth operation.
4. Troubleshooting Common Issues
Even after following the steps above, you may encounter some common issues. Here’s how to troubleshoot them:
4.1. Handle Still Not Working
- Check Cable Tension: Ensure the cable is properly tensioned. If it’s too loose, the locking mechanism won’t engage.
- Inspect Linkage Connections: Make sure all linkages are securely connected and moving freely.
- Lubricate Moving Parts: Apply penetrating oil to all moving parts to ensure smooth operation.
4.2. Seat Not Locking in Place
- Examine Locking Teeth: Check the locking teeth on the mechanism for wear or damage.
- Adjust Cable Position: Adjust the cable position to ensure it fully engages the locking mechanism.
- Replace Worn Parts: Replace any worn or damaged parts of the locking mechanism.
4.3. Handle is Hard to Move
- Clean the Mechanism: Remove any dirt or debris that may be hindering movement.
- Lubricate Pivot Points: Apply lubricant to all pivot points to reduce friction.
- Check for Obstructions: Ensure there are no obstructions preventing the handle from moving freely.
5. Preventive Maintenance
Preventive maintenance can help prolong the life of your car seat recliner mechanism and prevent future issues.
5.1. Regular Cleaning
Regularly clean the recliner mechanism to remove dirt and debris. Use a brush and vacuum to remove loose particles, and wipe down the mechanism with a damp cloth.
5.2. Lubrication
Periodically lubricate the moving parts of the recliner mechanism with penetrating oil. This will help ensure smooth operation and prevent corrosion.
5.3. Inspection
Inspect the recliner mechanism regularly for any signs of wear or damage. Address any issues promptly to prevent them from escalating.
5.4. Professional Check-ups
Consider having your car seats professionally inspected during routine maintenance. A professional can identify potential issues and perform necessary repairs or adjustments.
6. When to Seek Professional Help
While many car seat recliner handle issues can be resolved with DIY repairs, some situations warrant professional help.
6.1. Complex Electrical Issues
If your car seat has complex electrical functions and you are not comfortable working with electrical systems, seek professional help.
6.2. Extensive Damage
If the recliner mechanism is extensively damaged or corroded, it may be best to have it professionally repaired or replaced.
6.3. Lack of Experience
If you are not experienced in automotive repairs, it’s best to consult a professional to avoid causing further damage or injury.
7. Benefits of a Properly Functioning Recliner
A properly functioning recliner offers numerous benefits for both the driver and passengers.
7.1. Enhanced Comfort
A working recliner allows you to adjust the seat to the most comfortable position, reducing fatigue and discomfort during long drives.
7.2. Improved Safety
Proper seat positioning is crucial for safety. A functioning recliner ensures you can adjust the seat to maintain optimal visibility and control.
7.3. Increased Vehicle Value
Maintaining all components of your car, including the seats, helps maintain its overall value.
8. The Science Behind Seat Reclining
Understanding the biomechanics and engineering involved in seat reclining can provide a deeper appreciation for its importance.
8.1. Ergonomics and Posture
Ergonomics plays a vital role in seat design. The ability to recline allows individuals to find a position that supports their spine and reduces strain on muscles and joints.
8.2. Mechanical Engineering
The recliner mechanism is a feat of mechanical engineering, designed to withstand repeated use while providing smooth and reliable adjustments.
8.3. Materials Science
The materials used in the recliner mechanism must be durable and resistant to wear and corrosion. High-strength steel and advanced plastics are commonly used.
9. Cost Analysis of DIY vs. Professional Repair
Deciding whether to fix the car seat recliner handle yourself or seek professional help often depends on the cost. Here’s a breakdown to help you make an informed decision:
| Expense | DIY Repair | Professional Repair |
|---|---|---|
| Parts | $20 – $100 (depending on the part needed) | Included in labor cost; may be higher if sourced from OEM |
| Tools | $0 – $50 (if you need to buy specific tools) | N/A (tools already available) |
| Labor | Your time (can range from 1-3 hours) | $75 – $200 per hour (depending on the shop and complexity) |
| Total Estimated Cost | $20 – $150 + your time | $100 – $500+ (depending on the issue and labor rates) |
| Considerations | Requires mechanical knowledge, can be time-consuming, risk of incorrect installation | Guaranteed workmanship, saves time, potential for higher cost |
| Recommendation | For minor issues and those comfortable with car repairs | For complex issues, electrical problems, or if you prefer professional assurance. Contact CARDIAGTECH.NET for expert advice. |
10. CARDIAGTECH.NET: Your Partner in Automotive Solutions
At CARDIAGTECH.NET, we understand the importance of having reliable tools and equipment for automotive repairs. Whether you’re tackling a DIY project or running a professional repair shop, we’ve got you covered. Here’s why you should choose CARDIAGTECH.NET for your automotive needs:
10.1. Wide Range of Products
We offer an extensive selection of high-quality tools, diagnostic equipment, and replacement parts. Our catalog includes everything from socket sets and wrenches to advanced diagnostic scanners and specialized repair tools.
10.2. Quality Assurance
We source our products from trusted manufacturers known for their durability and performance. Every item is rigorously tested to ensure it meets our high standards of quality.
10.3. Expert Support
Our team of experienced technicians is available to provide expert advice and support. Whether you need help diagnosing a problem or choosing the right tool for the job, we’re here to assist you. Contact us via Whatsapp at +1 (641) 206-8880 or visit our website at CARDIAGTECH.NET.
10.4. Competitive Pricing
We offer competitive pricing on all our products, ensuring you get the best value for your money. Plus, we frequently run special promotions and discounts to help you save even more.
10.5. Convenient Shopping
Our user-friendly website makes it easy to browse our catalog, place orders, and track shipments. We also offer fast and reliable shipping to get your tools and equipment to you as quickly as possible.
10.6. Customer Satisfaction
Your satisfaction is our top priority. We stand behind our products and services, and we’re committed to ensuring you have a positive experience with CARDIAGTECH.NET.
Don’t let a faulty car seat recliner handle compromise your comfort and safety. Contact CARDIAGTECH.NET today for all your automotive repair needs. Our address is 276 Reock St, City of Orange, NJ 07050, United States.
11. Understanding Different Types of Car Seats
To effectively address recliner handle issues, it’s helpful to understand the different types of car seats available and their specific mechanisms.
11.1. Manual Reclining Seats
These seats use a lever or handle to adjust the seatback position. The mechanism is typically cable-operated, connecting the handle to a locking device.
11.2. Power Reclining Seats
Power seats use an electric motor to adjust the seatback. These systems are more complex, involving switches, wiring, and motors.
11.3. Bucket Seats
Bucket seats are designed for sporty vehicles, offering more support and bolstering. Their reclining mechanisms are often simpler but may still suffer from similar issues.
11.4. Bench Seats
Bench seats are common in older vehicles and trucks. They may have a reclining feature, but the mechanism is usually less sophisticated.
12. Advanced Techniques for Recliner Repair
For more complex issues, advanced repair techniques may be necessary.
12.1. Welding Repairs
If the frame or locking mechanism is cracked or broken, welding may be required. This should only be performed by a qualified welder.
12.2. Custom Part Fabrication
In some cases, replacement parts may not be available. Custom part fabrication may be necessary to create a suitable replacement.
12.3. Electrical Diagnostics
For power seats, electrical diagnostics may be required to identify and repair issues with the wiring, switches, or motors.
13. Environmental Considerations
When performing automotive repairs, it’s essential to consider the environmental impact.
13.1. Proper Disposal of Old Parts
Dispose of old parts properly to prevent environmental contamination. Recycle metal components and dispose of fluids according to local regulations.
13.2. Use of Eco-Friendly Products
Use eco-friendly cleaning and lubricating products to minimize your environmental footprint.
13.3. Waste Reduction
Reduce waste by using reusable tools and materials whenever possible.
14. The Future of Car Seat Technology
Car seat technology continues to evolve, with advancements in comfort, safety, and convenience.
14.1. Smart Seats
Smart seats use sensors and algorithms to automatically adjust to the optimal position for each occupant.
14.2. Advanced Materials
New materials are being developed to improve the durability and comfort of car seats.
14.3. Integrated Safety Systems
Car seats are increasingly being integrated with advanced safety systems, such as automatic collision notification and adaptive restraint systems.
15. Legal and Regulatory Aspects
Automotive repairs are subject to various legal and regulatory requirements.
15.1. Safety Standards
Ensure all repairs meet applicable safety standards to protect yourself and others.
15.2. Warranty Considerations
Be aware of any warranty implications before performing repairs. DIY repairs may void certain warranties.
15.3. Local Regulations
Comply with all local regulations regarding automotive repairs and waste disposal.
16. Real-Life Examples and Case Studies
To illustrate the concepts discussed, here are a few real-life examples and case studies:
16.1. Case Study 1: Broken Recliner Handle
A car owner noticed their recliner handle was broken, preventing them from adjusting their seat. They purchased a replacement handle from CARDIAGTECH.NET and followed the steps outlined above to successfully replace it.
16.2. Case Study 2: Faulty Locking Mechanism
A mechanic diagnosed a faulty locking mechanism in a car seat. They cleaned and lubricated the mechanism, but the issue persisted. They replaced the entire mechanism, restoring the seat to proper working order.
16.3. Case Study 3: Power Seat Electrical Issue
A technician encountered a power seat that would not recline. They used a multimeter to diagnose a faulty switch. They replaced the switch, resolving the issue.
17. Call to Action: Contact CARDIAGTECH.NET Today
Don’t let a malfunctioning car seat recliner handle ruin your driving experience. Whether you’re a DIY enthusiast or a professional mechanic, CARDIAGTECH.NET has the tools, equipment, and expertise you need to get the job done right.
Are you struggling with a stubborn car seat recliner handle? Do you need high-quality tools to get the job done efficiently? Contact CARDIAGTECH.NET today for expert advice and top-notch automotive repair solutions. Our team is ready to assist you with all your needs.
- Address: 276 Reock St, City of Orange, NJ 07050, United States
- WhatsApp: +1 (641) 206-8880
- Website: CARDIAGTECH.NET
We are dedicated to providing you with the best tools and support to ensure your automotive repairs are successful. Reach out now and let us help you enhance your vehicle’s comfort and safety.
18. Frequently Asked Questions (FAQ)
Here are some frequently asked questions related to car seat recliner handle repair:
-
What are the most common reasons a car seat won’t recline?
Common issues include a broken handle, damaged cable, or a faulty locking mechanism. -
Can I fix a car seat recliner myself, or do I need a professional?
Minor issues like a loose handle or simple cable adjustments can often be DIY repairs. More complex problems may require a professional. -
How much does it typically cost to repair a car seat recliner?
DIY repairs can range from $20 to $150 for parts. Professional repairs can cost between $100 and $500, depending on the complexity. -
What tools do I need to fix a car seat recliner handle?
Essential tools include a socket set, screwdrivers, pliers, wrench set, penetrating oil, and replacement parts. -
How do I know if the recliner cable is broken or just stretched?
A broken cable will be visibly snapped or frayed. A stretched cable will feel loose and may not properly engage the locking mechanism. -
Is it safe to drive with a broken car seat recliner?
Driving with a broken recliner can be unsafe as it may affect your driving position and control. -
Where can I buy replacement parts for my car seat recliner?
You can purchase replacement parts from auto parts stores, online retailers, or directly from CARDIAGTECH.NET. -
How can I prevent my car seat recliner from breaking in the future?
Regular cleaning, lubrication, and inspection can help prevent future issues. -
What should I do if my power seat recliner is not working?
Check the fuses, wiring, and switches. If these seem fine, the motor may be faulty and require replacement. -
Can I adjust the tension on the recliner cable?
Some systems allow for cable tension adjustments. Consult your vehicle’s service manual for specific instructions.
By following this comprehensive guide, you can effectively address issues with your car seat recliner handle and ensure a comfortable and safe driving experience. Remember, CARDIAGTECH.NET is here to support you with high-quality tools and expert advice. Contact us today to get started!