How To Fix Car Window Seal: A Complete Guide
Are you struggling with a damaged car window seal? CARDIAGTECH.NET offers a comprehensive guide on how to fix car window seal problems and prevent further damage using advanced techniques and products, ensuring a tight, secure, and durable window seal. By understanding the causes of seal deterioration and applying the proper repair methods, you can maintain your vehicle’s integrity and enhance its value. Learn about weather stripping adhesive, silicone lubricant, and automotive weather seals to effectively tackle this common issue.
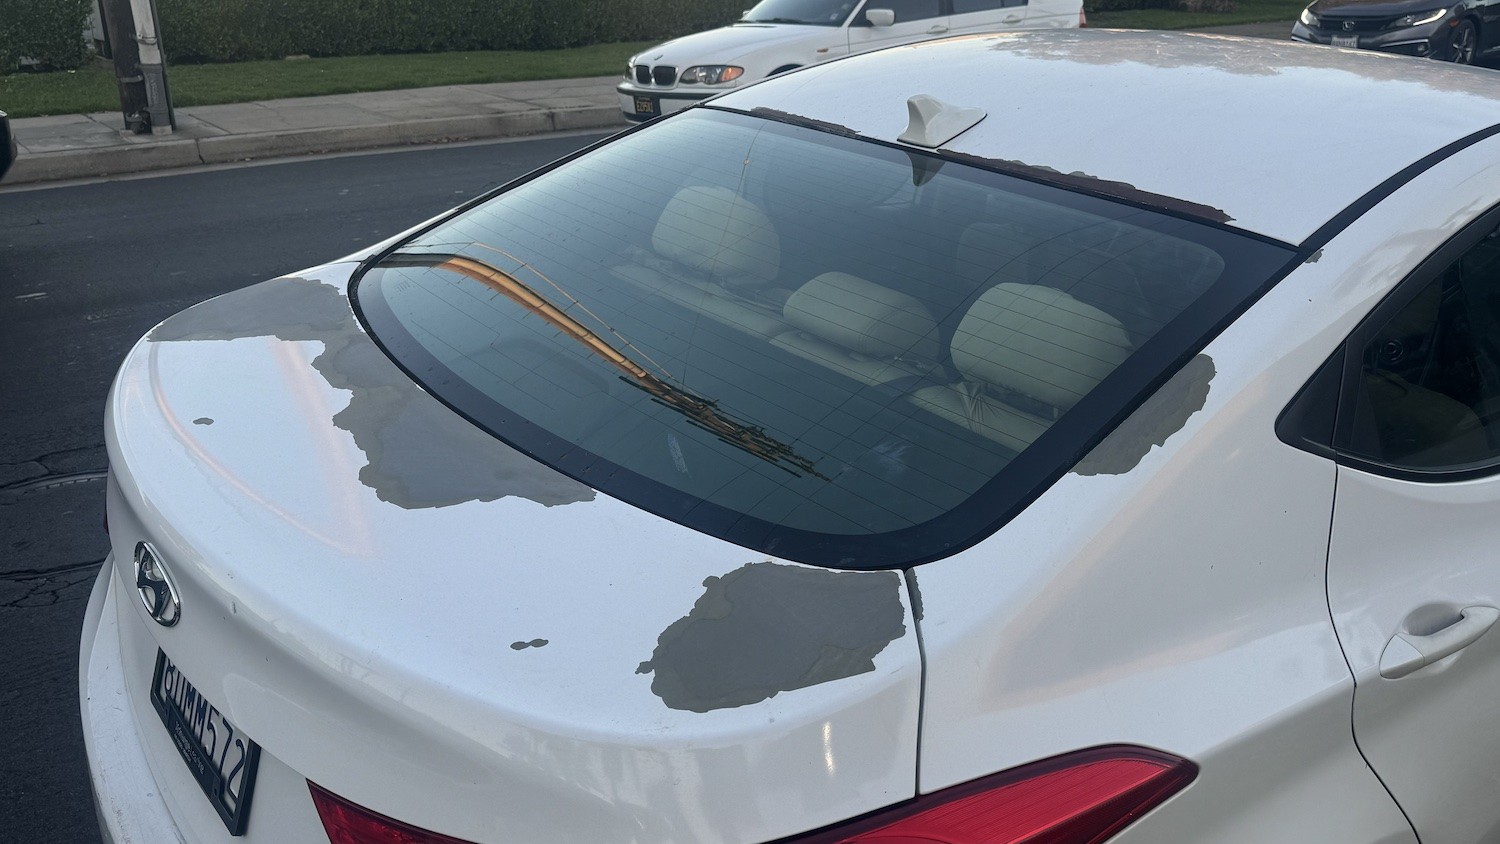
1. Identifying the Problem: Why Car Window Seals Fail
Car window seals are crucial for keeping moisture, noise, and debris out of your vehicle. Over time, however, these seals can degrade due to several factors. Understanding these causes is the first step in effectively addressing the problem and preventing future issues.
1.1. Environmental Factors
Exposure to the elements is a primary cause of window seal failure. The constant barrage of sunlight, rain, and extreme temperatures takes a toll on the rubber and other materials that make up the seals.
-
UV Radiation: Sunlight contains ultraviolet (UV) rays that can break down the chemical bonds in rubber, causing it to become brittle and crack. This is especially prevalent in areas with high sun exposure.
-
Temperature Fluctuations: The expansion and contraction of materials due to temperature changes can weaken the seal’s structure. Extreme heat can cause the rubber to soften and deform, while freezing temperatures can make it rigid and prone to cracking.
-
Moisture and Humidity: Constant exposure to moisture can lead to mold and mildew growth, which can further degrade the seal’s material. High humidity levels can also cause the metal components of the window frame to rust, compromising the seal’s integrity.
1.2. Physical Wear and Tear
The daily use of your vehicle also contributes to the wear and tear of window seals. Simple actions like opening and closing doors, as well as the vibrations from driving, can gradually weaken the seals.
-
Abrasion: Dirt, dust, and debris can get trapped between the window and the seal, causing abrasion every time the window is operated. This constant rubbing wears down the seal over time.
-
Impacts: Accidental impacts, such as slamming doors or contact with branches and other objects, can cause immediate damage to the seals.
-
Normal Aging: Like any rubber or plastic component, window seals naturally degrade over time, losing their elasticity and becoming more prone to damage.
1.3. Chemical Exposure
Exposure to various chemicals can also accelerate the deterioration of window seals. These chemicals can be found in car washes, cleaning products, and even air pollution.
-
Cleaning Products: Some car cleaning products contain harsh chemicals that can damage rubber seals. Always use products specifically designed for automotive use.
-
Road Salts and Chemicals: In colder climates, road salts and de-icing chemicals can splash onto the seals, causing them to corrode and degrade.
-
Air Pollution: Pollutants in the air, such as ozone and nitrogen oxides, can react with the rubber, leading to premature aging and cracking.
1.4. Poor Installation or Manufacturing Defects
In some cases, window seal failure can be attributed to issues that occurred during the manufacturing or installation process.
-
Improper Fit: If the seal was not properly fitted during installation, it may not create a tight barrier, allowing moisture and debris to enter.
-
Material Defects: Manufacturing defects, such as inconsistencies in the rubber compound or poor bonding, can lead to premature failure.
By understanding these common causes of car window seal failure, you can take proactive steps to protect your vehicle’s seals and address any issues promptly. Regular inspection and maintenance, along with the use of quality products from CARDIAGTECH.NET, can significantly extend the life of your window seals and maintain the integrity of your vehicle.
2. Essential Tools and Materials for the Job
Before you start fixing your car window seal, it’s important to gather all the necessary tools and materials. Having everything on hand will make the process smoother and more efficient. CARDIAGTECH.NET offers a wide range of high-quality tools and materials that can help you tackle this task like a professional.
2.1. Safety Gear
Safety should always be your top priority when working on any car repair. Here’s the essential safety gear you’ll need:
-
Gloves: Protect your hands from chemicals and sharp edges. Nitrile gloves are a good option as they are resistant to many automotive fluids.
-
Safety Glasses: Shield your eyes from debris and chemicals.
-
Dust Mask: If you plan on sanding or working in a dusty environment, a dust mask will protect your respiratory system.
2.2. Removal Tools
Removing the old window seal requires some specialized tools to avoid damaging the surrounding areas:
-
Flathead Screwdriver: Use a small flathead screwdriver to gently pry off the old seal. Be careful not to scratch the paint or glass.
-
Plastic Trim Removal Tools: These tools are designed to remove trim and seals without causing damage. They come in various shapes and sizes, making it easier to access tight spots.
-
Heat Gun or Hair Dryer: Applying heat can soften the old adhesive, making it easier to remove the seal. Use a heat gun on a low setting or a hair dryer to avoid overheating the area.
2.3. Cleaning Supplies
Proper cleaning is essential for ensuring that the new seal adheres correctly. Here’s what you’ll need:
-
WD-40 Multi-Purpose Product: This versatile product can help remove old adhesive residue and clean the surface.
-
Automotive Grease and Wax Remover: Use this to remove any grease, wax, or other contaminants from the surface.
-
Clean Rags: Have plenty of clean rags on hand for wiping surfaces and applying cleaning products.
-
Rubbing Alcohol: This is useful for a final wipe-down to ensure the surface is completely clean and dry.
2.4. Surface Preparation Tools
Preparing the surface properly will ensure a strong bond with the new seal:
-
Sandpaper: Use fine-grit sandpaper (220-grit or higher) to smooth the surface and remove any remaining residue.
-
Sanding Block: A sanding block will help you apply even pressure and avoid gouging the surface.
-
Wire Brush: A small wire brush can be useful for removing rust or corrosion from metal surfaces.
2.5. Installation Materials
Installing the new window seal requires the right adhesive and sealant:
-
Weather Stripping Adhesive: This is a specialized adhesive designed for bonding rubber to metal or glass. Choose a high-quality adhesive that is resistant to water and temperature changes. CARDIAGTECH.NET can guide you to the best options available.
-
New Window Seal: Purchase a new window seal that is specifically designed for your vehicle model. Ensure it is made from high-quality materials for long-lasting performance.
-
Silicone Lubricant: Applying silicone lubricant after installation can help protect the seal and keep it flexible.
2.6. Optional Tools
These tools are not essential, but they can make the job easier:
-
Utility Knife: Useful for trimming the new seal to the correct length.
-
Measuring Tape: Use this to accurately measure the length of the old seal and cut the new one accordingly.
-
Caulk Gun: If you are using a sealant in a tube, a caulk gun will make it easier to apply.
Having all these tools and materials on hand will ensure that you can complete the job efficiently and effectively. CARDIAGTECH.NET is your go-to source for high-quality automotive tools and materials, providing everything you need to fix your car window seal and keep your vehicle in top condition.
3. Step-by-Step Guide to Replacing a Car Window Seal
Replacing a car window seal can seem like a daunting task, but with the right tools and a clear step-by-step guide, you can tackle this project yourself. CARDIAGTECH.NET is here to provide you with a detailed guide to ensure a successful replacement.
3.1. Preparation and Safety Measures
Before you begin, ensure you have all the necessary tools and materials. Park your car in a well-lit, ventilated area. Wear safety glasses and gloves to protect yourself from debris and chemicals.
3.2. Removing the Old Seal
- Assess the Seal: Start by examining the old seal to understand how it is attached. Look for any obvious points where it is coming loose.
- Loosen the Seal: Use a plastic trim removal tool or a flathead screwdriver to gently pry the seal away from the window frame. Be careful not to scratch the paint or glass.
- Pull the Seal: Once you have loosened the seal, carefully pull it away from the frame. If the seal is brittle and breaks into pieces, use the trim removal tool to scrape away the remaining bits.
- Heat if Necessary: If the seal is difficult to remove, use a heat gun or hair dryer to soften the adhesive. Apply heat in short bursts to avoid damaging the surrounding areas.
3.3. Cleaning the Surface
- Remove Adhesive Residue: Apply WD-40 Multi-Purpose Product or an automotive grease and wax remover to the area where the old seal was attached. Let it sit for a few minutes to soften the adhesive residue.
- Scrub the Surface: Use a clean rag to scrub away the residue. For stubborn spots, use a plastic scraper or a soft wire brush.
- Sand the Surface: Use fine-grit sandpaper (220-grit or higher) to smooth the surface and remove any remaining residue. This will help the new seal adhere properly.
- Clean Again: Wipe the surface with a clean rag and rubbing alcohol to remove any sanding dust or remaining contaminants. Ensure the surface is completely clean and dry before proceeding.
3.4. Installing the New Seal
- Measure and Cut: Measure the length of the old seal or the area where the new seal will be installed. Cut the new seal to the appropriate length using a utility knife. It’s better to cut slightly longer than needed; you can always trim off excess later.
- Dry Fit: Before applying adhesive, dry fit the new seal to ensure it fits properly. Make any necessary adjustments.
- Apply Adhesive: Apply a thin, even layer of weather stripping adhesive to the window frame where the seal will be attached. Also, apply a thin bead of adhesive to the inside of the new seal.
- Attach the Seal: Starting at one corner, carefully press the new seal into place. Work your way around the window, applying even pressure to ensure a good bond.
- Secure the Seal: Use masking tape to hold the seal in place while the adhesive cures. Follow the adhesive manufacturer’s instructions for curing time, typically 24 hours.
- Trim Excess: Once the adhesive has cured, remove the masking tape and trim any excess seal material with a utility knife.
3.5. Final Touches and Protection
- Apply Silicone Lubricant: Apply a thin layer of silicone lubricant to the new seal to protect it from the elements and keep it flexible. This will help extend the life of the seal.
- Inspect the Seal: Check the seal for any gaps or imperfections. If necessary, apply additional adhesive or sealant to fill any gaps.
- Clean the Area: Clean the surrounding area with a car cleaner to remove any smudges or fingerprints.
By following these steps, you can successfully replace your car window seal and restore its functionality. CARDIAGTECH.NET provides all the high-quality tools and materials you need to get the job done right.
4. Advanced Techniques for Tricky Window Seals
While the standard replacement process works well for most car window seals, some situations require more advanced techniques. CARDIAGTECH.NET offers insights into handling tricky window seals to ensure a professional-quality repair.
4.1. Dealing with Curved or Angled Windows
Curved or angled windows present a unique challenge because the seal needs to conform to the shape of the glass and frame.
-
Sectioning the Seal: Instead of trying to install the seal in one continuous piece, divide it into smaller sections. This allows you to work with shorter lengths that are easier to manipulate around curves and angles.
-
Heating the Seal: Use a heat gun or hair dryer to gently heat the seal as you install it. This makes the rubber more pliable and easier to conform to the shape of the window. Be careful not to overheat the seal, as this can damage it.
-
Using Flexible Adhesive: Choose a weather stripping adhesive that is specifically designed for flexible materials. These adhesives remain pliable after curing, allowing the seal to move and flex without losing its bond.
4.2. Working with Embedded Seals
Some car windows have seals that are embedded directly into the glass or frame. These seals can be more difficult to remove and replace.
- Careful Removal: Use a plastic trim removal tool to carefully pry the seal away from the glass or frame. Be patient and work slowly to avoid damaging the surrounding areas.
- Specialized Adhesives: Use an adhesive that is specifically designed for bonding rubber to glass or metal. These adhesives are formulated to provide a strong, long-lasting bond in demanding conditions.
- Professional Assistance: If you are unsure about how to proceed, consider seeking professional assistance from a qualified auto glass technician. They have the tools and expertise to handle embedded seals safely and effectively.
4.3. Addressing Rust and Corrosion
Rust and corrosion can compromise the integrity of the window frame and prevent the new seal from bonding properly.
- Rust Removal: Use a wire brush or sandpaper to remove any rust or corrosion from the window frame. For stubborn rust, use a rust converter to neutralize the corrosion and prevent it from spreading.
- Surface Preparation: After removing the rust, clean the surface with a degreaser and rubbing alcohol to remove any contaminants. Allow the surface to dry completely before applying adhesive.
- Protective Coatings: Apply a protective coating, such as a rust-inhibiting primer, to the window frame before installing the new seal. This will help prevent future rust and corrosion.
4.4. Ensuring a Watertight Seal
A watertight seal is essential for preventing water damage and maintaining the integrity of your vehicle.
- Continuous Bead of Adhesive: Apply a continuous bead of weather stripping adhesive to the window frame and the inside of the seal. This will create a barrier that prevents water from seeping through.
- Sealant Application: After installing the seal, apply a bead of automotive sealant along the edges to further protect against water intrusion. Choose a high-quality sealant that is resistant to water, UV radiation, and temperature changes.
- Water Testing: After the adhesive and sealant have cured, test the seal by spraying water around the window. Check for any leaks and address them promptly.
By mastering these advanced techniques, you can tackle even the most challenging car window seal repairs with confidence. CARDIAGTECH.NET provides the tools, materials, and expertise you need to achieve professional-quality results.
5. Maintaining Your Car Window Seals for Longevity
Once you’ve successfully replaced your car window seals, the next step is to maintain them properly to ensure they last as long as possible. CARDIAGTECH.NET provides expert tips on how to extend the life of your window seals and protect them from premature wear and tear.
5.1. Regular Cleaning
Regular cleaning is essential for removing dirt, dust, and debris that can damage your window seals.
- Gentle Cleaning Solutions: Use mild soap and water to clean your window seals. Avoid harsh chemicals or abrasive cleaners, which can degrade the rubber.
- Soft Brush or Cloth: Use a soft brush or cloth to gently scrub the seals. Pay attention to areas where dirt and debris tend to accumulate.
- Rinsing and Drying: Rinse the seals thoroughly with clean water and dry them with a soft cloth.
5.2. Applying Protective Lubricants
Protective lubricants can help keep your window seals flexible and prevent them from drying out and cracking.
-
Silicone-Based Lubricants: Use a silicone-based lubricant specifically designed for automotive use. Silicone lubricants are safe for rubber and plastic and will not cause them to swell or degrade.
-
Application: Apply the lubricant to a clean cloth and gently wipe it onto the window seals. Pay attention to areas that are exposed to sunlight or extreme temperatures.
-
Frequency: Reapply the lubricant every few months, or as needed, to keep your window seals in good condition.
5.3. Protecting from UV Radiation
UV radiation can cause rubber to break down and crack over time. Protect your window seals from UV radiation by:
- Parking in the Shade: When possible, park your car in the shade to reduce its exposure to direct sunlight.
- Using Window Tint: Window tint can block a significant amount of UV radiation, helping to protect your window seals and interior.
- Applying UV Protectant: Apply a UV protectant to your window seals to help block UV radiation and prevent damage.
5.4. Inspecting Regularly
Regular inspections can help you identify and address potential problems before they become serious.
- Visual Inspection: Inspect your window seals regularly for signs of wear and tear, such as cracks, gaps, or discoloration.
- Touch Test: Feel the seals to ensure they are still flexible and not dry or brittle.
- Water Test: Spray water around the windows to check for leaks. Address any leaks promptly to prevent water damage.
5.5. Addressing Minor Damage Promptly
Addressing minor damage promptly can prevent it from escalating into a more serious problem.
- Small Cracks: Fill small cracks with a flexible sealant to prevent them from spreading.
- Loose Seals: Reattach loose seals with weather stripping adhesive.
- Professional Assistance: If you are unsure about how to address the damage, seek professional assistance from a qualified auto repair technician.
By following these maintenance tips, you can extend the life of your car window seals and keep your vehicle in top condition. CARDIAGTECH.NET provides all the high-quality products you need to maintain your window seals and protect them from the elements.
6. The Role of Window Seals in Vehicle Safety and Comfort
Car window seals play a critical role in ensuring vehicle safety and comfort. These often-overlooked components provide several essential functions that contribute to a better driving experience. CARDIAGTECH.NET highlights the importance of maintaining these seals for optimal vehicle performance.
6.1. Weather Protection
Window seals are primarily responsible for keeping the elements out of your vehicle.
- Water Resistance: Seals prevent rain, snow, and other forms of moisture from entering the cabin. This helps protect the interior from water damage, mold growth, and unpleasant odors.
- Wind and Draft Protection: Seals minimize drafts and wind noise, creating a more comfortable and quiet driving environment.
- Dust and Debris Prevention: Seals keep out dust, dirt, and other debris, helping to maintain a clean and healthy interior.
6.2. Noise Reduction
Window seals contribute significantly to reducing noise levels inside the vehicle.
- External Noise Reduction: By creating a tight barrier, seals block out external noise from traffic, wind, and other sources.
- Vibration Dampening: Seals can dampen vibrations, reducing rattles and other unwanted noises inside the cabin.
- Improved Audio Quality: A quieter cabin improves the clarity and enjoyment of your car’s audio system.
6.3. Structural Integrity
Window seals also play a role in maintaining the structural integrity of the vehicle.
- Glass Support: Seals provide support and cushioning for the windows, preventing them from rattling or breaking.
- Frame Protection: Seals protect the window frame from corrosion and damage by preventing water and debris from accumulating in the joints.
- Overall Stability: By maintaining a tight seal, the vehicle’s overall structural integrity is enhanced, contributing to safer handling and performance.
6.4. Energy Efficiency
Properly functioning window seals contribute to the energy efficiency of your vehicle.
- Climate Control: Seals help maintain a consistent temperature inside the cabin, reducing the workload on the air conditioning and heating systems.
- Fuel Economy: By reducing the need for climate control, seals can help improve fuel economy and reduce emissions.
- Reduced Wear and Tear: Properly sealed windows prevent moisture and debris from damaging the interior components, reducing the need for costly repairs.
6.5. Safety Features
Window seals also contribute to several important safety features in your vehicle.
- Visibility: Clear, properly sealed windows provide optimal visibility, enhancing driving safety.
- Airbag Deployment: In some vehicles, window seals play a role in the proper deployment of side airbags. Damaged or missing seals can interfere with airbag function.
- Structural Support: As mentioned earlier, seals contribute to the overall structural integrity of the vehicle, which is essential for crash protection.
By understanding the critical role that window seals play in vehicle safety and comfort, you can appreciate the importance of maintaining them properly. CARDIAGTECH.NET provides all the resources and expertise you need to keep your window seals in top condition.
7. Choosing the Right Replacement Window Seal
Selecting the right replacement window seal is crucial for ensuring a proper fit and long-lasting performance. CARDIAGTECH.NET offers guidance on how to choose the best replacement seal for your vehicle.
7.1. Vehicle Compatibility
The most important factor in choosing a replacement window seal is vehicle compatibility.
- Make and Model: Ensure that the seal is specifically designed for your vehicle’s make, model, and year. This information is usually available on the product packaging or website.
- Window Type: Determine the type of window seal you need. Some vehicles have different types of seals for the windshield, side windows, and rear window.
- OEM vs. Aftermarket: Decide whether you want an original equipment manufacturer (OEM) seal or an aftermarket seal. OEM seals are made by the vehicle manufacturer and are guaranteed to fit perfectly. Aftermarket seals can be more affordable but may not always provide the same level of fit and performance.
7.2. Material Quality
The quality of the material used in the window seal will affect its durability and performance.
- Rubber Compounds: Look for seals made from high-quality rubber compounds, such as EPDM (ethylene propylene diene monomer). EPDM rubber is resistant to weathering, UV radiation, and temperature changes.
- Density and Thickness: Check the density and thickness of the seal. A denser, thicker seal will provide better protection against noise and water intrusion.
- Flexibility: Ensure that the seal is flexible enough to conform to the shape of the window frame. A seal that is too stiff may not provide a tight seal.
7.3. Seal Design
The design of the window seal can also affect its performance.
- Profile Shape: Choose a seal with a profile shape that matches the original seal. The profile shape is the cross-sectional shape of the seal.
- Lip Design: Look for seals with well-designed lips that create a tight seal against the glass and frame. The lips should be flexible and resilient.
- Retention Features: Some seals have retention features, such as clips or barbs, that help hold them in place. These features can make installation easier and more secure.
7.4. Installation Considerations
Consider the installation requirements of the replacement window seal.
- Ease of Installation: Choose a seal that is easy to install, especially if you are doing the job yourself. Look for seals with clear instructions and helpful features, such as pre-applied adhesive.
- Adhesive Compatibility: Ensure that the seal is compatible with the weather stripping adhesive you plan to use.
- Tool Requirements: Check the tool requirements for installing the seal. Some seals may require specialized tools.
7.5. Brand Reputation
Consider the reputation of the brand when choosing a replacement window seal.
- Research Brands: Research different brands of window seals and read reviews from other customers.
- Quality Assurance: Look for brands that have a reputation for quality and reliability.
- Warranty: Check the warranty offered by the manufacturer. A longer warranty indicates that the manufacturer has confidence in the quality of their product.
By considering these factors, you can choose the right replacement window seal for your vehicle and ensure a proper fit and long-lasting performance. CARDIAGTECH.NET offers a wide selection of high-quality window seals from trusted brands, along with expert advice to help you make the right choice.
8. Cost-Effective Solutions for Car Window Seal Repairs
Repairing or replacing car window seals doesn’t have to break the bank. There are several cost-effective solutions that can help you maintain your vehicle without overspending. CARDIAGTECH.NET provides insights into affordable options for car window seal repairs.
8.1. DIY Repairs
One of the most cost-effective ways to address car window seal issues is to perform the repairs yourself.
- Assess the Damage: Determine the extent of the damage and whether a simple repair is possible. Small cracks or loose seals can often be fixed without replacing the entire seal.
- Gather Supplies: Purchase the necessary tools and materials from CARDIAGTECH.NET. DIY kits often include everything you need for a basic repair, such as adhesive, sealant, and application tools.
- Follow Instructions: Carefully follow the instructions provided with the repair kit or online tutorials. Take your time and pay attention to detail to ensure a successful repair.
- Cost Savings: DIY repairs can save you a significant amount of money compared to professional repairs. You only pay for the materials, and you avoid labor costs.
8.2. Partial Replacement
If only a portion of the window seal is damaged, you may be able to replace just that section instead of the entire seal.
- Identify the Damaged Area: Carefully identify the section of the seal that needs to be replaced.
- Cut and Remove: Use a utility knife to cut and remove the damaged section.
- Measure and Cut Replacement: Measure the length of the removed section and cut a replacement piece from a new window seal.
- Apply Adhesive: Apply weather stripping adhesive to the window frame and the replacement section.
- Install and Secure: Install the replacement section and secure it with masking tape until the adhesive cures.
- Cost Savings: Partial replacement can save you money by reducing the amount of material needed and the labor involved.
8.3. Using Aftermarket Seals
Aftermarket window seals are often more affordable than OEM seals.
- Research Brands: Research different brands of aftermarket seals and read reviews from other customers.
- Check Compatibility: Ensure that the aftermarket seal is compatible with your vehicle’s make, model, and year.
- Compare Prices: Compare prices from different retailers to find the best deal.
- Cost Savings: Aftermarket seals can save you money without sacrificing quality or performance.
8.4. Preventative Maintenance
Preventative maintenance can help extend the life of your car window seals and prevent costly repairs.
- Regular Cleaning: Clean your window seals regularly with mild soap and water to remove dirt and debris.
- Protective Lubricants: Apply silicone lubricant to your window seals to keep them flexible and prevent them from drying out.
- UV Protection: Protect your window seals from UV radiation by parking in the shade or using window tint.
- Cost Savings: Preventative maintenance can save you money in the long run by reducing the need for repairs and replacements.
8.5. Shop Around for Quotes
If you prefer to have a professional repair your car window seals, shop around for quotes from different auto repair shops.
- Get Multiple Quotes: Contact several auto repair shops and ask for written quotes.
- Compare Prices: Compare the prices and services offered by different shops.
- Ask for Recommendations: Ask friends, family, or online forums for recommendations.
- Cost Savings: Shopping around for quotes can help you find the best price for professional repairs.
By considering these cost-effective solutions, you can maintain your car window seals without exceeding your budget. CARDIAGTECH.NET offers a wide range of affordable tools and materials for DIY repairs, as well as expert advice to help you save money.
9. Common Mistakes to Avoid When Fixing Car Window Seals
When fixing car window seals, it’s important to avoid common mistakes that can compromise the repair and lead to further issues. CARDIAGTECH.NET highlights these pitfalls to help you achieve a successful and long-lasting repair.
9.1. Using the Wrong Adhesive
One of the most common mistakes is using the wrong type of adhesive.
- Avoid General-Purpose Adhesives: General-purpose adhesives may not provide a strong or durable bond in automotive applications.
- Use Weather Stripping Adhesive: Use a weather stripping adhesive specifically designed for bonding rubber to metal or glass.
- Check Compatibility: Ensure that the adhesive is compatible with the materials used in your window seal and frame.
- Consequences: Using the wrong adhesive can result in a weak bond, premature seal failure, and water leaks.
9.2. Not Cleaning the Surface Properly
Failing to clean the surface properly before applying adhesive is another common mistake.
- Remove Dirt and Debris: Clean the surface thoroughly with soap and water to remove dirt, dust, and debris.
- Degrease the Surface: Use a degreaser to remove any grease, oil, or wax from the surface.
- Sand the Surface: Use fine-grit sandpaper to smooth the surface and remove any remaining residue.
- Wipe with Alcohol: Wipe the surface with rubbing alcohol to remove any sanding dust or contaminants.
- Consequences: A dirty or contaminated surface can prevent the adhesive from bonding properly, resulting in a weak seal.
9.3. Applying Too Much or Too Little Adhesive
Applying too much or too little adhesive can also compromise the repair.
- Follow Instructions: Follow the adhesive manufacturer’s instructions for application.
- Apply Thin Layer: Apply a thin, even layer of adhesive to both the window frame and the window seal.
- Avoid Excess: Avoid applying too much adhesive, as this can create a mess and prevent the seal from seating properly.
- Consequences: Applying too much adhesive can create a messy, uneven seal, while applying too little adhesive can result in a weak bond.
9.4. Stretching the Seal During Installation
Stretching the seal during installation can cause it to shrink and pull away from the frame over time.
- Measure Accurately: Measure the length of the window frame accurately before cutting the seal.
- Avoid Stretching: Avoid stretching the seal during installation. Allow it to relax and conform to the shape of the window frame naturally.
- Secure Properly: Secure the seal with masking tape or clamps until the adhesive cures.
- Consequences: Stretching the seal can cause it to shrink and pull away from the frame, resulting in gaps and leaks.
9.5. Neglecting Rust and Corrosion
Neglecting rust and corrosion on the window frame can compromise the repair and lead to further damage.
- Remove Rust: Remove any rust or corrosion from the window frame with a wire brush or sandpaper.
- Apply Rust Converter: Apply a rust converter to neutralize the corrosion and prevent it from spreading.
- Prime and Paint: Prime and paint the window frame to protect it from future rust and corrosion.
- Consequences: Rust and corrosion can weaken the window frame and prevent the seal from bonding properly.
9.6. Rushing the Job
Rushing the job can lead to mistakes and a poor-quality repair.
- Take Your Time: Take your time and pay attention to detail.
- Follow Instructions: Follow the instructions carefully.
- Double-Check Your Work: Double-check your work to ensure that everything is properly installed.
- Consequences: Rushing the job can result in mistakes, a poor-quality repair, and the need to redo the work.
By avoiding these common mistakes, you can increase your chances of a successful and long-lasting car window seal repair. CARDIAGTECH.NET provides all the high-quality tools and materials you need to do the job right, as well as expert advice to help you avoid common pitfalls.
10. Frequently Asked Questions (FAQs) About Car Window Seals
Here are some frequently asked questions about car window seals, along with detailed answers to help you better understand and maintain these important components. CARDIAGTECH.NET provides these FAQs to address common concerns and provide valuable insights.
10.1. What is a car window seal and what does it do?
A car window seal is a rubber or plastic strip that surrounds the edges of your car windows. It creates a tight barrier between the window and the car frame, preventing water, wind, and noise from entering the vehicle.
10.2. How do I know if my car window seal needs to be replaced?
Common signs that your car window seal needs to be replaced include:
- Visible cracks or damage to the seal
- Water leaks inside the car
- Excessive wind noise while driving
- The seal is loose or falling off
10.3. Can I replace a car window seal myself, or do I need a professional?
You can replace a car window seal yourself if you have the necessary tools and experience. However, if you are not comfortable with DIY repairs, it is best to hire a professional.
10.4. How much does it cost to replace a car window seal?
The cost to replace a car window seal varies depending on the type of vehicle, the type of seal, and whether you hire a professional or do it yourself. DIY replacement can cost between $20 and $100 for the seal and adhesive. Professional replacement can cost between $100 and $500, including labor.
10.5. What type of adhesive should I use to install a car window seal?
You should use a weather stripping adhesive specifically designed for bonding rubber to metal or glass. This type of adhesive is resistant to water, temperature changes, and UV radiation