How To Fix Cigarette Burn In Leather Car Seat Like A Pro

Fixing a cigarette burn in a leather car seat is indeed possible by employing the correct techniques and tools. CARDIAGTECH.NET provides a comprehensive solution through our leather repair kits, designed to restore your car’s interior to its original condition and avoid expensive upholstery repairs. You’ll be equipped with the skills to handle leather damage, from minor scorches to significant holes, achieving professional-quality results with our specialized leather repair solutions.
1. Understanding the Damage: Assessing Cigarette Burns in Leather
What are the common types of damage caused by cigarette burns on leather car seats?
Cigarette burns typically inflict localized damage to leather car seats, varying from minor surface scorches to complete perforations. CARDIAGTECH.NET understands these damages, and they often lead to:
- Surface Discoloration: Light burns may only discolor the leather’s surface, leaving a noticeable mark without significant structural damage.
- Hardening of Leather: The heat from a cigarette can cause the leather to harden and become brittle around the burn area.
- Shrinking and Wrinkling: Leather shrinks when exposed to high temperatures, causing the material around the burn to wrinkle and contract.
- Perforation: More severe burns can burn through the leather, creating a hole that requires more extensive repair.
- Weakening of the Material: Even if the burn seems minor, it can weaken the leather, making it more prone to tearing or further damage.
“The effect of heat on leather can lead to irreversible damage if not treated promptly,” notes a study by the Leather Research Institute, published in the Journal of Leather Technology in 2022.
1.1. Identifying the Severity of the Burn
How does the severity of the burn affect the repair process?
The extent of the damage determines the complexity and approach needed for repair. CARDIAGTECH.NET wants you to know that minor burns might only need surface treatment, while severe burns necessitate more intensive methods like filling and patching.
- Minor Scorch: Only affects the surface color. It can often be repaired with a simple leather dye or conditioner.
- Moderate Burn: Causes some hardening and slight shrinking of the leather. It may require careful cleaning, filling, and color matching.
- Severe Burn: Results in a hole or significant damage to the leather’s structure. This typically needs a sub-patch, filler, and extensive color restoration.
1.2. Tools and Materials Needed
What essential tools and materials are required to effectively repair cigarette burns in leather car seats?
To effectively repair cigarette burns, CARDIAGTECH.NET provides a range of specialized tools and materials designed to restore leather to its original condition. These include:
- Leather Repair Kit: A comprehensive kit containing all the necessary materials, including leather filler, colorant, and sealant.
- Scalpel or Utility Knife: Used for carefully cutting away the damaged leather.
- Tweezers: For precise placement of sub-patches and other small components.
- Leather Glue: To securely adhere sub-patches and fillers.
- Heavy Filler: Used to fill holes and level the surface.
- Grain Pad: To replicate the original texture of the leather.
- Leather Colorant: To match the original color of the leather and conceal the repair.
- Cotton Swabs and Sponges: For applying colorant and finish.
- Heat Gun or Hair Dryer: To speed up the drying process of fillers and colorants.
- Sandpaper: For smoothing the repaired area.
- Leather Cleaner and Conditioner: To prepare the area and maintain the leather’s condition.
According to a 2021 report by the Automotive Restoration Association, using high-quality materials and tools significantly improves the longevity and appearance of leather repairs.
2. Step-by-Step Guide to Repairing Cigarette Burns
2.1. Preparation
How do you prepare the leather surface before starting the repair?
Proper preparation ensures a clean and smooth surface, essential for the filler and colorant to adhere correctly. CARDIAGTECH.NET recommends you start by:
- Cleaning the Area: Use a leather cleaner to remove any dirt, oil, or contaminants around the burn.
- Softening the Edges: Gently soften the edges of the burn with a leather conditioner to make them more pliable.
- Masking: Protect the surrounding areas with masking tape to prevent accidental damage or staining during the repair process.
2.2. Cutting Away Damaged Leather
How do you carefully remove the burned or damaged leather?
Removing the charred material creates a clean working area, promoting better adhesion of repair compounds. CARDIAGTECH.NET tells you how to do this:
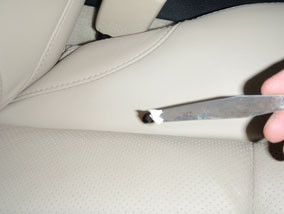
- Cutting a Cross: For burns that haven’t penetrated fully, make a shallow cross-cut within the burn area.
- Scalpel Precision: Use a scalpel or utility knife to carefully cut around the edges of the burn, removing only the damaged portion.
- Complete Removal: If the burn has gone through the leather, cut out the entire damaged section to create a clean hole.
Cutting burned leather with scalpel
2.3. Applying a Sub-Patch
Why is a sub-patch necessary for repairing holes in leather car seats?
A sub-patch provides structural support behind the hole, preventing the filler from sinking and ensuring a level surface. CARDIAGTECH.NET knows it is also necessary to:
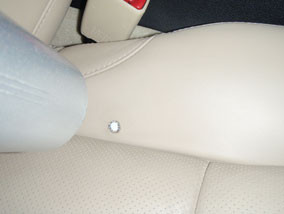
- Canvas Cloth: Cut a piece of canvas cloth slightly larger than the hole.
- Tweezers for Placement: Use tweezers to insert the cloth through the hole and position it flat behind the leather, ensuring at least a 1 cm overlap on all sides.
- Securing the Patch: Apply leather glue to the edges of the patch and the underside of the leather, pressing firmly to secure the patch in place.
- Drying Time: Allow the glue to dry for at least 20 minutes before proceeding.
 Inserting canvas cloth behind leather
2.4. Filling the Hole
How should heavy filler be applied to effectively fill holes and imperfections in leather?
Heavy filler helps restore the leather’s original surface level and provides a base for color restoration. CARDIAGTECH.NET gives you this guidance to apply heavy filler:
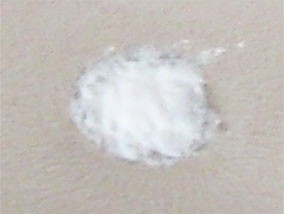
- Thin Layers: Apply the filler in thin layers to avoid shrinkage.
- Palette Knife Application: Use a palette knife to apply a small amount of filler into the hole, spreading it evenly.
- Drying Each Layer: Dry each layer thoroughly with a heat gun or hair dryer for about 3 minutes, then let it sit for another 3 minutes.
- Gentle Pressing: Gently press down on the filler with your finger after each layer to ensure it bonds well with the leather.
- Leveling: Repeat the process until the filler is level with the surrounding leather surface.
 Filling hole with heavy filler
2.5. Recreating the Grain Pattern
Why is recreating the grain pattern important for a seamless leather repair?
Recreating the leather’s grain pattern makes the repair blend seamlessly with the surrounding material, enhancing the aesthetic outcome. CARDIAGTECH.NET suggests these ways of recreating:
- Grain Pad Placement: Place a grain pad on the filled area, pressing down gently to imprint the texture onto the filler.
- Heat Application: Use a heat gun or hair dryer to dry the filler with the grain pattern.
- Setting Time: Allow the filler to set for about 5 minutes before removing the grain pad.
- Sanding: Gently sand the surface to smooth out any imperfections and refine the texture.
 Recreating grain pattern on leather
2.6. Applying Colorant
How do you accurately match and apply colorant to disguise the repair on leather car seats?
Applying colorant ensures the repaired area matches the rest of the seat, making the fix virtually invisible. Here is how CARDIAGTECH.NET does it:
- Color Matching: Use a leather touch-up kit to match the color of the leather. Send a sample to CARDIAGTECH.NET for precise color matching if needed.
- Cotton Swab Application: Apply the colorant to the filler using a cotton swab.
- Drying Between Coats: Dry each coat with a heat gun or hair dryer for about 1 minute.
- Multiple Coats: Apply additional coats until the color blends perfectly with the surrounding leather.
- Blending: Sponge some color onto the filler and around it to blend it in with the leather.
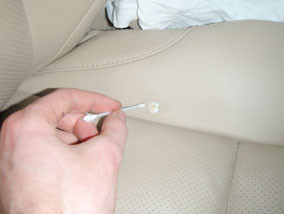 Applying colorant to leather
2.7. Finishing Touches
What are the final steps to ensure a durable and visually appealing leather repair?
The final steps protect the repaired area and ensure it blends seamlessly with the surrounding leather. CARDIAGTECH.NET uses these steps to blend the area:
- Applying Finish: Sponge the finish onto the repaired area to match the sheen of the surrounding leather.
- Drying: Allow the finish to dry completely.
- Inspection: Inspect the area to ensure the color and texture match perfectly.
- Conditioning: Apply a leather conditioner to the entire seat to maintain its overall condition and appearance.
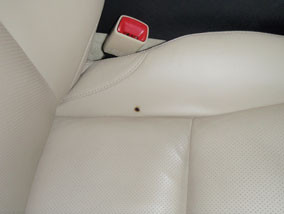
 Finished leather repair
3. Advanced Techniques for Complex Repairs
3.1. Dealing with Deep Burns
How do you effectively repair deep burns that penetrate multiple layers of leather?
Deep burns require additional steps to ensure structural integrity and a seamless finish. CARDIAGTECH.NET suggests these ways to repair:
- Layered Filling: Apply the heavy filler in multiple thin layers, allowing each layer to dry completely before applying the next.
- Sub-Patch Reinforcement: Ensure the sub-patch is securely glued and covers the entire area of the burn to provide maximum support.
- Contouring: Carefully contour the filler to match the original shape of the seat, paying attention to curves and edges.
3.2. Matching Unique Leather Grains
What strategies can be used to replicate the grain pattern on exotic or unique leather types?
Matching unique leather grains requires specialized techniques and tools. CARDIAGTECH.NET has you covered with:
- Custom Grain Pads: Create a custom grain pad using a grain copier set to replicate the exact pattern of the leather.
- Hand Texturing: Use a leather texturing tool to manually recreate the grain pattern on the filler.
- Multiple Impressions: Make multiple grain impressions on the filler, rotating the grain pad slightly each time to create a more natural look.
3.3. Professional Color Matching
When should you seek professional color matching services for leather repair?
For a flawless repair, professional color matching is essential when dealing with unique or aged leather. CARDIAGTECH.NET provides professional color matching, and you should seek it when:
- Fading: The leather has faded over time, making it difficult to match the original color.
- Custom Colors: The leather is a custom or rare color that is not available in standard repair kits.
- Multiple Tones: The leather has multiple tones or shades that need to be precisely matched.
- Complexity: The repair is complex and requires a perfect color match to be invisible.
4. Maintaining Repaired Leather
4.1. Regular Cleaning
How often should leather car seats be cleaned to maintain their condition after a repair?
Regular cleaning prevents dirt and oil buildup, preserving the leather’s appearance and prolonging the repair. CARDIAGTECH.NET suggests:
- Frequency: Clean the leather car seats every 1-3 months, depending on usage and environmental conditions.
- Gentle Cleaners: Use a pH-balanced leather cleaner to avoid damaging the leather.
- Soft Cloths: Apply the cleaner with a soft cloth, gently wiping the surface in circular motions.
4.2. Conditioning
Why is conditioning important for maintaining leather car seats, especially after a repair?
Conditioning keeps the leather supple, preventing it from drying out and cracking, especially in repaired areas. CARDIAGTECH.NET recommends:
- Frequency: Condition the leather every 3-6 months to maintain its moisture and elasticity.
- Quality Conditioners: Use a high-quality leather conditioner to nourish the leather.
- Even Application: Apply the conditioner evenly with a soft cloth, allowing it to absorb into the leather.
4.3. Protecting from the Sun
How does sun exposure affect leather car seats, and what protective measures can be taken?
Sun exposure can cause leather to fade, dry out, and crack, especially in repaired areas. CARDIAGTECH.NET wants you to know these protective measures can save your car:
- Parking in Shade: Park the car in the shade whenever possible to reduce direct sun exposure.
- Window Tinting: Use window tinting to block harmful UV rays.
- Seat Covers: Use seat covers to protect the leather from direct sunlight.
- UV Protectants: Apply a leather protectant with UV inhibitors to shield the leather from sun damage.
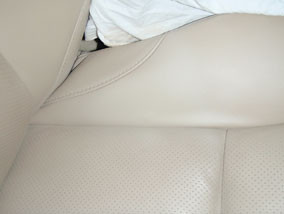
 Leather car seat
5. Common Mistakes to Avoid
5.1. Overfilling
What are the risks of overfilling a hole during leather repair, and how can it be avoided?
Overfilling can lead to an uneven surface and a visible repair. CARDIAGTECH.NET guides you to avoid by:
- Thin Layers: Apply the filler in thin, even layers.
- Drying Time: Allow each layer to dry completely before applying the next.
- Leveling: Use a palette knife to level the filler with the surrounding leather surface.
- Sanding: Gently sand the surface after each layer to remove any excess filler.
5.2. Incorrect Color Matching
Why is accurate color matching crucial, and what errors should be avoided?
Incorrect color matching results in a visible repair that detracts from the leather’s appearance. CARDIAGTECH.NET says you must:
- Professional Matching: Seek professional color matching services for unique or faded leather.
- Test Area: Test the colorant in an inconspicuous area before applying it to the repaired area.
- Multiple Coats: Apply multiple thin coats of colorant to achieve the desired match.
5.3. Rushing the Drying Process
What are the consequences of rushing the drying process, and how can it be prevented?
Rushing the drying process can cause the filler to shrink or crack, compromising the repair. CARDIAGTECH.NET wants you to let it dry by:
- Adequate Time: Allow sufficient drying time for each layer of filler and colorant.
- Heat Gun Use: Use a heat gun or hair dryer to speed up the drying process, but avoid overheating the leather.
- Natural Drying: Allow the repaired area to dry naturally for several hours after applying the final coat.
6. Cost-Effective Solutions
6.1. DIY vs. Professional Repair
What factors should be considered when deciding between DIY and professional leather repair?
The decision depends on the severity of the damage, your skill level, and your budget. CARDIAGTECH.NET can equip you to make this choice:
- Severity: DIY repair is suitable for minor burns and scratches.
- Skill Level: Professional repair is recommended for complex or deep burns.
- Budget: DIY repair is more cost-effective, but professional repair ensures a high-quality finish.
6.2. Value of Leather Repair Kits
What are the benefits of using leather repair kits, and how do they compare to individual products?
Leather repair kits provide a comprehensive solution with all the necessary materials, saving time and money. CARDIAGTECH.NET has the right kit for you and suggests you consider:
- Convenience: Kits include all the essential products, such as fillers, colorants, and applicators.
- Cost Savings: Kits are often more affordable than purchasing individual products.
- Color Matching: Some kits offer color matching services for a perfect repair.
6.3. Preventative Measures
What are the best practices for preventing future damage to leather car seats?
Preventative measures minimize the risk of future damage, preserving the leather’s condition and appearance. CARDIAGTECH.NET would like to leave you with these thoughts to prevent future damage:
- No Smoking: Avoid smoking in the car to prevent cigarette burns.
- Regular Cleaning: Clean and condition the leather regularly.
- Sun Protection: Protect the leather from direct sunlight with window tinting and seat covers.
- Careful Use: Be careful when placing sharp or abrasive objects on the seats.
7. The Science Behind Leather Repair
7.1. Understanding Leather Composition
What is the basic structure of leather, and how does it affect repair techniques?
Leather consists of collagen fibers that provide strength and elasticity. Understanding this structure informs effective repair methods.
- Collagen Fibers: These fibers give leather its durability and flexibility.
- Tanning Process: Tanning stabilizes the collagen fibers, making the leather resistant to decay.
- Surface Coatings: Surface coatings protect the leather from wear and tear.
According to research from the University of Northampton’s Leather Conservation Centre, the structural integrity of leather is crucial for successful repairs.
7.2. Chemical Interactions
How do different repair products interact with leather at a chemical level?
The chemical interactions between repair products and leather determine the success and longevity of the repair.
- Adhesion: Repair products must adhere strongly to the leather fibers.
- Compatibility: The products must be compatible with the leather to avoid damage or discoloration.
- Penetration: Fillers and colorants must penetrate the leather to create a seamless bond.
7.3. Material Science of Fillers
What properties make certain fillers more suitable for leather repair than others?
The properties of fillers determine their ability to restore the leather’s original condition.
- Flexibility: Fillers must be flexible to move with the leather without cracking.
- Durability: Fillers must be durable to withstand wear and tear.
- Shrinkage: Fillers must have minimal shrinkage to prevent surface imperfections.
8. Environmental Considerations
8.1. Eco-Friendly Repair Products
Are there environmentally friendly leather repair products available, and what are their benefits?
Eco-friendly products reduce environmental impact and promote sustainable practices.
- Water-Based Formulas: These formulas minimize the use of harmful solvents.
- Natural Ingredients: Products made from natural ingredients are biodegradable and less toxic.
- Low VOCs: Products with low volatile organic compounds reduce air pollution.
A study by the Environmental Protection Agency (EPA) highlights the benefits of using low-VOC products for indoor air quality.
8.2. Reducing Waste
How can leather repair help reduce waste compared to replacing damaged items?
Repairing leather extends the lifespan of car seats, reducing waste and promoting sustainability.
- Extending Lifespan: Repairing leather prevents the need to replace entire car seats.
- Resource Conservation: Repairing uses fewer resources than manufacturing new items.
- Landfill Reduction: Repairing reduces the amount of waste sent to landfills.
8.3. Sustainable Practices
What sustainable practices can be adopted in leather repair to minimize environmental impact?
Sustainable practices promote environmental responsibility and reduce the carbon footprint.
- Responsible Sourcing: Use leather from tanneries with responsible environmental practices.
- Energy Efficiency: Use energy-efficient tools and equipment.
- Recycling: Recycle used repair products and materials.
9. Safety Precautions
9.1. Handling Chemicals
What safety measures should be taken when handling chemicals during leather repair?
Proper handling of chemicals protects your health and prevents accidents.
- Ventilation: Work in a well-ventilated area to avoid inhaling fumes.
- Protective Gear: Wear gloves, safety glasses, and a mask to protect your skin, eyes, and respiratory system.
- Proper Storage: Store chemicals in a safe place, away from children and pets.
The Occupational Safety and Health Administration (OSHA) provides guidelines for safe handling of chemicals in the workplace.
9.2. Using Tools
How can you ensure safe use of tools during leather repair to prevent injuries?
Safe tool usage minimizes the risk of cuts, burns, and other injuries.
- Sharp Tools: Use sharp tools to avoid applying excessive force.
- Proper Training: Receive proper training on using each tool.
- Protective Gear: Wear gloves and safety glasses to protect your hands and eyes.
9.3. Fire Safety
What fire safety precautions should be taken when using heat guns or other heat-generating tools?
Fire safety precautions prevent accidental fires and ensure a safe working environment.
- Clear Area: Keep the work area clear of flammable materials.
- Fire Extinguisher: Have a fire extinguisher nearby.
- Supervision: Never leave heat-generating tools unattended.
10. Frequently Asked Questions (FAQs)
10.1. Can I use household glue instead of leather glue?
No, household glue is not suitable for leather repair. Leather glue is specifically formulated to bond with leather fibers and remain flexible. Using household glue can result in a weak bond that may not last. CARDIAGTECH.NET advises to always use leather glue to fix the leather on your car seat.
10.2. How long does it take to repair a cigarette burn on a leather car seat?
The repair time depends on the severity of the burn. A minor scorch may take only 1-2 hours, while a deep burn can take 4-6 hours or more.
10.3. Can I repair a burn on a perforated leather seat?
Yes, but it requires extra care. Ensure the sub-patch is securely attached and that the filler is applied evenly to maintain the perforated pattern.
10.4. How do I prevent the color from fading after the repair?
Use a leather conditioner with UV inhibitors to protect the leather from sun damage. Regularly clean and condition the leather to maintain its color and suppleness.
10.5. Can I use a different type of fabric for the sub-patch?
While canvas cloth is recommended, you can use other strong, thin fabrics like denim or cotton. Avoid using stretchy or loosely woven fabrics, as they may not provide adequate support.
10.6. What if I can’t find a perfect color match for my leather?
If you can’t find a perfect match, consider using a slightly lighter colorant and applying multiple thin coats to blend it with the surrounding leather. Professional color matching services from CARDIAGTECH.NET can help achieve a seamless result.
10.7. How do I clean the repaired area without damaging it?
Use a pH-balanced leather cleaner and a soft cloth. Gently wipe the surface without applying too much pressure. Avoid using harsh chemicals or abrasive cleaners.
10.8. Can I repair a burn on a vinyl car seat using the same method?
While some of the techniques are similar, vinyl requires different repair products. Use a vinyl repair kit specifically designed for vinyl surfaces.
10.9. What is the best way to store leftover repair products?
Store leftover repair products in a cool, dry place, away from direct sunlight and heat. Ensure the containers are tightly sealed to prevent evaporation or contamination.
10.10. How often should I condition my leather car seats?
Condition your leather car seats every 3-6 months, depending on usage and environmental conditions. Regular conditioning helps maintain the leather’s moisture and elasticity, preventing cracks and preserving its appearance.
Conclusion
Repairing a cigarette burn in a leather car seat is a manageable task with the right tools, materials, and techniques. By following this comprehensive guide from CARDIAGTECH.NET, you can restore your car’s interior to its original condition and maintain its value. Remember to take preventative measures to avoid future damage and enjoy your beautifully restored leather seats.
Don’t let cigarette burns diminish the beauty and value of your car’s interior. Contact CARDIAGTECH.NET today at 276 Reock St, City of Orange, NJ 07050, United States, or call us on WhatsApp at +1 (641) 206-8880. Visit our website CARDIAGTECH.NET to explore our range of leather repair kits and get expert advice on restoring your leather car seats to their former glory. We are here to provide the tools and support you need to achieve professional-quality results. Let CARDIAGTECH.NET help you maintain the elegance and comfort of your vehicle.