How To Fix Crack Car Bumper: Your Ultimate Guide
Fixing a cracked car bumper doesn’t have to be a daunting task. At CARDIAGTECH.NET, we provide expert advice and top-quality tools to help you repair bumper cracks efficiently and effectively, restoring your vehicle’s appearance and structural integrity. Discover how to mend minor damages, bumper repair, and restore structural integrity with our comprehensive solutions.
1. Understanding When to Repair or Replace a Cracked Bumper
Determining whether to repair or replace a cracked bumper is crucial for both aesthetics and safety. Automotive plastic repairs have become increasingly viable, making repair a strong initial consideration. However, specific situations necessitate replacement.
1.1. Factors Favoring Bumper Repair
- Minor Cracks and Scratches: Small imperfections that don’t compromise the bumper’s structure are ideal for repair.
- Cost-Effectiveness: Repairs are typically more affordable than replacements, especially for localized damage.
- SMART Repairs Applicability: If cracks or dents are shallow, localized repairs can be performed without removing the bumper.
1.2. Situations Demanding Bumper Replacement
- Manufacturer Guidelines: Some manufacturers advise against repairs, mandating replacement for certain vehicles.
- Extensive Damage: Multiple or deep cracks that undermine the bumper’s integrity necessitate replacement.
- Compromised Safety: If the bumper’s structural integrity is significantly affected, replacement ensures optimal safety.
1.3 Is Automotive Plastic Repair Right for You?
| Factor | Repair | Replace |
|---|---|---|
| Damage Extent | Minor cracks, scratches, small dents | Large cracks, significant structural damage |
| Manufacturer Guidelines | Repair permitted | Repair not recommended or prohibited |
| Safety Concerns | Structural integrity can be restored safely | Structural integrity cannot be restored safely |
| Cost | Lower upfront cost | Higher upfront cost |
| Efficiency | Faster for minor damage | Faster for extensive damage |
| Long-Term Solution | Suitable for minor aesthetic issues | Necessary for ensuring long-term safety and structural reliability |
2. Assessing the Damage: A Comprehensive Approach
A thorough assessment is vital in deciding between repair and replacement. Consider these questions to guide your decision:
2.1. Feasibility of Repair
- Manufacturer’s Guidelines: Check the vehicle’s manual to confirm if bumper repairs are permitted.
- Crack Size and Depth: Assess the crack’s dimensions to determine if it compromises the bumper’s structure.
2.2. Safety Considerations
- Structural Integrity: Evaluate if the repair will restore the bumper to its original strength.
- Safety Systems: Ensure repairs don’t affect vehicle safety systems and sensors.
2.3. Efficiency Analysis
- Time Estimate: A Vehicle Damage Assessor (VDA) should estimate the repair time.
- Cost Comparison: Compare the repair cost to the cost of a new bumper, including parts and labor.
2.4. Customer Needs
- Short-Term vs. Long-Term Fix: Discuss the pros and cons of each option with the customer.
- Timeliness: Understand the customer’s timeline and offer solutions that meet their needs.
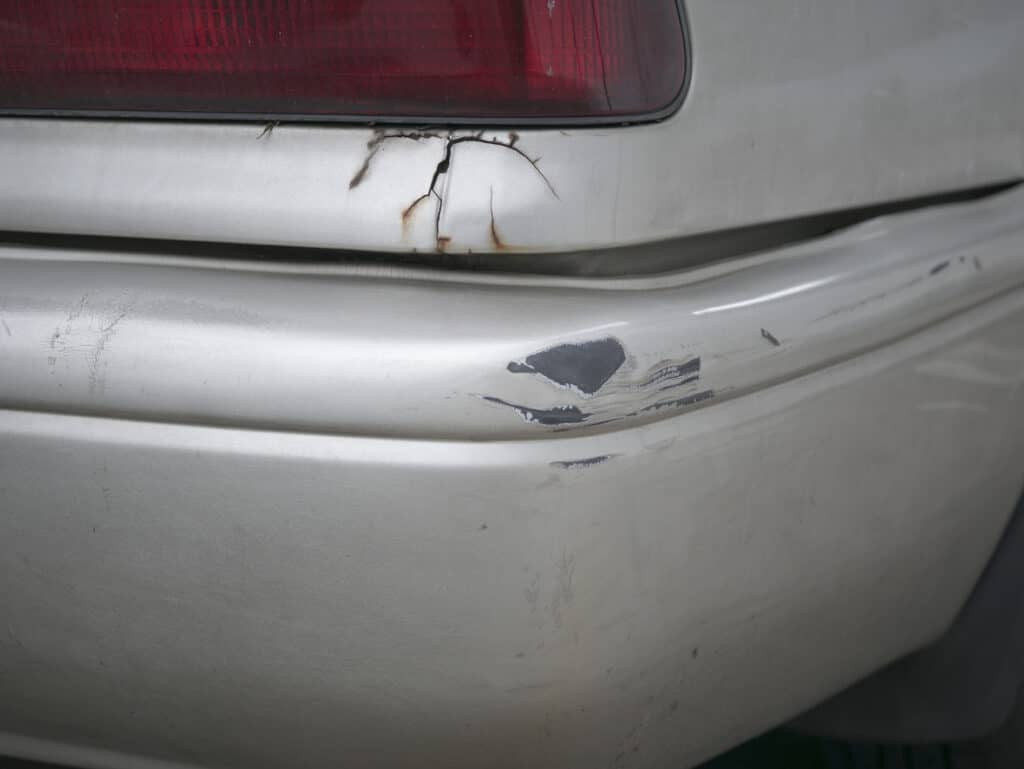
Close-up of a severely cracked car bumper
Alt Text: Detailed view of extensive cracking on a car’s plastic bumper.
3. Step-by-Step Guide to Repairing a Cracked Bumper
When repair is the chosen route, follow these steps for a flawless finish.
3.1. Initial Assessment
- Remove the Bumper (if necessary): Removing the bumper provides a comprehensive view of the damage.
- Evaluate the Crack: Determine the extent of the crack and any hidden damage.
3.2. Protection and Masking
- Apply Protective Tape: Use JTAPE Premium Cloth Protection Tape to safeguard adjacent panels from drilling, sanding, and painting.
- Prevent Overspray: Ensure a clean, high-quality finish by protecting surrounding areas.
3.3. Drilling to Prevent Further Cracking
- Drill Hole Placement: Drill 6mm holes at each end of the crack to prevent further propagation.
- Crack Barrier: These holes act as a barrier, stopping the crack from spreading.
3.4. Carving and Grinding
- Create a V-Groove: Carve a V-shaped groove along the crack to increase the bonding surface area.
- Remove Residue: Use a grinder and sharp knife to remove excess plastic, following the V pattern.
3.5. Sanding the Damaged Area
- Medium Grit Sanding: Sand both the front and back of the bumper using medium-grit sandpaper.
- Promote Adhesion: Micro-abrasions enhance the adhesion of the plastic adhesion promoter and paint.
3.6. Applying Plastic Adhesion Promoter
- Spray Application: Apply the promoter to the front and back of the damaged area.
- Proper Adhesion: Ensures epoxy and filler adhere correctly for a smooth finish.
3.7. Applying Epoxy
- Epoxy Application: Apply epoxy to both sides of the bumper and allow ample drying time.
- Back First: Start with the back for reinforcement before moving to the more visible front.
3.8. Surface Preparation
- Sanding Again: Sand the area again after the epoxy has dried to create a smooth base.
- Feather the Edges: Feather the edges of the repair area and create a slight depression where the crack was.
3.9. Applying Body Filler
- Even Application: Apply automotive body filler evenly to the repair area, following the bumper’s contours.
- Smooth Finish: Use a spreader to ensure a professional finish.
- Sanding After Drying: Lightly sand the area to prepare it for painting.
3.10. Painting the Bumper
- Masking: Use JTAPE Foam Masking Tapes to mask off surrounding panels for a seamless blend.
- Priming: Apply an even coat of primer and allow it to dry completely.
- Base Color: Spray several coats of the base color, allowing each layer to dry.
- Clear Coat: Finish with a few clear coat layers.
- Remove Masking Tape: Reveal a perfect blend and a high-quality finish.
 Technician preparing a car bumper for repair
Alt Text: Auto mechanic carefully preparing a car’s silver bumper for a plastic crack repair.
4. Advanced Techniques and Considerations
4.1. Removing the Bumper
- When to Remove: Remove the bumper for extensive damage or suspected defects on the back.
- Procedure: Lift the car with a jack and locate pins, latches, and screws in the wheel arches. Remove these along with any electrical connections.
4.2. Handling Cracks Extending to the Bumper End
- Replacement Recommendation: If a crack runs to the end of the bumper, replacement is typically necessary due to compromised structural integrity.
5. The Importance of Quality Tools and Materials from CARDIAGTECH.NET
Using high-quality tools and materials is essential for successful bumper repair. At CARDIAGTECH.NET, we offer a wide range of products specifically designed for automotive repairs.
5.1. Recommended Tools and Materials
- JTAPE Premium Cloth Protection Tape: Provides excellent protection during sanding and painting.
- Plastic Adhesion Promoter: Ensures proper adhesion of repair materials.
- Automotive Body Filler: Delivers a smooth, professional finish.
- JTAPE Foam Masking Tapes: Creates a soft-edge finish for seamless paint blending.
5.2. Benefits of Using Quality Products
- Enhanced Durability: Quality materials ensure long-lasting repairs.
- Improved Finish: Professional-grade tools help achieve a flawless finish.
- Increased Efficiency: Reliable tools reduce repair time and effort.
6. Cost Analysis: Repair vs. Replacement
Understanding the cost implications of each option helps in making an informed decision.
6.1. Factors Affecting Repair Costs
- Extent of Damage: More severe damage requires more time and materials.
- Labor Costs: Hourly rates for technicians can vary.
- Material Costs: Prices of fillers, paints, and other repair materials.
6.2. Factors Affecting Replacement Costs
- Bumper Price: Varies depending on the make and model of the vehicle.
- Labor Costs: Installation can take several hours.
- Additional Parts: May include brackets, lights, and sensors.
6.3 Repair Vs. Replacement Cost
| Aspect | Repair | Replacement |
|---|---|---|
| Materials | $50 – $200 (depending on the extent of damage) | Bumper: $200 – $1000+ |
| Labor | $100 – $400 (2-8 hours) | $100 – $500 (2-10 hours) |
| Additional Costs | Sandpaper, fillers, paint, masking tape | Mounting hardware, sensors, lights |
| Total Estimated | $150 – $600 | $300 – $1500+ |
| Long-Term Value | Best for minor cosmetic damage | Necessary for safety and structural integrity |
7. Maintaining Your Repaired Bumper
Proper maintenance extends the life of your repaired bumper.
7.1. Regular Cleaning
- Gentle Washing: Use mild soap and water to remove dirt and debris.
- Avoid Harsh Chemicals: Steer clear of abrasive cleaners that can damage the paint.
7.2. Protective Coatings
- Waxing: Apply wax to protect the paint from UV rays and environmental factors.
- Sealants: Consider using paint sealants for added protection.
7.3. Addressing Minor Damage Promptly
- Touch-Up Paint: Use touch-up paint to address small scratches and chips quickly.
- Professional Inspection: Have the bumper inspected regularly by a professional.
8. Overcoming Common Challenges in Bumper Repair
8.1. Color Matching
- Professional Matching: Consult with paint specialists to ensure accurate color matching.
- Blending: Blend the new paint seamlessly with the existing paint for a uniform finish.
8.2. Adhesion Issues
- Proper Preparation: Thoroughly clean and prepare the surface before applying repair materials.
- Quality Products: Use high-quality adhesion promoters and fillers.
8.3. Structural Weakness
- Reinforcement: Reinforce the repaired area with epoxy and fiberglass for added strength.
- Professional Advice: Seek advice from experienced technicians on structural repairs.
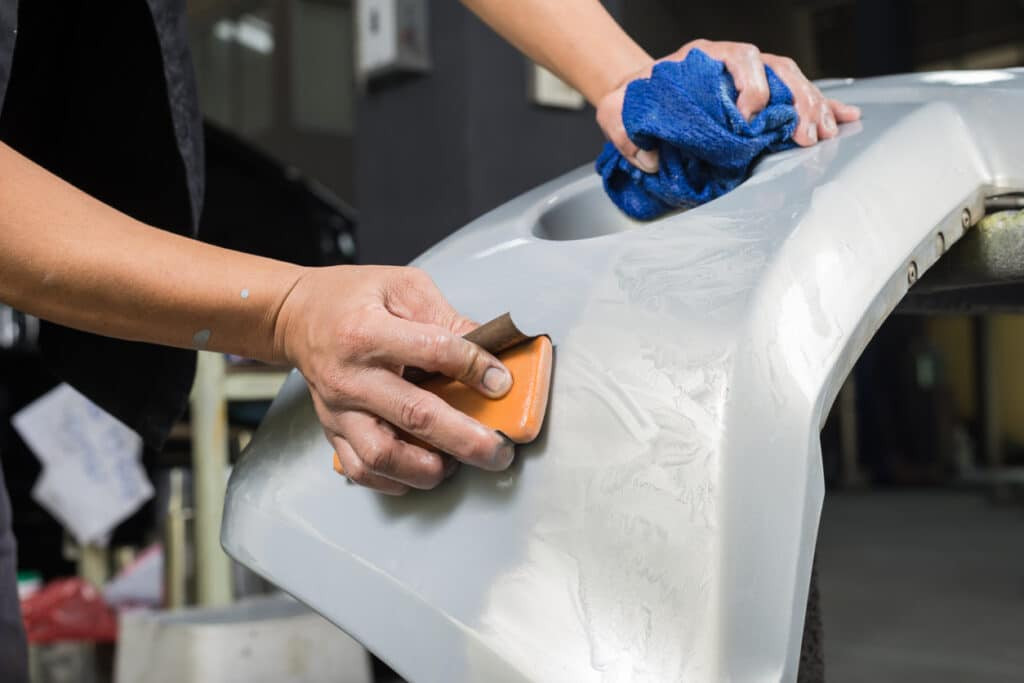 Hands cleaning a car bumper with a cloth
Alt Text: Close-up of hands carefully cleaning a car bumper during a repair process.
9. The Future of Automotive Plastic Repairs
Advancements in materials and techniques are continually improving automotive plastic repairs.
9.1. Technological Advancements
- Advanced Adhesives: New adhesives offer stronger bonds and faster drying times.
- 3D Printing: Emerging technology allows for the creation of custom bumper parts and repair pieces.
9.2. Sustainable Practices
- Recycled Materials: Increased use of recycled plastics in bumper manufacturing.
- Eco-Friendly Products: Development of environmentally friendly repair materials.
10. Why Choose CARDIAGTECH.NET for Your Automotive Repair Needs?
At CARDIAGTECH.NET, we understand the challenges you face in automotive repair. Our mission is to provide you with the tools, knowledge, and support you need to excel.
10.1. Expertise and Experience
- Decades of Experience: We bring extensive expertise in automotive repair and refinishing.
- Expert Advice: Our team is dedicated to providing you with the best solutions for your specific needs.
10.2. Quality Products
- Wide Range of Products: We offer a comprehensive selection of high-quality tools and materials.
- Trusted Brands: We partner with leading manufacturers to ensure reliability and performance.
10.3. Customer Support
- Dedicated Support: Our customer support team is here to assist you with any questions or concerns.
- Training Resources: We provide access to training materials and resources to enhance your skills.
11. Real-World Examples of Successful Bumper Repairs
11.1. Case Study 1: Minor Crack Repair
- Scenario: A customer reported a small crack on their bumper after a minor parking mishap.
- Solution: Our technician assessed the damage and performed a SMART repair, saving the customer time and money.
11.2. Case Study 2: Extensive Damage Restoration
- Scenario: A vehicle with multiple cracks and dents on the bumper required extensive repair work.
- Solution: The technician carefully repaired the bumper, reinforced it with epoxy, and repainted it to match the original color, restoring the vehicle’s appearance.
11.3 Case Study 3: Bumper Replacement
- Scenario: A customer’s bumper had extensive damage due to a high-speed collision, rendering the bumper beyond repair.
- Solution: Following safety protocols, our certified technician replaced the entire bumper. We ensured the new bumper matched the vehicle’s specifications and paint code, restoring both safety and aesthetics.
12. Expert Tips for Achieving a Professional Finish
12.1. Surface Preparation
- Thorough Cleaning: Ensure the surface is free of dirt, grease, and wax.
- Proper Sanding: Use the correct grit sandpaper for each stage of the repair.
12.2. Material Application
- Even Coats: Apply materials in thin, even coats to prevent drips and runs.
- Drying Time: Allow sufficient drying time between coats for optimal adhesion.
12.3. Painting Techniques
- Blending: Blend the new paint seamlessly with the existing paint.
- Clear Coat: Apply a clear coat for added protection and shine.
13. Staying Updated with Industry Trends
13.1. Continuous Learning
- Training Programs: Participate in training programs to stay updated with the latest techniques.
- Industry Events: Attend industry events to network with professionals and learn about new products.
13.2. Online Resources
- Blogs and Forums: Follow automotive repair blogs and forums for tips and advice.
- Webinars: Attend webinars to learn from industry experts.
14. Legal and Safety Considerations
14.1. Compliance
- Local Regulations: Comply with local regulations regarding automotive repairs.
- Safety Standards: Adhere to safety standards to protect yourself and your customers.
14.2. Insurance
- Coverage: Understand your insurance coverage for automotive repairs.
- Documentation: Keep accurate records of all repairs and expenses.
15. Frequently Asked Questions (FAQ) About Fixing Cracked Car Bumpers
15.1. Can I fix a cracked bumper myself?
- Yes, for minor damage. However, professional repair is recommended for extensive cracks or structural damage.
15.2. How much does it cost to repair a cracked bumper?
- The cost varies depending on the extent of the damage, typically ranging from $150 to $600.
15.3. Is it better to repair or replace a cracked bumper?
- Repair is suitable for minor damage, while replacement is necessary for extensive or structural damage.
15.4. What tools do I need to repair a cracked bumper?
- Essential tools include sandpaper, body filler, plastic adhesion promoter, epoxy, and paint.
15.5. How long does it take to repair a cracked bumper?
- Repair time varies from a few hours to a full day, depending on the damage severity.
15.6. Can a cracked bumper affect my car’s safety?
- Yes, if the structural integrity is compromised, it can affect the car’s safety in a collision.
15.7. What is SMART repair?
- SMART (Small to Medium Area Repair Technology) is a cost-effective repair method for minor damage.
15.8. How do I choose the right body filler?
- Choose a body filler specifically designed for automotive plastic repairs.
15.9. How can I ensure a perfect color match when painting?
- Consult with paint specialists for accurate color matching and blending techniques.
15.10. What are the latest advancements in automotive plastic repair?
- Advancements include advanced adhesives, 3D printing for custom parts, and eco-friendly materials.
16. Call to Action: Contact CARDIAGTECH.NET Today!
Ready to tackle that cracked bumper? Don’t let minor damages turn into major headaches. Contact CARDIAGTECH.NET today for expert advice and the best tools and materials in the industry.
16.1. Why Wait?
- Restore Your Vehicle’s Appearance: A repaired bumper enhances your car’s aesthetics.
- Ensure Safety: Proper repairs maintain your vehicle’s structural integrity and safety features.
- Save Money: Repairing is often more cost-effective than replacing.
16.2. How to Reach Us
- Address: 276 Reock St, City of Orange, NJ 07050, United States
- WhatsApp: +1 (641) 206-8880
- Website: CARDIAGTECH.NET
Let CARDIAGTECH.NET be your partner in achieving professional, durable, and cost-effective bumper repairs. Contact us now and experience the difference!