How To Fix Crack In Car Bumper: Your Expert Guide
A cracked car bumper is not only an eyesore but can also compromise your vehicle’s safety and structural integrity. At CARDIAGTECH.NET, we understand the importance of maintaining your car’s appearance and safety. This guide will walk you through the process of assessing the damage, repairing cracks, and knowing when replacement is the better option, ensuring you make the best decision for your vehicle.
1. Understanding When to Repair vs. Replace a Cracked Bumper
The decision to repair or replace a cracked bumper depends on several factors. Automotive plastic repairs have become increasingly viable as plastics are more frequently used in auto manufacturing. However, there are situations where replacement is necessary.
1.1 Assessing the Damage
A thorough evaluation is essential to determine the appropriate course of action. Here’s what to consider:
- Manufacturer Guidelines: Some manufacturers advise against repairs for specific models, necessitating bumper replacement.
- Extent of Damage: Multiple cracks or significant damage might compromise the bumper’s structural integrity, making replacement the safer option.
- SMART Repairs: For minor cracks or dents, localized repairs (SMART repairs) can be performed without removing the bumper, saving time and money.
1.2 Key Questions to Guide Your Decision
To make an informed decision, ask yourself these questions:
- Is Repair Possible? Check the manufacturer’s guidelines and assess the crack’s size and depth.
- Is Repair Safe? Ensure the repair restores the bumper’s structural integrity to its original safety standards. A compromised bumper can endanger drivers and passengers in future collisions.
- Is Repair Efficient? Minor cracks are typically more efficiently repaired. Extensive damage may require more time to repair than replacing the bumper.
- Is It the Best Option for the Customer? Be transparent with your customer about the pros and cons of each option, considering their budget and timeline.
1.3 Factors Influencing the Decision
| Factor | Repair | Replace |
|---|---|---|
| Damage Severity | Minor cracks, dents, and scratches. | Extensive damage, multiple cracks, or structural compromise. |
| Manufacturer Advice | Repair is permitted. | Repair is not recommended. |
| Efficiency | Faster and less expensive for small damages. | More efficient for severe damage that would take longer to repair. |
| Safety | The structural integrity of the bumper can be fully restored. | The structural integrity cannot be guaranteed through repair. |
| Cost | Lower upfront cost. | Higher upfront cost but potentially more cost-effective in the long run for extensive damage. |
| Time | Less time required. | More time required due to ordering and installation. |
| Customer Needs | Suitable for customers seeking a quick and economical solution for minor cosmetic issues. | Best for customers prioritizing safety and long-term reliability, regardless of cost. |
| Vehicle Safety Systems | Repair does not affect any vehicle safety systems or sensors. | Damage has affected the vehicle’s safety systems and sensors, necessitating replacement to ensure proper functionality. |
| Underlying Structure | The underlying structure is intact and undamaged. | The underlying structure is damaged, and repair will not provide sufficient support. |
| Vehicle Resale Value | Repair may be a viable option if the owner is not concerned about maintaining the vehicle’s resale value. | Replacement is recommended to maintain or improve the vehicle’s resale value, especially if the damage is significant. |
| Long-Term Reliability | Repair may provide a temporary fix but may not be as durable as a replacement, potentially leading to future issues. | Replacement provides a more durable and reliable solution, ensuring long-term performance and safety. |
| Insurance Coverage | Repair may be fully or partially covered by insurance, depending on the policy and the circumstances of the damage. | Replacement may be fully covered by insurance, especially if the damage is extensive and deemed necessary for safety. |
| Environmental Impact | Repairing the bumper reduces waste and conserves resources compared to manufacturing and disposing of a new bumper. | Replacing the bumper contributes to waste and resource consumption but may be necessary for safety and proper vehicle functioning. |
| Availability of Parts | Repair may be more feasible if the necessary materials and tools are readily available. | Replacement may be delayed if the specific bumper model is not readily available and needs to be ordered. |
| Professional Expertise | Repair can be performed by skilled technicians with expertise in plastic welding, body filling, and painting techniques. | Replacement requires specialized knowledge and equipment to ensure proper installation and alignment, which is typically performed by trained professionals. |
| SMART Repair Suitability | Repair is well-suited for SMART (Small to Medium Area Repair Techniques) repairs, which focus on localized damage and minimal intervention. | Replacement is not suitable for SMART repairs and requires a more comprehensive approach. |
1.4 The Role of a Vehicle Damage Assessor (VDA)
A Vehicle Damage Assessor (VDA) can provide an accurate estimate of the repair time and costs. This estimate, compared with the cost of a new bumper and parts, helps determine the most efficient solution.
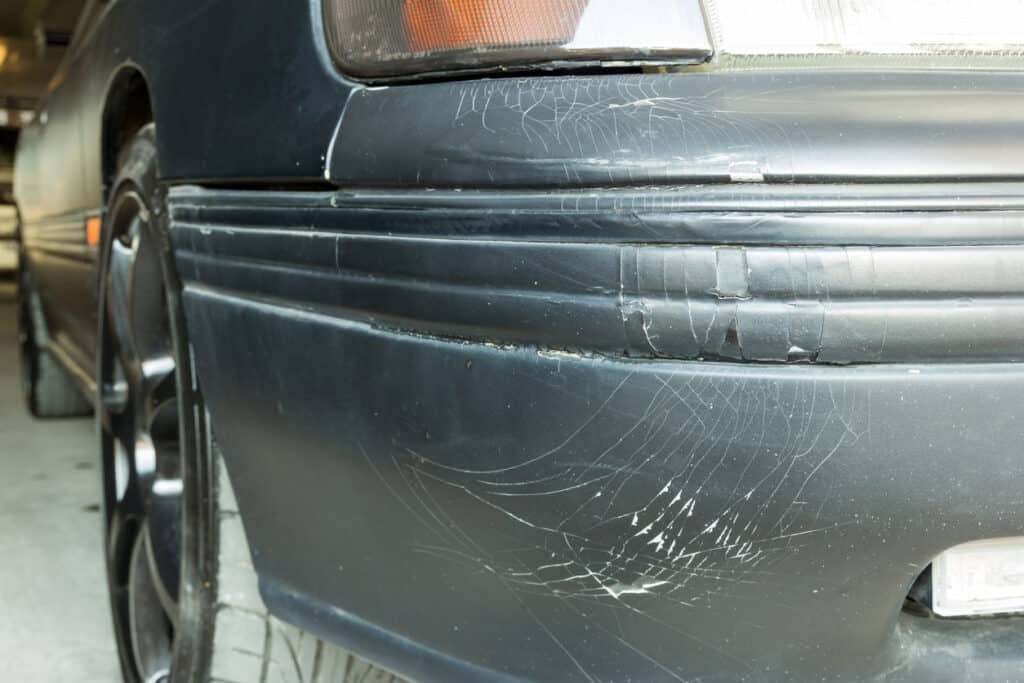
Front bumper zoomed in
Alt text: Close-up of a car’s front bumper showing minor scratches and imperfections on the painted surface.
2. Step-By-Step Guide: How to Repair a Cracked Bumper
If you decide to repair the bumper, follow these steps for a professional finish:
2.1 Step 1: Assess the Damage
Remove the bumper to fully evaluate the crack’s size, depth, and any hidden damage. This step confirms whether repair or replacement is the best course.
2.2 Step 2: Mask Off the Area
Protect adjacent panels from drilling, sanding, and painting. Use JTAPE Premium Cloth Protection Tape around the bumper’s edges to prevent unwanted damage or overspray.
2.3 Step 3: Drill to Prevent Further Cracking
Drill 6mm holes at each end of the crack to prevent it from spreading further. This creates a barrier and stabilizes the damaged area.
2.4 Step 4: Carve and Grind for Bonding
Create a V-shaped groove along the crack to increase the surface area for bonding. Use a grinder and sharp knife to remove excess plastic, following a ‘V’ pattern.
2.5 Step 5: Sand the Damaged Area
Sand both the front and back of the cracked area with medium-grit sandpaper. This removes damage and creates micro-abrasions, helping the plastic adhesion promoter and paint to bond effectively.
2.6 Step 6: Apply Plastic Adhesion Promoter
Spray a plastic adhesion promoter on the front and back of the damaged area. This ensures the epoxy and filler adhere properly, resulting in a smooth finish.
2.7 Step 7: Apply Epoxy to Both Sides
Apply epoxy to both sides of the bumper and allow it to dry. Start with the back for reinforcement, then move to the front for a better appearance. Use a spreader for smooth application.
2.8 Step 8: Prepare and Sand the Surface
After the epoxy dries, sand the area again to create a smooth base for the body filler. Feather the edges of the repair area and ensure a slight dip where the crack was.
2.9 Step 9: Apply Body Filler
Apply automotive body filler evenly to the repair area, following the bumper’s curves and corners. Use a spreader for a smooth, professional finish. Once dry, lightly sand the area to prepare it for painting.
2.10 Step 10: Paint the Bumper
Mask off the surrounding panels using JTAPE Foam Masking Tapes for a soft-edge finish. Apply an even coat of primer, let it dry, then spray several coats of the base color, allowing each layer to dry. Finish with a few clear coat layers. Remove the masking tape to reveal a seamless blend and a high-quality finish.
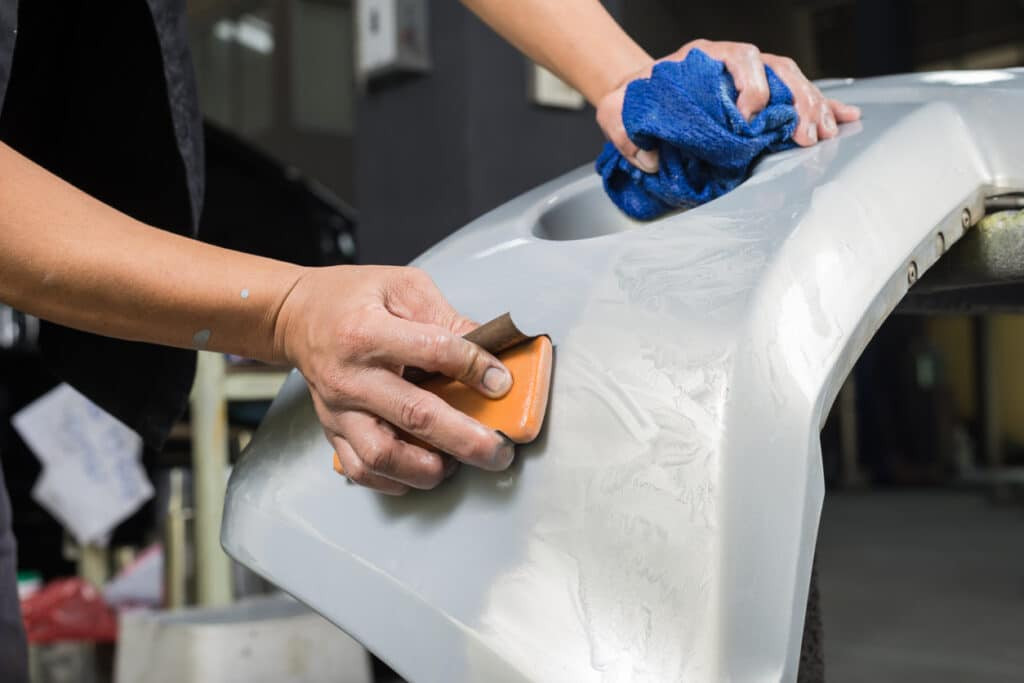
 Fixing a silver bumper
Alt text: A mechanic carefully working on the bumper of a silver car, ensuring a smooth and even surface.
2.11 When to Remove the Bumper
For minor scuffs, scratches, and cracks, removing the bumper might not be necessary. However, for larger areas of damage or suspected defects on the back, removal is best.
If removal is required:
- Lift the car with a jack.
- Locate the pins, latches, and screws holding the bumper in place, typically in the wheel arches.
- Remove all fasteners and any electrical connections.
2.12 Special Considerations
If the crack extends to the end of the bumper, replacement is often the better option due to compromised structural integrity.
3. Why Choose CARDIAGTECH.NET for Your Automotive Repair Needs
At CARDIAGTECH.NET, we understand the challenges you face as auto repair professionals. You need tools and equipment that enhance efficiency, accuracy, and safety. Here’s how we can help:
3.1 Addressing Your Challenges
- Physical Demands: Our tools are designed to reduce physical strain, making your job easier and more comfortable.
- Exposure to Harmful Substances: We offer equipment that minimizes contact with oil, grease, and chemicals, ensuring a safer working environment.
- Keeping Up with Technology: We provide the latest diagnostic and repair tools to keep you ahead of the curve in automotive technology.
- Time Constraints: Our efficient and reliable tools help you complete repairs quickly without compromising quality.
- Competition: Our high-quality tools enable you to deliver superior service, giving you a competitive edge.
- Finding Quality Tools: CARDIAGTECH.NET offers a wide range of top-quality tools tailored to your specific needs.
3.2 Our Commitment to Your Success
We are committed to providing solutions that enhance your work:
- Increased Efficiency: Our tools are designed to speed up repair times, allowing you to serve more customers.
- Enhanced Accuracy and Safety: Our precision tools ensure accurate repairs and safer working conditions.
- Cost Savings: By minimizing errors and reducing repair times, our tools help you save on costs.
- Increased Revenue: Efficient and high-quality service leads to greater customer satisfaction and increased revenue.
- Enhanced Reputation: Using top-quality tools enhances your reputation as a reliable and professional auto repair shop.
3.3 Explore Our Extensive Range of Automotive Tools
CARDIAGTECH.NET offers a comprehensive selection of tools and equipment, including:
- Diagnostic Tools: Advanced scanners and diagnostic systems for accurate problem identification.
- Welding Equipment: High-quality welders for strong and durable repairs.
- Sanding and Grinding Tools: Precision tools for surface preparation and finishing.
- Painting Equipment: Professional-grade spray guns and accessories for flawless paint jobs.
- Hand Tools: A wide variety of durable and reliable hand tools for all your repair needs.
3.4 Real-World Benefits
Here’s how our tools can transform your business:
- Increased Throughput: Complete more repairs in less time, boosting your shop’s productivity.
- Reduced Errors: Accurate diagnostic tools minimize the risk of misdiagnosis and costly mistakes.
- Improved Customer Satisfaction: High-quality repairs and efficient service lead to happier customers and repeat business.
- Enhanced Employee Morale: Providing your team with the best tools improves their job satisfaction and reduces turnover.
3.5 Call to Action
Don’t let outdated tools hold you back. Upgrade your auto repair shop with CARDIAGTECH.NET and experience the difference. Contact us today to discover how our tools can help you achieve greater efficiency, accuracy, and profitability.
Address: 276 Reock St, City of Orange, NJ 07050, United States
WhatsApp: +1 (641) 206-8880
Website: CARDIAGTECH.NET
Contact us now for expert advice and the best deals on automotive repair tools. Let CARDIAGTECH.NET be your partner in success.
 Close-up of hands cleaning a bumper
Alt text: Close-up image of a mechanic’s hands meticulously cleaning a car bumper, preparing it for further repair work.
4. Understanding the Costs Involved in Bumper Repair
The cost of repairing a cracked bumper can vary widely depending on the severity of the damage, the type of vehicle, and whether you choose to DIY or hire a professional. Here’s a breakdown of potential costs:
4.1 DIY Repair Costs
If you decide to repair the bumper yourself, you’ll need to factor in the cost of materials:
- Sandpaper: $10 – $20
- Body Filler: $20 – $40
- Epoxy: $15 – $30
- Primer: $10 – $20
- Paint: $20 – $50 (depending on the color and type)
- Masking Tape: $5 – $10
- Adhesion Promoter: $10 – $20
- Tools (if needed): Variable, could range from $20 for basic tools to hundreds for more specialized equipment.
Total DIY Cost: Roughly $110 – $230 + tools
4.2 Professional Repair Costs
Hiring a professional to repair your bumper can cost significantly more, but ensures a high-quality finish:
- Minor Crack Repair: $200 – $400
- Moderate Crack Repair: $400 – $700
- Severe Crack Repair: $700 – $1200+
These prices can vary based on location, shop rates, and the specific vehicle model.
4.3 Replacement Costs
Replacing a bumper is generally more expensive than repairing it:
- New Bumper (Unpainted): $200 – $800+ (depending on the vehicle)
- Painting: $200 – $500
- Installation: $100 – $300
Total Replacement Cost: $500 – $1600+
4.4 Factors Affecting the Costs
Several factors can influence the final cost of bumper repair or replacement:
- Vehicle Make and Model: Luxury vehicles and those with complex bumper designs tend to have higher repair costs.
- Type of Paint: Matching the exact color of your car can be expensive, especially for custom or rare colors.
- Labor Rates: Labor costs vary by region and shop, with larger cities generally having higher rates.
- Additional Damage: Hidden damage discovered during the repair process can increase costs.
4.5 Cost Comparison Table
| Repair Type | DIY Cost | Professional Repair Cost | Replacement Cost |
|---|---|---|---|
| Minor Crack | $110 – $230 | $200 – $400 | $500 – $1600+ |
| Moderate Crack | $110 – $230 | $400 – $700 | $500 – $1600+ |
| Severe Crack | $110 – $230 | $700 – $1200+ | $500 – $1600+ |
| New Bumper (Unpainted) | N/A | N/A | $200 – $800+ |
| Painting | $20 – $50 | Included | $200 – $500 |
| Installation | DIY | Included | $100 – $300 |
4.6 Insurance Considerations
If the bumper damage was caused by an accident, your insurance may cover the repair or replacement costs. Contact your insurance provider to understand your coverage and deductible. Keep in mind that filing a claim could potentially increase your premiums.
4.7 Making the Right Choice
When deciding whether to repair or replace a cracked bumper, consider the following:
- Budget: Determine how much you are willing to spend.
- Severity of Damage: Assess the extent of the damage and whether it compromises the structural integrity of the bumper.
- Long-Term Value: Consider the long-term value of your vehicle and whether a professional repair or replacement is a worthwhile investment.
By carefully evaluating these factors and understanding the costs involved, you can make an informed decision that best suits your needs and budget.
5. Safety Precautions When Repairing a Car Bumper
Repairing a car bumper can be a rewarding DIY project, but it’s crucial to prioritize safety. Here are essential safety precautions to keep in mind:
5.1 Personal Protective Equipment (PPE)
- Safety Glasses: Always wear safety glasses or goggles to protect your eyes from debris, dust, and chemical splashes.
- Gloves: Use chemical-resistant gloves to protect your hands from harsh chemicals, solvents, and adhesives.
- Respirator: Wear a respirator mask, especially when sanding or painting, to avoid inhaling harmful particles and fumes.
- Ear Protection: Use earplugs or earmuffs to protect your hearing when using power tools like grinders or sanders.
- Protective Clothing: Wear old clothes or a shop apron to protect your skin and clothing from paint, chemicals, and debris.
5.2 Workspace Safety
- Ventilation: Work in a well-ventilated area to avoid inhaling harmful fumes from paints, solvents, and adhesives. Open windows and doors or use a fan to circulate air.
- Lighting: Ensure adequate lighting to see clearly and avoid accidents. Use work lights if necessary.
- Cleanliness: Keep your workspace clean and free from clutter to prevent trips and falls. Clean up spills immediately.
- Fire Safety: Keep flammable materials away from heat sources and open flames. Have a fire extinguisher nearby in case of emergencies.
5.3 Tool Safety
- Read the Manual: Familiarize yourself with the operating instructions and safety guidelines for all tools you use.
- Inspect Tools: Before each use, inspect your tools for damage or wear. Replace damaged tools immediately.
- Use Correct Tools: Use the right tool for the job. Avoid using tools for purposes they were not designed for.
- Power Tool Safety:
- Ensure power tools are properly grounded.
- Use extension cords that are rated for the tool’s amperage.
- Keep cords away from sharp edges and heat.
- Turn off and unplug power tools before changing accessories or making adjustments.
- Hand Tool Safety:
- Use the correct size wrench or socket to avoid stripping bolts.
- Cut away from yourself when using knives or blades.
- Wear gloves to protect your hands from cuts and abrasions.
5.4 Chemical Safety
- Read Labels: Carefully read and follow the instructions and warnings on all chemical products.
- Storage: Store chemicals in their original containers, tightly sealed, and in a cool, dry place away from heat and sunlight.
- Disposal: Dispose of used chemicals and materials (e.g., rags, sandpaper) properly according to local regulations.
- First Aid: Know the first aid procedures for each chemical you are using. Keep a first aid kit readily available.
5.5 Vehicle Safety
- Secure Vehicle: Park the vehicle on a level surface, engage the parking brake, and use wheel chocks to prevent movement.
- Disconnect Battery: Disconnect the negative terminal of the battery to prevent electrical shorts or shocks.
- Support Vehicle: If you need to lift the vehicle, use jack stands to support it securely. Never work under a vehicle supported only by a jack.
- Component Handling: Be careful when removing and handling vehicle components. Some parts may be heavy or have sharp edges.
5.6 Additional Tips
- Stay Focused: Avoid distractions and concentrate on the task at hand.
- Take Breaks: If you’re working on a complex or time-consuming repair, take breaks to avoid fatigue.
- Ask for Help: If you’re unsure about any step of the repair process, don’t hesitate to ask for help from a qualified professional.
By following these safety precautions, you can minimize the risk of accidents and injuries while repairing your car bumper and ensure a safe and successful DIY project.
6. Tools and Materials Needed for Bumper Repair
Repairing a cracked car bumper requires a specific set of tools and materials to ensure a professional and durable finish. Here’s a comprehensive list to help you get started:
6.1 Safety Gear
- Safety Glasses: Protect your eyes from debris and chemical splashes.
- Gloves: Chemical-resistant gloves to protect your hands.
- Respirator: To avoid inhaling harmful particles and fumes.
- Ear Protection: Earplugs or earmuffs for noisy tools.
- Protective Clothing: Old clothes or a shop apron.
6.2 Preparation Tools
- Socket Set and Wrenches: For removing and reinstalling the bumper and related components.
- Screwdrivers: Assorted sizes for various screws and fasteners.
- Trim Removal Tools: To remove plastic trim and panels without damage.
- Power Drill: For drilling holes to stop crack propagation.
- Grinder: With a suitable grinding disc for creating a V-groove.
- Sandpaper: Assorted grits (e.g., 80, 180, 320, 400) for sanding and surface preparation.
- Sanding Block: To ensure even sanding.
- Masking Tape: For protecting adjacent areas from overspray.
- Masking Paper or Plastic Sheeting: For covering larger areas.
- Cleaning Supplies: Soap, water, and a clean cloth for cleaning the bumper.
- Wax and Grease Remover: To remove contaminants before painting.
6.3 Repair Materials
- Plastic Adhesion Promoter: To improve adhesion of repair materials.
- Epoxy: For bonding and reinforcing the cracked area.
- Body Filler (Bondo): For filling in imperfections and creating a smooth surface.
- Spreader: For applying body filler evenly.
- Primer: To create a uniform base for paint.
- Automotive Paint: Matching the vehicle’s color code.
- Clear Coat: For protecting the paint and adding shine.
- Mixing Cups and Sticks: For mixing epoxy, body filler, and paint.
6.4 Painting Equipment
- Spray Gun: For applying primer, paint, and clear coat (optional; aerosol cans can be used for smaller repairs).
- Air Compressor: To power the spray gun (if using a professional spray gun).
- Paint Thinner: For cleaning the spray gun.
6.5 Optional Tools and Materials
- Heat Gun: For shaping and molding plastic.
- Plastic Welder: For welding plastic bumpers (requires practice and skill).
- Jack and Jack Stands: For lifting the vehicle to remove the bumper (if necessary).
- Work Light: For better visibility in the work area.
- Vacuum Cleaner: For cleaning up dust and debris.
6.6 Recommended Brands and Products
- 3M: Sandpaper, masking tape, body filler, and automotive paint.
- SEM: Plastic adhesion promoter and flexible parts repair materials.
- Evercoat: Body filler and glazing putty.
- DuPont or PPG: Automotive paint and clear coat.
- Norton: Sandpaper and abrasives.
- Milwaukee, DeWalt, or Makita: Power tools.
6.7 Shopping Checklist
Before starting your bumper repair project, use this checklist to ensure you have everything you need:
- [ ] Safety Glasses
- [ ] Gloves
- [ ] Respirator
- [ ] Ear Protection
- [ ] Protective Clothing
- [ ] Socket Set and Wrenches
- [ ] Screwdrivers
- [ ] Trim Removal Tools
- [ ] Power Drill
- [ ] Grinder
- [ ] Sandpaper (Assorted Grits)
- [ ] Sanding Block
- [ ] Masking Tape
- [ ] Masking Paper or Plastic Sheeting
- [ ] Cleaning Supplies
- [ ] Wax and Grease Remover
- [ ] Plastic Adhesion Promoter
- [ ] Epoxy
- [ ] Body Filler
- [ ] Spreader
- [ ] Primer
- [ ] Automotive Paint
- [ ] Clear Coat
- [ ] Mixing Cups and Sticks
- [ ] Spray Gun (or Aerosol Cans)
- [ ] Air Compressor (if using a spray gun)
- [ ] Paint Thinner
- [ ] Heat Gun (Optional)
- [ ] Plastic Welder (Optional)
- [ ] Jack and Jack Stands (Optional)
- [ ] Work Light (Optional)
- [ ] Vacuum Cleaner (Optional)
Having all the necessary tools and materials on hand will make the bumper repair process smoother, safer, and more efficient, resulting in a professional-looking repair that lasts.
7. Tips for Achieving a Professional Finish
Repairing a cracked car bumper requires attention to detail to achieve a professional-looking finish. Here are some tips to help you get the best results:
7.1 Preparation is Key
- Thorough Cleaning: Start by thoroughly cleaning the bumper with soap and water to remove dirt, grease, and contaminants. Follow up with a wax and grease remover for a pristine surface.
- Proper Sanding: Use the correct grit sandpaper for each stage of the repair. Start with a coarser grit to remove imperfections and gradually move to finer grits for a smooth finish.
- Feathering: Feather the edges of the repair area by gradually sanding down the surrounding paint. This creates a seamless transition between the repair and the original finish.
- Masking: Take your time to properly mask off the surrounding areas to protect them from overspray. Use high-quality masking tape and paper or plastic sheeting.
7.2 Applying Repair Materials
- Plastic Adhesion Promoter: Always use a plastic adhesion promoter before applying any repair materials to ensure proper bonding.
- Epoxy Application: Mix the epoxy according to the manufacturer’s instructions and apply it evenly to both sides of the crack. Allow it to cure completely before proceeding.
- Body Filler Application: Apply body filler in thin layers to avoid air bubbles and shrinkage. Allow each layer to dry completely before sanding.
- Sanding Body Filler: Use a sanding block to sand the body filler evenly. Check for imperfections and apply additional layers if necessary.
7.3 Painting Techniques
- Primer Application: Apply several thin coats of primer, allowing each coat to dry before applying the next. This creates a uniform base for the paint.
- Paint Mixing: Mix the paint according to the manufacturer’s instructions and strain it through a paint filter to remove any contaminants.
- Spray Gun Setup: Adjust the spray gun settings (pressure, flow rate, and pattern) to achieve a consistent and even spray.
- Paint Application: Apply several thin coats of paint, overlapping each pass by about 50%. Allow each coat to dry before applying the next.
- Blending: Blend the new paint into the surrounding area by gradually fading out the spray. This helps to create a seamless transition.
- Clear Coat Application: Apply several thin coats of clear coat to protect the paint and add shine. Allow each coat to dry before applying the next.
7.4 Finishing Touches
- Wet Sanding: After the clear coat has dried, wet sand the surface with fine-grit sandpaper (e.g., 2000 grit) to remove any imperfections.
- Buffing and Polishing: Use a buffing pad and polishing compound to restore the shine and remove any swirl marks.
- Waxing: Apply a coat of wax to protect the paint and enhance the shine.
7.5 Additional Tips
- Practice: Practice your painting technique on a test panel before painting the bumper.
- Patience: Don’t rush the repair process. Take your time and pay attention to detail.
- Cleanliness: Keep your workspace clean and free from dust and contaminants.
- Lighting: Use adequate lighting to see clearly and avoid mistakes.
- Temperature and Humidity: Pay attention to the temperature and humidity. Extreme conditions can affect the drying and curing of repair materials.
7.6 Common Mistakes to Avoid
- Applying Body Filler Too Thickly: This can lead to air bubbles and shrinkage.
- Sanding Too Aggressively: This can damage the surrounding paint.
- Applying Paint in Thick Coats: This can cause runs and drips.
- Not Allowing Materials to Dry Completely: This can lead to adhesion problems and a poor finish.
- Ignoring Safety Precautions: Always wear safety glasses, gloves, and a respirator when working with repair materials.
By following these tips and avoiding common mistakes, you can achieve a professional-looking finish when repairing a cracked car bumper. Remember, patience and attention to detail are key to success.
8. FAQs About Fixing Cracks in Car Bumpers
Here are some frequently asked questions about repairing cracks in car bumpers, along with detailed answers to help you understand the process better:
8.1 Is it possible to repair a cracked car bumper, or is replacement always necessary?
Whether a cracked car bumper can be repaired or needs to be replaced depends on the extent and nature of the damage. Minor cracks, scratches, or small dents can often be repaired, while severe damage, such as large cracks, punctures, or structural damage, may necessitate replacement for safety and aesthetic reasons.
8.2 What tools and materials are required to fix a cracked car bumper?
The tools and materials needed to repair a cracked car bumper typically include:
- Safety glasses and gloves
- Sandpaper (various grits)
- Body filler or plastic repair compound
- Spreader or applicator
- Masking tape and paper
- Primer
- Automotive paint matching the car’s color
- Clear coat (optional)
- Sanding block or orbital sander
- Cleaning solvents and wax/grease remover
8.3 Can I fix a cracked car bumper myself, or should I seek professional help?
Whether you can fix a cracked car bumper yourself depends on your DIY skills, experience, and the severity of the damage. Minor repairs can be done at home with the right tools and materials, while more extensive damage may require professional expertise and equipment for a proper and safe repair.
8.4 How much does it typically cost to repair a cracked car bumper?
The cost to repair a cracked car bumper varies depending on the extent of the damage, the type of car, and whether you DIY or hire a professional. DIY repairs may cost $50-$200 for materials, while professional repairs can range from $200 to $1000 or more, depending on the labor rates and complexity of the repair.
8.5 What are the potential risks of driving with a cracked car bumper?
Driving with a cracked car bumper can pose several risks, including:
- Compromised structural integrity of the bumper, reducing its ability to protect the car in a collision.
- Aesthetic concerns and reduced resale value of the vehicle.
- Potential for further damage and increased repair costs if the crack worsens over time.
- Risk of the bumper detaching from the car, posing a hazard to other drivers.
8.6 How long does it take to fix a cracked car bumper?
The time it takes to fix a cracked car bumper depends on the severity of the damage and the repair method used. DIY repairs may take several hours to a full day, while professional repairs can often be completed within a few hours to a day, depending on the shop’s schedule and the complexity of the repair.
8.7 Will repairing a cracked car bumper affect the car’s safety or performance?
If the repair is done properly and the bumper’s structural integrity is restored, it should not negatively affect the car’s safety or performance. However, if the repair is not done correctly, it could compromise the bumper’s ability to protect the car in a collision.
8.8 Is it necessary to repaint the car bumper after repairing a crack?
Whether repainting is necessary depends on the extent of the repair and the appearance of the bumper. If the repair involves filling in a crack or sanding down the surface, repainting is usually necessary to blend the repair with the surrounding area and restore the bumper’s original appearance.
8.9 What are some common mistakes to avoid when repairing a cracked car bumper?
Common mistakes to avoid when repairing a cracked car bumper include:
- Not properly cleaning and preparing the surface before applying repair materials.
- Using the wrong type of repair materials or not mixing them properly.
- Applying too much or too little body filler or plastic repair compound.
- Not sanding the repair area smoothly before priming and painting.
- Using the wrong type of paint or not applying it evenly.
8.10 How can I prevent future cracks in my car bumper?
To prevent future cracks in your car bumper, you can:
- Drive carefully and avoid collisions.
- Park in safe areas and avoid bumping into objects.
- Consider installing bumper guards or protectors.
- Regularly inspect your bumper for signs of damage and address any issues promptly.
By understanding these FAQs and taking appropriate action, you can effectively address cracks in your car bumper and maintain the safety and appearance of your vehicle.

