How to Fix Cracked Car Body: Expert Repair Guide
How to fix cracked car body panels efficiently and effectively is a common concern for vehicle owners. CARDIAGTECH.NET offers expert solutions for repairing damaged auto body panels, ensuring a seamless finish and long-lasting results. Explore professional techniques, cost-effective methods, and essential tools for auto body restoration, plastic welding, and surface preparation.
1. Understanding When to Repair or Replace a Cracked Car Body
Determining whether to repair or replace a cracked car body panel is crucial for both safety and cost-effectiveness. Many factors influence this decision, including the extent of the damage, the vehicle manufacturer’s recommendations, and the overall structural integrity of the car.
1.1. Initial Assessment: Evaluating the Damage
The initial assessment involves a thorough examination of the cracked area. This includes checking the size, depth, and location of the crack. Minor cracks and surface damage can often be repaired, while more extensive damage might necessitate a full panel replacement.
- Size and Depth: Small, shallow cracks are typically easier to repair than large, deep ones.
- Location: Cracks in high-stress areas, such as near structural supports, may require replacement to ensure safety.
- Material: The type of material (e.g., steel, aluminum, plastic) also affects the repair process and feasibility.
1.2. Manufacturer Guidelines: Adhering to Recommendations
Always consult the vehicle manufacturer’s guidelines before attempting any repairs. Some manufacturers provide specific instructions on repairing body panels, while others may advise against it, recommending replacement instead. Adhering to these guidelines ensures that the repair meets safety standards and maintains the vehicle’s original specifications.
- Repair Limitations: Some manufacturers specify the maximum size or type of damage that can be safely repaired.
- Approved Methods: Certain repair methods may be recommended or prohibited based on the vehicle’s design and materials.
- Warranty Considerations: Improper repairs can void the vehicle’s warranty, making it essential to follow manufacturer guidelines.
1.3. Structural Integrity: Ensuring Safety
The structural integrity of the car body is paramount. Cracks that compromise the vehicle’s frame or safety features should always be addressed with a replacement. Repairing a structurally compromised panel can lead to further damage and potential safety hazards in the event of an accident.
- Frame Damage: Cracks that extend into the vehicle’s frame require professional assessment and potential frame straightening or replacement.
- Safety Features: Damage near airbags, sensors, or other safety systems may affect their functionality and require expert attention.
- Long-Term Durability: Even if a repair seems feasible, consider the long-term durability and potential for future issues.
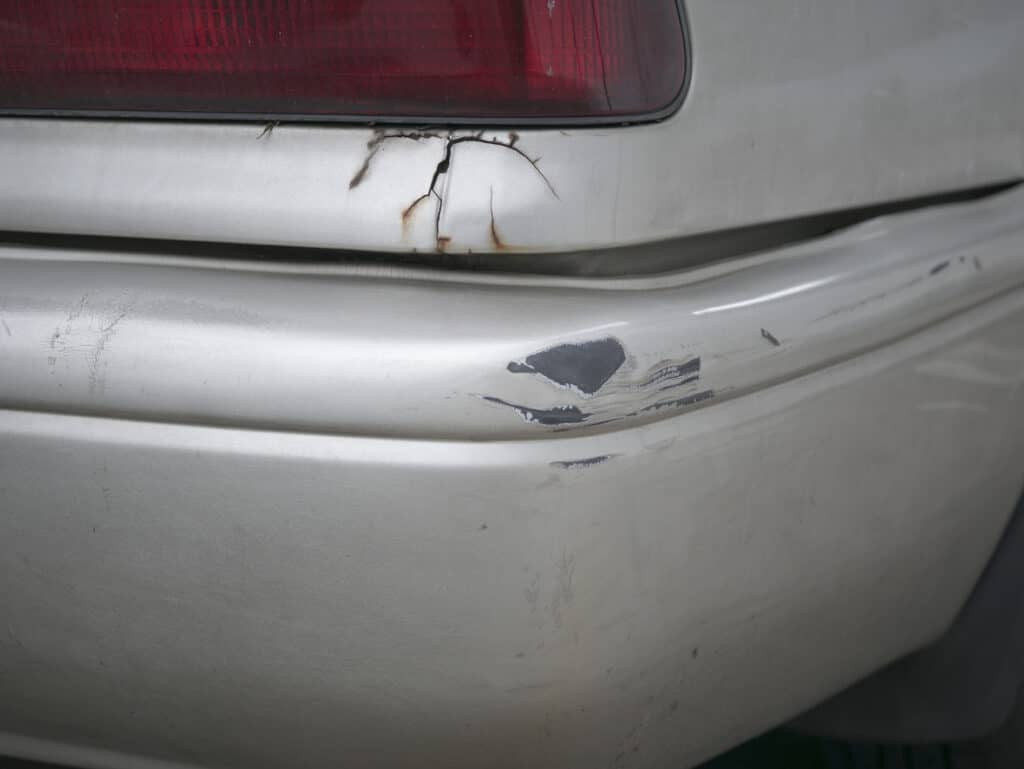
Close-up of a car body crack
2. Essential Tools and Materials for Car Body Repair
Having the right tools and materials is essential for effectively repairing cracked car body panels. A well-equipped workshop ensures that the repair process is efficient, safe, and produces high-quality results. CARDIAGTECH.NET offers a comprehensive range of tools and materials designed for professional auto body repair.
2.1. Surface Preparation Tools
Surface preparation is a critical step in the repair process. Proper preparation ensures that the repair materials adhere correctly and provide a smooth, even finish.
| Tool | Description | Use |
|---|---|---|
| Sandpaper | Available in various grits (e.g., 80, 120, 220, 320) | Removing rust, old paint, and smoothing the repair area. |
| Sanding Block | Provides a flat, even surface for sanding | Ensuring consistent sanding pressure and preventing uneven surfaces. |
| Grinder | Used for removing larger areas of rust, paint, or damage. | Quickly removing material and shaping the repair area. |
| Wire Brush | Used for removing loose rust and debris. | Cleaning the surface and preparing it for further treatment. |
| Degreaser | Removes grease, oil, and other contaminants from the surface. | Ensuring proper adhesion of repair materials. |
| Tack Cloth | Removes dust and small particles from the surface. | Providing a clean surface for painting and finishing. |
2.2. Repair and Bonding Materials
Selecting the right repair and bonding materials is crucial for a durable and long-lasting repair. CARDIAGTECH.NET offers a variety of high-quality materials designed for different types of car body repair.
| Material | Description | Use |
|---|---|---|
| Body Filler (Bondo) | A two-part putty used to fill dents and imperfections. | Smoothing out the surface and creating a uniform shape. |
| Fiberglass Resin | Used for repairing fiberglass panels and creating strong, durable repairs. | Reinforcing damaged areas and providing structural support. |
| Epoxy Resin | A two-part adhesive used for bonding metal and plastic parts. | Creating strong, permanent bonds between different materials. |
| Plastic Welding Kit | Used for repairing plastic bumpers and body panels. | Melting and fusing plastic materials to create seamless repairs. |
| Panel Bonding Adhesive | A high-strength adhesive used for bonding replacement panels. | Attaching new panels to the car body without welding. |
| Seam Sealer | Used to seal seams and joints, preventing water and corrosion from entering. | Protecting the repaired area and ensuring a watertight seal. |
2.3. Painting and Finishing Supplies
Achieving a professional finish requires high-quality painting and finishing supplies. CARDIAGTECH.NET provides a range of products designed to match the vehicle’s original color and provide a durable, attractive finish.
| Supply | Description | Use |
|---|---|---|
| Automotive Primer | A base coat that prepares the surface for painting. | Improving adhesion and providing a uniform surface for the topcoat. |
| Automotive Paint | Available in various colors and finishes (e.g., basecoat, clearcoat). | Matching the vehicle’s original color and providing a durable, attractive finish. |
| Clearcoat | A protective layer that adds gloss and protects the paint from scratches and UV damage. | Enhancing the appearance and durability of the paint. |
| Paint Thinner | Used to thin paint and clean painting equipment. | Adjusting the viscosity of the paint and ensuring smooth application. |
| Masking Tape | Used to protect areas that should not be painted. | Creating clean lines and preventing overspray. |
| Masking Paper | Used to cover larger areas that need protection. | Protecting the surrounding areas from paint and debris. |
| Spray Gun | Used to apply paint evenly and efficiently. | Providing a professional-quality finish with consistent coverage. |
| Buffing Compound | Used to remove imperfections and create a smooth, glossy surface. | Polishing the paint and removing swirl marks. |
| Polishing Pads | Used with buffing compound to achieve a high-gloss finish. | Enhancing the shine and appearance of the paint. |
2.4. Safety Equipment
Safety should always be a top priority when working on car body repairs. CARDIAGTECH.NET recommends using appropriate safety equipment to protect yourself from potential hazards.
| Equipment | Description | Use |
|---|---|---|
| Safety Glasses | Protects your eyes from debris and chemicals. | Preventing eye injuries from flying particles and splashes. |
| Gloves | Protects your hands from chemicals and sharp objects. | Preventing skin irritation and cuts. |
| Respirator | Protects your lungs from dust, fumes, and vapors. | Ensuring clean air and preventing respiratory problems. |
| Ear Protection | Protects your ears from loud noises, such as grinders and sanders. | Preventing hearing damage. |
| Work Apron/Coveralls | Protects your clothing from paint, chemicals, and dirt. | Keeping your clothes clean and preventing contamination. |
| First Aid Kit | Provides supplies for treating minor injuries. | Addressing cuts, burns, and other common injuries that may occur during the repair process. |
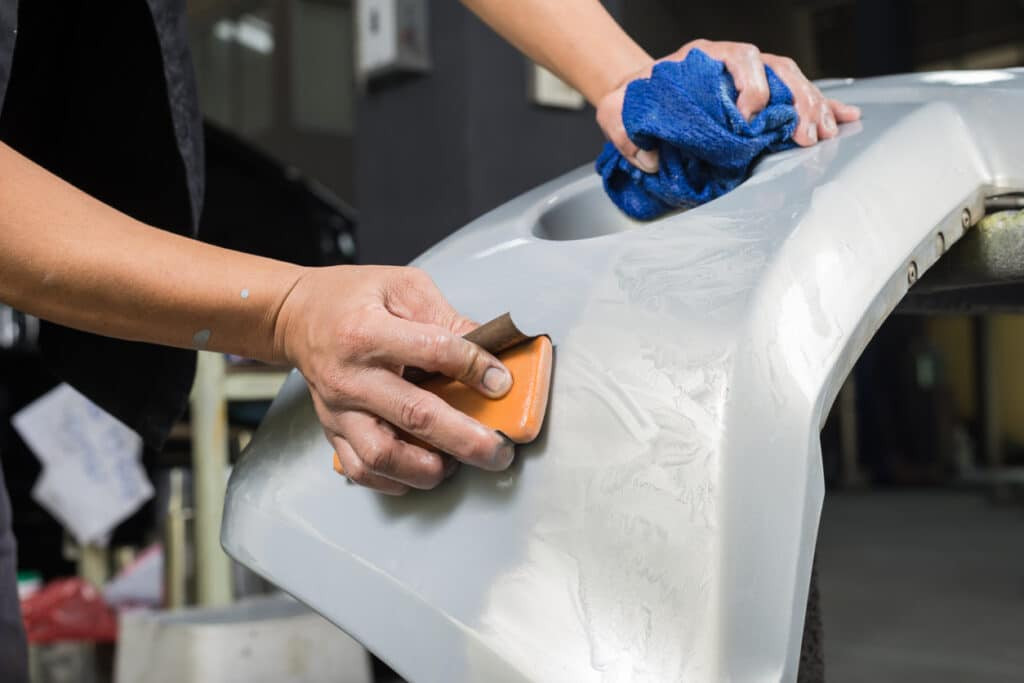
 Tools for car body repair
3. Step-by-Step Guide to Fixing a Cracked Car Body
Repairing a cracked car body involves several key steps, from assessing the damage to applying the final coat of paint. This comprehensive guide provides a detailed walkthrough of the entire process, ensuring a professional and durable repair.
3.1. Step 1: Assessing the Damage
The first step is to thoroughly assess the damage. This involves cleaning the area, identifying the extent of the crack, and determining if there are any underlying issues, such as rust or structural damage.
- Clean the Area: Use soap and water to remove dirt and debris from the damaged area. Dry the surface thoroughly.
- Inspect the Crack: Examine the crack closely to determine its depth, length, and location. Look for any signs of rust or corrosion.
- Check for Structural Damage: Assess whether the crack has compromised the structural integrity of the panel. Look for any signs of bending or warping.
3.2. Step 2: Preparing the Surface
Proper surface preparation is essential for ensuring that the repair materials adhere correctly and provide a smooth, even finish.
- Remove Rust and Old Paint: Use a wire brush or grinder to remove any rust or old paint from the repair area. Be thorough to ensure a clean surface.
- Sand the Area: Use sandpaper (80-grit to start, then 120-grit) to sand the area around the crack. Feather the edges to create a smooth transition.
- Clean the Surface: Use a degreaser to remove any grease, oil, or contaminants from the surface. Wipe with a tack cloth to remove any remaining dust.
3.3. Step 3: Repairing the Crack
The method for repairing the crack will depend on the type of material and the extent of the damage. Here are some common repair techniques:
3.3.1. Plastic Welding for Plastic Panels
Plastic welding is an effective method for repairing cracks in plastic bumpers and body panels.
- Prepare the Plastic Welder: Set up the plastic welder according to the manufacturer’s instructions. Choose the appropriate welding rod for the type of plastic being repaired.
- Weld the Crack: Carefully weld the crack, using the plastic welder to melt and fuse the plastic material. Work slowly and evenly to create a strong bond.
- Smooth the Weld: Use a grinder or sandpaper to smooth the weld and remove any excess material.
3.3.2. Body Filler (Bondo) for Metal Panels
Body filler is commonly used to repair dents and imperfections in metal panels.
- Mix the Body Filler: Mix the body filler according to the manufacturer’s instructions. Be sure to use the correct ratio of filler to hardener.
- Apply the Filler: Apply the body filler to the repair area, using a spreader to smooth it out. Overfill the area slightly to allow for sanding.
- Sand the Filler: Once the filler is dry, sand it down using progressively finer grits of sandpaper (120-grit, 220-grit, 320-grit). Feather the edges to create a smooth transition.
3.3.3. Fiberglass Resin for Fiberglass Panels
Fiberglass resin is used to repair cracks and damage in fiberglass panels.
- Prepare the Fiberglass Resin: Mix the fiberglass resin according to the manufacturer’s instructions. Be sure to use the correct ratio of resin to hardener.
- Apply the Resin: Apply the fiberglass resin to the repair area, using a brush or roller. Apply multiple layers of fiberglass mat for added strength.
- Sand the Resin: Once the resin is dry, sand it down using progressively finer grits of sandpaper. Feather the edges to create a smooth transition.
3.4. Step 4: Priming and Painting
Priming and painting are essential for achieving a professional finish that matches the vehicle’s original color.
- Apply Primer: Apply several thin coats of automotive primer to the repair area, allowing each coat to dry before applying the next. Sand the primer with fine-grit sandpaper (400-grit) to create a smooth surface.
- Apply Basecoat: Apply several thin coats of automotive basecoat to the repair area, allowing each coat to dry before applying the next. Match the color to the vehicle’s original paint code.
- Apply Clearcoat: Apply several thin coats of automotive clearcoat to the repair area, allowing each coat to dry before applying the next. The clearcoat will protect the paint and provide a glossy finish.
3.5. Step 5: Finishing and Polishing
The final step is to polish the painted surface to remove any imperfections and achieve a high-gloss finish.
- Wet Sand: Wet sand the clearcoat with fine-grit sandpaper (2000-grit) to remove any orange peel or imperfections.
- Buff the Surface: Use a buffing compound and a polishing pad to buff the surface, removing any swirl marks and creating a smooth, glossy finish.
- Polish the Surface: Use a polishing compound and a polishing pad to polish the surface, enhancing the shine and appearance of the paint.
- Wax the Surface: Apply a coat of wax to protect the paint and enhance the shine.
 Spraying Paint
4. Advanced Techniques for Complex Car Body Repairs
Some car body repairs require advanced techniques and specialized knowledge. These techniques are typically used for more extensive damage or when working with unique materials.
4.1. Panel Replacement
When a panel is too damaged to repair, it may need to be replaced. This involves removing the old panel and installing a new one.
- Remove the Old Panel: Use a grinder or cutting tool to remove the old panel. Be careful not to damage the surrounding areas.
- Prepare the New Panel: Clean and prepare the new panel for installation. This may involve sanding, priming, and painting.
- Install the New Panel: Use panel bonding adhesive or welding to attach the new panel to the car body. Ensure proper alignment and fit.
- Finish the Repair: Smooth the seams and blend the new panel into the surrounding areas. Prime and paint the repair area to match the vehicle’s original color.
4.2. Frame Straightening
If the car’s frame is bent or damaged, it may need to be straightened. This is a complex process that requires specialized equipment and expertise.
- Assess the Damage: Use a measuring system to assess the extent of the frame damage. Identify the areas that need to be straightened.
- Secure the Vehicle: Secure the vehicle to a frame straightening machine.
- Straighten the Frame: Use hydraulic tools and clamps to pull the frame back into its original shape. Monitor the progress using the measuring system.
- Verify Alignment: Verify that the frame is properly aligned and meets the manufacturer’s specifications.
4.3. Working with Aluminum
Aluminum car bodies require specialized repair techniques due to the unique properties of the metal.
- Use Aluminum-Specific Tools: Use tools that are designed for working with aluminum. These tools will prevent contamination and corrosion.
- Weld with Aluminum-Specific Welders: Use a specialized aluminum welder to weld aluminum panels. This will ensure a strong, clean weld.
- Avoid Galvanic Corrosion: Prevent galvanic corrosion by using compatible materials and coatings.
5. Cost-Effective Solutions for Car Body Repair
Repairing a cracked car body can be expensive, but there are several cost-effective solutions that can help you save money without compromising quality.
5.1. DIY Repairs
If you have the skills and tools, you can save money by doing the repairs yourself. However, it’s important to be realistic about your abilities and only attempt repairs that you are confident in completing successfully.
- Start with Small Repairs: Begin with small, simple repairs to gain experience and build your confidence.
- Follow Tutorials and Guides: Use online tutorials and guides to learn the proper techniques and procedures.
- Invest in Quality Tools: Invest in quality tools that will last and provide reliable performance.
5.2. Used Parts
Using used parts can be a cost-effective way to replace damaged panels. However, it’s important to inspect the parts carefully to ensure that they are in good condition and fit properly.
- Source from Reputable Suppliers: Purchase used parts from reputable suppliers who offer warranties and guarantees.
- Inspect for Damage: Carefully inspect the used parts for any signs of damage, such as rust, dents, or cracks.
- Verify Compatibility: Verify that the used parts are compatible with your vehicle’s make and model.
5.3. Local Repair Shops
Getting quotes from multiple local repair shops can help you find the best price for the repair. Be sure to ask for a detailed breakdown of the costs and inquire about any discounts or promotions.
- Get Multiple Quotes: Obtain quotes from at least three different repair shops.
- Ask for a Detailed Breakdown: Request a detailed breakdown of the costs, including labor, parts, and materials.
- Inquire About Discounts: Ask about any discounts or promotions that may be available.
6. Maintaining Your Car Body to Prevent Cracks
Preventing cracks in your car body can save you time and money in the long run. Regular maintenance and care can help keep your car looking its best and prevent costly repairs.
6.1. Regular Washing and Waxing
Regular washing and waxing can help protect your car’s paint from the elements and prevent rust and corrosion.
- Wash Your Car Regularly: Wash your car at least once a month to remove dirt, grime, and contaminants.
- Wax Your Car Regularly: Wax your car every three to six months to protect the paint and enhance the shine.
6.2. Protective Coatings
Applying a protective coating, such as ceramic coating or paint protection film, can provide an extra layer of protection against scratches, chips, and UV damage.
- Ceramic Coating: A ceramic coating provides a durable, long-lasting layer of protection that resists scratches, chemicals, and UV damage.
- Paint Protection Film: A paint protection film is a clear, adhesive film that is applied to the car’s paint to protect it from scratches, chips, and road debris.
6.3. Careful Driving and Parking
Careful driving and parking can help prevent accidents and damage to your car’s body.
- Avoid Tailgating: Maintain a safe following distance to avoid rear-end collisions.
- Park Carefully: Park in well-lit areas and avoid parking too close to other vehicles.
- Be Aware of Your Surroundings: Be aware of your surroundings and watch out for potential hazards, such as potholes, road debris, and low-hanging branches.
7. Common Mistakes to Avoid When Repairing a Cracked Car Body
Repairing a cracked car body can be challenging, and it’s important to avoid common mistakes that can compromise the quality and durability of the repair.
7.1. Insufficient Surface Preparation
Insufficient surface preparation is one of the most common mistakes made when repairing a cracked car body. Failing to properly clean, sand, and degrease the repair area can prevent the repair materials from adhering correctly and lead to premature failure.
- Always Clean the Surface Thoroughly: Use soap and water, degreaser, and a tack cloth to remove all dirt, grease, and contaminants.
- Sand the Area Properly: Use progressively finer grits of sandpaper to feather the edges and create a smooth transition.
- Remove All Rust and Old Paint: Use a wire brush or grinder to remove all rust and old paint from the repair area.
7.2. Using the Wrong Materials
Using the wrong materials can also compromise the quality and durability of the repair. Be sure to use materials that are designed for the type of material being repaired and follow the manufacturer’s instructions carefully.
- Use the Correct Body Filler: Use a body filler that is designed for the type of metal being repaired.
- Use the Correct Welding Rod: Use a welding rod that is designed for the type of plastic being welded.
- Use Compatible Materials: Avoid using incompatible materials that can cause corrosion or other problems.
7.3. Rushing the Repair Process
Rushing the repair process can also lead to mistakes and compromise the quality of the repair. Take your time and follow the proper procedures to ensure a professional and durable result.
- Allow Sufficient Drying Time: Allow sufficient drying time for the repair materials, such as body filler and primer.
- Apply Thin Coats: Apply thin coats of paint and clearcoat, allowing each coat to dry before applying the next.
- Follow the Manufacturer’s Instructions: Follow the manufacturer’s instructions for all materials and equipment.
8. Advantages of Purchasing Car Body Repair Tools from CARDIAGTECH.NET
Purchasing car body repair tools from CARDIAGTECH.NET offers numerous advantages, ensuring you have access to high-quality equipment that enhances your repair capabilities and efficiency.
8.1. Wide Selection of High-Quality Tools
CARDIAGTECH.NET provides an extensive range of tools specifically designed for car body repair, ensuring you find the perfect equipment for your needs.
- Comprehensive Inventory: From basic hand tools to advanced diagnostic equipment, CARDIAGTECH.NET offers a complete selection.
- Trusted Brands: The tools available are sourced from reputable manufacturers known for their durability and performance.
- Specialty Tools: Access specialized tools for tasks such as dent removal, welding, and panel alignment.
8.2. Expert Guidance and Support
Navigating the world of car body repair tools can be overwhelming. CARDIAGTECH.NET offers expert guidance to help you make informed decisions.
- Knowledgeable Staff: Benefit from the expertise of knowledgeable staff who can assist you in selecting the right tools.
- Detailed Product Information: Each tool is accompanied by detailed specifications and usage instructions.
- Customer Support: Receive ongoing customer support to address any questions or concerns you may have.
8.3. Competitive Pricing
CARDIAGTECH.NET is committed to providing competitive pricing on all car body repair tools, ensuring you get the best value for your investment.
- Affordable Options: Find tools that fit your budget without compromising on quality.
- Special Offers: Take advantage of special offers and promotions to save even more.
- Transparent Pricing: Enjoy transparent pricing with no hidden fees, so you know exactly what you’re paying for.
9. Testimonials from Satisfied CARDIAGTECH.NET Customers
Hearing from other customers can provide valuable insights into the quality and reliability of CARDIAGTECH.NET’s products and services.
9.1. Real-World Experiences
Read testimonials from satisfied customers who have used CARDIAGTECH.NET’s car body repair tools to achieve outstanding results.
- John, Auto Body Technician: “CARDIAGTECH.NET has been my go-to supplier for years. Their tools are top-notch, and their customer service is exceptional.”
- Sarah, DIY Enthusiast: “I was able to fix a dent in my car thanks to the quality tools and helpful guides from CARDIAGTECH.NET.”
- Mike, Garage Owner: “The diagnostic equipment from CARDIAGTECH.NET has significantly improved our efficiency and accuracy in car body repairs.”
9.2. Success Stories
Discover how CARDIAGTECH.NET’s tools have helped professionals and DIY enthusiasts alike overcome challenges and achieve successful car body repairs.
- Improved Efficiency: Many customers report increased efficiency and reduced repair times due to the quality and precision of the tools.
- Enhanced Accuracy: The advanced diagnostic equipment ensures accurate assessments, leading to better repair outcomes.
- Cost Savings: By investing in reliable tools, customers avoid frequent replacements and reduce overall repair costs.
10. Frequently Asked Questions (FAQs) About Fixing a Cracked Car Body
10.1. Can I fix a cracked car body myself, or should I hire a professional?
Whether you can fix a cracked car body yourself depends on the extent of the damage, your skill level, and the tools you have available. Minor cracks and surface damage can often be repaired by DIY enthusiasts, while more extensive damage or structural issues should be handled by a professional.
10.2. What tools do I need to fix a cracked car body?
The tools you need will vary depending on the type of repair you’re performing. However, some essential tools include sandpaper, a sanding block, a grinder, body filler, primer, paint, clearcoat, masking tape, and safety equipment.
10.3. How much does it cost to fix a cracked car body?
The cost of fixing a cracked car body can vary widely depending on the extent of the damage, the type of repair, and the labor costs in your area. Minor repairs may cost a few hundred dollars, while more extensive repairs can cost several thousand dollars.
10.4. Is it safe to drive with a cracked car body?
Driving with a cracked car body can be unsafe, especially if the damage compromises the structural integrity of the vehicle. It’s important to have the damage assessed and repaired as soon as possible to avoid potential safety hazards.
10.5. How long does it take to fix a cracked car body?
The time it takes to fix a cracked car body depends on the extent of the damage and the type of repair being performed. Minor repairs may take a few hours, while more extensive repairs can take several days.
10.6. Can I paint over body filler?
Yes, you can paint over body filler, but it’s important to prepare the surface properly first. Sand the body filler smooth and apply several coats of primer before painting.
10.7. How do I match the paint color to my car?
You can match the paint color to your car by finding the paint code, which is typically located on a sticker inside the driver’s side door jamb or in the engine compartment. Take the paint code to an automotive paint supplier, who can mix a custom batch of paint to match your car’s color.
10.8. What is the best way to protect my car’s paint?
The best way to protect your car’s paint is to wash and wax it regularly, apply a protective coating such as ceramic coating or paint protection film, and drive and park carefully to avoid accidents and damage.
10.9. Can I use a heat gun to remove dents from my car body?
Yes, you can use a heat gun to remove minor dents from your car body. Heat the area around the dent with the heat gun, then use a tool to gently push the dent out from the inside. Be careful not to overheat the paint, as this can cause it to blister or peel.
10.10. How do I prevent rust from forming on my car body?
You can prevent rust from forming on your car body by washing it regularly, applying a rust inhibitor, and repairing any scratches or chips in the paint.
11. Call to Action: Get Expert Advice and Tools from CARDIAGTECH.NET Today
Facing challenges with cracked car bodies and struggling to find the right tools and guidance? CARDIAGTECH.NET understands the difficulties you face in maintaining efficient and high-quality auto body repairs. From the physical demands and constant exposure to chemicals to the ever-increasing need for updated knowledge, we know you need solutions that enhance efficiency, precision, and safety.
Ready to transform your car body repair process?
Contact CARDIAGTECH.NET today for personalized advice and access to our premium range of car body repair tools. Our expert team is ready to assist you in selecting the perfect equipment to meet your specific needs, ensuring you achieve professional results every time.
Reach out now:
- Address: 276 Reock St, City of Orange, NJ 07050, United States
- WhatsApp: +1 (641) 206-8880
- Website: CARDIAGTECH.NET
Let CARDIAGTECH.NET be your trusted partner in achieving excellence in car body repair. Contact us today and experience the difference that quality tools and expert support can make.