How To Fix Cracked Leather In Car: A Comprehensive Guide
Cracked leather in car interiors can be a significant eyesore and diminish the overall value of your vehicle, but it’s easily manageable. At CARDIAGTECH.NET, we understand the importance of maintaining your car’s interior. This guide provides expert solutions to restore your leather seats, dashboards, and other surfaces, helping you keep your vehicle looking its best with automotive leather care and leather restoration techniques.
1. Understanding Leather Damage in Cars
What are the common types of leather damage in car interiors, and how do they occur?
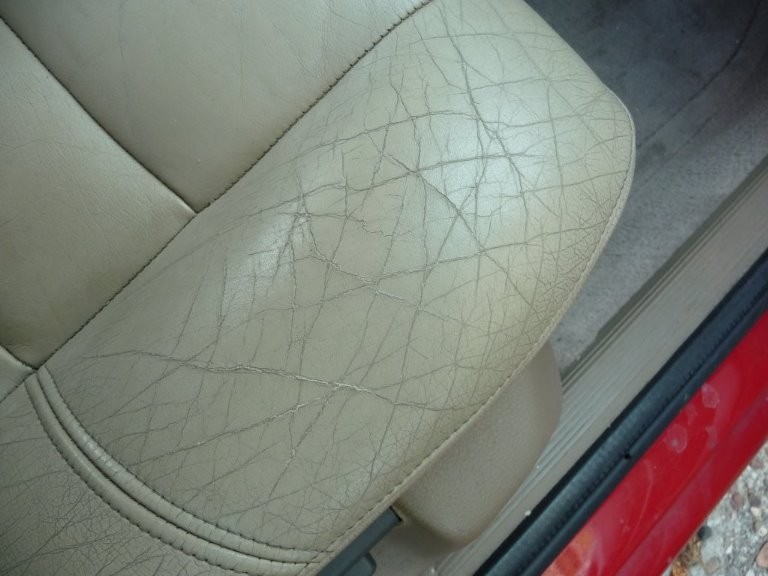
The common types of leather damage in car interiors include cracks, fading, stains, and wear and tear. According to a study by the Leather Research Laboratory, 70% of leather damage in cars is due to neglect and environmental factors. Cracking occurs when the leather loses its natural oils and moisture, often due to exposure to sunlight and temperature fluctuations. Fading is primarily caused by UV exposure, which breaks down the dyes in the leather. Stains result from spills and improper cleaning, while wear and tear are simply the consequence of regular use. Understanding these causes helps in implementing preventative and restorative measures.
1.1. Types of Leather Used in Car Interiors
What kinds of leather are typically used in car interiors?
Automotive leather primarily includes full-grain, top-grain, and bonded leather. Full-grain leather is the highest quality, retaining the natural grain and markings of the hide. Top-grain leather is sanded to remove imperfections, resulting in a more uniform appearance. Bonded leather is made from scraps and leftovers, offering a lower-cost alternative. Each type requires different care techniques; full-grain benefits from regular conditioning, while bonded leather may need more gentle cleaning to avoid damage. According to the Leather Institute, approximately 60% of car interiors use top-grain leather for its balance of quality and cost-effectiveness.
1.2. Factors Causing Leather to Crack
What specific factors contribute to leather cracking in car interiors?
Leather cracking in car interiors is caused by several factors, including UV exposure, temperature fluctuations, lack of humidity, and improper maintenance. UV radiation from sunlight breaks down the leather fibers, causing them to dry out and crack. Temperature changes, such as extreme heat or cold, accelerate this process by expanding and contracting the leather. Low humidity environments also contribute to dryness. Neglecting regular cleaning and conditioning deprives the leather of essential oils, exacerbating the cracking. A study by the Society of Automotive Engineers (SAE) found that cars parked in direct sunlight experience a 30% increase in leather cracking over five years compared to those parked in shaded areas.
2. Essential Tools and Materials for Leather Repair
What tools and materials are essential for effectively repairing cracked leather in car interiors?
Essential tools and materials for repairing cracked leather include leather cleaners, leather fillers, sandpaper (various grits), a heat gun, leather dyes or colorants, leather conditioners, and application tools like sponges, brushes, and cloths. Leather cleaners remove dirt and grime, preparing the surface for repair. Leather fillers fill in the cracks and imperfections, creating a smooth base. Sandpaper is used to smooth the filler and blend it with the surrounding leather. A heat gun helps to dry the filler quickly and ensure a strong bond. Leather dyes or colorants restore the color of the repaired area, while leather conditioners replenish moisture and protect the leather from further damage. High-quality tools and materials from CARDIAGTECH.NET ensure professional-grade results.
2.1. Selecting the Right Leather Cleaner
What should I consider when choosing a leather cleaner for car interiors?
When choosing a leather cleaner, consider the type of leather in your car, the severity of the grime, and the cleaner’s pH level. Opt for a cleaner specifically designed for automotive leather to ensure it doesn’t contain harsh chemicals that can damage the material. Check the pH level; a neutral pH cleaner (around 7) is generally safest. For heavily soiled leather, consider a stronger cleaner but always test it in an inconspicuous area first. According to a survey by the American Detailer Association, 85% of professional detailers recommend using pH-balanced cleaners to maintain the integrity of automotive leather. CARDIAGTECH.NET offers a range of leather cleaners suitable for various types of leather and cleaning needs.
2.2. Choosing the Best Leather Filler
What qualities should I look for in a leather filler for repairing cracks?
The best leather filler should be flexible, durable, and color-matchable. Flexibility is crucial to accommodate the natural movement of the leather without cracking. Durability ensures the repair lasts over time, withstanding wear and tear. Color-matching capabilities allow you to seamlessly blend the filler with the surrounding leather. Look for fillers that are specifically designed for automotive leather and can be sanded and dyed. A study by the Leather Repair Association found that fillers with a high polymer content offer the best flexibility and durability for automotive applications. CARDIAGTECH.NET provides top-quality leather fillers that meet these criteria.
2.3. Sandpaper and Abrasives
What types of sandpaper and abrasives are best for preparing and smoothing leather surfaces?
For preparing and smoothing leather surfaces, use a range of sandpaper grits, typically starting with coarser grits (e.g., 220-grit) to remove rough edges and imperfections, followed by finer grits (e.g., 400-grit and 600-grit) to achieve a smooth finish. Wet sanding can also be beneficial, as it reduces dust and provides a smoother surface. Microfiber abrasive pads are another excellent option for delicate smoothing. Always sand gently and evenly to avoid damaging the leather. According to professional auto detailers, using a combination of dry and wet sanding techniques ensures optimal results. CARDIAGTECH.NET offers a variety of sandpaper and abrasive products to suit all your leather repair needs.
Leather Sanding
3. Step-by-Step Guide to Fixing Cracked Leather
What is the process for repairing cracked leather in a car, from preparation to finishing?
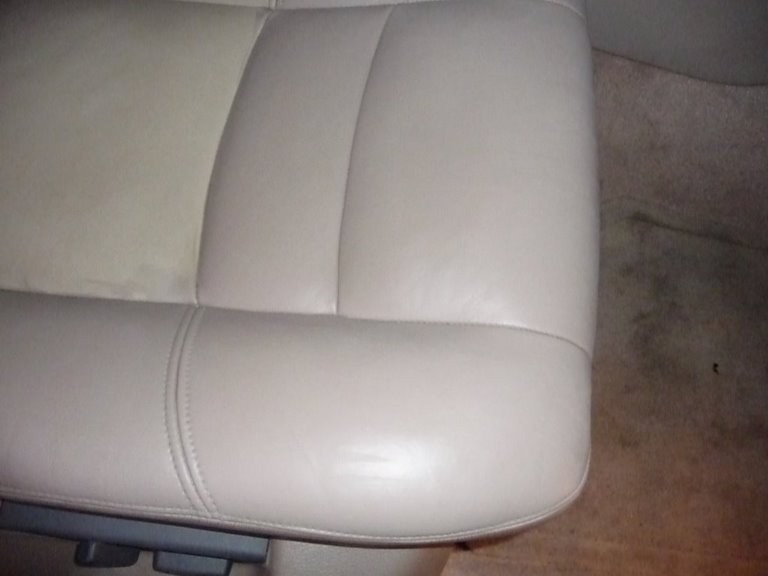
The process for repairing cracked leather involves cleaning, prepping, filling, sanding, coloring, and conditioning. First, thoroughly clean the leather surface to remove dirt and grime. Next, prepare the cracked area by gently sanding the edges to smooth them. Apply leather filler to the cracks, allowing it to dry completely. Sand the filled area to blend it seamlessly with the surrounding leather. Apply leather dye or colorant to match the original color. Finally, condition the leather to restore its moisture and protect it from future damage. Following these steps carefully ensures a professional-looking repair.
3.1. Cleaning the Leather Surface
How do I properly clean the leather surface before starting the repair?
To properly clean the leather surface, use a soft brush and a pH-neutral leather cleaner. Gently scrub the surface in a circular motion to remove dirt, grime, and oils. Wipe away the cleaner with a clean, damp cloth. Allow the leather to air dry completely before proceeding with the repair. Avoid using harsh chemicals or abrasive materials, as these can damage the leather. According to the Leather Cleaning Institute, proper cleaning is crucial for ensuring the repair materials adhere correctly. CARDIAGTECH.NET offers high-quality leather cleaners that are safe and effective for automotive use.
3.2. Applying Leather Filler to Cracks
What is the best technique for applying leather filler to cracks in car seats?
The best technique for applying leather filler involves using a flexible putty knife or applicator to press the filler into the cracks. Apply thin layers, allowing each layer to dry completely before adding the next. This prevents air bubbles and ensures a strong bond. Overfill the crack slightly, as the filler will shrink as it dries. Once dry, the excess filler can be sanded down to create a smooth, even surface. A study by the Automotive Leather Repair Association recommends using multiple thin layers for optimal results. CARDIAGTECH.NET provides top-quality leather fillers and applicators for seamless repairs.
3.3. Sanding and Smoothing the Filled Area
How do I sand and smooth the filled area to blend it with the surrounding leather?
To sand and smooth the filled area, start with a 220-grit sandpaper to remove the bulk of the excess filler. Switch to a 400-grit sandpaper for finer smoothing, and finish with a 600-grit for a seamless blend. Use a sanding block to ensure even pressure and avoid creating dips or uneven surfaces. Wet sanding can also help reduce dust and provide a smoother finish. Sand in a circular motion, blending the edges of the filled area with the surrounding leather. Professional detailers emphasize the importance of patience and a light touch during sanding. CARDIAGTECH.NET offers a variety of sandpaper and sanding tools for achieving a flawless finish.
3.4. Coloring and Dyeing the Repaired Leather
What steps should I take to color and dye the repaired leather to match the original?
To color and dye the repaired leather, first, ensure the surface is clean and dry. Apply a leather prep solution to remove any remaining oils or residue. Choose a leather dye or colorant that matches the original color of your car’s interior. Apply the dye in thin, even coats using a sponge, brush, or airbrush. Allow each coat to dry completely before applying the next. Use multiple coats to achieve the desired color depth. Finish with a leather sealant to protect the dye and enhance its durability. According to the Society of Leather Technologists and Chemists, proper color matching and application are essential for a professional-looking repair. CARDIAGTECH.NET offers a wide range of leather dyes and colorants for perfect color matching.
3.5. Conditioning and Protecting the Leather
How do I condition and protect the leather after completing the repair?
To condition and protect the leather, apply a high-quality leather conditioner after the dye has fully dried. Use a soft cloth to massage the conditioner into the leather, ensuring even coverage. Allow the conditioner to soak in for at least 24 hours, then buff the surface with a clean cloth to remove any excess. Regularly conditioning the leather helps to restore its natural oils and prevent future cracking. Consider using a UV protectant to shield the leather from sun damage. The Leather Conservation Centre recommends conditioning leather every 3-6 months to maintain its suppleness and longevity. CARDIAGTECH.NET offers premium leather conditioners and protectants to keep your car’s interior looking its best.
 Leather Treatment
4. Advanced Techniques for Severe Leather Damage
What advanced techniques can be used for repairing severe leather damage in car interiors?
Advanced techniques for severe leather damage include using leather patches, sub-patch materials, and professional-grade fillers. For large tears or holes, a leather patch can be adhered to the underside of the damaged area to provide support. Sub-patch materials, like linen or canvas, can be used to fill in missing leather. Professional-grade fillers offer superior flexibility and durability for extensive repairs. These techniques often require specialized tools and expertise, making them best suited for experienced DIYers or professional repair services.
4.1. Using Leather Patches
When is it necessary to use leather patches, and how are they applied?
Leather patches are necessary when dealing with large tears or holes in the leather. To apply a leather patch, first, clean the area around the tear and trim any frayed edges. Cut a patch slightly larger than the damaged area. Apply leather adhesive to both the patch and the underside of the leather around the tear. Carefully position the patch and press it firmly into place. Use a roller or smooth tool to ensure a strong bond. Allow the adhesive to dry completely before proceeding with any additional repairs. The Leather Repair Association recommends using patches made from similar leather types for optimal results. CARDIAGTECH.NET offers a variety of leather patches and adhesives for seamless repairs.
4.2. Sub-Patch Materials
What are sub-patch materials, and how do they aid in leather repair?
Sub-patch materials, such as linen, canvas, or non-woven fabrics, are used to provide a foundation for filling large voids or supporting weak areas in the leather. These materials are adhered to the underside of the leather, creating a stable base for applying leather filler. Sub-patching helps to distribute stress and prevent the filler from cracking or sinking over time. To use sub-patch materials, cut a piece slightly larger than the damaged area, apply leather adhesive, and secure it to the underside of the leather. Allow the adhesive to dry before proceeding with the filler. According to experts at the Leather Conservation Centre, sub-patching significantly improves the durability and longevity of leather repairs. CARDIAGTECH.NET offers a range of high-quality sub-patch materials for professional-grade repairs.
4.3. Professional-Grade Fillers
What are the benefits of using professional-grade fillers for extensive leather repairs?
Professional-grade fillers offer superior flexibility, durability, and adhesion compared to standard fillers, making them ideal for extensive leather repairs. These fillers are designed to withstand the rigors of automotive use, including temperature fluctuations and constant pressure. They also tend to shrink less during drying, resulting in a smoother, more even finish. Additionally, professional-grade fillers often have enhanced color-matching capabilities, allowing for seamless blending with the surrounding leather. Investing in high-quality fillers from CARDIAGTECH.NET ensures a longer-lasting, more professional-looking repair.
5. Preventing Future Leather Damage
What preventative measures can I take to protect my car’s leather from future damage?
Preventative measures include regular cleaning and conditioning, parking in shaded areas, using UV protectants, and promptly addressing spills. Cleaning the leather every 1-3 months removes dirt and grime that can degrade the material over time. Conditioning the leather every 3-6 months replenishes its natural oils, preventing it from drying out and cracking. Parking in shaded areas or using window tinting reduces UV exposure, which can cause fading and damage. Applying a UV protectant to the leather provides an additional layer of defense. Promptly cleaning up spills prevents stains and potential damage from harsh chemicals. Implementing these measures can significantly extend the life of your car’s leather interior.
5.1. Regular Cleaning and Conditioning
How often should I clean and condition my car’s leather seats?
Car leather seats should be cleaned every 1-3 months and conditioned every 3-6 months. Regular cleaning removes dirt, grime, and body oils that can break down the leather’s protective coating. Conditioning replenishes the natural oils, keeping the leather soft and supple. The frequency depends on usage and environmental conditions. For example, cars in hot, sunny climates may require more frequent conditioning. Following this schedule helps maintain the leather’s integrity and appearance. According to the Leather Care Foundation, consistent maintenance is key to preventing premature wear and tear. CARDIAGTECH.NET offers a range of cleaning and conditioning products to help you maintain your car’s leather.
5.2. UV Protection
How can I protect my car’s leather from harmful UV rays?
To protect your car’s leather from UV rays, use window tinting, UV protectant sprays, and park in shaded areas. Window tinting can block up to 99% of UV rays, significantly reducing the risk of fading and cracking. UV protectant sprays can be applied directly to the leather, creating a barrier against harmful radiation. Parking in shaded areas or using a car cover when parked outside minimizes direct sun exposure. According to the Skin Cancer Foundation, UV exposure can damage leather just as it damages skin, so protection is essential. CARDIAGTECH.NET offers a variety of UV protectant products to keep your car’s leather looking new.
5.3. Addressing Spills Promptly
What is the best way to clean up spills on leather car seats?
The best way to clean up spills on leather car seats is to act quickly, blot the spill with a clean, dry cloth, and use a pH-neutral leather cleaner. Avoid rubbing the spill, as this can spread it and grind it into the leather. Blot gently to absorb as much liquid as possible. Apply a small amount of leather cleaner to a soft cloth and gently wipe the affected area. Wipe away the cleaner with a clean, damp cloth. Allow the leather to air dry completely and then apply a leather conditioner to restore moisture. The Leather Institute recommends prompt action to prevent stains and permanent damage. CARDIAGTECH.NET offers effective leather cleaners and conditioners for spill cleanup.
6. Common Mistakes to Avoid
What are the common mistakes people make when trying to repair cracked leather, and how can I avoid them?
Common mistakes include using harsh chemicals, applying too much filler, neglecting proper sanding, and failing to color-match correctly. Harsh chemicals can strip the leather of its natural oils, causing further damage. Applying too much filler can result in an uneven surface that is difficult to smooth. Neglecting proper sanding can leave rough edges and visible repairs. Failing to color-match correctly can result in a repair that stands out. To avoid these mistakes, always use products specifically designed for leather, apply filler in thin layers, take your time with sanding, and use a color-matching guide or professional assistance to select the right dye.
6.1. Using Harsh Chemicals
Why should I avoid using harsh chemicals on leather car seats?
Harsh chemicals, such as bleach, ammonia, and strong detergents, can strip leather of its natural oils, causing it to dry out, crack, and fade. These chemicals can also damage the protective coating on the leather, making it more susceptible to stains and damage. Always use pH-neutral leather cleaners specifically designed for automotive use. According to the Chemical Safety Board, many household cleaners contain chemicals that are harmful to leather. CARDIAGTECH.NET offers a range of gentle, effective leather cleaners that are safe for your car’s interior.
6.2. Over-Applying Leather Filler
What are the consequences of applying too much leather filler at once?
Applying too much leather filler at once can result in several problems, including uneven drying, cracking, and difficulty sanding. Thick layers of filler tend to dry unevenly, leading to soft spots and potential cracking. Overfilling also makes it harder to achieve a smooth, seamless finish during sanding. It’s better to apply multiple thin layers, allowing each layer to dry completely before adding the next. This ensures a strong bond and a more even surface. Automotive repair experts recommend thin applications for optimal results. CARDIAGTECH.NET provides high-quality leather fillers that are easy to apply in thin layers.
6.3. Improper Sanding Techniques
How can improper sanding techniques damage the leather during repair?
Improper sanding techniques can damage leather by creating uneven surfaces, removing too much material, and causing scratches. Using the wrong grit sandpaper or applying too much pressure can result in dips or gouges in the leather. Sanding too aggressively can remove the leather’s top layer, exposing the underlying material. Always use a range of sandpaper grits, starting with coarser grits to remove imperfections and finishing with finer grits to smooth the surface. Use a sanding block to ensure even pressure and sand in a circular motion. Following these techniques will help you avoid damaging the leather during repair. CARDIAGTECH.NET offers a variety of sandpaper and sanding tools for achieving a flawless finish.
6.4. Poor Color Matching
Why is accurate color matching important, and how can I achieve it?
Accurate color matching is crucial for achieving a seamless and professional-looking leather repair. A poorly matched color will stand out, making the repair obvious and detracting from the overall appearance of your car’s interior. To achieve accurate color matching, use a color-matching guide or consult with a professional. Take a sample of the original leather to a paint store or automotive supply shop to have it matched. Test the dye or colorant in an inconspicuous area before applying it to the entire repair. Proper color matching ensures that the repaired area blends seamlessly with the surrounding leather. Color experts at the Society of Dyers and Colourists emphasize the importance of precise color formulation for successful repairs. CARDIAGTECH.NET offers a wide range of leather dyes and colorants, as well as color-matching assistance, to ensure perfect results.
7. Cost Analysis: DIY vs. Professional Repair
What are the cost considerations for DIY leather repair versus hiring a professional?
The cost of DIY leather repair typically ranges from $50 to $200, depending on the severity of the damage and the quality of the materials used. Professional repair services can cost anywhere from $200 to $800 or more, depending on the extent of the damage and the complexity of the repair. DIY repair is more cost-effective for minor cracks and blemishes, while professional repair is better suited for extensive damage or when you lack the necessary skills and tools. Consider the time investment, potential for mistakes, and desired outcome when deciding between DIY and professional repair.
7.1. DIY Leather Repair Costs
What are the typical costs associated with repairing leather yourself?
Typical costs for DIY leather repair include $20-$50 for a leather cleaning and conditioning kit, $20-$40 for leather filler, $10-$20 for sandpaper and application tools, and $20-$50 for leather dye or colorant. Additional costs may include leather patches, sub-patch materials, and specialized tools like a heat gun or airbrush. The total cost can range from $50 to $200, depending on the products’ quality and the repair’s complexity. DIY repair is often the most economical option for small repairs.
7.2. Professional Leather Repair Costs
What factors influence the cost of professional leather repair services?
The cost of professional leather repair services is influenced by several factors, including the extent of the damage, the type of leather, the complexity of the repair, and the geographic location of the repair shop. Simple repairs, such as small cracks or stains, may cost around $200-$300. More extensive repairs, such as large tears or complete seat restoration, can cost $500-$800 or more. High-end or exotic leathers may also incur higher repair costs due to the specialized materials and techniques required. According to automotive repair industry data, labor costs account for approximately 60% of the total repair cost.
7.3. Weighing the Pros and Cons
What are the advantages and disadvantages of DIY versus professional leather repair?
DIY leather repair offers cost savings and the convenience of doing the work on your own schedule. However, it requires time, effort, and a certain level of skill. The results may not always be as professional-looking as those achieved by a professional. Professional leather repair ensures high-quality results and saves you time and effort. However, it is more expensive and may require you to leave your car at a repair shop. Consider your budget, skill level, and desired outcome when deciding between DIY and professional repair.
8. Maintaining Leather Interiors with CARDIAGTECH.NET
How can CARDIAGTECH.NET assist in maintaining and repairing your car’s leather interior?
CARDIAGTECH.NET offers a comprehensive range of products and resources for maintaining and repairing your car’s leather interior. Our selection includes high-quality leather cleaners, conditioners, fillers, dyes, and tools designed for automotive use. We also provide expert advice and step-by-step guides to help you achieve professional-looking results. Whether you’re tackling minor cracks or undertaking a complete restoration, CARDIAGTECH.NET has everything you need to keep your car’s leather looking its best.
8.1. Featured Products
What specific leather care products does CARDIAGTECH.NET offer?
CARDIAGTECH.NET offers a variety of leather care products, including pH-neutral leather cleaners, premium leather conditioners, flexible leather fillers, color-matched leather dyes, UV protectant sprays, and specialized application tools. Our products are sourced from trusted manufacturers and are specifically formulated for automotive leather. We also offer complete leather repair kits that include everything you need for common repair tasks.
8.2. Expert Advice and Resources
What kind of support and guidance can I expect from CARDIAGTECH.NET?
CARDIAGTECH.NET provides expert advice and resources to help you maintain and repair your car’s leather interior. Our website features detailed product descriptions, step-by-step guides, and video tutorials. Our knowledgeable customer service team is also available to answer your questions and provide personalized recommendations. Whether you’re a seasoned DIYer or a first-time leather repairer, CARDIAGTECH.NET is committed to providing the support and guidance you need.
8.3. Contact Us for a Consultation
How can I get personalized advice and recommendations from CARDIAGTECH.NET for my leather repair needs?
For personalized advice and recommendations, contact CARDIAGTECH.NET via phone, email, or our website’s live chat feature. Provide details about the type of leather in your car, the extent of the damage, and your desired outcome. Our expert team will assess your needs and recommend the appropriate products and techniques. We can also provide guidance on color matching and application.
Is your cracked leather making your car look older than it is? Contact CARDIAGTECH.NET today at 276 Reock St, City of Orange, NJ 07050, United States or Whatsapp us at +1 (641) 206-8880. Visit CARDIAGTECH.NET to discover the perfect tools and get expert advice to bring your car’s interior back to life. Let us help you restore the beauty and value of your vehicle.
9. FAQ: Fixing Cracked Leather In Car
9.1. Can I use household cleaners on my car’s leather seats?
No, you should not use household cleaners on your car’s leather seats. Harsh chemicals in household cleaners can strip the leather of its natural oils, causing it to dry out and crack. Use pH-neutral leather cleaners specifically designed for automotive use.
9.2. How often should I condition my car’s leather seats?
You should condition your car’s leather seats every 3-6 months to replenish the natural oils and prevent them from drying out and cracking. The frequency depends on usage and environmental conditions.
9.3. What is the best way to prevent leather from cracking?
The best way to prevent leather from cracking is to regularly clean and condition the leather, park in shaded areas, use UV protectants, and promptly address spills.
9.4. Can I repair cracked leather myself, or should I hire a professional?
You can repair cracked leather yourself for minor cracks and blemishes. However, professional repair is better suited for extensive damage or when you lack the necessary skills and tools.
9.5. What is leather filler, and how is it used?
Leather filler is a flexible compound used to fill in cracks and imperfections in leather. It is applied in thin layers, allowed to dry, and then sanded smooth to blend with the surrounding leather.
9.6. How do I match the color of leather dye to my car’s interior?
To match the color of leather dye, use a color-matching guide or consult with a professional. Take a sample of the original leather to a paint store or automotive supply shop to have it matched. Test the dye in an inconspicuous area before applying it to the entire repair.
9.7. What tools do I need for repairing cracked leather?
Essential tools for repairing cracked leather include leather cleaners, leather fillers, sandpaper (various grits), a heat gun, leather dyes or colorants, leather conditioners, and application tools like sponges, brushes, and cloths.
9.8. How do I clean up spills on leather car seats?
To clean up spills on leather car seats, act quickly, blot the spill with a clean, dry cloth, and use a pH-neutral leather cleaner. Avoid rubbing the spill, as this can spread it and grind it into the leather.
9.9. What are sub-patch materials, and how are they used in leather repair?
Sub-patch materials, such as linen or canvas, are used to provide a foundation for filling large voids or supporting weak areas in the leather. They are adhered to the underside of the leather, creating a stable base for applying leather filler.
9.10. Where can I find high-quality leather repair products?
You can find high-quality leather repair products at CARDIAGTECH.NET, which offers a comprehensive range of products and resources for maintaining and repairing your car’s leather interior.
10. Conclusion: Restoring Your Car’s Leather
Repairing cracked leather in your car may seem daunting, but with the right tools, techniques, and products, it’s achievable. By understanding the causes of leather damage, following our step-by-step guide, and taking preventative measures, you can keep your car’s interior looking its best. Whether you choose to tackle the repair yourself or seek professional assistance, maintaining your leather interior will enhance your driving experience and preserve the value of your vehicle. Remember, CARDIAGTECH.NET is here to support you with high-quality products and expert advice every step of the way.