**How To Fix Deep Chips In Car Paint Like A Pro**

Do you want to learn how to fix deep chips in car paint and restore your car’s flawless appearance? At CARDIAGTECH.NET, we provide expert guidance and top-quality tools to help you repair paint damage effectively. Learn the best methods for paint chip repair and protect your vehicle’s finish with our wide selection of automotive tools and equipment. With our help, you can master car paint chip repair, auto paint repair and proper car paint maintenance, ensuring your car looks its best.
1. Understanding Deep Car Paint Chips
Deep chips in car paint are more than just cosmetic blemishes; they are gateways to potential long-term damage. These chips, often caused by road debris, gravel, or even minor collisions, expose the underlying metal of your vehicle to the elements. This exposure can lead to rust, corrosion, and further degradation of the surrounding paint. Addressing these deep chips promptly is crucial to maintaining the structural integrity and aesthetic appeal of your car.
1.1. Identifying the Severity of the Chip
Before starting any repair, it’s essential to accurately assess the depth and extent of the damage. A minor chip might only affect the clear coat or the color coat, while a deep chip penetrates through multiple layers, reaching the bare metal. Identifying the severity will determine the appropriate repair strategy and the tools needed. CARDIAGTECH.NET offers diagnostic tools to help you evaluate the damage accurately.
1.2. The Dangers of Neglecting Deep Chips
Ignoring deep paint chips can have significant consequences. The exposed metal is vulnerable to moisture and oxygen, leading to rust formation. Rust not only weakens the metal structure but also causes the paint around the chip to bubble and peel. Over time, this can lead to more extensive and costly repairs. Addressing chips early prevents these issues and preserves your car’s value.
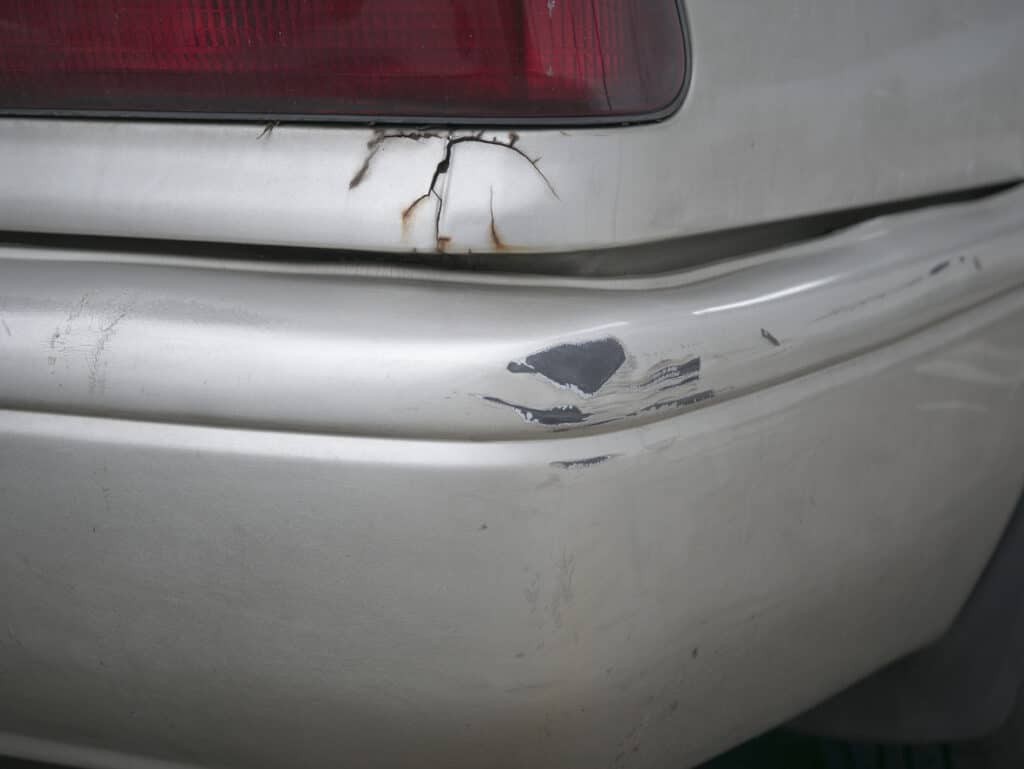
Deep car paint chips exposing metal
2. Essential Tools And Materials For Paint Chip Repair
Repairing deep chips in car paint requires a selection of specific tools and materials. Using the right equipment ensures a professional-quality finish and prevents further damage. Here’s a detailed breakdown of what you’ll need, and how CARDIAGTECH.NET provides solutions for each requirement.
2.1. Comprehensive List Of Repair Essentials
- Cleaning Supplies: Automotive soap, degreaser, and microfiber cloths are essential for preparing the area.
- Sandpaper: Various grits (e.g., 320, 600, 1200, 2000) for smoothing and blending the repair area.
- Primer: To provide a base for the paint to adhere to and protect the exposed metal.
- Touch-Up Paint: Matching the exact color code of your car is crucial for a seamless repair.
- Clear Coat: To protect the paint and provide a glossy finish.
- Applicators: Fine-tipped brushes, paint pens, or toothpicks for precise application.
- Rubbing Compound: For leveling the repaired area with the surrounding paint.
- Polishing Compound: To restore the shine and smooth out any imperfections.
- Wax: To protect the repaired area and enhance the finish.
2.2. Highlighting CARDIAGTECH.NET’s Product Solutions
At CARDIAGTECH.NET, we offer a range of high-quality tools and materials to meet all your car paint repair needs:
| Product Category | Specific Products | Benefits |
|---|---|---|
| Sandpaper Sets | Assorted Grit Sandpaper Pack | Provides a variety of grits for different stages of repair, ensuring a smooth and even surface. |
| Touch-Up Paint Kits | Automotive Touch-Up Paint Kit with Color Match Guarantee | Guarantees an exact color match to your car’s paint code, ensuring a seamless repair. Includes applicators for precise application. |
| Polishing Compounds | Professional Grade Rubbing and Polishing Compound Kit | Formulated for automotive finishes, these compounds effectively level and smooth the repaired area, restoring shine and removing imperfections. |
| Clear Coat Sprays | High-Gloss Automotive Clear Coat Spray | Provides a durable, glossy finish that protects the repaired area from UV rays and environmental damage. |
| Applicator Sets | Precision Applicator Set for Touch-Up Paint | Includes fine-tipped brushes and applicators for precise and controlled application of paint, ensuring a professional-looking repair. |
| Rust Prevention | Anti-Rust Primer | Provides excellent adhesion and corrosion protection, ensuring a long-lasting repair. |
2.3. Importance of Quality Materials
Investing in high-quality materials is crucial for achieving a professional-looking repair. Cheap materials may not provide the same level of adhesion, color accuracy, or durability, leading to unsatisfactory results and the need for repeat repairs. CARDIAGTECH.NET ensures that all our products meet the highest standards, providing you with the best possible results.
3. Step-By-Step Guide To Fixing Deep Chips In Car Paint
Repairing deep chips in car paint can seem daunting, but with the right tools and a step-by-step approach, you can achieve professional-looking results. Here’s a comprehensive guide to walk you through the process.
3.1. Preparing The Damaged Area
- Cleaning: Thoroughly clean the area around the chip with automotive soap and water. Remove any dirt, wax, or contaminants that could interfere with the repair.
- Degreasing: Use a degreaser to remove any residual oils or grease. This ensures that the primer and paint adhere properly.
- Drying: Allow the area to dry completely before proceeding.
3.2. Sanding The Chip And Surrounding Paint
- Initial Sanding: Use 320-grit sandpaper to gently remove any loose paint or rust around the chip. Be careful not to apply too much pressure, as this could damage the surrounding paint.
- Feathering: Switch to 600-grit sandpaper to feather the edges of the chip, creating a smooth transition between the damaged area and the surrounding paint.
- Final Sanding: Use 1200-grit sandpaper to further refine the surface, preparing it for primer.
3.3. Applying Primer For Optimal Adhesion
- Application: Apply a thin, even coat of automotive primer to the sanded area. The primer provides a base for the paint to adhere to and helps prevent rust.
- Drying Time: Allow the primer to dry completely according to the manufacturer’s instructions. This typically takes about 30 minutes to an hour.
- Sanding the Primer: Once the primer is dry, lightly sand it with 2000-grit sandpaper to create a smooth surface for the touch-up paint.
3.4. Applying Touch-Up Paint With Precision
- Color Matching: Ensure that the touch-up paint matches your car’s paint code exactly. CARDIAGTECH.NET offers color-matching services to guarantee a perfect match.
- Application Technique: Use a fine-tipped brush, paint pen, or toothpick to carefully apply the touch-up paint to the chip. Apply the paint in thin layers, allowing each layer to dry before applying the next. This prevents the paint from running or sagging.
- Building Layers: Continue applying thin layers of paint until the chip is filled to the level of the surrounding paint.
3.5. Blending And Leveling The Repaired Area
- Curing Time: Allow the touch-up paint to cure completely, typically for 24 to 48 hours.
- Wet Sanding: Use 2000-grit sandpaper to wet sand the repaired area, blending it with the surrounding paint. Use a sanding block to ensure a flat, even surface.
- Rubbing Compound: Apply rubbing compound to the sanded area, using a microfiber cloth or a polishing pad. This helps to level the repaired area and remove any scratches or imperfections.
- Polishing Compound: Follow up with polishing compound to restore the shine and smooth out any remaining imperfections.
3.6. Applying Clear Coat For Protection And Shine
- Application: Apply a thin, even coat of automotive clear coat to the repaired area. The clear coat protects the paint and provides a glossy finish.
- Drying Time: Allow the clear coat to dry completely according to the manufacturer’s instructions.
- Final Polishing: Once the clear coat is dry, lightly polish the area with polishing compound to enhance the shine and remove any imperfections.
3.7. Waxing For Long-Lasting Protection
- Application: Apply a coat of automotive wax to the repaired area, using a clean microfiber cloth.
- Buffing: Allow the wax to dry according to the manufacturer’s instructions, then buff it off with a clean, dry microfiber cloth. This protects the repaired area and enhances the shine.
Detailed Table: Step-by-Step Guide
| Step | Action | Tools/Materials | Grit (Sandpaper) | Drying Time |
|---|---|---|---|---|
| 1. Cleaning | Wash and degrease the area | Automotive soap, degreaser, microfiber cloths | N/A | 15-30 minutes |
| 2. Initial Sanding | Remove loose paint, rust | Sandpaper | 320 | N/A |
| 3. Feathering | Smooth edges of the chip | Sandpaper | 600 | N/A |
| 4. Final Sanding | Prepare for primer application | Sandpaper | 1200 | N/A |
| 5. Primer Application | Apply thin, even coat of primer | Automotive primer, applicator | N/A | 30-60 minutes |
| 6. Sanding the Primer | Create smooth surface for paint | Sandpaper | 2000 | N/A |
| 7. Touch-Up Paint | Apply thin layers of touch-up paint | Touch-up paint, fine-tipped brush | N/A | 2-4 hours between layers |
| 8. Curing | Allow paint to harden | N/A | N/A | 24-48 hours |
| 9. Wet Sanding | Blend repaired area with surrounding paint | Sandpaper, sanding block | 2000 | N/A |
| 10. Rubbing Compound | Level the repaired area | Rubbing compound, microfiber cloth/pad | N/A | N/A |
| 11. Polishing Compound | Restore shine, remove imperfections | Polishing compound, microfiber cloth/pad | N/A | N/A |
| 12. Clear Coat Application | Apply thin, even coat of clear coat | Automotive clear coat spray | N/A | 2-4 hours |
| 13. Final Polishing | Enhance shine, remove imperfections | Polishing compound, microfiber cloth/pad | N/A | N/A |
| 14. Waxing | Protect repaired area, enhance shine | Automotive wax, microfiber cloth | N/A | Dry as per instructions |
4. Advanced Techniques For A Flawless Finish
Achieving a truly flawless finish when repairing deep chips in car paint requires more than just the basic steps. Incorporating advanced techniques can elevate your repair from good to exceptional. Here are some advanced tips and tricks to ensure a seamless and professional-looking result.
4.1. Wet Sanding Techniques
Wet sanding is a critical step in achieving a smooth, even surface. It involves using sandpaper with water to reduce friction and prevent the sandpaper from clogging.
- Proper Lubrication: Use a spray bottle to keep the sandpaper and the surface constantly lubricated with water. This helps to remove sanding debris and prevents scratches.
- Sanding Block: Use a sanding block to ensure even pressure and prevent finger marks on the surface. This is particularly important when sanding larger areas.
- Circular Motion: Sand in a circular motion to blend the repaired area with the surrounding paint. This helps to avoid creating sharp lines or edges.
4.2. Color Matching Secrets
Achieving a perfect color match is essential for a seamless repair. Even slight variations in color can be noticeable.
- Paint Code Verification: Always verify your car’s paint code before purchasing touch-up paint. The paint code is typically located on a sticker in the driver’s side door jamb or in the engine compartment.
- Test Application: Before applying the touch-up paint to the chip, test it on an inconspicuous area of the car to ensure a perfect match.
- Custom Tinting: If the touch-up paint doesn’t match exactly, consider having it custom tinted at an automotive paint supply store.
4.3. Using Fillers For Deep Chips
For extremely deep chips that extend to the bare metal, using a filler can help to create a smooth, even surface.
- Application: Apply a thin layer of automotive body filler to the chip, using a plastic spreader.
- Sanding: Allow the filler to dry completely, then sand it with 320-grit sandpaper to level it with the surrounding paint.
- Priming: Apply a coat of automotive primer to the filled area, then sand it with 600-grit sandpaper to create a smooth surface for the touch-up paint.
4.4. Blending Clear Coat Effectively
Blending the clear coat with the surrounding paint is crucial for achieving a seamless finish.
- Fading Technique: Use a fade-out thinner to gradually blend the edges of the clear coat with the surrounding paint. This helps to avoid creating a hard line between the repaired area and the original paint.
- Multiple Coats: Apply multiple thin coats of clear coat, allowing each coat to dry before applying the next. This helps to build up the clear coat gradually and create a smooth, even surface.
- Polishing: After the clear coat has dried completely, polish the area with polishing compound to remove any imperfections and enhance the shine.
Table: Advanced Techniques for Flawless Finish
| Technique | Description | Benefits |
|---|---|---|
| Wet Sanding | Sanding with constant water lubrication | Reduces friction, prevents clogging, avoids scratches, ensures even surface. |
| Color Matching | Verify paint code, test application, custom tinting | Ensures seamless color match, avoids noticeable color variations. |
| Using Fillers | Applying body filler for very deep chips | Creates smooth, even surface, prepares for touch-up paint. |
| Blending Clear Coat | Fading technique, multiple coats, polishing | Avoids hard lines, builds smooth surface, enhances shine, ensures seamless finish. |
5. Common Mistakes To Avoid During Paint Chip Repair
While repairing deep chips in car paint can be a rewarding DIY project, it’s essential to avoid common mistakes that can compromise the quality of the repair. Here are some pitfalls to watch out for and how to steer clear of them.
5.1. Skipping Preparation
One of the biggest mistakes is rushing into the repair without properly preparing the area.
- Consequences: Skipping cleaning and degreasing can prevent the primer and paint from adhering properly, leading to peeling and flaking.
- Solution: Always thoroughly clean and degrease the area before beginning any repairs. Use automotive soap, water, and a degreaser to remove any dirt, wax, or contaminants.
5.2. Using The Wrong Materials
Using the wrong materials can compromise the quality and durability of the repair.
- Consequences: Using low-quality paint or primer can result in poor adhesion, color mismatch, and a dull finish.
- Solution: Invest in high-quality automotive-grade materials from trusted brands like those available at CARDIAGTECH.NET. Ensure that the touch-up paint matches your car’s paint code exactly.
5.3. Applying Too Much Paint At Once
Applying too much paint at once can lead to runs, drips, and an uneven finish.
- Consequences: Thick layers of paint can take longer to dry and may not adhere properly, leading to peeling and cracking.
- Solution: Apply the paint in thin, even layers, allowing each layer to dry before applying the next. This prevents runs and ensures a smooth, even finish.
5.4. Neglecting To Blend The Repaired Area
Failing to blend the repaired area with the surrounding paint can result in a noticeable patch.
- Consequences: A hard line between the repaired area and the original paint can be unsightly and detract from the overall appearance of the car.
- Solution: Use wet sanding and rubbing compound to blend the repaired area with the surrounding paint. This creates a smooth transition and ensures a seamless finish.
5.5. Forgetting To Apply Clear Coat
Skipping the clear coat can leave the repaired area unprotected and vulnerable to damage.
- Consequences: Without a clear coat, the touch-up paint is exposed to UV rays, environmental contaminants, and scratches, which can cause it to fade, chip, and peel.
- Solution: Always apply a coat of automotive clear coat to the repaired area to protect the paint and provide a glossy finish.
Table: Common Mistakes and Solutions
| Mistake | Consequences | Solution |
|---|---|---|
| Skipping Preparation | Poor adhesion, peeling | Thoroughly clean and degrease the area. |
| Using Wrong Materials | Poor adhesion, color mismatch, dull finish | Invest in high-quality automotive-grade materials. |
| Applying Too Much Paint | Runs, drips, uneven finish | Apply thin, even layers, allowing each layer to dry. |
| Neglecting To Blend | Noticeable patch | Use wet sanding and rubbing compound to blend the area. |
| Forgetting To Apply Clear Coat | Unprotected paint, fading, chipping | Always apply a coat of automotive clear coat. |
6. Maintaining Your Car’s Paint To Prevent Future Chips
Preventing deep chips in your car’s paint is always better than having to repair them. Proper maintenance and protective measures can significantly reduce the risk of damage and keep your car looking its best. Here are some essential tips for maintaining your car’s paint.
6.1. Regular Washing And Waxing
Regular washing and waxing are the foundation of good paint maintenance.
- Washing: Wash your car regularly, at least every two weeks, to remove dirt, grime, and contaminants that can damage the paint. Use a pH-neutral automotive soap and a soft microfiber wash mitt.
- Waxing: Apply a coat of automotive wax every three to six months to protect the paint from UV rays, oxidation, and environmental damage. Wax also helps to repel water and dirt, making it easier to keep your car clean.
6.2. Using Paint Protection Film (PPF)
Paint Protection Film (PPF) is a clear, transparent film that is applied to the car’s paint to protect it from scratches, chips, and other damage.
- Application: Have PPF professionally installed on high-impact areas such as the hood, bumper, and fenders.
- Benefits: PPF provides excellent protection against stone chips, road debris, and minor scratches, helping to keep your car’s paint looking new for years.
6.3. Avoiding Harsh Chemicals And Abrasives
Harsh chemicals and abrasives can damage your car’s paint and clear coat.
- Avoid: Avoid using household cleaners, dish soap, or abrasive scrub brushes to wash your car. These can strip away the wax and damage the paint.
- Use: Use only pH-neutral automotive soaps and soft microfiber wash mitts.
6.4. Parking Strategically
Where you park your car can have a significant impact on its paint.
- Avoid: Avoid parking under trees, which can drop sap, leaves, and bird droppings on your car.
- Park: Park in covered garages or carports whenever possible to protect your car from the elements.
6.5. Promptly Addressing Minor Scratches And Chips
Addressing minor scratches and chips promptly can prevent them from worsening and causing more extensive damage.
- Touch-Up: Use touch-up paint to repair minor scratches and chips as soon as possible.
- Professional: Consult a professional for more extensive damage.
Table: Maintaining Car Paint
| Maintenance Tip | Description | Benefits |
|---|---|---|
| Regular Washing and Waxing | Wash every two weeks, wax every 3-6 months | Removes dirt, protects from UV rays, oxidation, environmental damage, repels water and dirt. |
| Using Paint Protection Film | Professionally installed on high-impact areas | Excellent protection against stone chips, road debris, minor scratches. |
| Avoiding Harsh Chemicals | Use pH-neutral automotive soaps and soft microfiber wash mitts | Prevents damage to paint and clear coat. |
| Parking Strategically | Avoid parking under trees, park in covered areas | Protects from sap, leaves, bird droppings, and the elements. |
| Promptly Addressing Scratches | Use touch-up paint for minor damage, consult a professional for extensive damage | Prevents minor damage from worsening and causing more extensive issues. |
7. Professional Paint Chip Repair Services
While DIY repairs can be effective for minor chips, professional paint chip repair services offer a higher level of expertise and can achieve a flawless finish, especially for deep or extensive damage. Here’s why you might consider professional services and what to expect.
7.1. When To Seek Professional Help
- Extensive Damage: If the damage is extensive, covering a large area of the car, professional repair is the best option.
- Deep Chips: For very deep chips that expose the bare metal, professional repair can ensure proper rust prevention and a seamless finish.
- Color Matching Issues: If you are unable to achieve a perfect color match with DIY methods, professional services can provide custom color matching.
- Lack of Experience: If you are not comfortable with DIY repairs or lack the necessary tools and skills, professional services can provide a hassle-free solution.
7.2. Benefits Of Professional Services
- Expertise: Professional technicians have the expertise and training to assess the damage and perform the repair correctly.
- Tools: They have access to professional-grade tools and equipment that are not available to the average DIYer.
- Materials: Professional services use high-quality materials that are designed for automotive finishes.
- Warranty: Many professional services offer a warranty on their work, providing peace of mind.
7.3. Finding Reputable Repair Shops
- Research: Research local repair shops and read online reviews.
- Ask: Ask for recommendations from friends, family, and colleagues.
- Check: Check for certifications and affiliations with industry organizations.
- Estimates: Get estimates from multiple shops and compare prices and services.
8. Cost Considerations For DIY Vs. Professional Repair
When deciding whether to repair deep chips in car paint yourself or hire a professional, cost is often a significant factor. Here’s a breakdown of the costs associated with DIY and professional repair options to help you make an informed decision.
8.1. Diy Repair Costs
- Materials: The cost of materials for DIY repair can range from $50 to $200, depending on the quality of the materials and the extent of the damage. This includes items such as automotive soap, degreaser, sandpaper, primer, touch-up paint, clear coat, rubbing compound, polishing compound, and wax.
- Tools: If you don’t already have them, you may need to purchase additional tools such as a sanding block, microfiber cloths, and applicators, which can add to the cost.
- Time: DIY repair requires time and effort, which can be a significant cost if you have a busy schedule.
8.2. Professional Repair Costs
- Estimates: The cost of professional paint chip repair can range from $100 to $500 or more, depending on the extent of the damage and the location of the repair shop.
- Factors: Factors that can affect the cost include the size and depth of the chips, the complexity of the repair, and the type of paint finish.
- Additional: Some repair shops may charge extra for custom color matching or rust repair.
8.3. Cost-Benefit Analysis
- DIY: DIY repair is a cost-effective option for minor chips, but it may not be the best choice for deep or extensive damage.
- Professional: Professional repair is more expensive, but it can provide a higher quality finish and ensure that the repair is done correctly.
- Decision: Consider the extent of the damage, your budget, and your level of experience when deciding whether to repair the chips yourself or hire a professional.
9. The Science Behind Car Paint And Chip Resistance
Understanding the science behind car paint and chip resistance can help you appreciate the importance of proper maintenance and repair. Here’s a look at the composition of car paint and the factors that contribute to its durability.
9.1. Layers Of Car Paint
- Electrocoat: The electrocoat is the first layer of paint applied to the car’s metal body. It provides corrosion protection and helps the paint adhere to the metal.
- Primer: The primer is applied over the electrocoat to create a smooth surface for the base coat and to provide additional corrosion protection.
- Base Coat: The base coat is the layer of paint that provides the color and finish. It can be a solid color, metallic, or pearlescent.
- Clear Coat: The clear coat is the final layer of paint applied to the car. It provides protection from UV rays, scratches, and environmental damage, and it gives the paint its glossy finish.
9.2. Factors Affecting Chip Resistance
- Paint Quality: The quality of the paint and clear coat can have a significant impact on its chip resistance. High-quality paints and clear coats are more durable and resistant to damage.
- Application: The way the paint is applied can also affect its chip resistance. Paint that is applied too thin or too thick can be more prone to chipping.
- Environmental Factors: Exposure to UV rays, extreme temperatures, and harsh chemicals can degrade the paint and make it more susceptible to chipping.
10. Conclusion: Maintaining Your Car’s Appearance
Repairing deep chips in car paint is an essential aspect of maintaining your vehicle’s appearance and protecting it from long-term damage. Whether you choose to tackle the repairs yourself or seek professional assistance, understanding the process and using the right tools and materials are key to achieving a flawless finish.
Remember, regular maintenance, prompt attention to minor damage, and strategic protection measures can significantly reduce the risk of future chips and keep your car looking its best for years to come.
At CARDIAGTECH.NET, we are committed to providing you with the highest quality tools, materials, and expert guidance to help you achieve professional-looking results. Explore our extensive range of automotive products and resources, and take the first step towards restoring your car’s flawless appearance today.
Ready to take action?
Are you facing challenges with deep chips in your car paint? Do you want to ensure a professional-quality repair that lasts? Contact CARDIAGTECH.NET today for expert advice and personalized solutions. Our team of experienced technicians can guide you through the repair process, recommend the best tools and materials for your specific needs, and provide ongoing support to ensure your satisfaction.
Don’t let deep chips compromise your car’s appearance and value. Reach out to us now and let us help you restore your vehicle to its original glory.
Contact Information:
- Address: 276 Reock St, City of Orange, NJ 07050, United States
- WhatsApp: +1 (641) 206-8880
- Website: CARDIAGTECH.NET
FAQ: How To Fix Deep Chips In Car Paint
Here are 10 frequently asked questions about fixing deep chips in car paint, designed to provide you with quick and informative answers.
1. What causes deep chips in car paint?
Deep chips are typically caused by road debris, gravel, or small collisions that penetrate through multiple layers of paint, exposing the metal underneath.
2. Can I fix deep chips in my car paint myself?
Yes, you can fix deep chips yourself with the right tools and materials. However, professional repair is recommended for extensive or very deep damage.
3. What tools and materials do I need for DIY paint chip repair?
You’ll need automotive soap, degreaser, sandpaper (various grits), primer, touch-up paint, clear coat, applicators, rubbing compound, polishing compound, and wax.
4. How do I match the touch-up paint to my car’s color?
Find your car’s paint code (usually located on a sticker in the driver’s side door jamb or engine compartment) and use it to purchase matching touch-up paint.
5. How do I prepare the damaged area before applying touch-up paint?
Thoroughly clean the area with automotive soap and degreaser, then sand the chip and surrounding paint with progressively finer grits of sandpaper.
6. How do I apply touch-up paint for the best results?
Apply the paint in thin, even layers, allowing each layer to dry before applying the next. Use a fine-tipped brush or paint pen for precise application.
7. How do I blend the repaired area with the surrounding paint?
Use wet sanding with 2000-grit sandpaper, followed by rubbing compound and polishing compound to blend the repaired area with the surrounding paint.
8. Is clear coat necessary for paint chip repair?
Yes, clear coat is essential for protecting the touch-up paint from UV rays, scratches, and environmental damage, and for providing a glossy finish.
9. How can I prevent future chips in my car paint?
Regularly wash and wax your car, use paint protection film on high-impact areas, avoid harsh chemicals and abrasives, and park strategically.
10. When should I seek professional paint chip repair services?
Seek professional help for extensive damage, very deep chips, color matching issues, or if you lack the necessary tools and skills for DIY repair.