How To Fix A Car Door Handle: Comprehensive Guide
A car door handle is crucial for accessing your vehicle and ensuring safety. A malfunctioning handle can be a major inconvenience, potentially leaving you stuck outside or, even worse, trapped inside. At CARDIAGTECH.NET, we empower you with the knowledge to tackle this common issue head-on. This guide provides you with a comprehensive, step-by-step method for fixing typical car door handle problems, helping you save money and regain control over your vehicle’s functionality. We’ll cover everything from essential tools to detailed instructions, ensuring a smooth and successful repair experience. Discover related solutions, like door lock repair and auto body maintenance, all designed to keep your car in top condition.
1. Understanding Car Door Handle Issues
Car door handles endure constant use and exposure to the elements, making them susceptible to wear and tear. Understanding the common issues that arise will help you diagnose the problem effectively.
1.1. Common Problems With Car Door Handles
- Broken Linkages: Internal rods or cables connecting the handle to the latch mechanism can break or become detached.
- Worn-Out Springs: Springs responsible for returning the handle to its resting position can weaken or break over time.
- Frozen Mechanisms: In cold climates, ice can accumulate in the handle mechanism, preventing it from moving.
- Loose Screws or Fasteners: Over time, the screws and fasteners holding the handle in place can loosen, causing the handle to become wobbly or detached.
- Corrosion: Rust and corrosion can seize up the handle mechanism, making it difficult to operate.
1.2. Identifying The Root Cause
Before diving into the repair, it’s crucial to pinpoint the exact cause of the problem. Here’s how:
- Inspect the Handle: Check for any visible damage, such as cracks, breaks, or loose parts.
- Test the Handle: Try opening the door from both the inside and outside. Note whether the handle feels loose, sticky, or completely unresponsive.
- Listen Carefully: Pay attention to any unusual sounds when you operate the handle, such as clicking, grinding, or snapping.
- Examine the Linkages: If possible, inspect the internal linkages connecting the handle to the latch mechanism. Look for any signs of damage, disconnection, or corrosion.
- Consider the Weather: If it’s extremely cold, ice may be the culprit. Try warming the handle with a hairdryer to see if it thaws out.
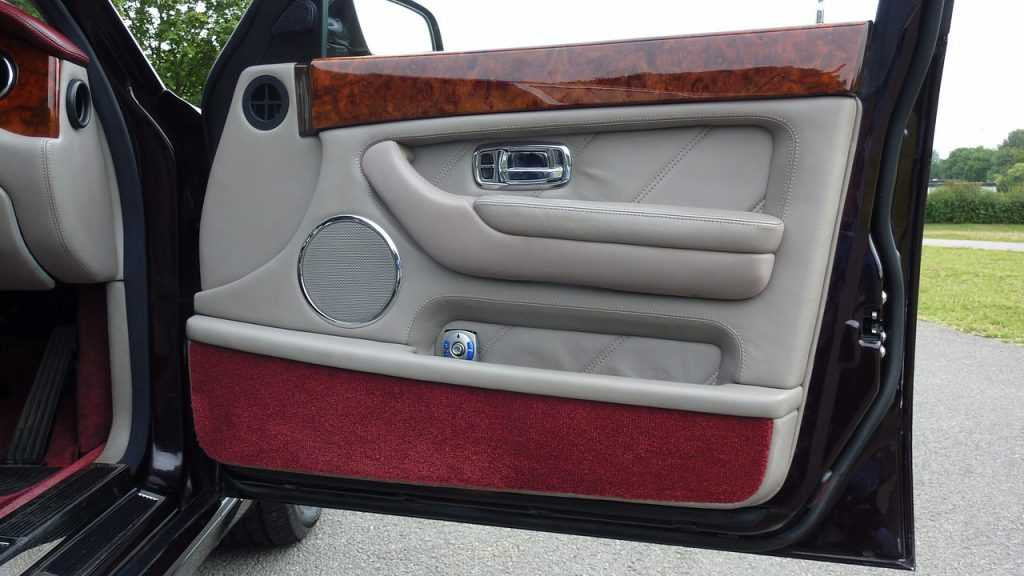
Inspect the handle for any visible damage
2. Essential Tools And Materials
Having the right tools and materials on hand is crucial for a successful car door handle repair. Here’s a comprehensive list of what you’ll need:
2.1. Required Tools
| Tool | Description |
|---|---|
| Screwdrivers | A set of Phillips and flat-head screwdrivers in various sizes to remove screws and fasteners. |
| Socket Set | A set of sockets and a ratchet wrench for removing bolts and nuts. |
| Pliers | For gripping, bending, and cutting wires and small parts. |
| Trim Removal Tool Set | Plastic tools designed to remove interior trim panels without causing damage. |
| Rubber Mallet | For gently tapping trim panels back into place without damaging them. |
| Multimeter | A tool for testing electrical circuits, helpful for diagnosing issues with power door locks and handles. |
| Work Gloves | To protect your hands from dirt, grease, and sharp edges. |
| Safety Glasses | To protect your eyes from debris and flying particles. |
| Flashlight or Work Light | To provide ample lighting in the work area. |
2.2. Required Materials
| Material | Description |
|---|---|
| Replacement Handle | The correct replacement handle for your car’s make, model, and year. You can purchase this from a dealer, auto parts store, or online. |
| Door Panel Clips | These clips often break when removing the door panel. Having replacements on hand will ensure a secure reinstallation. |
| Lubricant | A lubricant such as WD-40 or lithium grease to help loosen rusted parts and ensure smooth operation of the handle mechanism. |
| Masking Tape | To label parts and screws for easy reassembly, especially helpful for beginners. |
| Clean Rags or Shop Towels | For wiping away dirt, grease, and excess lubricant. |
| Small Container or Tray | To keep track of screws and small parts as you disassemble the door. |
| Penetrating Oil | To loosen stubborn or corroded bolts and fasteners. |
Having all these tools and materials prepared in advance will streamline the repair process and minimize frustration.
3. Step-By-Step Guide To Fixing A Car Door Handle
This section provides a detailed, step-by-step guide to fixing a car door handle. Follow these instructions carefully, and don’t hesitate to consult your car’s repair manual or online resources if you need further clarification.
3.1. Step 1: Preparing The Vehicle
- Park Safely: Park your car on a level surface in a well-lit area. Engage the parking brake and turn off the ignition.
- Gather Your Tools and Materials: Ensure you have all the necessary tools and materials within easy reach.
- Protect the Work Area: Cover the surrounding area with a clean cloth or paper to protect it from scratches and spills.
- Consult the Repair Manual: Refer to your car’s repair manual for specific instructions and diagrams related to your vehicle’s door handle assembly.
3.2. Step 2: Removing The Interior Door Panel
- Locate and Remove Screws: Identify and remove all screws holding the door panel in place. These are typically located around the edges of the panel, in the armrest, and behind the door handle or lock mechanism.
- Pry Off Plastic Covers: Some screws may be hidden behind plastic covers. Use a small flat-head screwdriver or a trim removal tool to gently pry off these covers.
- Use Trim Removal Tools: Insert a trim removal tool between the door panel and the door frame. Gently pry around the edges of the panel to release the retaining clips.
- Lift and Remove the Panel: Once all the clips are released, lift the door panel upwards and away from the door frame. Be careful not to pull too hard, as there may still be wires or cables connected to the panel.
- Disconnect Wires and Cables: Disconnect any electrical connectors or cables attached to the door panel, such as those for the power windows, door locks, or speakers.
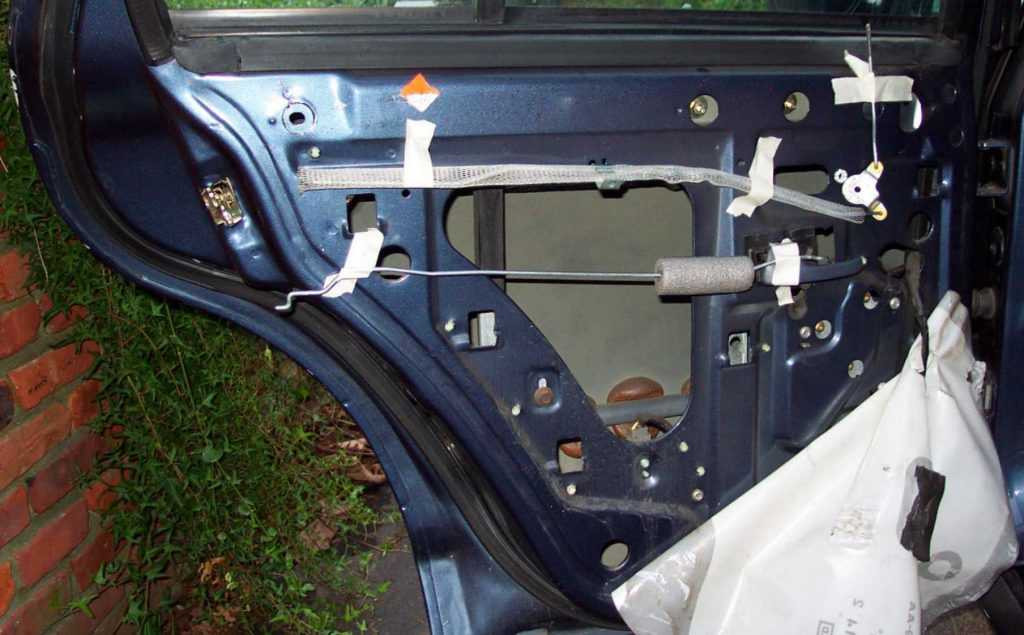
 Remove the inside door panel of your car
3.3. Step 3: Accessing The Door Handle Mechanism
- Remove the Water Shield: Carefully peel back the plastic water shield that covers the inside of the door. This shield protects the door’s internal components from moisture.
- Locate the Door Handle Linkages: Identify the rods, cables, or connectors that link the door handle to the latch mechanism.
- Disconnect the Linkages: Use pliers or your fingers to carefully disconnect the linkages from the door handle. Take note of how they are connected, as you’ll need to reattach them in the same way later.
3.4. Step 4: Removing The Old Door Handle
- Remove Mounting Hardware: Locate and remove the screws, bolts, or clips that secure the door handle to the door. These may be accessible from the inside of the door or from the outside.
- Carefully Extract the Handle: Once the mounting hardware is removed, carefully extract the old door handle from the door. Be mindful of any tight spaces or obstructions.
3.5. Step 5: Installing The New Door Handle
- Position the New Handle: Align the new door handle with the mounting holes in the door.
- Secure the Handle: Install the screws, bolts, or clips to secure the new door handle to the door. Tighten them firmly, but be careful not to overtighten and strip the threads.
- Reconnect the Linkages: Reconnect the linkages to the new door handle, ensuring they are properly seated and secured.
3.6. Step 6: Testing The New Door Handle
- Test the Handle Function: Before reassembling the door panel, test the new door handle to ensure it is working correctly. Open and close the door several times from both the inside and outside.
- Check the Lock Mechanism: Verify that the door lock mechanism is functioning properly. Lock and unlock the door using the key, the power door lock switch, and the manual lock knob.
3.7. Step 7: Reassembling The Door Panel
- Reconnect Wires and Cables: Reconnect any electrical connectors or cables to the door panel, such as those for the power windows, door locks, or speakers.
- Reinstall the Water Shield: Carefully reattach the plastic water shield to the inside of the door.
- Align and Attach the Panel: Align the door panel with the door frame and gently push it into place, ensuring that all the retaining clips are properly engaged.
- Reinstall Screws: Reinstall all the screws that hold the door panel in place. Tighten them firmly, but be careful not to overtighten and strip the threads.
- Test All Functions: Test all the door’s functions, including the power windows, door locks, speakers, and interior lights, to ensure they are working correctly.
4. Advanced Tips And Tricks
- Use Penetrating Oil: If you encounter stubborn or corroded bolts and fasteners, apply penetrating oil and let it soak for several minutes before attempting to remove them.
- Take Pictures: Before disconnecting any linkages or wires, take pictures with your smartphone or camera. This will serve as a helpful reference when reassembling the door.
- Work Methodically: Keep track of all the parts you remove and label them with masking tape. This will prevent confusion and make reassembly easier.
- Don’t Force Anything: If you encounter resistance when removing or installing parts, stop and double-check your work. Forcing things can damage the components and make the problem worse.
- Seek Professional Help: If you’re uncomfortable performing any of these steps, or if you encounter a problem you can’t solve, don’t hesitate to seek professional help from a qualified mechanic.
5. Preventing Future Issues
- Lubricate Regularly: Lubricate the door handle mechanism and linkages with a silicone-based lubricant at least twice a year. This will help prevent corrosion and ensure smooth operation.
- Avoid Slamming Doors: Slamming doors can put unnecessary stress on the door handle and latch mechanisms. Close doors gently to prolong their lifespan.
- Protect From the Elements: Park your car in a garage or carport to protect it from extreme weather conditions, which can damage the door handles and other components.
- Address Problems Promptly: If you notice any signs of trouble with your door handle, such as looseness, stickiness, or unusual noises, address the problem promptly. Delaying repairs can lead to more significant damage.
Inspect the handle for any visible damage
6. When To Call A Professional
While many car door handle repairs can be done DIY, some situations warrant professional assistance. Consider calling a mechanic if:
- You’re uncomfortable working on your car.
- You’re unsure how to diagnose the problem.
- You lack the necessary tools or materials.
- The repair involves complex electrical or mechanical components.
- You’ve attempted the repair yourself but are still having problems.
Remember, it’s always better to err on the side of caution when it comes to car repairs. A qualified mechanic can accurately diagnose the problem, perform the necessary repairs safely and effectively, and ensure your car is back on the road in no time.
7. Ensuring Vehicle Security After Repair
7.1. Verify Proper Locking Functionality
After you’ve completed the door handle repair, the first and foremost step is to ensure that the door’s locking mechanism is functioning correctly. This involves a thorough check of both the manual and power locking systems.
- Manual Lock Test: Manually lock and unlock the door using the key from the outside and the lock knob from the inside. Verify that the lock engages and disengages smoothly without any sticking or resistance.
- Power Lock Test: If your vehicle is equipped with power locks, test the system using the door switch and the remote key fob. Confirm that all doors, including the one you repaired, lock and unlock simultaneously and reliably.
- Alarm System Integration: If your vehicle has an alarm system, arm and disarm it to ensure that the door sensors are properly connected and that the alarm triggers correctly if the door is opened without authorization.
7.2. Inspect the Door Alignment
Proper door alignment is essential for maintaining a tight seal and preventing unauthorized access. After the repair, carefully inspect the door’s alignment with the surrounding body panels.
- Visual Inspection: Look for any gaps or unevenness between the door and the frame. The door should sit flush with the adjacent panels when closed.
- Weather Stripping Check: Examine the weather stripping around the door frame for any signs of damage or misalignment. Damaged or improperly installed weather stripping can compromise the door’s seal and increase the risk of forced entry.
- Latch Engagement: Ensure that the door latch engages securely with the striker plate on the door frame. The door should close firmly and latch without requiring excessive force.
7.3. Professional Security System Check
If you have concerns about your vehicle’s security after the door handle repair, consider having a professional security system check. A qualified technician can assess your vehicle’s security vulnerabilities and recommend appropriate upgrades or repairs.
- Security System Inspection: A professional can inspect your vehicle’s alarm system, immobilizer, and other security features to ensure they are functioning correctly.
- Vulnerability Assessment: A security expert can identify potential weaknesses in your vehicle’s security and recommend measures to address them.
- Security System Upgrades: If necessary, a professional can install advanced security features, such as GPS tracking, remote engine disable, and reinforced door locks, to enhance your vehicle’s protection.
8. Cost Considerations
8.1. DIY vs. Professional Repair Costs
- DIY Repair: The cost of a DIY car door handle repair primarily includes the price of the replacement handle, which can range from $20 to $100 depending on the make and model of your vehicle. Additional costs may include tools and materials, such as screwdrivers, pliers, lubricants, and door panel clips, which can add another $10 to $50 to the total cost.
- Professional Repair: Professional car door handle repairs can range from $100 to $500, depending on the complexity of the repair and the labor rates of the mechanic. Labor costs typically range from $50 to $150 per hour, and the repair may take one to three hours to complete. Additionally, the cost of the replacement handle will be included in the total repair bill.
8.2. Factors Affecting Repair Costs
- Vehicle Make and Model: The make and model of your vehicle can significantly impact the cost of a car door handle repair. Luxury vehicles and those with complex door handle mechanisms may require more specialized parts and labor, resulting in higher repair costs.
- Type of Door Handle: The type of door handle, whether it’s a manual or power-operated handle, can also affect the repair cost. Power-operated handles typically have more intricate electrical components, which can increase the complexity and cost of the repair.
- Extent of Damage: The extent of the damage to the door handle and its surrounding components can also influence the repair cost. If the damage is limited to the handle itself, the repair may be relatively straightforward and inexpensive. However, if the damage extends to the door panel, locking mechanism, or electrical wiring, the repair may be more extensive and costly.
8.3. Getting Quotes From Multiple Mechanics
To ensure you’re getting the best price for a professional car door handle repair, it’s essential to get quotes from multiple mechanics. Contact at least three different repair shops and provide them with the make, model, and year of your vehicle, as well as a description of the problem. Ask for a detailed estimate that includes the cost of the replacement handle, labor charges, and any other associated fees. Compare the quotes carefully and choose the mechanic that offers the best value for your money.
9. Choosing The Right Replacement Handle
9.1. OEM vs. Aftermarket Handles
- OEM (Original Equipment Manufacturer) Handles: OEM handles are made by the same manufacturer that produced the original handle for your vehicle. They are designed to meet the exact specifications of your car and offer the best fit, finish, and performance. However, OEM handles are typically more expensive than aftermarket options.
- Aftermarket Handles: Aftermarket handles are produced by third-party manufacturers and are designed to be compatible with a wide range of vehicles. They are generally more affordable than OEM handles, but their quality and fit may vary. Some aftermarket handles may not match the original handle’s appearance or performance.
9.2. Key Considerations When Selecting A Replacement
- Compatibility: Ensure that the replacement handle is compatible with your vehicle’s make, model, and year. Check the part number and consult your car’s repair manual or an online parts catalog to verify compatibility.
- Quality: Choose a replacement handle made from high-quality materials that can withstand the rigors of daily use. Look for handles made from durable metals or reinforced plastics.
- Finish: Select a replacement handle with a finish that matches the original handle and complements your vehicle’s overall appearance. Consider factors such as color, texture, and gloss level.
- Features: Decide whether you need a replacement handle with the same features as the original, such as keyless entry, illuminated handles, or integrated security sensors.
9.3. Where To Buy Replacement Handles
- Dealerships: Dealerships are a reliable source for OEM replacement handles. They can help you find the exact handle you need for your vehicle and ensure that it meets the highest quality standards.
- Auto Parts Stores: Auto parts stores, such as AutoZone, Advance Auto Parts, and O’Reilly Auto Parts, offer a wide selection of aftermarket handles. Their knowledgeable staff can assist you in finding a compatible handle for your vehicle.
- Online Retailers: Online retailers, such as Amazon and eBay, offer a convenient way to shop for replacement handles from the comfort of your home. However, it’s essential to verify the seller’s reputation and read customer reviews before making a purchase.
10. Addressing Specific Door Handle Types
10.1. Exterior Door Handles
10.1.1. Cable-Operated Handles
Cable-operated exterior door handles rely on a cable connecting the handle to the door latch mechanism. When the handle is pulled, the cable pulls the latch, allowing the door to open. Issues with these handles often involve cable stretching, breakage, or detachment.
Troubleshooting Steps:
- Inspect the Cable: Check the cable for any signs of damage, such as fraying, kinking, or breakage.
- Verify Cable Tension: Ensure the cable has proper tension. If it’s too loose, it may not fully engage the latch.
- Lubricate the Cable: Apply a silicone-based lubricant to the cable to reduce friction and ensure smooth operation.
- Adjust Cable Position: If possible, adjust the cable position to increase tension or improve engagement with the latch.
10.1.2. Rod-Operated Handles
Rod-operated exterior door handles use a series of metal rods to connect the handle to the door latch mechanism. These handles are more common in older vehicles. Problems typically involve rod bending, disconnection, or corrosion.
Troubleshooting Steps:
- Inspect the Rods: Check the rods for any signs of bending, damage, or corrosion.
- Verify Rod Connections: Ensure all rod connections are secure and properly aligned.
- Lubricate the Rods: Apply a lithium grease to the rods to reduce friction and prevent corrosion.
- Straighten Bent Rods: If any rods are bent, carefully straighten them using pliers.
10.1.3. Electronic Handles
Electronic exterior door handles rely on electronic sensors and actuators to operate the door latch. These handles are becoming increasingly common in modern vehicles. Issues often involve sensor malfunctions, wiring problems, or actuator failures.
Troubleshooting Steps:
- Scan for Error Codes: Use an OBD-II scanner to check for any error codes related to the door handle system.
- Check Wiring Connections: Verify all wiring connections to the door handle and latch mechanism are secure and free from corrosion.
- Test Sensor Operation: Use a multimeter to test the operation of the door handle sensors.
- Replace Faulty Components: If any sensors or actuators are faulty, replace them with new components.
10.2. Interior Door Handles
10.2.1. Mechanical Handles
Mechanical interior door handles typically use a simple lever or button mechanism to release the door latch. Issues often involve worn-out springs, broken linkages, or latch misalignment.
Troubleshooting Steps:
- Inspect the Spring: Check the spring for any signs of wear, damage, or breakage.
- Verify Linkage Connections: Ensure all linkage connections are secure and properly aligned.
- Adjust Latch Position: If the latch is misaligned, adjust its position to ensure proper engagement with the door strike.
- Replace Worn Components: If any components are worn or broken, replace them with new parts.
10.2.2. Electronic Handles
Electronic interior door handles often integrate with the vehicle’s central locking system and may include features such as child safety locks and automatic door unlocking. Issues often involve wiring problems, switch malfunctions, or module failures.
Troubleshooting Steps:
- Check Wiring Connections: Verify all wiring connections to the door handle and central locking system are secure and free from corrosion.
- Test Switch Operation: Use a multimeter to test the operation of the door handle switch.
- Scan for Error Codes: Use an OBD-II scanner to check for any error codes related to the central locking system.
- Replace Faulty Components: If any switches or modules are faulty, replace them with new components.
11. Safety Precautions
- Disconnect the Battery: Before working on any electrical components, disconnect the negative terminal of the car battery to prevent electrical shock.
- Wear Safety Glasses: Always wear safety glasses to protect your eyes from debris and flying particles.
- Use Gloves: Wear work gloves to protect your hands from dirt, grease, and sharp edges.
- Work in a Well-Ventilated Area: If you’re using any chemicals or solvents, work in a well-ventilated area to avoid inhaling harmful fumes.
- Follow Instructions: Carefully follow the instructions in your car’s repair manual or online resources.
- Don’t Rush: Take your time and work carefully. Rushing can lead to mistakes and injuries.
12. Optimizing Car Door Handle Functionality With CARDIAGTECH.NET
At CARDIAGTECH.NET, we understand the importance of having reliable and functional car door handles. That’s why we offer a wide range of high-quality tools and equipment to help you diagnose and repair any car door handle issue.
- Professional-Grade Tools: Our selection of professional-grade tools includes everything you need to tackle even the most challenging car door handle repairs. From trim removal tools to socket sets, we have the right tools for the job.
- Diagnostic Equipment: Our advanced diagnostic equipment can help you quickly and accurately diagnose any electrical or mechanical problems with your car door handles. With our OBD-II scanners and multimeters, you can pinpoint the root cause of the issue and avoid unnecessary repairs.
- Expert Advice: Our team of experienced technicians is always available to provide expert advice and support. Whether you need help diagnosing a problem or choosing the right replacement parts, we’re here to assist you every step of the way.
- Commitment to Customer Satisfaction: At CARDIAGTECH.NET, we’re committed to providing our customers with the highest level of satisfaction. We offer competitive prices, fast shipping, and a hassle-free return policy.
Don’t let a malfunctioning car door handle compromise your safety and convenience. Contact CARDIAGTECH.NET today at 276 Reock St, City of Orange, NJ 07050, United States or via Whatsapp at +1 (641) 206-8880 to learn more about our products and services. Our team is ready to help you find the perfect solution for your car door handle needs. Visit our website at CARDIAGTECH.NET to explore our full range of offerings.
13. FAQs About Car Door Handles
13.1. Can weather affect my car handle’s functionality?
Yes, extreme weather conditions can impact your car door handle’s performance. In cold climates, ice can form inside the mechanism, preventing movement, while in hot climates, plastic components may warp or degrade faster. According to a study by the National Highway Traffic Safety Administration (NHTSA), extreme temperatures can significantly affect the reliability of vehicle components, including door handles.
13.2. Is it possible to upgrade my car door handles during replacement?
When replacing a car door handle, you have the option to upgrade to a handle with better materials or enhanced features, such as keyless entry sensors, provided the new handle is compatible with your vehicle’s make and model. This is supported by data from the Specialty Equipment Market Association (SEMA), which indicates a growing trend in vehicle customization and upgrades.
13.3. Can fixing a car door handle impact the vehicle’s security?
If the repair is not done correctly, especially with exterior handles, it might compromise the door’s locking mechanism, making it easier to break into. Ensure repairs are performed accurately, and consider professional assistance for complex mechanisms to maintain vehicle security. The National Insurance Crime Bureau (NICB) emphasizes the importance of secure door locks in preventing vehicle theft.
13.4. How do I prevent paint damage when replacing an exterior car door handle?
Preventing paint damage requires careful handling and protection of the surrounding area. Use masking tape around the edges of the handle area to protect the paint. Employing plastic pry tools rather than metal screwdrivers for any leverage can also minimize the risk of scratches or chips. According to automotive refinishing experts at PPG, proper surface preparation and the use of appropriate tools are crucial for preventing paint damage during repairs.
13.5. What’s the importance of lubrication in maintaining car door handles?
Regular lubrication of the car door handle mechanism with appropriate products can significantly extend its life and ensure smooth operation. It helps reduce friction, prevent rust, and keep moving parts from sticking or seizing, especially in varying weather conditions. A study by the Society of Automotive Engineers (SAE) found that regular lubrication can significantly reduce wear and tear on vehicle components, including door handles.
13.6. Are there any legal considerations when modifying car door handles?
In some jurisdictions, modifying your car, including the door handles, can have legal implications, especially if the modifications affect the vehicle’s safety or security features. It’s advisable to check local regulations before undertaking modifications that significantly alter the original design or functionality. Legal experts at the American Bar Association (ABA) recommend consulting with a qualified attorney before making any significant modifications to your vehicle.
13.7. How can I diagnose electronic issues in power-operated door handles?
Diagnosing electronic issues in power-operated door handles typically involves using a multimeter to check for continuity and voltage supply to the handle. It may also require scanning the vehicle’s computer system for error codes that could indicate specific malfunctions within the electronic handle system. Automotive diagnostic specialists at Bosch recommend using professional-grade diagnostic tools to accurately identify and resolve electronic issues in modern vehicles.
13.8. What type of lubricant should I use for car door handles?
For car door handles, it’s best to use a silicone-based lubricant or white lithium grease. Silicone lubricants are excellent for rubber and plastic parts because they won’t degrade these materials. White lithium grease works well on metal components, providing long-lasting lubrication and protection against rust and corrosion. Avoid using oil-based lubricants, as they can attract dirt and grime, leading to further problems.
13.9. How often should I lubricate my car door handles?
It’s a good practice to lubricate your car door handles at least twice a year, typically before the start of winter and again in the spring. This helps ensure smooth operation through temperature changes and protects against moisture-related issues like freezing. If you live in an area with harsh weather conditions or frequently wash your car, you may need to lubricate them more often.
13.10. Can a faulty door handle affect my car’s resale value?
Yes, a faulty or damaged door handle can negatively affect your car’s resale value. Potential buyers often assess the condition of a vehicle’s exterior, including door handles, as an indicator of overall maintenance. A broken or malfunctioning handle can suggest neglect, leading to a lower offer. Repairing or replacing a damaged handle before selling your car can help maintain its value and attract more buyers.
Driving a car with damaged door parts is risky, which is why CARDIAGTECH.NET provides all the equipment you need.
14. Final Thoughts
Fixing a car door handle may seem daunting, but with the right tools, knowledge, and a little patience, it’s a task that many car owners can successfully tackle themselves. By following the steps outlined in this guide, you can save money on professional repair costs and gain a greater understanding of your vehicle.
Remember to prioritize safety, take your time, and don’t hesitate to seek professional help if you encounter any difficulties. With a properly functioning door handle, you can enjoy a safer and more convenient driving experience.
