How To Fix Dripping Paint On Car Like A Pro
How To Fix Dripping Paint On Car? CARDIAGTECH.NET unveils proven techniques to seamlessly eliminate imperfections and achieve a flawless finish. Discover how to expertly blend paint runs, avoid costly re-sprays, and restore your vehicle’s pristine appearance, ensuring a professional-quality result with every repair & paint correction.
1. Understanding Paint Dripping and Runs
Paint drips and runs are common imperfections that can occur during the automotive painting process. These blemishes arise when wet paint accumulates excessively on a surface, gravity then causes it to flow downward, resulting in an uneven and unsightly finish. Understanding the causes and characteristics of paint drips is essential for effective repair and prevention & auto body repair.
1.1. Causes of Paint Dripping
Several factors contribute to the formation of paint drips and runs on vehicles:
- Over-application of paint: Applying too much paint in a single coat increases the likelihood of drips.
- Incorrect spray gun technique: Holding the spray gun too close to the surface or moving it too slowly can lead to excessive paint build-up.
- Improper paint viscosity: Paint that is too thin or not properly mixed may run more easily.
- Environmental factors: High humidity or extreme temperatures can affect paint drying time and increase the risk of drips.
- Uneven surface: Painting on uneven surfaces can cause the paint to pool and drip in certain areas.
1.2. Identifying Different Types of Paint Runs
Recognizing the type of paint run is important for choosing the right repair method. Common types include:
- Sagging: Occurs when a large area of paint sags downward, creating a wavy appearance.
- Curtaining: Similar to sagging but with a more pronounced “curtain-like” effect.
- Stringing: Thin, vertical lines of paint that drip down from edges or corners.
- Pooling: Accumulation of paint in low-lying areas, forming puddles that can lead to drips.
2. Essential Tools and Materials
Before attempting to fix dripping paint on a car, gather the necessary tools and materials. Having these items readily available will streamline the repair process and ensure a professional finish. CARDIAGTECH.NET supplies all of the tools needed. Contact us at Whatsapp: +1 (641) 206-8880 or visit us at 276 Reock St, City of Orange, NJ 07050, United States.
2.1. Sandpaper and Sanding Blocks
Sandpaper is crucial for leveling paint drips and creating a smooth surface for blending. Different grits are needed for various stages of the repair:
| Sandpaper Grit | Use |
|---|---|
| 400-grit | For initial leveling of severe drips |
| 600-grit | For smoothing out imperfections after initial sanding |
| 800-grit | For refining the surface before applying new paint |
| 1000-grit | For wet sanding to achieve an ultra-smooth finish before polishing |
| Sanding Blocks | Provides even pressure and control during sanding |
2.2. Rubbing Compound and Polishing Compound
Rubbing compound and polishing compound are essential for restoring the gloss and smoothness of the repaired area.
- Rubbing Compound: A mildly abrasive paste used to remove fine scratches and imperfections from the sanded surface.
- Polishing Compound: A finer abrasive used after rubbing compound to enhance the shine and clarity of the paint.
2.3. Buffing Pads and Polishing Machine
Buffing pads and a polishing machine are used to apply rubbing and polishing compounds evenly and efficiently.
- Buffing Pads: Foam or microfiber pads of varying aggressiveness for different stages of polishing.
- Polishing Machine: A power tool with adjustable speed settings to control the buffing process.
2.4. Automotive Paint and Clear Coat
To seamlessly blend the repaired area with the surrounding paint, use automotive paint that matches the vehicle’s color code.
- Automotive Paint: High-quality paint formulated for automotive applications, available in various colors and finishes.
- Clear Coat: A protective layer applied over the paint to enhance gloss and durability.
2.5. Other Essential Materials
- Masking Tape: Used to protect surrounding areas from overspray and sanding damage.
- Tack Cloth: A sticky cloth used to remove dust and debris from the surface before painting.
- Wax and Grease Remover: Used to clean the surface and remove any contaminants that could affect paint adhesion.
- Paint Thinner or Reducer: Used to adjust the viscosity of the paint for optimal spraying.
- Spray Gun: For applying paint and clear coat evenly and efficiently.
- Mixing Cups and Stir Sticks: For accurately measuring and mixing paint and hardener.
- Personal Protective Equipment (PPE): Includes gloves, respirators, and eye protection to ensure safety during the repair process.
3. Step-by-Step Guide to Fixing Dripping Paint
Fixing dripping paint on a car requires patience, precision, and attention to detail. Follow this comprehensive step-by-step guide to achieve professional-quality results:
3.1. Preparation
- Clean the Area: Thoroughly wash the area around the paint drip with soap and water. Remove any dirt, wax, or grease using a wax and grease remover.
- Mask the Surrounding Area: Use masking tape and paper to protect the surrounding paint from overspray and accidental sanding. Apply the tape carefully, ensuring clean and crisp edges.
- Allow the Paint to Cure: Let the paint dry. Depending on the paint type and environmental conditions, this may take several hours or even a day or two.
3.2. Sanding the Drip
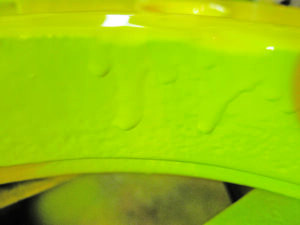
- Initial Sanding: Wrap a piece of 400-grit sandpaper around a sanding block. Lightly sand the paint drip, focusing on leveling the high spots. Use a gentle, back-and-forth motion, being careful not to apply too much pressure.
- Smoothing: Once the drip is mostly level, switch to 600-grit sandpaper to smooth out any remaining imperfections. Continue sanding until the area is smooth and flush with the surrounding paint.
- Refining: Use 800-grit sandpaper to further refine the surface. Wet sanding can help to minimize scratches and create an even smoother finish. Dip the sandpaper in water and sand lightly, keeping the surface wet.
- Final Sanding: For an ultra-smooth finish, wet sand the area with 1000-grit sandpaper. This step is crucial for achieving a seamless blend between the repaired area and the surrounding paint.
Sanding a Paint Drip
3.3. Applying Automotive Paint
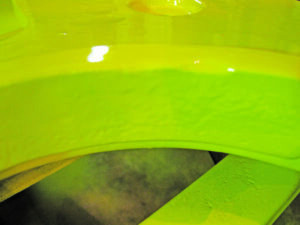
- Clean the Surface Again: After sanding, clean the area with a tack cloth to remove any dust or debris. Ensure the surface is completely clean and dry before proceeding.
- Prime the Area: If the sanding has exposed the primer or bare metal, apply a thin coat of automotive primer. This will help the paint adhere properly and provide a uniform base.
- Mix the Paint: Follow the manufacturer’s instructions to mix the automotive paint with the appropriate hardener and reducer. Use mixing cups and stir sticks to ensure accurate measurements.
- Apply the Paint: Load the paint into a spray gun and adjust the settings for optimal atomization. Hold the gun 6-8 inches from the surface and apply thin, even coats of paint, overlapping each stroke by about 50%. Allow each coat to dry before applying the next.
3.4. Applying Clear Coat
- Apply Clear Coat: After the final coat of paint has dried, apply several coats of automotive clear coat. This will protect the paint and enhance its gloss and durability. Follow the same spraying technique as with the paint, applying thin, even coats and allowing each to dry before the next.
- Wet Sand the Clear Coat: Once the clear coat has fully cured, wet sand the area with 1500-grit or 2000-grit sandpaper to remove any orange peel or imperfections.
- Compounding: Apply a small amount of rubbing compound to a buffing pad and use a polishing machine to buff the area. Work in small sections, using a circular motion and moderate pressure.
- Polishing: After compounding, switch to a polishing compound and a clean buffing pad. Polish the area to restore the gloss and clarity of the paint.
- Waxing: Apply a coat of wax to protect the paint and enhance its shine. Use a soft cloth to apply the wax in a thin, even layer, and then buff it off to reveal a glossy finish.
 Applying Automotive Paint
4. Advanced Techniques
In addition to the basic step-by-step guide, several advanced techniques can help achieve even better results when fixing dripping paint on a car. These techniques require more skill and experience but can make a significant difference in the final outcome.
4.1. Spot Repair
Spot repair involves fixing small imperfections without repainting the entire panel. This technique is ideal for addressing isolated paint drips or runs and can save time and materials.
- Prepare the Area: Clean and mask the area around the drip, as described in the basic guide.
- Sand the Drip: Use fine-grit sandpaper (800-grit or higher) to carefully sand the drip, feathering the edges to blend with the surrounding paint.
- Apply Touch-Up Paint: Use a small brush or applicator to apply touch-up paint to the sanded area. Apply thin coats, allowing each to dry before the next.
- Blend the Paint: Use a blending solvent or clear coat blending solution to soften the edges of the touch-up paint and blend it with the surrounding paint.
- Polish the Area: After the paint has dried, polish the area with rubbing compound and polishing compound to restore the gloss and smoothness of the finish.
4.2. Wet Sanding Techniques
Wet sanding is a technique that involves using water as a lubricant while sanding. This helps to minimize scratches, prevent sandpaper from clogging, and create an ultra-smooth surface.
- Prepare the Surface: Clean the surface and apply a small amount of water with a spray bottle.
- Sand with Wet Sandpaper: Use wet/dry sandpaper (1000-grit or higher) to sand the area, keeping it wet at all times. Use a gentle, circular motion and light pressure.
- Rinse and Inspect: Rinse the area with water and inspect the surface for any remaining imperfections. Repeat the sanding process if necessary.
- Dry and Polish: Dry the area with a clean cloth and polish it with rubbing compound and polishing compound to restore the gloss and smoothness of the finish.
4.3. Blending Techniques
Blending is the process of seamlessly integrating the repaired area with the surrounding paint. This technique is crucial for achieving a professional-quality repair that is virtually undetectable.
- Feather the Edges: When sanding the drip, feather the edges of the sanded area to create a smooth transition between the repaired area and the surrounding paint.
- Use Blending Solvents: Apply a blending solvent to the edges of the repaired area to soften the paint and promote adhesion.
- Apply Clear Coat to the Entire Panel: To ensure a uniform finish, apply clear coat to the entire panel, rather than just the repaired area. This will help to blend the repaired area and create a seamless appearance.
 Blending Automotive Paint
5. Preventing Future Paint Runs
Preventing paint drips and runs is always better than having to fix them. By following best practices for automotive painting, you can minimize the risk of these imperfections and achieve a flawless finish every time.
5.1. Proper Spray Gun Technique
- Maintain the Right Distance: Hold the spray gun 6-8 inches from the surface.
- Use a Consistent Speed: Move the gun at a steady, even pace.
- Overlap Each Stroke: Overlap each stroke by about 50% to ensure uniform coverage.
- Avoid Arcing: Keep the gun perpendicular to the surface to avoid arcing, which can cause uneven paint distribution.
5.2. Correct Paint Viscosity
- Follow Manufacturer’s Instructions: Mix the paint with the appropriate hardener and reducer, following the manufacturer’s instructions.
- Check the Viscosity: Use a viscosity cup to measure the paint’s viscosity and ensure it is within the recommended range.
5.3. Environmental Considerations
- Paint in a Controlled Environment: Paint in a well-ventilated area with moderate temperature and humidity.
- Avoid Extreme Temperatures: Avoid painting in direct sunlight or extreme temperatures, as this can affect the paint’s drying time and increase the risk of drips.
5.4. Surface Preparation
- Clean the Surface Thoroughly: Remove any dirt, wax, or grease from the surface before painting.
- Sand the Surface: Sand the surface to create a smooth, uniform base for the paint.
- Apply Primer: Apply a coat of automotive primer to promote adhesion and provide a uniform base.
6. Choosing the Right Tools and Materials
Selecting the right tools and materials is essential for achieving professional-quality results when fixing dripping paint on a car. Consider the following factors when making your selections: CARDIAGTECH.NET delivers the best tools on the market. Reach out to our team for assistance at Whatsapp: +1 (641) 206-8880 or visit us at 276 Reock St, City of Orange, NJ 07050, United States.
6.1. Sandpaper Quality
- Choose High-Quality Sandpaper: Opt for sandpaper specifically designed for automotive use, as it is more durable and provides a more consistent finish.
- Use a Variety of Grits: Keep a range of sandpaper grits on hand to address different stages of the repair process.
6.2. Rubbing and Polishing Compounds
- Select the Right Compound for the Job: Use rubbing compound to remove fine scratches and imperfections, and polishing compound to enhance the shine and clarity of the paint.
- Consider the Abrasiveness: Choose a compound with the appropriate abrasiveness for the type of paint and the severity of the imperfections.
6.3. Buffing Pads and Polishing Machines
- Use Foam or Microfiber Pads: Foam pads are ideal for applying rubbing compound, while microfiber pads are better for polishing.
- Choose a Polishing Machine with Adjustable Speed: This will allow you to control the buffing process and achieve optimal results.
6.4. Automotive Paint and Clear Coat
- Use High-Quality Automotive Paint: Opt for paint specifically formulated for automotive applications, as it is more durable and provides a more consistent finish.
- Match the Vehicle’s Color Code: Use automotive paint that matches the vehicle’s color code to ensure a seamless blend between the repaired area and the surrounding paint.
- Choose a Durable Clear Coat: Select a clear coat that is resistant to scratches, UV damage, and other environmental factors.
7. Common Mistakes to Avoid
Fixing dripping paint on a car can be challenging, and it’s easy to make mistakes that can compromise the final result. Here are some common mistakes to avoid:
7.1. Rushing the Process
- Take Your Time: Don’t rush the repair process. Allow each step to be completed thoroughly and carefully.
- Allow Paint to Dry: Allow each coat of paint and clear coat to dry completely before proceeding to the next step.
7.2. Applying Too Much Pressure
- Use Gentle Pressure: When sanding, buffing, or polishing, use gentle pressure and avoid pressing too hard.
- Let the Tools Do the Work: Let the tools and materials do the work, rather than trying to force the process.
7.3. Using the Wrong Products
- Use the Right Products for the Job: Use the right sandpaper grit, rubbing compound, polishing compound, and automotive paint for the specific repair.
- Avoid Incompatible Products: Avoid using products that are not compatible with each other, as this can lead to poor results or damage to the paint.
7.4. Neglecting Safety Precautions
- Wear Personal Protective Equipment (PPE): Always wear gloves, respirators, and eye protection when working with automotive paints, solvents, and other chemicals.
- Work in a Well-Ventilated Area: Paint in a well-ventilated area to avoid inhaling harmful fumes.
8. Cost-Effective Solutions
Repairing dripping paint on a car doesn’t have to break the bank. Here are some cost-effective solutions to consider:
8.1. DIY Repair Kits
- All-in-One Kits: DIY repair kits offer a budget-friendly way to tackle minor paint imperfections. These kits typically include sandpaper, rubbing compound, polishing compound, and touch-up paint, providing everything you need for a small repair.
8.2. Local Auto Parts Stores
- Wide Selection: Local auto parts stores often carry a wide range of automotive paints, clear coats, and repair materials at competitive prices.
8.3. Online Marketplaces
- Competitive Pricing: Online marketplaces like Amazon and eBay can offer competitive pricing on automotive repair products. However, be sure to compare prices and read reviews before making a purchase.
8.4. Refinishing Only the Affected Area
- Spot Repair: Instead of repainting the entire panel, consider refinishing only the affected area. This spot repair technique can save time and money while still delivering satisfactory results.
9. Maintaining Your Car’s Paint Job
Once you’ve fixed the dripping paint on your car, it’s essential to take steps to maintain the paint job and prevent future imperfections. Here are some tips for keeping your car’s paint looking its best:
9.1. Regular Washing
- Remove Contaminants: Wash your car regularly to remove dirt, grime, and other contaminants that can damage the paint.
- Use Mild Soap: Use a mild, pH-balanced soap specifically designed for automotive use.
9.2. Waxing
- Protect the Paint: Apply a coat of wax every few months to protect the paint from UV damage, oxidation, and other environmental factors.
- Enhance Shine: Waxing can also enhance the shine and clarity of the paint.
9.3. Parking Strategically
- Avoid Direct Sunlight: When possible, park your car in a garage or shaded area to protect it from direct sunlight.
- Cover the Car: Use a car cover to shield the paint from the elements, especially during extended periods of storage.
9.4. Promptly Address Scratches and Chips
- Touch-Up Paint: Repair scratches and chips promptly to prevent rust and further damage.
- Professional Repair: Consider professional repair services for larger or more complex paint issues.
10. When to Seek Professional Help
While fixing dripping paint on a car can be a rewarding DIY project, there are times when it’s best to seek professional help. Consider the following scenarios:
10.1. Extensive Damage
- Large Areas: If the paint drips cover a large area or involve multiple panels, it may be more cost-effective and time-efficient to have a professional handle the repair.
10.2. Complex Repairs
- Advanced Techniques: Complex repairs that require advanced techniques, such as color matching or blending, may be best left to a professional.
10.3. Lack of Experience
- Minimize Risks: If you lack experience with automotive painting, it’s best to seek professional help to avoid making costly mistakes.
10.4. Time Constraints
- Save Time and Effort: If you’re short on time or don’t have the necessary tools and equipment, a professional can complete the repair quickly and efficiently.
By seeking professional help when needed, you can ensure that your car’s paint job is restored to its original condition and that any underlying issues are properly addressed.
CARDIAGTECH.NET can help you find the right tools and materials for your project, contact us at Whatsapp: +1 (641) 206-8880 or visit us at 276 Reock St, City of Orange, NJ 07050, United States.
FAQ: Fixing Dripping Paint On Cars
Here are some frequently asked questions about fixing dripping paint on cars:
-
What causes paint drips on cars?
Paint drips on cars can be caused by over-application of paint, incorrect spray gun technique, improper paint viscosity, environmental factors, or uneven surfaces.
-
Can I fix a paint drip myself?
Yes, you can fix a paint drip yourself with the right tools, materials, and techniques. However, more extensive damage may require professional help.
-
What sandpaper grit should I use to fix a paint drip?
Start with 400-grit sandpaper for initial leveling, then switch to 600-grit, 800-grit, and 1000-grit for smoothing and refining the surface.
-
Do I need to apply clear coat after fixing a paint drip?
Yes, applying clear coat is essential to protect the paint, enhance its gloss, and blend the repaired area with the surrounding paint.
-
How can I prevent future paint drips on my car?
Prevent future paint drips by using proper spray gun technique, ensuring correct paint viscosity, painting in a controlled environment, and preparing the surface thoroughly.
-
What is spot repair, and when should I use it?
Spot repair involves fixing small imperfections without repainting the entire panel. It’s ideal for isolated paint drips or runs.
-
What is wet sanding, and how does it help?
Wet sanding involves using water as a lubricant while sanding. This helps minimize scratches, prevent sandpaper from clogging, and create an ultra-smooth surface.
-
How can I blend the repaired area with the surrounding paint?
Blend the repaired area by feathering the edges, using blending solvents, and applying clear coat to the entire panel.
-
When should I seek professional help for fixing a paint drip?
Seek professional help for extensive damage, complex repairs, lack of experience, or time constraints.
-
What are some cost-effective solutions for fixing dripping paint on a car?
Cost-effective solutions include DIY repair kits, local auto parts stores, online marketplaces, and refinishing only the affected area.
Don’t let dripping paint diminish your car’s beauty. With the right tools and techniques, you can achieve a flawless finish that turns heads wherever you go. CARDIAGTECH.NET is your partner in automotive excellence.
Ready to get started? Contact CARDIAGTECH.NET today at Whatsapp: +1 (641) 206-8880 or visit us at 276 Reock St, City of Orange, NJ 07050, United States, and let us help you find the perfect tools and materials for your paint repair project. Don’t settle for anything less than perfection – with CARDIAGTECH.NET, your car will shine like new.