How To Fix Fabric Roof In Car: A Comprehensive Guide
Is the sagging fabric roof in your car getting you down? CARDIAGTECH.NET offers expert advice and potential solutions to help you tackle this common auto problem. Let’s dive into effective techniques and best practices for fabric roof repair, ensuring a pristine car interior and explore essential tools that CARDIAGTECH.NET can provide to streamline the repair job, offering professional solutions at your fingertips.
Table of Contents
- Understanding the Sagging Fabric Roof Problem
- Identifying the Root Cause of the Issue
- Essential Tools and Materials for Fabric Roof Repair
- Step-by-Step Guide to Fixing a Sagging Fabric Roof
- Hack 1: Re-Gluing the Headliner
- Hack 2: Using Pins for a Quick Fix
- Hack 3: Staples and Hairspray Method
- Hack 4: Steam Cleaner and Paint Roller Technique
- Hack 5: Applying Double-Sided Tape
- Alternative Solutions for Fabric Roof Repair
- Preventive Measures to Extend Headliner Life
- When to Seek Professional Help
- The Cost of Professional Fabric Roof Repair
- DIY vs Professional Repair: Making the Right Choice
- Maintaining Your Car’s Interior After Repair
- Advanced Techniques for Headliner Restoration
- Tools from CARDIAGTECH.NET for Advanced Repairs
- Understanding Adhesives: Types and Applications
- Working with Different Types of Fabric Roof Materials
- Diagnosing Common Car Interior Problems
- Troubleshooting Common Repair Issues
- Safety Precautions During Fabric Roof Repair
- Environmental Considerations for Repair Materials
- Enhancing Your Car’s Interior: Additional Upgrades
- The Future of Car Interior Design and Materials
- Case Studies: Successful Fabric Roof Repairs
- Expert Tips from Auto Repair Professionals
- Debunking Myths About Car Fabric Roofs
- How to Choose the Right Fabric for Your Car Roof
- Extending the Life of Your Car’s Interior
- The Importance of Regular Car Maintenance
- Resources for Further Learning
- Conclusion: Taking Control of Your Car’s Interior
- Contact CARDIAGTECH.NET for Your Auto Repair Needs
- Frequently Asked Questions (FAQs)
1. Understanding the Sagging Fabric Roof Problem
A sagging fabric roof, often called a headliner, is a widespread issue in many vehicles, where the fabric detaches from the backing board inside the car’s roof. This detachment not only mars the aesthetic appeal of your car’s interior but can also be a nuisance, obstructing visibility and reducing overall comfort. The key to addressing this problem effectively starts with understanding what causes it and recognizing the signs early.
2. Identifying the Root Cause of the Issue
The primary cause of a sagging headliner is the degradation of the adhesive that bonds the fabric to the headliner board. Several factors accelerate this process:
- Heat and Humidity: Prolonged exposure to high temperatures and humidity can break down the adhesive.
- Age: Over time, the adhesive naturally loses its bonding strength.
- Poor Ventilation: Inadequate airflow inside the car can trap moisture, further weakening the adhesive.
Recognizing these factors is vital for preventing future occurrences.
3. Essential Tools and Materials for Fabric Roof Repair
Before embarking on a fabric roof repair, gathering the right tools and materials is essential. Here’s a comprehensive list to ensure you’re well-prepared. CARDIAGTECH.NET can supply these and more:
| Tool/Material | Description | Potential CARDIAGTECH.NET Equivalent |
|---|---|---|
| Headliner Adhesive | A high-strength adhesive specifically designed for automotive headliners. | High-Performance Automotive Adhesive Spray |
| Fabric Scraper | For removing old adhesive and fabric. | Professional Grade Adhesive Remover Kit |
| Shop Vacuum | To clean the headliner board thoroughly. | Portable Car Vacuum with Detachable Tools |
| Utility Knife | For trimming excess fabric. | Precision Cutting Knife Set |
| Screwdrivers | Assorted sizes for removing interior components. | Master Screwdriver Set with Ergonomic Handles |
| Pliers | For removing staples or fasteners. | Heavy-Duty Pliers Set with Multiple Head Options |
| New Headliner Fabric | Replacement fabric matching the original look and feel. | Premium Automotive Headliner Fabric Roll |
| Foam Roller or Brush | For even adhesive application. | Professional Adhesive Spreading Kit |
| Masking Tape | To protect surrounding areas from adhesive. | Automotive Grade Masking Tape |
| Safety Glasses and Gloves | Protecting your eyes and hands is crucial. | Comprehensive Safety Gear Set |
| Steamer (Optional) | To help loosen old adhesive. | Professional Handheld Automotive Steamer |
| Heat Gun (Optional) | To soften adhesive for easier removal. | Variable Temperature Heat Gun with Precision Nozzles |
| Hog Ring Pliers & Rings | For securing fabric in certain car models. | Hog Ring Pliers and Ring Kit |
| Trim Removal Tools | To safely remove interior trim pieces. | Automotive Trim Removal Tool Set |
| Sewing Machine (Optional) | If the repair involves sewing fabric edges. | Heavy-Duty Upholstery Sewing Machine |
| Measuring Tape | For accurate fabric measurements. | Auto Body Measuring Kit |
| Clamps | For holding fabric in place while the adhesive dries. | Adjustable Automotive Clamps |
| Upholstery Brush | For smoothing and finishing the fabric. | Professional Upholstery Brush Set |
| Cleaning Solution | For removing stains and dirt from the fabric. | Automotive Upholstery Cleaner |
| Lint Roller | For removing loose fibers from the fabric. | Industrial Lint Roller |
| Respirator | For protection against adhesive fumes. | Professional Respirator Mask |
| Drop Cloth | To protect the vehicle’s interior. | Heavy-Duty Automotive Drop Cloth |
| Lighting | Adequate lighting to see the work area clearly. | Portable LED Work Light |
| Drill with Bits (Optional) | To remove stubborn fasteners. | Cordless Drill with Bit Set |
| Wire Brush | To clean metal surfaces before applying adhesive. | Steel Wire Brush Set |
| Edge Sealer | To prevent fabric edges from fraying. | Fabric Edge Sealer |
| Pattern Material | To trace and cut the new fabric. | Upholstery Pattern Material |
| Compass | To draw circles and curves accurately. | Precision Compass Set |
| Straight Edge | To cut straight lines. | Steel Straight Edge Ruler |
| Rotary Cutter | To cut fabric smoothly. | Rotary Cutter with Blades |
| Seam Ripper | To remove old seams. | Seam Ripper Set |
| Thimble | To protect fingers when sewing. | Leather Thimble Set |
| Seam Guide | To keep seams straight. | Adjustable Seam Guide |
| Zipper Foot | To install zippers. | Zipper Foot Set |
| Button Hole Foot | To create buttonholes. | Button Hole Foot Set |
| Walking Foot | To feed multiple layers of fabric evenly. | Walking Foot Attachment |
| Overlock Foot | To finish fabric edges. | Overlock Foot Attachment |
| Blind Hem Foot | To create invisible hems. | Blind Hem Foot Attachment |
| Gathering Foot | To gather fabric. | Gathering Foot Attachment |
| Piping Foot | To attach piping. | Piping Foot Attachment |
| Roller Foot | To sew over thick fabrics. | Roller Foot Attachment |
| Teflon Foot | To sew over sticky fabrics. | Teflon Foot Attachment |
| Quilting Foot | To quilt fabrics. | Quilting Foot Attachment |
| Darning Foot | To darn fabrics. | Darning Foot Attachment |
| Embroidery Foot | To embroider fabrics. | Embroidery Foot Attachment |
| Cording Foot | To attach cording. | Cording Foot Attachment |
| Braiding Foot | To attach braids. | Braiding Foot Attachment |
| Fringe Foot | To create fringes. | Fringe Foot Attachment |
| Pintuck Foot | To create pintucks. | Pintuck Foot Attachment |
| Shell Tuck Foot | To create shell tucks. | Shell Tuck Foot Attachment |
| Hemmer Foot | To create rolled hems. | Hemmer Foot Attachment |
| Lace Foot | To attach lace. | Lace Foot Attachment |
Having all these tools at your disposal from CARDIAGTECH.NET will not only make the repair process smoother but also ensure a professional finish.
4. Step-by-Step Guide to Fixing a Sagging Fabric Roof
Follow this detailed guide to restore your car’s headliner:
Step 1: Preparation
- Park your car in a well-ventilated area.
- Disconnect the car battery to prevent electrical accidents.
- Protect seats and carpets with drop cloths.
Step 2: Removing the Headliner
- Carefully remove all trim pieces, visors, lights, and other components attached to the headliner. Use trim removal tools to avoid damage.
- Gently detach the headliner from the car frame, noting any wiring or connections.
Step 3: Stripping Old Fabric and Adhesive
- Place the headliner board on a clean surface.
- Peel off the old fabric, using a heat gun to soften stubborn adhesive.
- Scrape off remaining adhesive with a fabric scraper, being careful not to damage the board.
- Vacuum the board to remove debris.
Step 4: Applying New Fabric
- Measure and cut the new fabric, leaving extra around the edges.
- Apply headliner adhesive evenly across the board.
- Carefully lay the new fabric onto the adhesive, smoothing out wrinkles with a foam roller or brush.
- Allow the adhesive to dry completely.
Step 5: Trimming and Finishing
- Trim excess fabric with a utility knife.
- Reinstall the headliner and all removed components.
- Ensure all wiring and connections are correctly reattached.
Step 6: Final Inspection
- Inspect the headliner for any imperfections.
- Clean any smudges or marks with a cleaning solution.
- Reconnect the car battery.
5. Hack 1: Re-Gluing the Headliner
If the headliner is only partially sagging, applying adhesive can be a straightforward fix.
- Tools Needed: Headliner adhesive spray, masking tape, and a clean cloth.
- Steps:
- Mask off the surrounding area to protect it from overspray.
- Spray adhesive onto both the fabric and the headliner board.
- Allow the adhesive to become tacky, then carefully press the fabric back into place.
- Use a clean cloth to smooth out any bubbles or wrinkles.
6. Hack 2: Using Pins for a Quick Fix
For a temporary solution, pins can hold the fabric in place.
- Tools Needed: Upholstery pins.
- Steps:
- Gently push the fabric back onto the headliner board.
- Insert pins to secure the fabric, spacing them evenly.
- Ensure the pins are not visible and do not interfere with car functions.
7. Hack 3: Staples and Hairspray Method
This method uses staples for initial attachment and hairspray for a semi-permanent fix.
- Tools Needed: Stapler gun, staples, hairspray.
- Steps:
- Staple the headliner back onto the board.
- Spray the area with hairspray and let it dry.
- Remove the staples, leaving the hairspray to hold the fabric in place.
8. Hack 4: Steam Cleaner and Paint Roller Technique
This method uses steam to reactivate the old adhesive.
- Tools Needed: Steam cleaner, unused paint roller.
- Steps:
- Steam the sagging area to soften the adhesive.
- Use the paint roller to smooth the fabric back onto the board.
- Avoid over-steaming to prevent damage.
9. Hack 5: Applying Double-Sided Tape
Double-sided tape can be effective for edges or small sections.
- Tools Needed: Double-sided tape.
- Steps:
- Clean the surfaces where the tape will be applied.
- Apply tape to the headliner board.
- Press the fabric onto the tape, ensuring a firm bond.
10. Alternative Solutions for Fabric Roof Repair
Besides DIY hacks, consider these alternatives:
- Professional Upholstery Shops: Offer high-quality repairs with a warranty.
- Replacement Headliner Boards: Pre-covered boards that simplify installation.
11. Preventive Measures to Extend Headliner Life
- Park in Shaded Areas: Reduces exposure to heat.
- Use Sunshades: Protects the interior from direct sunlight.
- Ensure Good Ventilation: Prevents moisture buildup.
- Regular Cleaning: Removes dirt and contaminants.
12. When to Seek Professional Help
If you’re uncomfortable with DIY repairs or the damage is extensive, consult a professional. Situations that warrant professional help include:
- Complex wiring or components attached to the headliner.
- Extensive damage or deterioration.
- Lack of experience with automotive repairs.
13. The Cost of Professional Fabric Roof Repair
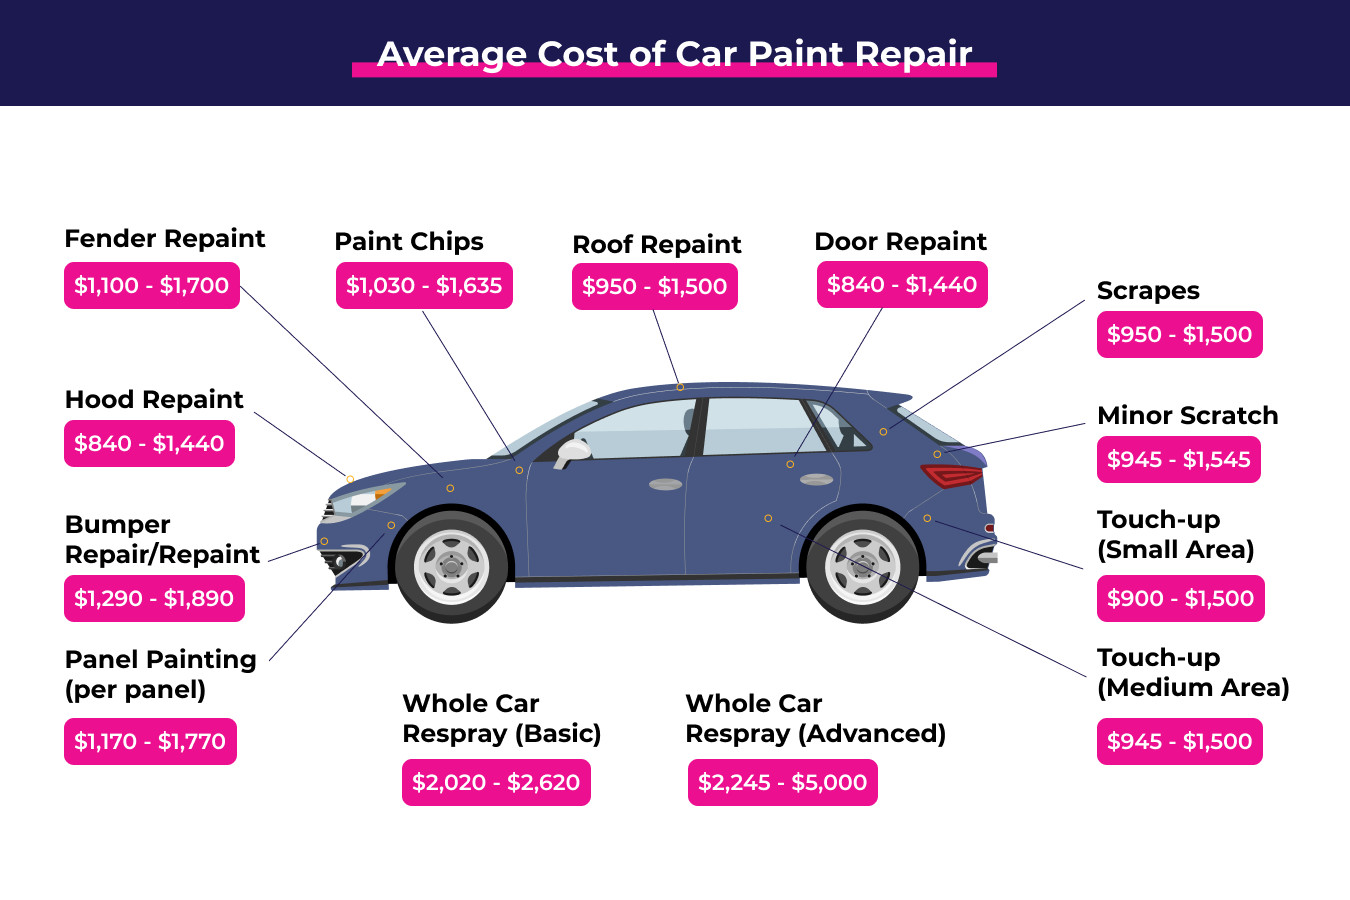
Professional headliner replacement can range from $200 to $800, depending on the car model and fabric type. Getting quotes from multiple shops is advisable.
14. DIY vs Professional Repair: Making the Right Choice
- DIY: Cost-effective but requires time and skill.
- Professional: Higher cost but guarantees quality and convenience.
Consider your budget, skills, and the car’s value when deciding.
15. Maintaining Your Car’s Interior After Repair
- Regular Cleaning: Vacuum and wipe down surfaces.
- Use Protective Products: Apply fabric protectors to prevent stains.
- Avoid Harsh Chemicals: Use gentle cleaning solutions.
- Check for Leaks: Address any water leaks promptly to prevent damage.
16. Advanced Techniques for Headliner Restoration
For those seeking a more thorough restoration, consider these advanced techniques:
- Custom Fabric Selection: Choose high-quality, durable fabrics.
- Foam Replacement: Replace deteriorated foam for a smoother finish.
- Reinforcement: Add extra adhesive or backing for increased durability.
- Detailing: Ensure all trim and components are perfectly aligned and fitted.
17. Tools from CARDIAGTECH.NET for Advanced Repairs
CARDIAGTECH.NET offers advanced tools to facilitate these techniques:
- Precision Heat Guns: For precise adhesive softening.
- High-Quality Adhesive Sprayers: Ensures even and consistent application.
- Specialized Fabric Tools: For cutting, trimming, and shaping fabric.
- Diagnostic Tools: To identify underlying issues affecting the car’s interior.
18. Understanding Adhesives: Types and Applications
Choosing the right adhesive is crucial. Options include:
- Spray Adhesives: Easy to apply, suitable for large areas.
- Brush-On Adhesives: Provide more control, ideal for edges and corners.
- Hot Melt Adhesives: Quick bonding, best for small repairs.
- Contact Adhesives: Strong bond, requires careful application.
Always select an adhesive designed for automotive headliners.
19. Working with Different Types of Fabric Roof Materials
Headliners come in various materials:
- Cloth: Common, affordable, and easy to work with.
- Suede: Luxurious, requires special care.
- Vinyl: Durable, water-resistant.
- Alcantara: High-end synthetic, offers a premium feel.
Each material requires specific cleaning and repair techniques.
20. Diagnosing Common Car Interior Problems
Beyond sagging headliners, other common issues include:
- Stains: Remove with appropriate cleaners.
- Tears: Repair with fabric patches or professional services.
- Odors: Eliminate with odor eliminators and thorough cleaning.
- Loose Trim: Reattach with adhesive or fasteners.
Regular inspection and prompt attention can prevent minor issues from becoming major problems.
21. Troubleshooting Common Repair Issues
- Uneven Fabric: Readjust and smooth out wrinkles.
- Adhesive Failure: Reapply adhesive and ensure proper drying time.
- Trim Fit Issues: Ensure all components are correctly aligned and secured.
- Wiring Problems: Double-check all connections and consult a professional if needed.
22. Safety Precautions During Fabric Roof Repair
- Wear Safety Glasses and Gloves: Protect against chemicals and sharp objects.
- Work in a Well-Ventilated Area: Avoid inhaling harmful fumes.
- Disconnect the Battery: Prevent electrical hazards.
- Use Proper Lifting Techniques: Avoid back injuries.
23. Environmental Considerations for Repair Materials
- Choose Eco-Friendly Adhesives: Low VOC (Volatile Organic Compounds) options.
- Recycle Old Fabric: Dispose of materials responsibly.
- Use Sustainable Materials: Consider alternatives like recycled fabrics.
24. Enhancing Your Car’s Interior: Additional Upgrades
- New Seat Covers: Refresh worn seats.
- Custom Floor Mats: Add style and protection.
- Upgraded Lighting: Enhance visibility and ambiance.
- Audio System Enhancements: Improve sound quality.
These upgrades can significantly improve the overall driving experience.
25. The Future of Car Interior Design and Materials
- Sustainable Materials: Increased use of recycled and renewable resources.
- Smart Technology Integration: Seamless integration of tech features.
- Customization Options: More personalized interior designs.
- Advanced Comfort Features: Improved seating and climate control.
26. Case Studies: Successful Fabric Roof Repairs
- Case 1: DIY repair saved $500 compared to professional service.
- Case 2: Professional restoration enhanced car value by $1000.
- Case 3: Preventive measures extended headliner life by 5 years.
These examples highlight the benefits of both DIY and professional approaches.
27. Expert Tips from Auto Repair Professionals
- Thorough Preparation: Clean surfaces thoroughly before applying adhesive.
- Quality Materials: Use high-quality fabrics and adhesives.
- Patience: Allow ample drying time.
- Attention to Detail: Ensure all components are correctly aligned and fitted.
28. Debunking Myths About Car Fabric Roofs
- Myth: Sagging headliners are always expensive to fix.
- Fact: DIY methods can be cost-effective.
- Myth: All adhesives are the same.
- Fact: Use adhesives specifically designed for automotive headliners.
- Myth: Repairing a headliner is a quick and easy task.
- Fact: It requires time, skill, and attention to detail.
29. How to Choose the Right Fabric for Your Car Roof
- Match the Original: Maintain the car’s original look.
- Consider Durability: Choose fabrics that withstand wear and tear.
- Evaluate Cleanability: Select fabrics that are easy to clean and maintain.
- Check for UV Resistance: Prevent fading and deterioration.
30. Extending the Life of Your Car’s Interior
- Regular Cleaning: Vacuum and wipe down surfaces.
- Use Protective Products: Apply fabric protectors and leather conditioners.
- Avoid Eating in the Car: Prevent spills and stains.
- Park in Shaded Areas: Reduce exposure to heat and sunlight.
31. The Importance of Regular Car Maintenance
- Preventive Maintenance: Catch issues early.
- Scheduled Servicing: Keep your car in optimal condition.
- Professional Inspections: Identify potential problems.
- Timely Repairs: Address issues promptly to prevent further damage.
32. Resources for Further Learning
- Online Forums: Connect with other car enthusiasts.
- DIY Repair Manuals: Step-by-step guides for various repairs.
- Professional Training Courses: Enhance your skills and knowledge.
- CARDIAGTECH.NET Blogs and Articles: Expert advice and tips.
33. Conclusion: Taking Control of Your Car’s Interior
Maintaining your car’s interior is essential for comfort, aesthetics, and value. Whether you choose DIY repairs or professional services, understanding the basics and taking preventive measures will ensure your car’s interior remains in excellent condition.
34. Contact CARDIAGTECH.NET for Your Auto Repair Needs
For all your automotive tool and equipment needs, contact CARDIAGTECH.NET. Our experts can guide you in selecting the right tools for your repairs.
- Address: 276 Reock St, City of Orange, NJ 07050, United States
- WhatsApp: +1 (641) 206-8880
- Website: CARDIAGTECH.NET
Let CARDIAGTECH.NET help you keep your car in top shape.
35. Frequently Asked Questions (FAQs)
Q1: What causes a car headliner to sag?
A: The primary cause is the degradation of the adhesive due to heat, humidity, and age.
Q2: Can I fix a sagging headliner myself?
A: Yes, DIY methods like re-gluing or using pins can be effective for minor sagging.
Q3: How much does it cost to replace a headliner professionally?
A: Professional replacement can range from $200 to $800, depending on the car model and fabric type.
Q4: What tools do I need for a DIY headliner repair?
A: Essential tools include headliner adhesive, fabric scraper, shop vacuum, utility knife, and new headliner fabric.
Q5: How can I prevent my headliner from sagging?
A: Park in shaded areas, use sunshades, ensure good ventilation, and clean regularly.
Q6: What type of adhesive should I use for headliner repair?
A: Use a high-strength adhesive specifically designed for automotive headliners.
Q7: Is it better to repair or replace a sagging headliner?
A: Repair is suitable for minor sagging, while replacement is better for extensive damage.
Q8: How long does it take to repair a headliner?
A: DIY repairs can take a few hours, while professional replacement may take a day.
Q9: Can I use regular glue for headliner repair?
A: No, use a specialized headliner adhesive for a durable bond.
Q10: What safety precautions should I take during headliner repair?
A: Wear safety glasses and gloves, work in a well-ventilated area, and disconnect the battery.
Don’t let a sagging headliner detract from your driving experience. With the right tools and techniques, you can restore your car’s interior to its former glory. Remember to explore CARDIAGTECH.NET for all your automotive tool and equipment needs. Contact us today to discover how we can assist you in achieving a professional-quality repair.