How To Fix Faded Black Trim On Car: A Guide
Is your car’s black trim looking faded and old? CARDIAGTECH.NET understands that restoring your vehicle’s appearance can significantly boost its value and your pride of ownership. Discover the easy and effective methods to revive your car’s faded trim, making it look new again with our guide, which also discusses plastic restorer, trim sealant and UV protection.
1. Understanding Faded Black Trim and Its Causes
Faded black trim on a car is a common problem, primarily caused by prolonged exposure to ultraviolet (UV) rays from the sun. This UV radiation breaks down the chemical bonds in the plastic, leading to discoloration and a dull, gray appearance. According to a study by the Society of Automotive Engineers (SAE), UV exposure is a leading cause of degradation in automotive plastics.
1.1. The Science Behind Fading
At a molecular level, UV radiation affects the polymers in the plastic trim, causing them to degrade. This process, known as photodegradation, results in the loss of pigments and structural integrity. Think of it like sunburn for your car’s plastic – the sun’s rays are relentlessly attacking and breaking down the material. Factors such as temperature, humidity, and the presence of pollutants can accelerate this degradation.
1.2. Why Black Trim Fades Faster
Black trim tends to fade faster than other colors because black absorbs more heat. This increased heat absorption exacerbates the effects of UV radiation, speeding up the degradation process. Imagine wearing a black shirt on a sunny day versus a white one – the black shirt will feel much hotter, similarly, black plastic absorbs more energy and degrades faster.
1.3. Common Areas Affected
The most commonly affected areas include:
- Bumpers
- Side mirrors
- Window surrounds
- Door handles
- Grilles
- Any other exterior plastic components
These parts are constantly exposed to the elements, making them prime targets for fading and wear.
1.4. The Impact of Environmental Factors
Besides UV rays, other environmental factors contribute to the fading of black trim:
- Pollution: Airborne pollutants and acid rain can react with the plastic, causing it to degrade.
- Road Salts: In colder climates, road salts used during winter can accelerate corrosion and fading.
- Harsh Chemicals: Car wash chemicals and detergents, if not properly diluted or formulated for automotive use, can strip away protective layers and cause discoloration.
1.5. The Importance of Protection
Protecting your car’s black trim is crucial to maintaining its appearance and value. Regular maintenance and the application of protective products can significantly extend the life of your trim, keeping your car looking newer for longer.
2. Identifying the Right Solution for Your Faded Trim
Before diving into solutions, it’s essential to assess the condition of your faded black trim to determine the most appropriate method for restoration. Different levels of fading and damage require different approaches.
2.1. Assessing the Level of Fading
- Minor Fading: The trim appears slightly dull or grayish but is still relatively smooth and intact.
- Moderate Fading: The trim is noticeably discolored, with a chalky or uneven appearance.
- Severe Fading: The trim is heavily discolored, brittle, and may show signs of cracking or significant surface damage.
2.2. Understanding the Material
Different types of plastic respond differently to restoration methods. Common types of automotive plastic include:
- Polypropylene (PP): Commonly used for bumpers and interior trim.
- Acrylonitrile Butadiene Styrene (ABS): Used for grilles, mirror housings, and other exterior parts.
- Polyvinyl Chloride (PVC): Often found in window and door trim.
Identifying the type of plastic can help you choose the right products and techniques for restoration.
2.3. Considering DIY vs. Professional Services
Deciding whether to tackle the restoration yourself or hire a professional depends on your budget, skill level, and the severity of the damage.
- DIY: Suitable for minor to moderate fading, offering a cost-effective solution with the right products and techniques.
- Professional Services: Recommended for severe fading, extensive damage, or if you lack the time or confidence to do it yourself.
Many auto detailing shops offer trim restoration services, but costs can range from $50 to $200 depending on the extent of the work.
2.4. The Importance of Preparation
Regardless of the chosen method, proper preparation is key to achieving the best results. This includes thorough cleaning, degreasing, and masking off surrounding areas to protect them from accidental damage.
2.5. Evaluating Your Options
Now that you’ve assessed the condition of your trim and considered your options, it’s time to explore the various methods for fixing faded black trim. CARDIAGTECH.NET is here to guide you through the best solutions for your vehicle. Remember, if you need help with tools, CARDIAGTECH.NET at 276 Reock St, City of Orange, NJ 07050, United States and Whatsapp: +1 (641) 206-8880 are here to help.
3. Debunking Myths: Methods to Avoid
Before diving into recommended solutions, let’s address some common but ineffective or harmful methods that should be avoided when trying to restore faded black trim.
3.1. The Heat Gun Myth
What it is: Applying heat from a heat gun or torch to the plastic surface, with the intention of drawing out the original oils and color.
Why it’s bad: This method is only a temporary fix and can cause irreversible damage. While the heat might temporarily darken the plastic, it also dries it out, making it more prone to cracking and fading in the future. Repeated heating can lead to the plastic becoming brittle and structurally unsound. According to experts at Popular Mechanics, “Using a heat gun can be risky, as it’s easy to overheat and damage the plastic.”
3.2. Shoe Polish and Other Household Products
What it is: Using shoe polish, tire shine, or other non-automotive products as a quick fix for faded trim.
Why it’s bad: These products are not designed for automotive plastics and can cause more harm than good. Shoe polish can leave a sticky residue that attracts dirt and grime, while tire shine often contains chemicals that can degrade the plastic over time. Household cleaners may contain harsh chemicals that strip away the protective layers of the trim, leading to further discoloration.
3.3. Over-the-Counter “Restorers” with Short Lifespans
What it is: Using cheap, low-quality trim restorers that promise quick results but fail to deliver long-term solutions.
Why it’s bad: Many of these products are simply glorified dressings that provide a temporary shine but wash away after a few weeks or even after the first rain. They often contain silicone or petroleum-based ingredients that can attract dust and leave a greasy film on the trim. These products do not repair the underlying damage and can actually accelerate the fading process over time.
3.4. Abrasive Cleaning Methods
What it is: Using harsh abrasive cleaners, scouring pads, or sandpaper to remove the faded layer of plastic.
Why it’s bad: While abrasive methods might seem like a quick way to remove the faded surface, they can scratch and damage the plastic, leaving it looking worse than before. These methods remove the protective layer of the plastic, making it more vulnerable to UV damage and discoloration. According to detailing experts, “Abrasive cleaning should be avoided unless absolutely necessary, and always followed by proper polishing and protection.”
3.5. Ignoring Preparation
What it is: Applying trim restorers or protectants without properly cleaning and preparing the surface.
Why it’s bad: Applying products to a dirty or contaminated surface can prevent them from properly bonding with the plastic, reducing their effectiveness and longevity. Dirt, grease, and old product residue can create a barrier that prevents the restorer from penetrating the plastic, resulting in uneven coverage and a poor finish.
Avoiding these methods will save you time, money, and potential damage to your vehicle. CARDIAGTECH.NET is dedicated to providing you with effective and safe solutions for restoring your car’s black trim.
4. Recommended Solutions: Restoring Faded Black Trim
When it comes to restoring faded black trim, several effective methods can bring back that like-new appearance. Here are some recommended solutions, with a focus on the popular and reliable Solution Finish Trim Restorer.
4.1. Thorough Cleaning and Degreasing
Before applying any restoration product, it is crucial to thoroughly clean and degrease the trim. This ensures that the product can properly bond with the plastic and deliver the best results.
Steps:
- Wash the Trim: Use a mild soap and water solution to remove dirt and grime.
- Degrease: Apply a dedicated degreaser or isopropyl alcohol (IPA) to remove any residual oils, waxes, or silicones.
- Rinse and Dry: Rinse the trim thoroughly with clean water and allow it to dry completely before proceeding.
4.2. Solution Finish Trim Restorer
Solution Finish Trim Restorer is a widely acclaimed product known for its ability to permanently restore faded black trim. Unlike temporary dressings, Solution Finish penetrates the plastic, restoring its original color and providing long-lasting protection.
Steps:
- Preparation: Ensure the trim is clean, dry, and free of any contaminants.
- Application: Apply a small amount of Solution Finish to a microfiber applicator pad or foam applicator.
- Even Coating: Spread a thin, even coat over the faded trim, working in small sections.
- Penetration: Allow the solution to penetrate the plastic for 3-5 minutes.
- Buffing: Use a clean microfiber towel to buff off any excess product, wiping in the direction of the trim.
- Drying Time: Allow the trim to dry for at least 6 hours, preferably overnight, before exposing it to water or harsh conditions.
Why it works: Solution Finish contains a unique blend of polymers and UV absorbers that penetrate the plastic, restoring its color and providing long-lasting protection against future fading. According to customer reviews, a single application can last for 8-12 months or longer, depending on the climate and exposure conditions.
4.3. Trim Sealants and Protectants
After restoring the color of your trim, it’s essential to protect it from future fading and damage. Trim sealants and protectants provide a barrier against UV rays, moisture, and other environmental factors.
Recommended Products:
- Solution Finish Over The Top Plastic Sealer: Designed to complement Solution Finish Trim Restorer, this sealant provides additional UV protection and extends the life of the restoration.
- 303 Aerospace Protectant: A popular choice for protecting a variety of surfaces, including plastic, rubber, and vinyl. It provides excellent UV protection and leaves a non-greasy finish.
- CarPro DLUX: A high-end trim coating that offers long-lasting protection and a deep, rich finish.
Application:
- Clean the Trim: Ensure the trim is clean and dry before applying the sealant or protectant.
- Apply a Thin Coat: Use a foam applicator or microfiber towel to apply a thin, even coat of the product.
- Buffing: Allow the product to dry for the recommended time, then buff off any excess with a clean microfiber towel.
4.4. Regular Maintenance
Maintaining your car’s black trim is an ongoing process. Regular cleaning and the occasional application of a protectant can help keep it looking its best for years to come.
Tips:
- Wash Regularly: Wash your car regularly with a pH-neutral soap to remove dirt and grime.
- Apply Protectant: Apply a trim protectant every 3-6 months, or as needed, to maintain UV protection.
- Park in the Shade: When possible, park your car in the shade or use a car cover to reduce exposure to UV rays.
By following these recommended solutions, you can effectively restore and protect your car’s faded black trim, keeping it looking like new for years to come. And remember, CARDIAGTECH.NET is here to help with tools, at 276 Reock St, City of Orange, NJ 07050, United States and Whatsapp: +1 (641) 206-8880.
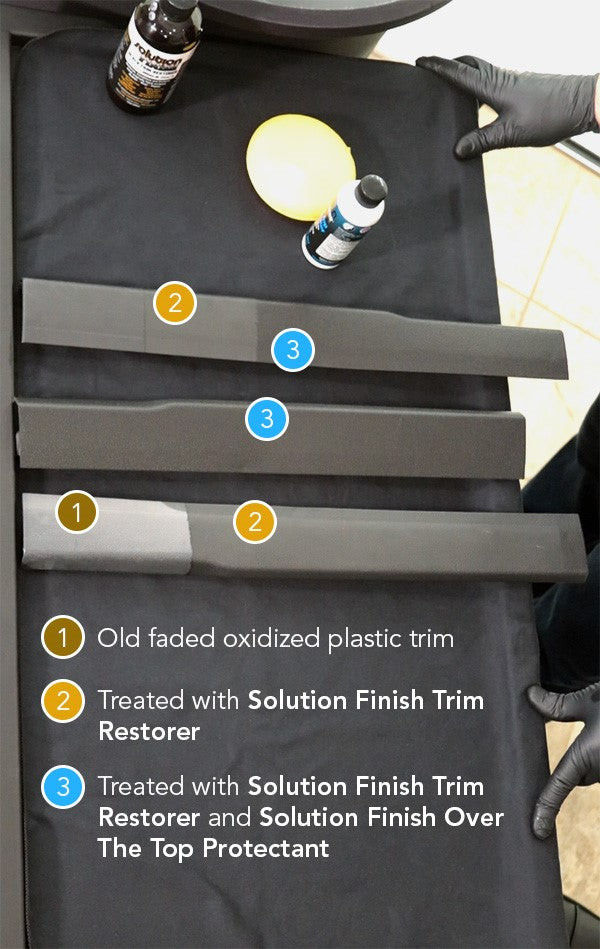
Solution Finish Black Plastic Restorer example photo
Alt: Demonstrating Solution Finish Over The Top sealant on car trim
5. Step-by-Step Guide: Restoring Trim with Solution Finish
To help you achieve the best results, here’s a detailed, step-by-step guide on how to restore faded black trim using Solution Finish Trim Restorer.
5.1. Gathering Your Supplies
Before you begin, make sure you have all the necessary supplies:
- Solution Finish Trim Restorer
- Isopropyl Alcohol (IPA) 70-90%
- Microfiber towels (several)
- Foam applicator pad or microfiber applicator
- Gloves
- Eye protection
- Masking tape (optional, for protecting adjacent surfaces)
5.2. Preparation
Step 1: Cleaning the Trim
- Wash the Trim: Use a mild soap and water solution to remove any loose dirt and grime from the trim. Rinse thoroughly.
- Apply Degreaser: Spray isopropyl alcohol (IPA) onto a microfiber towel and wipe down the trim to remove any oils, waxes, or silicones. This step is crucial for ensuring proper adhesion of the Solution Finish.
- Dry the Trim: Allow the trim to dry completely before proceeding.
Step 2: Masking (Optional)
- If desired, use masking tape to protect any adjacent painted surfaces or glass from accidental contact with the Solution Finish.
5.3. Application of Solution Finish
Step 3: Applying the Restorer
- Shake the Bottle: Shake the Solution Finish bottle well to ensure the product is properly mixed.
- Apply to Applicator: Pour a small amount of Solution Finish onto a foam applicator pad or microfiber applicator. A little goes a long way, so start with a small amount and add more as needed.
- Apply to Trim: Spread a thin, even coat of Solution Finish over the faded trim, working in small sections. Use a back-and-forth motion to ensure complete coverage.
Step 4: Allowing Penetration
- Wait 3-5 Minutes: Allow the Solution Finish to penetrate the plastic for 3-5 minutes. This allows the polymers to bond with the plastic and restore its color.
5.4. Buffing and Drying
Step 5: Buffing Off Excess
- Use a Clean Towel: Use a clean, dry microfiber towel to buff off any excess Solution Finish. Wipe in the direction of the trim to achieve a smooth, even finish.
- Check for Streaks: Inspect the trim for any streaks or unevenness. If necessary, use a clean section of the microfiber towel to buff out any imperfections.
Step 6: Drying Time
- Allow to Dry: Allow the trim to dry for at least 6 hours, preferably overnight. Avoid exposing the treated area to water or harsh conditions during this time.
5.5. Additional Protection (Optional)
Step 7: Applying a Sealant
- For added protection, apply a trim sealant such as Solution Finish Over The Top Plastic Sealer or 303 Aerospace Protectant. Follow the manufacturer’s instructions for application and drying time.
5.6. Tips for Best Results
- Work in the Shade: Apply Solution Finish in a shaded area to prevent the product from drying too quickly.
- Use Gloves and Eye Protection: Solution Finish can stain clothing and skin, so wear gloves and eye protection during application.
- Proper Ventilation: Use with adequate ventilation.
- Avoid Painted Surfaces: Do not use on painted or glass surfaces. Wipe off immediately with a clean towel if Solution Finish gets on these areas.
- Multiple Coats: For severely faded trim, you may need to apply a second coat of Solution Finish for optimal results. Allow the first coat to dry completely before applying the second.
By following these steps and tips, you can effectively restore your car’s faded black trim and keep it looking like new for years to come. And remember, CARDIAGTECH.NET is here to help with tools, at 276 Reock St, City of Orange, NJ 07050, United States and Whatsapp: +1 (641) 206-8880.
6. Long-Term Care: Maintaining Restored Trim
Once you’ve restored your car’s black trim, it’s essential to implement a long-term care routine to keep it looking its best and prevent future fading.
6.1. Regular Cleaning
Why it’s important: Regular cleaning removes dirt, grime, and pollutants that can degrade the plastic over time.
How to do it:
- Wash Regularly: Wash your car regularly with a pH-neutral car wash soap.
- Use a Soft Brush: For textured trim, use a soft-bristled brush to gently scrub away dirt and grime.
- Rinse Thoroughly: Rinse the trim thoroughly with clean water to remove any soap residue.
6.2. Applying Protectants Regularly
Why it’s important: Trim protectants provide a barrier against UV rays, moisture, and other environmental factors.
How to do it:
- Choose a Quality Protectant: Select a trim protectant that is specifically designed for automotive plastics, such as 303 Aerospace Protectant or Solution Finish Over The Top Plastic Sealer.
- Apply Every 3-6 Months: Apply the protectant every 3-6 months, or as needed, to maintain UV protection.
- Follow Instructions: Follow the manufacturer’s instructions for application and drying time.
6.3. Protecting from UV Rays
Why it’s important: UV rays are the primary cause of fading and degradation in automotive plastics.
How to do it:
- Park in the Shade: When possible, park your car in the shade to reduce exposure to UV rays.
- Use a Car Cover: If you park your car outdoors, use a car cover to protect it from the sun.
- Window Tinting: Consider having your car windows tinted to reduce the amount of UV rays that enter the vehicle.
6.4. Avoiding Harsh Chemicals
Why it’s important: Harsh chemicals can strip away the protective layers of the trim, leading to discoloration and damage.
How to do it:
- Use pH-Neutral Soap: Use a pH-neutral car wash soap that is specifically designed for automotive use.
- Avoid Abrasive Cleaners: Avoid using abrasive cleaners, scouring pads, or sandpaper on the trim.
- Dilute Chemicals Properly: If you use any chemicals on the trim, dilute them properly according to the manufacturer’s instructions.
6.5. Addressing Issues Promptly
Why it’s important: Addressing issues promptly can prevent them from becoming more severe and costly to repair.
How to do it:
- Inspect Regularly: Inspect your car’s trim regularly for any signs of fading, cracking, or damage.
- Touch Up as Needed: If you notice any minor fading, touch up the trim with a trim restorer or protectant.
- Seek Professional Help: If you encounter any severe damage, seek professional help from an auto detailing shop or repair facility.
By following these long-term care tips, you can keep your car’s restored black trim looking its best for years to come. And remember, CARDIAGTECH.NET is here to help with tools, at 276 Reock St, City of Orange, NJ 07050, United States and Whatsapp: +1 (641) 206-8880.
7. The Science Behind Plastic Restoration
Understanding the science behind plastic restoration can help you appreciate why certain methods and products are more effective than others.
7.1. Understanding Plastic Composition
Automotive plastics are typically made up of polymers, which are long chains of molecules. These polymers are susceptible to degradation from UV rays, heat, and other environmental factors.
Common Types of Automotive Plastics:
- Polypropylene (PP): Known for its chemical resistance and flexibility.
- Acrylonitrile Butadiene Styrene (ABS): Known for its impact resistance and durability.
- Polyvinyl Chloride (PVC): Known for its weather resistance and versatility.
7.2. The Effects of UV Radiation
UV radiation breaks down the chemical bonds in the polymers, leading to discoloration, cracking, and a loss of structural integrity. This process, known as photodegradation, is the primary cause of fading in automotive plastics. According to a study published in the Journal of Polymer Science, UV radiation can reduce the tensile strength of polypropylene by up to 50% after just 500 hours of exposure.
7.3. How Trim Restorers Work
Trim restorers work by penetrating the plastic and replenishing the lost oils and polymers. These products often contain UV absorbers, which help to protect the plastic from future damage. High-quality trim restorers, such as Solution Finish, contain a unique blend of ingredients that bond with the plastic at a molecular level, providing long-lasting restoration and protection.
7.4. The Role of Sealants and Protectants
Sealants and protectants provide a barrier against UV rays, moisture, and other environmental factors. These products typically contain UV absorbers and hydrophobic ingredients that repel water and prevent dirt and grime from adhering to the plastic. By creating a protective layer on the surface of the trim, sealants and protectants help to extend the life of the restoration and keep the plastic looking its best.
7.5. The Importance of Proper Preparation
Proper preparation is crucial for achieving the best results with plastic restoration. Cleaning and degreasing the trim removes any contaminants that can interfere with the bonding of the trim restorer or sealant. By ensuring that the plastic is clean and free of any oils, waxes, or silicones, you can maximize the effectiveness of the restoration process.
By understanding the science behind plastic restoration, you can make informed decisions about which methods and products to use. And remember, CARDIAGTECH.NET is here to help with tools, at 276 Reock St, City of Orange, NJ 07050, United States and Whatsapp: +1 (641) 206-8880.
8. Advanced Techniques for Severe Fading
For severely faded or damaged trim, more advanced techniques may be necessary to achieve the desired results. These techniques often involve a combination of cleaning, sanding, and refinishing.
8.1. Sanding the Trim
When to Use: Sanding is appropriate for trim that is heavily discolored, rough, or has significant surface damage.
How to Do It:
- Clean the Trim: Thoroughly clean the trim with soap and water to remove any dirt and grime.
- Wet Sanding: Use wet sandpaper with a grit of 400-600 to gently sand the surface of the trim. Wet sanding helps to prevent the sandpaper from clogging and reduces the risk of scratching the plastic.
- Rinse and Dry: Rinse the trim thoroughly with clean water and allow it to dry completely.
- Repeat as Needed: Repeat the sanding process with progressively finer grits of sandpaper (e.g., 800-1000) until the surface is smooth and even.
8.2. Applying a Primer
When to Use: Primer is used to create a smooth, uniform surface for the final coat of paint or trim restorer.
How to Do It:
- Choose the Right Primer: Select a primer that is specifically designed for automotive plastics.
- Apply a Thin Coat: Apply a thin, even coat of primer to the sanded trim, using a spray gun or aerosol can.
- Allow to Dry: Allow the primer to dry completely according to the manufacturer’s instructions.
- Sand Lightly: Lightly sand the primed surface with fine-grit sandpaper (e.g., 1000-1200) to remove any imperfections.
8.3. Refinishing the Trim
When to Use: Refinishing is used to restore the color and appearance of the trim after sanding and priming.
How to Do It:
- Choose the Right Finish: Select a trim restorer or paint that is specifically designed for automotive plastics and matches the original color of the trim.
- Apply a Thin Coat: Apply a thin, even coat of the finish to the primed trim, using a spray gun or aerosol can.
- Allow to Dry: Allow the finish to dry completely according to the manufacturer’s instructions.
- Apply Additional Coats: Apply additional coats of the finish as needed to achieve the desired color and coverage.
- Clear Coat (Optional): For added protection and durability, apply a clear coat over the finish.
8.4. Professional Help
When to Use: If you are not comfortable with sanding, priming, and refinishing the trim yourself, seek professional help from an auto detailing shop or repair facility.
8.5. Precautions
- Work in a Well-Ventilated Area: When sanding, priming, or refinishing the trim, work in a well-ventilated area to avoid inhaling harmful fumes.
- Wear Protective Gear: Wear gloves, eye protection, and a respirator to protect yourself from dust and chemicals.
- Follow Instructions: Follow the manufacturer’s instructions for all products and equipment.
By using these advanced techniques, you can restore even the most severely faded or damaged trim to its original condition. And remember, CARDIAGTECH.NET is here to help with tools, at 276 Reock St, City of Orange, NJ 07050, United States and Whatsapp: +1 (641) 206-8880.
9. Cost Analysis: DIY vs. Professional Restoration
When deciding whether to restore your car’s faded black trim yourself or hire a professional, it’s essential to consider the costs involved.
9.1. DIY Restoration Costs
Supplies:
- Trim Restorer (e.g., Solution Finish): $20-$40
- Isopropyl Alcohol (IPA): $5-$10
- Microfiber Towels: $10-$20
- Foam Applicator Pads: $5-$10
- Masking Tape: $5-$10
- Sandpaper (if needed): $10-$20
- Primer (if needed): $10-$20
- Clear Coat (if needed): $10-$20
Total DIY Cost: $75-$150
Time Investment: 2-4 hours
9.2. Professional Restoration Costs
Average Cost: $50-$200 per trim piece (depending on the extent of the damage and the complexity of the job)
Total Professional Cost: $100-$800 (for all trim pieces)
Time Investment: None (you drop off the car and pick it up when it’s done)
9.3. Factors Affecting Costs
- Severity of Fading: More severe fading requires more extensive work and higher costs.
- Size and Complexity of Trim: Larger and more complex trim pieces require more time and materials.
- Type of Materials Used: High-quality trim restorers and sealants cost more than lower-quality products.
- Labor Rates: Professional labor rates vary depending on the location and the experience of the technician.
9.4. Pros and Cons of DIY Restoration
Pros:
- Cost Savings: DIY restoration is typically much cheaper than hiring a professional.
- Control: You have complete control over the process and can ensure that the job is done to your satisfaction.
- Learning Experience: DIY restoration can be a rewarding learning experience.
Cons:
- Time Investment: DIY restoration requires a significant time investment.
- Skill Required: DIY restoration requires some skill and knowledge.
- Risk of Mistakes: There is a risk of making mistakes that can damage the trim.
9.5. Pros and Cons of Professional Restoration
Pros:
- Convenience: Professional restoration is convenient and requires no time investment on your part.
- Expertise: Professionals have the expertise and experience to restore the trim to its original condition.
- Quality Results: Professionals use high-quality products and techniques to ensure quality results.
Cons:
- Higher Cost: Professional restoration is typically much more expensive than DIY restoration.
- Less Control: You have less control over the process and must rely on the professional to do the job to your satisfaction.
9.6. Making the Decision
Ultimately, the decision of whether to restore your car’s faded black trim yourself or hire a professional depends on your budget, skill level, and time availability. If you are on a tight budget and enjoy working on cars, DIY restoration may be the best option. If you are short on time and prefer to leave the job to a professional, then hiring a professional may be the better choice.
And remember, CARDIAGTECH.NET is here to help with tools, at 276 Reock St, City of Orange, NJ 07050, United States and Whatsapp: +1 (641) 206-8880. We can advise on the right tools for either a DIY repair, or for your professional shop!
10. Conclusion: Revitalize Your Ride
Restoring faded black trim on your car is a rewarding project that can significantly enhance its appearance and value. By understanding the causes of fading, choosing the right restoration method, and following a proper maintenance routine, you can keep your car looking its best for years to come.
10.1. Recap of Key Points
- Causes of Fading: UV radiation, environmental factors, and harsh chemicals can all contribute to the fading of black trim.
- Recommended Solutions: Thorough cleaning, Solution Finish Trim Restorer, trim sealants, and regular maintenance are all effective ways to restore and protect black trim.
- Methods to Avoid: Avoid using heat guns, shoe polish, abrasive cleaners, and ignoring preparation.
- Long-Term Care: Regular cleaning, applying protectants, protecting from UV rays, and avoiding harsh chemicals are essential for maintaining restored trim.
- Advanced Techniques: Sanding, priming, and refinishing may be necessary for severely faded or damaged trim.
- Cost Analysis: DIY restoration is typically cheaper but requires more time and skill, while professional restoration is more expensive but offers convenience and expertise.
10.2. Final Thoughts
Whether you choose to tackle the restoration yourself or hire a professional, the key is to take action and address the issue promptly. Faded black trim not only detracts from the appearance of your car but can also reduce its resale value. By investing a little time and effort into restoring your car’s trim, you can revitalize your ride and enjoy a renewed sense of pride in your vehicle.
10.3. Call to Action
Ready to restore your car’s faded black trim and bring back that like-new shine? CARDIAGTECH.NET offers a wide range of high-quality trim restorers, sealants, and detailing supplies to help you get the job done right.
Contact us today for expert advice and personalized recommendations:
- Address: 276 Reock St, City of Orange, NJ 07050, United States
- WhatsApp: +1 (641) 206-8880
- Website: CARDIAGTECH.NET
Let CARDIAGTECH.NET be your partner in restoring and maintaining your car’s appearance. We have the tools and expertise to help you achieve professional-quality results, whether you’re a DIY enthusiast or a seasoned auto detailer. Don’t wait any longer – revitalize your ride and experience the satisfaction of a car that looks as good as new. Contact us now and let’s get started!
FAQ: Fixing Faded Black Trim on Cars
1. What causes black trim to fade on cars?
Black trim fades primarily due to exposure to ultraviolet (UV) rays from the sun. This UV radiation breaks down the chemical bonds in the plastic, leading to discoloration and a dull, gray appearance. Other factors include environmental pollutants, road salts, and harsh chemicals from car washes.
2. Is it possible to permanently restore faded black trim?
Yes, it is possible to permanently restore faded black trim using the right products and techniques. Products like Solution Finish Trim Restorer penetrate the plastic, restoring its original color and providing long-lasting protection against future fading.
3. Can I use a heat gun to restore faded black trim?
While a heat gun can temporarily darken the plastic, this method is not recommended as it can dry out the plastic and make it more prone to cracking and fading in the future. Repeated heating can also lead to the plastic becoming brittle and structurally unsound.
4. Are there any household products I can use to restore faded black trim?
It is not recommended to use household products like shoe polish or tire shine, as they are not designed for automotive plastics and can cause more harm than good. These products can leave a sticky residue, degrade the plastic, or strip away protective layers.
5. How often should I apply trim protectant to maintain the restored trim?
You should apply a trim protectant every 3-6 months, or as needed, to maintain UV protection and keep the trim looking its best. Regular cleaning and maintenance are also essential.
6. What is the best way to clean black trim before applying a restorer?
The best way to clean black trim is to use a mild soap and water solution to remove dirt and grime, followed by a degreaser or isopropyl alcohol (IPA) to remove any residual oils, waxes, or silicones.
7. Can I restore severely faded trim myself, or should I hire a professional?
For severely faded or damaged trim, more advanced techniques may be necessary, such as sanding, priming, and refinishing. If you are not comfortable with these techniques, it is best to seek professional help from an auto detailing shop or repair facility.
8. What are the benefits of using a trim sealant after restoring the trim?
Trim sealants provide a barrier against UV rays, moisture, and other environmental factors, helping to extend the life of the restoration and keep the plastic looking its best.
9. How much does it cost to restore faded black trim?
The cost of restoring faded black trim can range from $75-$150 for a DIY restoration to $100-$800 for professional restoration, depending on the severity of the fading and the size and complexity of the trim.
10. Where can I find high-quality trim restorers and detailing supplies?
You can find high-quality trim restorers and detailing supplies at CARDIAGTECH.NET, located at 276 Reock St, City of Orange, NJ 07050, United States. You can also contact us via WhatsApp at +1 (641) 206-8880 for expert advice and personalized recommendations.