How To Fix Faded Plastic Trim On Car Easily
Faded plastic trim on your car can be frustrating, but don’t worry. CARDIAGTECH.NET offers a great solution to restore your vehicle’s appearance. We’ll guide you through effective methods to revive that dull, grayed plastic, bringing back its original luster. Discover how to keep your car looking its best with our expert tips and product recommendations, focusing on long-lasting results and easy application. From trim restorers to UV protection, we’ve got you covered.
1. Identifying the Problem: Why Does Plastic Trim Fade?
Understanding why your car’s plastic trim fades is the first step in finding a lasting solution. Several factors contribute to this common automotive issue, and recognizing them can help you take preventive measures.
1.1. The Culprit: Ultraviolet (UV) Radiation
UV radiation from the sun is the primary cause of fading and discoloration in plastic trim. Here’s why:
- Chemical Breakdown: UV rays break down the chemical bonds in the plastic, leading to a loss of pigment and structural integrity.
- Surface Degradation: The outer layer of the plastic becomes brittle and chalky due to constant exposure to sunlight.
- Heat Absorption: Dark-colored plastic absorbs more heat, accelerating the degradation process.
According to a study by the American Chemical Society, prolonged exposure to UV radiation can reduce the tensile strength of certain plastics by up to 50% over a year.
1.2. Environmental Factors
Besides UV radiation, other environmental elements can exacerbate the fading of plastic trim:
- Oxidation: Exposure to oxygen can cause the plastic to oxidize, leading to discoloration.
- Pollution: Airborne pollutants, such as acid rain and industrial fallout, can react with the plastic surface.
- Extreme Temperatures: Fluctuations in temperature can cause the plastic to expand and contract, resulting in cracks and fading.
1.3. Inadequate Maintenance
Lack of regular cleaning and protection can significantly contribute to the problem:
- Buildup of Grime: Dirt, dust, and road salts accumulate on the surface, accelerating wear and tear.
- Use of Harsh Chemicals: Some cleaning products contain harsh chemicals that strip away protective oils and cause fading.
- Neglecting Protection: Failure to apply protective coatings or dressings leaves the plastic vulnerable to the elements.
| Factor | Description | Impact on Plastic Trim |
|---|---|---|
| UV Radiation | Electromagnetic radiation from the sun | Breaks down chemical bonds, causes discoloration and brittleness |
| Oxidation | Reaction with oxygen | Discoloration and surface degradation |
| Pollution | Airborne contaminants like acid rain and industrial fallout | Chemical reactions on the surface, leading to fading and damage |
| Extreme Temperatures | Fluctuations in temperature | Expansion and contraction, causing cracks and fading |
| Inadequate Maintenance | Lack of regular cleaning, harsh chemicals, neglecting protective coatings | Buildup of grime, stripping of protective oils, leaving plastic vulnerable to the elements |
By understanding these factors, you can take proactive steps to protect your car’s plastic trim and maintain its appearance. Now, let’s delve into the various methods available to restore that faded plastic.
2. Available Methods to Restore Faded Plastic Trim
When it comes to restoring faded plastic trim, you have several options to choose from. Each method has its pros and cons, catering to different needs, budgets, and desired levels of durability. Let’s explore these methods in detail.
2.1. Heating/Melting the Plastic: A Short-Term Fix
Using a heat gun or torch to melt the plastic surface is a technique that some car enthusiasts try. However, this method is generally not recommended.
- How It Works: The heat temporarily darkens the plastic by melting the top layer, giving it a refreshed appearance.
- Pros:
- Immediate Results: Provides a quick, temporary improvement in color.
- Cons:
- Damages the Plastic: The high heat can degrade the plastic, making it more brittle and prone to cracking.
- Short-Lived Effect: The restored look fades quickly, often within weeks, as the underlying damage is not addressed.
- Safety Risks: Using a torch or heat gun can be dangerous, requiring careful handling to avoid burns or vehicle damage.
- Uneven Finish: It’s difficult to achieve a uniform appearance, often resulting in a patchy or inconsistent look.
“Heating plastic trim is like putting a band-aid on a broken leg. It might look better temporarily, but it doesn’t fix the underlying problem and can even make it worse,” says Mike Pennington, Director of Training at Meguiar’s.
2.2. Applying Trim Dressings: A Temporary Shine
Trim dressings are topical products designed to enhance the appearance of plastic trim.
- How It Works: These dressings contain oils and polymers that create a glossy or satin finish, temporarily masking the faded appearance.
- Pros:
- Easy Application: Trim dressings are simple to apply with a cloth or applicator pad.
- Instant Enhancement: They provide an immediate improvement in the trim’s color and shine.
- Affordable: These products are relatively inexpensive and widely available.
- Cons:
- Short Lifespan: The effects are temporary, typically lasting only a few weeks, as the dressing washes away with rain or car washes.
- Runoff Issues: Many dressings can run or streak when wet, leaving unsightly stains on the car’s paint.
- Maintenance Required: Regular reapplication is necessary to maintain the desired look.
- Not a True Restoration: Dressings don’t repair the damaged plastic; they merely cover up the fading.
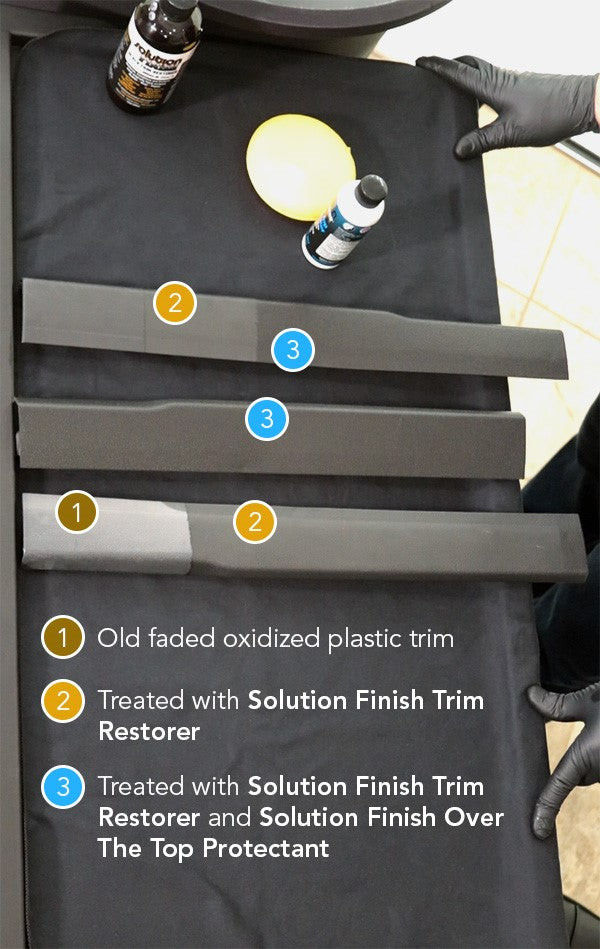
2.3. Using Trim Restorers: The Recommended Solution
Trim restorers, like Solution Finish, are designed to provide a longer-lasting solution by penetrating and restoring the plastic. CARDIAGTECH.NET recommends this method for its effectiveness and durability.
- How It Works: Trim restorers contain solvents and polymers that penetrate the plastic, replenishing lost oils and pigments.
- Pros:
- Long-Lasting Results: Restorers can last for several months or even years, depending on the product and environmental conditions.
- True Restoration: They revive the plastic by restoring its original color and luster, rather than just covering up the damage.
- UV Protection: Many restorers contain UV inhibitors that help protect the plastic from future fading.
- Professional Finish: They provide a natural, like-new appearance without the artificial shine of some dressings.
- Cons:
- Higher Cost: Trim restorers are generally more expensive than dressings.
- Application Time: The application process may be more involved, requiring careful cleaning and preparation.
- Potential Staining: Some restorers can stain if not applied properly or if excess product is not removed.
| Method | How It Works | Pros | Cons | Lifespan |
|---|---|---|---|---|
| Heating/Melting | Melts the top layer of plastic | Immediate results | Damages the plastic, short-lived effect, safety risks, uneven finish | Weeks |
| Trim Dressings | Topical application of oils and polymers | Easy application, instant enhancement, affordable | Short lifespan, runoff issues, requires maintenance, not a true restoration | Weeks |
| Trim Restorers (Solution Finish) | Penetrates and restores the plastic with solvents and polymers | Long-lasting results, true restoration, UV protection, professional finish | Higher cost, application time, potential staining | Months to Years |
Choosing the right method depends on your priorities. If you’re looking for a quick, cheap fix, trim dressings might suffice. However, for a lasting solution that truly restores your car’s plastic trim, CARDIAGTECH.NET recommends using a high-quality trim restorer like Solution Finish. Now, let’s dive into how to use Solution Finish effectively.
3. Step-by-Step Guide: How to Restore Black Plastic Trim with Solution Finish
Solution Finish is a top-tier trim restorer that can bring your car’s faded plastic back to life. Here’s a detailed guide on how to use it effectively, ensuring long-lasting results and a professional finish, all available at CARDIAGTECH.NET.
3.1. Gather Your Supplies
Before you begin, make sure you have all the necessary materials on hand. This will streamline the process and ensure you achieve the best possible results.
- Solution Finish Trim Restorer: This is the key product for restoring the plastic.
- Isopropyl Alcohol (IPA): 70-90% IPA is essential for cleaning the plastic and removing any residue.
- Microfiber Towels: You’ll need several clean microfiber towels for cleaning, applying, and buffing.
- Foam Applicator Pad: This helps to apply the Solution Finish evenly.
- Gloves: Protect your hands from staining.
- Eye Protection: Safety glasses or goggles to prevent eye irritation.
- Optional: Solution Finish Over The Top Plastic Sealer: For added UV protection and longevity.
3.2. Prepare the Surface
Proper preparation is crucial for the success of any restoration project. Follow these steps to ensure the plastic trim is ready for the Solution Finish.
- Wash the Trim: Start by washing the plastic trim with soap and water to remove any loose dirt and grime. Rinse thoroughly and allow to dry.
- Clean with Isopropyl Alcohol: Saturate a microfiber towel with isopropyl alcohol and thoroughly wipe down the plastic trim. This step removes any remaining residue, oils, or silicones that could interfere with the Solution Finish.
- Allow to Dry: Ensure the plastic is completely dry before proceeding to the next step.
3.3. Apply Solution Finish
Now that the surface is prepared, it’s time to apply the Solution Finish. Follow these steps carefully for best results:
- Shake the Bottle: Shake the Solution Finish bottle well to ensure the product is properly mixed.
- Apply to Applicator Pad: Pour a small amount of Solution Finish onto the foam applicator pad. A little goes a long way, so start with a small amount and add more as needed.
- Apply to Plastic Trim: Spread a thin, even coat of Solution Finish over the plastic trim. Work in small sections, covering the entire area completely.
- Allow to Penetrate: Let the Solution Finish penetrate the plastic for 3-5 minutes. This allows the product to bond with the plastic and restore its color.
3.4. Buff Off Excess
After allowing the Solution Finish to penetrate, it’s important to remove any excess product to avoid a sticky or uneven finish.
- Use a Clean Microfiber Towel: Take a clean, dry microfiber towel and gently buff off any excess Solution Finish from the plastic trim.
- Wipe Off Surrounding Areas: If any Solution Finish gets onto painted surfaces or glass, wipe it off immediately with a clean towel.
- Inspect and Reapply (If Necessary): Inspect the trim to ensure even coverage. If you notice any areas that look uneven or still faded, apply a second thin coat of Solution Finish and repeat the buffing process.
3.5. Allow to Cure
Allowing the Solution Finish to cure properly is essential for long-lasting results.
- Dry Time: Allow the treated plastic trim to dry for at least 6 hours before exposing it to water or washing the car.
- Avoid Direct Sunlight: If possible, keep the car out of direct sunlight during the drying process.
3.6. Add Protection with Solution Finish Over The Top Plastic Sealer (Optional)
For added protection and longevity, consider applying Solution Finish Over The Top Plastic Sealer.
- Apply Thin Coat: Apply a thin, even coat of the sealer to the treated plastic trim using a foam applicator pad.
- Allow to Dry: Let the sealer dry for 20-30 minutes.
- Apply Additional Coats (Optional): For added protection, you can apply up to three coats, allowing 30 minutes of drying time between each coat.
- Cure Time: Allow the sealer to cure for at least 12 hours before exposing it to water or washing the car.
| Step | Description | Materials Needed |
|---|---|---|
| 1. Gather Supplies | Assemble all necessary materials | Solution Finish, IPA, Microfiber Towels, Applicator Pad, Gloves, Eye Protection |
| 2. Prepare Surface | Wash trim, clean with IPA, allow to dry | Soap, Water, IPA, Microfiber Towels |
| 3. Apply Solution Finish | Shake bottle, apply thin coat, allow to penetrate for 3-5 minutes | Solution Finish, Applicator Pad |
| 4. Buff Off Excess | Use clean microfiber towel to remove excess product, wipe off surrounding areas | Microfiber Towels |
| 5. Allow to Cure | Let the treated trim dry for at least 6 hours, avoid direct sunlight | N/A |
| 6. Add Protection (Optional) | Apply Solution Finish Over The Top Plastic Sealer, allow to dry, apply additional coats if desired, cure for 12 hours | Solution Finish Over The Top Plastic Sealer, Applicator Pad |
By following these steps, you can effectively restore your car’s faded plastic trim with Solution Finish, achieving a long-lasting, professional-looking finish. Now, let’s look at some expert tips for using Solution Finish to ensure you get the best possible results.
Solution Finish Black Plastic Restorer example photo
4. Expert Tips for Using Solution Finish
To maximize the effectiveness of Solution Finish and ensure a professional-grade restoration, consider these expert tips from CARDIAGTECH.NET.
4.1. Work in a Controlled Environment
- Shade is Key: Always apply Solution Finish in a shaded area to prevent the product from drying too quickly. Direct sunlight can cause uneven application and streaking.
- Cool Surface: Ensure the plastic trim is cool to the touch before applying Solution Finish. A hot surface can cause the product to evaporate too quickly, reducing its effectiveness.
- Ventilation: Work in a well-ventilated area to avoid inhaling the fumes from the Solution Finish.
4.2. Preparation is Paramount
- Thorough Cleaning: The cleaner the surface, the better the Solution Finish will adhere. Use a dedicated plastic cleaner or degreaser before applying isopropyl alcohol for optimal results.
- Multiple IPA Wipes: For heavily soiled or oxidized plastic, multiple wipes with isopropyl alcohol may be necessary to remove all contaminants.
- Surface Texture: For rough or textured plastic, use a soft brush to gently scrub the surface while cleaning with IPA to ensure all crevices are free of debris.
4.3. Application Techniques
- Thin Coats: Apply Solution Finish in thin, even coats to avoid drips and runs. Multiple thin coats are better than one thick coat.
- Applicator Choice: Experiment with different applicator pads to find what works best for you. Microfiber applicators are great for smooth surfaces, while foam applicators are better for textured surfaces.
- Overlap Passes: When applying Solution Finish, overlap each pass slightly to ensure complete and even coverage.
4.4. Buffing and Curing
- Quality Microfiber Towels: Use high-quality microfiber towels for buffing to avoid scratching the plastic.
- Gentle Pressure: Apply gentle pressure when buffing to remove excess product without stripping the restored finish.
- Extended Cure Time: Allow the Solution Finish to cure for as long as possible before exposing the treated area to water or sunlight. Ideally, wait 24 hours for best results.
4.5. Maintenance and Protection
- Regular Cleaning: Clean the treated plastic trim regularly with a mild soap and water solution to remove dirt and grime.
- UV Protection: Apply Solution Finish Over The Top Plastic Sealer or another UV protectant to extend the life of the restored finish.
- Avoid Harsh Chemicals: Do not use harsh chemicals or abrasive cleaners on the treated plastic trim, as they can damage the restored finish.
4.6. Addressing Specific Issues
- Streaking: If you notice streaking after applying Solution Finish, reapply a thin coat and buff immediately with a clean microfiber towel.
- Uneven Finish: For an uneven finish, lightly sand the affected area with fine-grit sandpaper (3000 grit or higher) before reapplying Solution Finish.
- Staining: If Solution Finish stains surrounding surfaces, use a plastic cleaner or degreaser to remove the stain as soon as possible.
| Tip | Description | Benefit |
|---|---|---|
| Controlled Environment | Work in shade, ensure cool surface, use ventilation | Prevents uneven application, streaking, and health hazards |
| Preparation | Thorough cleaning, multiple IPA wipes, address surface texture | Ensures optimal adhesion and removal of contaminants |
| Application Techniques | Thin coats, applicator choice, overlap passes | Avoids drips, runs, and ensures complete coverage |
| Buffing and Curing | Quality microfiber towels, gentle pressure, extended cure time | Prevents scratching, removes excess product effectively, and allows for optimal bonding |
| Maintenance | Regular cleaning, UV protection, avoid harsh chemicals | Extends the life of the restored finish and maintains appearance |
| Addressing Issues | Reapply and buff for streaking, sand and reapply for uneven finish, clean stains immediately | Corrects common issues and ensures a professional-looking result |
By following these expert tips, you can achieve a professional-grade restoration of your car’s faded plastic trim with Solution Finish, ensuring long-lasting results and a like-new appearance. Now, let’s explore how to maintain your restored trim to keep it looking its best.
5. Maintaining Your Restored Plastic Trim
Once you’ve restored your car’s plastic trim, the next step is to maintain its appearance and protect it from future damage. Proper maintenance will not only keep your trim looking its best but also extend the life of the restoration. Here are some essential maintenance tips from CARDIAGTECH.NET.
5.1. Regular Cleaning
- Frequency: Clean your car’s plastic trim at least once a month, or more often if you live in an area with heavy pollution or harsh weather conditions.
- Mild Soap and Water: Use a mild soap and water solution to gently wash the plastic trim. Avoid using harsh chemicals or abrasive cleaners, as they can damage the restored finish.
- Soft Brush: For textured plastic trim, use a soft-bristled brush to gently scrub away dirt and grime.
- Rinse Thoroughly: Rinse the trim thoroughly with clean water to remove any soap residue.
- Dry with Microfiber Towel: Dry the trim with a clean, soft microfiber towel to prevent water spots.
5.2. UV Protection
- Apply UV Protectant: After cleaning, apply a UV protectant to the plastic trim. This will help shield the plastic from the harmful effects of the sun’s rays, which can cause fading and discoloration.
- Solution Finish Over The Top Plastic Sealer: Consider using Solution Finish Over The Top Plastic Sealer for added UV protection and longevity.
- Reapply Regularly: Reapply the UV protectant every few months, or as directed by the product instructions.
5.3. Avoid Harsh Chemicals
- Check Cleaning Products: Always check the labels of your cleaning products to ensure they are safe for use on plastic trim.
- Avoid Abrasives: Avoid using abrasive cleaners, scouring pads, or harsh chemicals, as they can scratch and damage the restored finish.
- Solvent-Based Cleaners: Be cautious when using solvent-based cleaners, as they can strip away the protective coating and cause the plastic to fade.
5.4. Protect from the Elements
- Park in Shade: Whenever possible, park your car in a shaded area to protect the plastic trim from direct sunlight.
- Car Covers: Use a car cover when your car is parked for extended periods of time to shield it from the elements.
- Garage Parking: If you have a garage, park your car inside to protect it from the sun, rain, and other environmental factors.
5.5. Address Issues Promptly
- Stains and Spills: Clean up any stains or spills on the plastic trim as soon as possible to prevent them from setting in and causing permanent damage.
- Scratches and Scuffs: Address any scratches or scuffs promptly to prevent them from worsening. Use a plastic polish or scratch remover to gently buff out minor imperfections.
- Fading: If you notice any signs of fading, reapply Solution Finish or another trim restorer as needed to maintain the appearance of the plastic trim.
| Maintenance Task | Description | Frequency |
|---|---|---|
| Regular Cleaning | Wash with mild soap and water, use soft brush, rinse thoroughly, dry with microfiber towel | At least once a month, or more often as needed |
| UV Protection | Apply UV protectant, consider Solution Finish Over The Top Plastic Sealer, reapply regularly | Every few months, or as directed by product instructions |
| Avoid Harsh Chemicals | Check cleaning product labels, avoid abrasives, be cautious with solvent-based cleaners | Always |
| Protect from Elements | Park in shade, use car covers, garage parking | Whenever possible |
| Address Issues Promptly | Clean stains and spills, address scratches and scuffs, reapply trim restorer if fading occurs | As needed |
By following these maintenance tips, you can keep your restored plastic trim looking its best for years to come, preserving the appearance and value of your car. Now, let’s explore some alternative products and solutions for restoring faded plastic trim.
6. Alternative Products and Solutions for Plastic Trim Restoration
While Solution Finish is a highly recommended product, there are several alternative options available for restoring faded plastic trim. Each product has its unique features and benefits, catering to different preferences and budgets. Here are some notable alternatives from CARDIAGTECH.NET.
6.1. Cerakote Ceramic Trim Coat Kit
- Description: Cerakote Ceramic Trim Coat Kit is a ceramic-based coating designed to restore and protect plastic trim.
- Features:
- Long-lasting ceramic coating
- UV protection
- Chemical resistance
- Easy application
- Pros:
- Provides a durable, long-lasting finish
- Offers excellent UV protection
- Resists chemicals and environmental contaminants
- Cons:
- Higher cost compared to some other options
- Requires careful preparation and application
6.2. Mothers Back-to-Black Trim & Plastic Restorer
- Description: Mothers Back-to-Black Trim & Plastic Restorer is a popular choice for restoring faded plastic trim.
- Features:
- Easy to apply
- Restores color and shine
- Protects against UV damage
- Pros:
- Affordable
- Widely available
- Provides good results for the price
- Cons:
- May not last as long as some other options
- Requires regular reapplication
6.3. Meguiar’s Ultimate Black Plastic Restorer
- Description: Meguiar’s Ultimate Black Plastic Restorer is designed to restore and protect exterior plastic and vinyl trim.
- Features:
- UV protection
- Long-lasting formula
- Easy to use
- Pros:
- Provides a deep, rich black finish
- Offers good UV protection
- Easy to apply and remove
- Cons:
- May leave a slightly glossy finish
- Can be more expensive than some other options
6.4. Chemical Guys Black on Black Instant Shine Tire & Trim Dressing
- Description: Chemical Guys Black on Black Instant Shine Tire & Trim Dressing is a versatile product that can be used to restore and protect both tires and plastic trim.
- Features:
- Provides a high-gloss shine
- UV protection
- Easy to apply
- Pros:
- Provides a high-gloss finish
- Offers good UV protection
- Can be used on multiple surfaces
- Cons:
- May not be suitable for those who prefer a more natural finish
- Requires regular reapplication to maintain the shine
6.5. Solution Finish Fusion Grey Plastic Restorer
- Description: Solution Finish Fusion Grey Plastic Restorer, similar to the black version, is specifically formulated for grey plastic trim.
- Features:
- Long-lasting restoration
- UV protection
- Easy to apply
- Pros:
- Provides a durable, long-lasting finish
- Offers excellent UV protection
- Restores grey plastic to its original color
- Cons:
- May not be suitable for black plastic trim
- Requires careful preparation and application
| Product | Description | Features | Pros | Cons |
|---|---|---|---|---|
| Cerakote Ceramic Trim Coat Kit | Ceramic-based coating for restoring and protecting plastic trim | Long-lasting ceramic coating, UV protection, chemical resistance, easy application | Provides a durable, long-lasting finish, offers excellent UV protection, resists chemicals and environmental contaminants | Higher cost, requires careful preparation and application |
| Mothers Back-to-Black Trim & Plastic Restorer | Popular choice for restoring faded plastic trim | Easy to apply, restores color and shine, protects against UV damage | Affordable, widely available, provides good results for the price | May not last as long as some other options, requires regular reapplication |
| Meguiar’s Ultimate Black Plastic Restorer | Designed to restore and protect exterior plastic and vinyl trim | UV protection, long-lasting formula, easy to use | Provides a deep, rich black finish, offers good UV protection, easy to apply and remove | May leave a slightly glossy finish, can be more expensive than some other options |
| Chemical Guys Black on Black Instant Shine Tire & Trim Dressing | Versatile product for restoring and protecting both tires and plastic trim | Provides a high-gloss shine, UV protection, easy to apply | Provides a high-gloss finish, offers good UV protection, can be used on multiple surfaces | May not be suitable for those who prefer a more natural finish, requires regular reapplication to maintain the shine |
| Solution Finish Fusion Grey Plastic Restorer | Formulated for grey plastic trim, similar to the black version | Long-lasting restoration, UV protection, easy to apply | Provides a durable, long-lasting finish, offers excellent UV protection, restores grey plastic to its original color | May not be suitable for black plastic trim, requires careful preparation and application |
These alternative products offer a range of options for restoring faded plastic trim, each with its own set of advantages and disadvantages. Consider your specific needs and preferences when choosing the right product for your car. Now, let’s address some frequently asked questions about restoring faded plastic trim.
7. Frequently Asked Questions (FAQs) About Fixing Faded Plastic Trim
Here are some frequently asked questions about restoring faded plastic trim on cars, along with detailed answers to help you make informed decisions, provided by CARDIAGTECH.NET.
Q1: What causes plastic trim to fade?
A: The primary cause of fading is prolonged exposure to ultraviolet (UV) radiation from the sun. UV rays break down the chemical bonds in the plastic, leading to a loss of pigment and structural integrity. Other factors include oxidation, pollution, extreme temperatures, and inadequate maintenance.
Q2: Is it possible to permanently restore faded plastic trim?
A: While no restoration is truly “permanent,” using high-quality trim restorers like Solution Finish can provide long-lasting results, often lasting for several months to years. Regular maintenance and UV protection can further extend the life of the restoration.
Q3: Can I use household products to restore faded plastic trim?
A: While some household products like baking soda or vinegar may offer temporary improvements, they are not designed for automotive plastic and can potentially cause damage. It’s best to use products specifically formulated for restoring plastic trim.
Q4: How often should I apply trim restorer to my car?
A: The frequency of application depends on the product used and the environmental conditions. High-quality trim restorers like Solution Finish may only need to be applied once or twice a year, while other products may require more frequent reapplication. Follow the product instructions for best results.
Q5: What is the best way to prepare plastic trim before applying a restorer?
A: Proper preparation is crucial for successful restoration. Start by washing the trim with soap and water, then clean it with isopropyl alcohol (IPA) to remove any remaining residue, oils, or silicones. Ensure the plastic is completely dry before applying the restorer.
Q6: Can I apply trim restorer in direct sunlight?
A: No, it’s best to apply trim restorer in a shaded area to prevent the product from drying too quickly. Direct sunlight can cause uneven application and streaking.
Q7: How can I protect restored plastic trim from future fading?
A: Apply a UV protectant to the restored plastic trim to shield it from the harmful effects of the sun’s rays. Consider using Solution Finish Over The Top Plastic Sealer for added UV protection and longevity.
Q8: What should I do if trim restorer gets on the car’s paint?
A: Wipe off any trim restorer that gets on the car’s paint immediately with a clean microfiber towel. If the restorer has dried, use a plastic cleaner or degreaser to gently remove the stain.
Q9: Can I use trim restorer on all types of plastic trim?
A: Most trim restorers are designed for use on exterior plastic and vinyl trim. However, it’s always best to check the product label to ensure it’s suitable for the specific type of plastic on your car.
Q10: Is it necessary to wear gloves and eye protection when applying trim restorer?
A: Yes, it’s always recommended to wear gloves and eye protection when applying trim restorer to protect your skin and eyes from potential irritation or staining.
| Question | Answer |
|---|---|
| What causes plastic trim to fade? | Prolonged exposure to UV radiation, oxidation, pollution, extreme temperatures, and inadequate maintenance. |
| Is it possible to permanently restore faded plastic trim? | While no restoration is truly “permanent,” high-quality trim restorers can provide long-lasting results. Regular maintenance and UV protection can further extend the life of the restoration. |
| Can I use household products to restore faded plastic trim? | While some household products may offer temporary improvements, they are not designed for automotive plastic and can potentially cause damage. It’s best to use products specifically formulated for restoring plastic trim. |
| How often should I apply trim restorer to my car? | The frequency of application depends on the product used and the environmental conditions. High-quality trim restorers may only need to be applied once or twice a year, while other products may require more frequent reapplication. Follow the product instructions for best results. |
| What is the best way to prepare plastic trim before applying a restorer? | Start by washing the trim with soap and water, then clean it with isopropyl alcohol (IPA) to remove any remaining residue, oils, or silicones. Ensure the plastic is completely dry before applying the restorer. |
| Can I apply trim restorer in direct sunlight? | No, it’s best to apply trim restorer in a shaded area to prevent the product from drying too quickly. Direct sunlight can cause uneven application and streaking. |
| How can I protect restored plastic trim from future fading? | Apply a UV protectant to the restored plastic trim to shield it from the harmful effects of the sun’s rays. Consider using Solution Finish Over The Top Plastic Sealer for added UV protection and longevity. |
| What should I do if trim restorer gets on the car’s paint? | Wipe off any trim restorer that gets on the car’s paint immediately with a clean microfiber towel. If the restorer has dried, use a plastic cleaner or degreaser to gently remove the stain. |
| Can I use trim restorer on all types of plastic trim? | Most trim restorers are designed for use on exterior plastic and vinyl trim. However, it’s always best to check the product label to ensure it’s suitable for the specific type of plastic on your car. |
| Is it necessary to wear gloves and eye protection when applying trim restorer? | Yes, it’s always recommended to wear gloves and eye protection when applying trim restorer to protect your skin and eyes from potential irritation or staining. |
These FAQs provide valuable information to help you understand the causes of faded plastic trim, how to restore it effectively, and how to maintain its appearance for years to come. For all your car care needs, trust CARDIAGTECH.NET to provide expert advice and high-quality products.
Don’t let faded plastic trim detract from your car’s appearance any longer. Contact CARDIAGTECH.NET today at +1 (641) 206-8880 or visit our website at CARDIAGTECH.NET for expert advice and premium restoration products like Solution Finish. Our team is ready to help you restore your vehicle to its former glory and keep it looking its best. We are located at 276 Reock St, City of Orange, NJ 07050, United States. Let us help you elevate your car care experience and achieve professional results with ease.