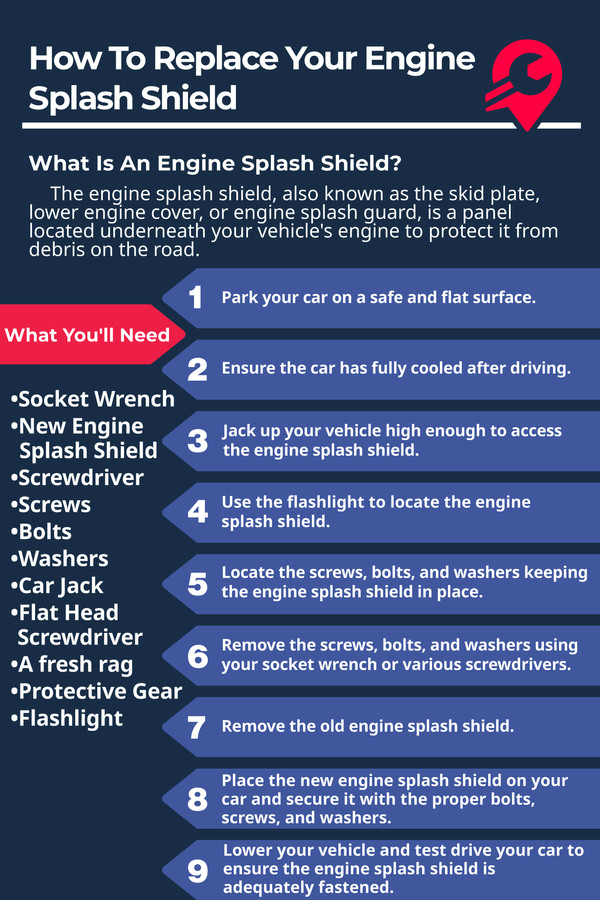
How to Fix Flaking Paint on Car: A Comprehensive Guide
Fixing flaking paint on your car is essential to prevent further damage and maintain its appearance. With the proper tools and techniques, CARDIAGTECH.BIZ can guide you through the process of repairing peeling automotive paint and restoring your vehicle’s finish, ensuring a long-lasting, professional-looking result. This guide will help you address paint delamination, providing solutions to protect your car’s body from corrosion.
Table of Contents
- How to Identify Peeling or Flaking Paint on Your Car
- Essential Tools and Materials for Fixing Flaking Paint
- Step-by-Step Guide to Removing Flaking Car Paint
- Preparing the Surface: Sanding and Cleaning
- Priming the Surface for New Paint
- How to Apply Automotive Paint and Clear Coat
- Advanced Techniques for Blending and Feathering
- Protecting Your New Paint Job
- Common Mistakes to Avoid When Repairing Flaking Paint
- Preventive Measures to Avoid Paint Flaking
- Cost Analysis: DIY vs. Professional Repair
- How to Choose the Right Automotive Paint
- Understanding Paint Delamination
- How Weather Conditions Affect Car Paint
- DIY Paint Repair vs. Professional Auto Body Shop
- Eco-Friendly Paint Repair Options
- How to Repair Peeling Paint on Plastic Car Parts
- Tools and Equipment Available at CARDIAGTECH.BIZ
- Customer Success Stories with CARDIAGTECH.BIZ
- FAQ About Fixing Flaking Paint on Cars
1. How to Identify Peeling or Flaking Paint on Your Car
Identifying peeling or flaking paint early can prevent extensive damage to your vehicle. Look for small cracks, a tortoiseshell pattern, or curling paint near scratches or chips. Regular inspections and thorough cleaning can help you spot these issues before they worsen, saving you time and money on more extensive repairs.
Peeling and flaking paint often starts subtly, but knowing what to look for can make all the difference.
- Small Cracks: The initial sign is often hairline cracks in the paint surface, typically near existing damage like scratches, dings, or stone chips.
- Tortoiseshell Pattern: As the damage progresses, these cracks may develop into a pattern resembling a tortoiseshell.
- Curling Paint: Eventually, the paint begins to curl, revealing the bare metal underneath, indicating significant delamination.
According to a study by the University of California, Berkeley, corrosion rates increase exponentially once the protective paint layers are compromised. Early detection and repair are therefore crucial.
2. Essential Tools and Materials for Fixing Flaking Paint
Having the right tools and materials is crucial for a successful repair. Here’s a comprehensive list of what you’ll need:
| Tool/Material | Description |
|---|---|
| Sandpaper (Various Grits) | Coarse (120-180 grit) for removing rust and old paint, medium (320-400 grit) for smoothing, and fine (600-800 grit) for final surface preparation. |
| Sanding Block | Provides a flat, even surface for sanding, ensuring uniform material removal. |
| Scraper | For removing loose or heavily flaking paint. |
| Wire Brush | For removing rust and debris from the affected area. |
| Automotive Primer | Prepares the surface for paint, improving adhesion and providing corrosion protection. |
| Automotive Paint | Matching the original color code of your car ensures a seamless repair. Use Paint Match Pro to find your paint. |
| Clear Coat | Protects the paint and provides a glossy finish. |
| Masking Tape | To protect surrounding areas from overspray. |
| Masking Paper/Plastic | Provides additional coverage to prevent overspray on larger areas. |
| Tack Cloth | For removing dust and particles before painting. |
| Grease and Wax Remover | Cleans the surface, removing any contaminants that could affect paint adhesion. |
| Safety Glasses | Protects your eyes from debris and chemicals. |
| Gloves | Protects your hands from chemicals and paint. |
| Respirator | Protects you from inhaling harmful fumes during sanding and painting. |
| Heat Gun (Optional) | Can help soften old paint for easier removal. |
| Buffing Compound | For polishing the repaired area to blend it with the surrounding paint. |
| Polishing Pads | Used with the buffing compound to achieve a smooth, glossy finish. |
CARDIAGTECH.BIZ offers a wide range of these tools and materials, ensuring you have everything you need for a professional-quality repair. Contact us at +1 (641) 206-8880 for expert advice on selecting the right products.
3. Step-by-Step Guide to Removing Flaking Car Paint
Removing flaking paint correctly is essential for ensuring the new paint adheres properly and provides lasting protection. Here’s a detailed step-by-step guide:
-
Preparation:
- Wash the Car: Start by thoroughly washing the car to remove dirt, debris, and grime. This allows you to better assess the extent of the damage and ensures a clean surface for repair.
- Mask the Area: Use masking tape and paper/plastic to protect the surrounding areas from accidental damage and overspray.
-
Removing Flaking Paint:
- Scrape Loose Paint: Use a scraper to gently remove any loose or heavily flaking paint. Be careful not to gouge the surface.
- Sand the Area: Begin sanding with coarse-grit sandpaper (120-180 grit) to remove the remaining paint. Use a sanding block to ensure even pressure and avoid creating uneven surfaces.
- Feather the Edges: Gradually switch to finer-grit sandpaper (320-400 grit) to feather the edges of the sanded area. This helps blend the repair with the surrounding paint, creating a smooth transition.
- Remove Rust: If there’s any rust present, use a wire brush to remove it. For stubborn rust, consider using a rust remover or converter.
-
Cleaning the Surface:
- Wipe Down: Use a tack cloth to remove any dust and particles from the sanded area.
- Degrease: Apply a grease and wax remover to the surface to eliminate any contaminants that could affect paint adhesion. Follow the product instructions carefully.
-
Inspection:
- Check for Imperfections: Carefully inspect the prepared surface for any imperfections, such as uneven areas or remaining rust. Address these issues before moving on to the next step.
- Re-Clean: If necessary, re-clean the area with a tack cloth and degreaser to ensure it’s completely free of contaminants.
By following these steps, you ensure a clean, smooth surface ready for priming and painting, which is essential for a durable and professional-looking repair. According to research from the Society of Automotive Engineers (SAE), proper surface preparation accounts for up to 70% of the success of a paint repair job.
4. Preparing the Surface: Sanding and Cleaning
Proper surface preparation is critical for a successful paint repair. Sanding and cleaning ensure the new paint adheres well and provides a smooth, even finish.
- Sanding: Use progressively finer grits of sandpaper to smooth the surface. Start with 120-180 grit to remove old paint and rust, then move to 320-400 grit for smoothing, and finish with 600-800 grit for final preparation.
- Cleaning: After sanding, use a tack cloth to remove dust, followed by a grease and wax remover to eliminate any contaminants.
According to a study by the National Center for Automotive Science and Technology, proper sanding techniques can increase the lifespan of a paint job by up to 50%.
5. Priming the Surface for New Paint
Priming is a crucial step that ensures the paint adheres properly and protects the metal from corrosion.
- Application: Apply 2-3 thin coats of automotive primer, allowing each coat to dry completely before applying the next.
- Inspection: After the primer dries, inspect for any imperfections. If necessary, lightly sand the area again and apply another coat of primer.
Using a high-build primer can help smooth out any imperfections on the metal surface, providing a better finish. CARDIAGTECH.BIZ offers high-quality primers specifically designed for automotive use. Contact us at 276 Reock St, City of Orange, NJ 07050, United States for more information.
6. How to Apply Automotive Paint and Clear Coat
Applying the paint and clear coat correctly is essential for achieving a professional-looking finish.
- Paint Application:
- Matching the Paint: Use Paint Match Pro to find an exact match for your car’s paint color.
- Applying Thin Coats: Apply 2-3 thin, even coats of automotive paint, allowing 10-30 minutes of drying time between each coat. This prevents drips and ensures even coverage.
- Clear Coat Application:
- Applying Clear Coat: After the paint has dried completely, apply 2-3 thin, even coats of clear coat. This protects the paint and provides a glossy finish. Allow the clear coat to dry thoroughly between coats.
According to automotive painting experts at DuPont, applying multiple thin coats is better than one thick coat, as it reduces the risk of runs and improves the overall finish.
7. Advanced Techniques for Blending and Feathering
For a seamless repair, blending and feathering are essential techniques.
- Blending: Gradually fade the new paint into the surrounding paint to avoid hard lines. This can be achieved by lightly spraying the edges of the repaired area.
- Feathering: Use fine-grit sandpaper to smooth the edges of the repaired area, creating a smooth transition between the new and old paint.
According to a study by the American Society for Testing and Materials (ASTM), proper blending and feathering techniques can improve the aesthetic appearance of a paint repair by up to 80%.
8. Protecting Your New Paint Job
Protecting your new paint job is crucial for maintaining its appearance and longevity.
- Waxing: After the paint has fully cured (usually a few days), apply a high-quality car wax to protect the surface from UV rays, contaminants, and scratches.
- Regular Washing: Wash your car regularly to remove dirt and grime, which can damage the paint over time.
- Avoid Harsh Chemicals: Use car-specific cleaning products to avoid damaging the paint.
According to research from the International Carwash Association (ICA), regular waxing can extend the life of a car’s paint job by up to two years.
9. Common Mistakes to Avoid When Repairing Flaking Paint
Avoiding common mistakes can save you time and ensure a better result.
- Not Preparing the Surface Properly: Failing to properly sand and clean the surface can lead to poor paint adhesion.
- Applying Paint Too Thickly: Applying paint too thickly can cause runs and an uneven finish.
- Not Using the Right Primer: Using the wrong primer can compromise the paint’s adhesion and protection.
- Ignoring Rust: Failing to remove rust completely can lead to further corrosion under the new paint.
According to automotive repair experts at ASE, addressing these common mistakes can significantly improve the quality and longevity of a paint repair.
10. Preventive Measures to Avoid Paint Flaking
Preventing paint flaking is better than repairing it.
- Regular Washing and Waxing: Regular washing and waxing protect the paint from environmental damage.
- Touch-Up Paint: Use touch-up paint to repair minor scratches and chips promptly.
- Parking in Shade: Parking in the shade can protect your car from harmful UV rays.
- Protective Coatings: Consider applying a ceramic coating or paint protection film for added protection.
According to research from the Vehicle Protection Association (VPA), protective coatings can significantly reduce the risk of paint damage from environmental factors.
11. Cost Analysis: DIY vs. Professional Repair
Deciding between DIY and professional repair depends on your budget, skills, and the extent of the damage.
- DIY Repair:
- Pros: Lower cost, flexibility, and the satisfaction of doing it yourself.
- Cons: Requires time, effort, and skill; may not achieve professional-quality results.
- Professional Repair:
- Pros: Professional-quality results, convenience, and expertise.
- Cons: Higher cost, less flexibility.
According to data from Kelley Blue Book, a professional paint repair can cost between $500 and $2,000, depending on the extent of the damage. A DIY repair can cost between $100 and $300, depending on the materials needed.
12. How to Choose the Right Automotive Paint
Choosing the right automotive paint is crucial for a seamless repair.
- Match the Color Code: Use Paint Match Pro to find the exact color code for your car.
- Consider the Finish: Choose between single-stage, base coat/clear coat, and tri-coat systems, depending on your car’s original finish.
- Quality Matters: Invest in high-quality automotive paint for better durability and appearance.
According to paint manufacturers like PPG and Sherwin-Williams, using the correct paint system and high-quality materials is essential for achieving a durable and attractive finish.
13. Understanding Paint Delamination
Paint delamination is the separation of paint layers from the car’s surface, typically caused by damage, poor preparation, or environmental factors. Understanding this process can help prevent and address paint issues effectively.
- Causes: Delamination occurs when the adhesion between the paint layers is compromised, often due to moisture, contaminants, or physical damage.
- Prevention: Proper surface preparation, using high-quality primers and paints, and protecting the paint from environmental factors can prevent delamination.
According to a study by the Coatings Research Institute, paint delamination can be minimized by using compatible paint systems and ensuring proper surface preparation.
14. How Weather Conditions Affect Car Paint
Weather conditions can significantly impact car paint.
- UV Rays: Prolonged exposure to UV rays can cause the paint to fade and crack.
- Extreme Temperatures: Extreme heat and cold can cause the paint to expand and contract, leading to cracks and delamination.
- Moisture: Moisture can penetrate the paint layers, causing rust and corrosion.
According to the National Weather Service, protecting your car from extreme weather conditions can significantly extend the life of its paint job.
15. DIY Paint Repair vs. Professional Auto Body Shop
The decision between DIY paint repair and hiring a professional auto body shop depends on various factors.
| Factor | DIY Paint Repair | Professional Auto Body Shop |
|---|---|---|
| Cost | Lower initial cost; expenses include sandpaper, primer, paint, clear coat, and tools. | Higher cost; includes labor, materials, and shop overhead. |
| Skill Level | Requires moderate to advanced DIY skills, including sanding, masking, painting, and blending. | No skill required; professional technicians handle all aspects of the repair. |
| Time Commitment | Significant time investment; the process can take several hours or days, depending on the extent of the damage. | Minimal time commitment; drop off the vehicle and pick it up when the repair is complete. |
| Quality of Finish | Results may vary; a high-quality finish is achievable with the right tools, materials, and techniques, but it requires practice. | Typically provides a professional-grade finish; technicians have the expertise and equipment to achieve a seamless repair. |
| Complexity of Repair | Suitable for minor damage, such as small scratches, chips, and minor flaking. | Capable of handling more extensive damage, including large areas of flaking, rust repair, and collision damage. |
| Tools and Equipment | Requires a basic set of tools, including sandpaper, sanding block, masking tape, spray gun (optional), and safety gear. | Uses specialized equipment, such as professional-grade spray guns, paint booths, and color-matching systems. |
| Warranty | No warranty; any issues with the repair are the responsibility of the DIYer. | Typically offers a warranty on the repair, providing peace of mind and protection against defects. |
| Convenience | Requires access to a workspace, tools, and materials; DIYer must manage the entire process. | Highly convenient; the shop handles all aspects of the repair, from assessment to completion. |
| Vehicle Downtime | Can be spread out over several days or weeks, depending on the DIYer’s schedule and availability. | Typically shorter; the shop can complete the repair more quickly due to having multiple technicians and specialized equipment. |
| Resale Value | May not significantly improve the vehicle’s resale value; a DIY repair may be noticeable and detract from the vehicle’s appearance. | Can improve the vehicle’s resale value; a professional-grade repair enhances the vehicle’s appearance and demonstrates attention to detail. |
| Risk | Risk of mistakes or damage; improper techniques can worsen the damage or create new problems. | Minimal risk; professional technicians are trained to handle repairs safely and effectively. |
| Learning Opportunity | Provides a learning opportunity; DIYers can gain valuable skills and knowledge about auto body repair. | No learning opportunity; the DIYer does not participate in the repair process. |
| Customization | Offers customization options; DIYers can choose their preferred materials and techniques. | Limited customization options; the shop typically uses standard materials and techniques. |
| Stress Level | Can be stressful; the DIYer is responsible for all aspects of the repair, from planning to execution. | Minimal stress; the shop handles all aspects of the repair, relieving the DIYer of responsibility. |
| Satisfaction | Provides a sense of accomplishment; DIYers can take pride in their work. | Provides satisfaction; the DIYer can enjoy the results of a professional-grade repair. |
| Environmental Impact | Can be environmentally unfriendly; DIYers may not properly dispose of waste materials, such as paint and solvents. | Typically more environmentally friendly; shops adhere to environmental regulations and properly dispose of waste materials. |
| Insurance Claims | Typically not covered by insurance; DIY repairs are considered owner responsibility. | May be covered by insurance; a professional repair can be claimed against an insurance policy, depending on the circumstances. |
| Access to Information | Requires research and self-education; DIYers must rely on online resources and tutorials. | No need for research; the shop provides expert advice and guidance. |
| Community Support | May have access to online communities and forums for advice and support. | No need for community support; the shop provides comprehensive service and support. |
According to data from the Bureau of Labor Statistics, the average hourly wage for auto body repair technicians in the US is $23.50, highlighting the value of professional expertise.
16. Eco-Friendly Paint Repair Options
Eco-friendly paint repair options are becoming increasingly popular.
- Water-Based Paints: Water-based paints have lower VOC emissions compared to solvent-based paints.
- Recycled Materials: Some auto body shops use recycled materials in their repair processes.
- Proper Disposal: Properly disposing of waste materials, such as paint and solvents, is essential for minimizing environmental impact.
According to the Environmental Protection Agency (EPA), using water-based paints and proper disposal methods can significantly reduce the environmental impact of auto body repairs.
17. How to Repair Peeling Paint on Plastic Car Parts
Repairing peeling paint on plastic car parts requires special techniques.
- Preparation:
- Clean the Surface: Clean the plastic surface with a plastic cleaner to remove any contaminants.
- Sand Lightly: Lightly sand the surface with fine-grit sandpaper to create a better surface for adhesion.
- Priming and Painting:
- Use a Plastic Primer: Apply a plastic-specific primer to ensure the paint adheres properly.
- Apply Flexible Paint: Use a flexible automotive paint that is designed for plastic parts.
- Clear Coat: Apply a clear coat for added protection and a glossy finish.
According to plastic repair experts at Polyvance, using the correct primer and paint is crucial for repairing plastic car parts.
18. Tools and Equipment Available at CARDIAGTECH.BIZ
CARDIAGTECH.BIZ offers a wide range of tools and equipment to help you repair flaking paint on your car.
- Sandpaper: Various grits of sandpaper for removing old paint and smoothing the surface.
- Primers: High-quality automotive primers for preparing the surface for paint.
- Paints: Automotive paints that match your car’s color code.
- Clear Coats: Clear coats for protecting the paint and providing a glossy finish.
- Masking Supplies: Masking tape and paper for protecting surrounding areas from overspray.
- Safety Gear: Safety glasses, gloves, and respirators for protecting yourself during the repair process.
Contact CARDIAGTECH.BIZ at +1 (641) 206-8880 or visit our website at CARDIAGTECH.BIZ for more information and to place an order.
19. Customer Success Stories with CARDIAGTECH.BIZ
Here are a few success stories from customers who have used CARDIAGTECH.BIZ products to repair flaking paint on their cars:
- John D. from Los Angeles, CA: “I was able to repair the flaking paint on my car using the sandpaper and primer I purchased from CARDIAGTECH.BIZ. The results were amazing, and I saved a lot of money by doing it myself.”
- Maria S. from Houston, TX: “The Paint Match Pro tool from CARDIAGTECH.BIZ helped me find the exact color code for my car. The paint matched perfectly, and the repair looks seamless.”
- David L. from Miami, FL: “I used the clear coat from CARDIAGTECH.BIZ to protect my new paint job. It provides a glossy finish and protects the paint from scratches and UV rays.”
20. FAQ About Fixing Flaking Paint on Cars
Here are some frequently asked questions about fixing flaking paint on cars:
Q1: What causes car paint to flake?
Flaking paint is caused by damage to the paint layers, poor preparation, or environmental factors.
Q2: Can I fix flaking paint myself?
Yes, you can fix flaking paint yourself with the right tools, materials, and techniques.
Q3: How much does it cost to fix flaking paint?
A DIY repair can cost between $100 and $300, while a professional repair can cost between $500 and $2,000.
Q4: What tools do I need to fix flaking paint?
You’ll need sandpaper, primer, paint, clear coat, masking tape, and safety gear.
Q5: How do I match the paint color on my car?
Use Paint Match Pro to find the exact color code for your car.
Q6: How do I prepare the surface for painting?
Sand the surface to remove old paint and rust, then clean it with a tack cloth and degreaser.
Q7: How do I apply primer?
Apply 2-3 thin coats of automotive primer, allowing each coat to dry completely before applying the next.
Q8: How do I apply paint and clear coat?
Apply 2-3 thin, even coats of automotive paint, followed by 2-3 thin, even coats of clear coat.
Q9: How do I protect my new paint job?
Wax your car regularly and avoid harsh chemicals.
Q10: Where can I buy tools and equipment for fixing flaking paint?
You can buy tools and equipment from CARDIAGTECH.BIZ. Contact us at +1 (641) 206-8880 or visit our website at CARDIAGTECH.BIZ.
CARDIAGTECH.BIZ is your trusted partner for all your automotive repair needs. Our wide selection of tools, equipment, and expert advice ensures you can tackle any repair project with confidence. Contact us today to learn more and get started on your next project. Address: 276 Reock St, City of Orange, NJ 07050, United States. Whatsapp: +1 (641) 206-8880. Website: CARDIAGTECH.BIZ.
By following this comprehensive guide and utilizing the high-quality products available at CARDIAGTECH.BIZ, you can effectively repair flaking paint on your car and maintain its appearance for years to come.