How To Fix Hard Leather Car Seats: A Comprehensive Guide
Are you struggling with stiff, uncomfortable leather car seats? How to fix hard leather car seats is a question many car owners face, especially those with vintage or well-used vehicles. At CARDIAGTECH.NET, we understand the importance of maintaining your car’s interior, and restoring your leather seats to their original supple condition. This guide will walk you through effective methods and products, including leather conditioners and rejuvenators, to revive your car seats. Addressing issues like cracking, fading, and stiffness will enhance your driving experience and preserve your car’s value.
1. Understanding Why Leather Car Seats Harden
Leather car seats, while luxurious, are susceptible to hardening over time. Several factors contribute to this issue, making it essential to understand the root causes to implement effective solutions.
1.1. Environmental Factors
The environment inside your car plays a significant role in the condition of your leather seats.
-
Sun Exposure: Prolonged exposure to sunlight can cause the leather to dry out and fade. Ultraviolet (UV) rays break down the natural oils in the leather, leading to stiffness and cracking.
-
Temperature Fluctuations: Extreme temperature changes, such as hot summers and cold winters, can expand and contract the leather. This constant stress weakens the fibers, causing the leather to lose its flexibility.
-
Humidity: Both high and low humidity levels can negatively impact leather. High humidity can lead to mold and mildew growth, while low humidity can dry out the leather, making it brittle.
1.2. Lack of Maintenance
Proper maintenance is crucial for preserving the suppleness of leather car seats.
-
Infrequent Cleaning: Dust, dirt, and debris accumulate on the leather surface, acting as abrasives that wear down the material over time. These particles can also clog the pores of the leather, preventing it from breathing and retaining moisture.
-
Neglecting Conditioning: Leather requires regular conditioning to replenish its natural oils. Without conditioning, the leather loses its moisture content, leading to dryness and stiffness.
1.3. Use of Harsh Chemicals
Using the wrong cleaning products can cause significant damage to leather car seats.
-
Inappropriate Cleaners: Many household cleaners contain harsh chemicals such as alcohol, bleach, and ammonia, which can strip the leather of its natural oils and cause it to dry out and crack.
-
Abrasive Materials: Scrubbing the leather with abrasive materials like rough cloths or scrub brushes can scratch the surface and damage the finish.
1.4. Natural Aging
Even with the best care, leather naturally ages over time.
-
Loss of Natural Oils: As leather ages, it gradually loses its natural oils and moisture content, making it more prone to stiffness and cracking.
-
Wear and Tear: Regular use of the car seats causes friction and wear, which can damage the leather fibers and lead to hardening.
1.5. Type of Leather
The type of leather used in your car seats also affects how it ages and hardens.
-
Quality of Leather: High-quality leather is more durable and resistant to wear and tear compared to lower-quality leather.
-
Tanning Process: The tanning process used to treat the leather can affect its long-term durability and flexibility. Some tanning methods may make the leather more susceptible to drying out and hardening.
By understanding these factors, you can take proactive steps to protect and maintain your leather car seats, keeping them soft, supple, and comfortable for years to come. Regular cleaning, conditioning, and protection from environmental factors are essential for preventing the hardening of leather car seats.
2. Assessing the Condition of Your Leather Seats
Before diving into the restoration process, it’s crucial to assess the condition of your leather seats accurately. This evaluation will help you determine the extent of the damage and the appropriate steps to take.
2.1. Visual Inspection
Start with a thorough visual inspection of your leather seats.
- Cracking: Look for any signs of cracking, especially in high-stress areas like the seat cushions, backrests, and side bolsters. Cracks can range from fine lines to deep fissures.
- Fine Cracks (Spiderweb Cracks): These are small, superficial cracks that indicate the leather is beginning to dry out.
- Deep Cracks: These are more severe and indicate significant loss of moisture and flexibility.
- Fading: Check for discoloration or fading, particularly on areas exposed to direct sunlight. Fading is a sign that the leather has lost its protective oils and is becoming brittle.
- Stiffness: Feel the leather to assess its stiffness. Compare the feel of different areas of the seat to identify the most affected regions.
- Dryness: Observe if the leather appears dry or parched. Dry leather often feels rough to the touch and lacks its natural sheen.
- Stains: Identify any stains, such as watermarks, oil stains, or dye transfer from clothing. Stains can compromise the leather’s integrity and appearance.
2.2. Touch Test
Use your hands to evaluate the leather’s texture and pliability.
- Flexibility: Gently flex the leather in various areas. If it feels stiff and resistant, it needs conditioning. Supple leather should bend easily without creaking or cracking.
- Roughness: Run your hand over the surface to check for roughness. Roughness indicates that the leather is dry and may have accumulated dirt and debris.
- Tackiness: Check for any sticky or tacky spots. This can indicate a buildup of dirt or residue from cleaning products.
2.3. Pinch Test
Perform a pinch test to assess the leather’s elasticity.
- Pinch and Release: Gently pinch a small section of the leather between your fingers and release it. Observe how quickly the leather returns to its original shape.
- Slow Recovery: If the leather takes a long time to return to its shape or leaves a visible crease, it has lost elasticity and needs conditioning.
- Immediate Recovery: Supple leather should bounce back quickly, indicating good elasticity.
2.4. Smell Test
The smell of leather can also indicate its condition.
- Leather Scent: Healthy leather should have a distinct, pleasant leather scent.
- Unpleasant Odors: Musty or mildew-like odors can indicate moisture damage or bacterial growth.
2.5. Identifying Problem Areas
Note the specific areas of the seats that require the most attention.
- High-Wear Areas: Focus on areas that experience the most friction and contact, such as the driver’s seat, side bolsters, and armrests.
- Sun-Exposed Areas: Pay close attention to areas that are directly exposed to sunlight, such as the top of the backrests and seat cushions.
- Seam Areas: Check the seams for any signs of cracking or fraying, as these areas are often more vulnerable to damage.
By conducting a comprehensive assessment, you can accurately determine the condition of your leather seats and tailor your restoration efforts to address the specific issues. This will ensure that you use the right products and techniques to restore your seats to their optimal condition. Remember to document your findings with photos to track your progress and compare the before-and-after results.
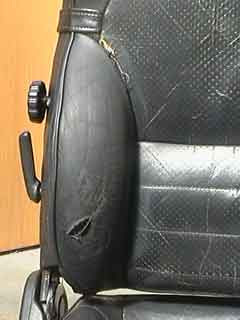
alt: Close-up of worn leather car seat showing cracks and wear, highlighting the need for restoration
3. Essential Tools and Products
To effectively fix hard leather car seats, having the right tools and products is essential. This section outlines the necessary items to clean, condition, and protect your leather seats.
3.1. Cleaning Supplies
Proper cleaning removes dirt, grime, and other contaminants that can damage leather.
- Leather Cleaner: Choose a pH-balanced leather cleaner specifically designed for automotive leather. Avoid using household cleaners, as they can be too harsh.
- Example: Lexol Leather Cleaner, Chemical Guys Leather Cleaner
- Soft Microfiber Towels: Use high-quality microfiber towels to gently wipe down the leather without scratching it.
- Features: Lint-free, non-abrasive
- Soft-Bristled Brush: A soft-bristled brush helps to loosen dirt and grime from the leather’s pores.
- Example: Horsehair brush
- Vacuum Cleaner: A vacuum cleaner with a soft brush attachment is useful for removing loose debris and dirt from the seats.
3.2. Conditioning Products
Conditioning replenishes the leather’s natural oils, keeping it soft and supple.
- Leather Conditioner: Opt for a high-quality leather conditioner that contains natural oils and moisturizers.
- Ingredients to Look For: Lanolin, beeswax, mink oil
- Examples: Leather Honey, Obenauf’s Leather Oil (as mentioned in the original article)
- Applicator Pads: Use foam or microfiber applicator pads to evenly distribute the conditioner over the leather surface.
3.3. Protection Products
Protecting the leather from future damage is crucial for long-term maintenance.
- Leather Protectant: A leather protectant creates a barrier against UV rays, spills, and stains.
- Features: UV protection, water resistance
- Examples: 303 Aerospace Protectant, Meguiar’s Leather Sealer
- UV Protectant Spray: This spray helps to shield the leather from sun damage, preventing fading and cracking.
3.4. Optional Tools
These tools can be helpful for more intensive leather restoration.
- Leather Rejuvenator: For severely hardened leather, a leather rejuvenator can help to restore its flexibility.
- Examples: Leatherique Rejuvenator Oil (as mentioned in the original article)
- Heat Gun or Hair Dryer: Gentle heat can help the conditioner penetrate deeper into the leather. Use with caution to avoid overheating.
- Leather Dye or Color Restorer: If the leather is faded or discolored, a leather dye or color restorer can help to restore its original appearance.
- Leather Repair Kit: For repairing cracks, tears, or scratches, a leather repair kit can be useful.
3.5. Product Recommendations from CARDIAGTECH.NET
At CARDIAGTECH.NET, we understand the importance of using high-quality products for car maintenance. Here are some of our top recommendations for fixing hard leather car seats:
- CARDIAGTECH Leather Cleaner: Our pH-balanced formula effectively removes dirt and grime without stripping the leather’s natural oils.
- CARDIAGTECH Leather Conditioner: Infused with natural oils and moisturizers, our conditioner restores the leather’s suppleness and prevents cracking.
- CARDIAGTECH Leather Protectant: Provides a durable barrier against UV rays, spills, and stains, ensuring long-lasting protection.
3.6. Where to Purchase
You can find these essential tools and products at various retailers:
- Auto Parts Stores: Stores like AutoZone, Advance Auto Parts, and O’Reilly Auto Parts carry a wide range of leather care products.
- Online Retailers: Websites like Amazon, CARDIAGTECH.NET, and specialty detailing sites offer a vast selection of leather cleaning, conditioning, and protection products.
- Detailing Supply Stores: Local detailing supply stores often carry high-quality products specifically designed for automotive detailing.
Having the right tools and products on hand will make the process of fixing hard leather car seats more efficient and effective. Always read and follow the manufacturer’s instructions when using any leather care product.
4. Step-by-Step Guide to Softening Hard Leather Car Seats
Restoring hard leather car seats requires a systematic approach. Follow this step-by-step guide to effectively clean, condition, and protect your leather seats, bringing them back to their original suppleness.
4.1. Preparation
Before you begin, prepare your workspace and gather all the necessary supplies.
- Park the Car: Park your car in a shaded area or inside a garage to avoid direct sunlight, which can cause the cleaning and conditioning products to dry too quickly.
- Gather Supplies: Collect all the cleaning, conditioning, and protection products, as well as microfiber towels, a soft-bristled brush, a vacuum cleaner, and applicator pads.
- Protect Surfaces: Cover any nearby surfaces, such as carpets and trim, with drop cloths or plastic sheeting to protect them from accidental spills or overspray.
4.2. Vacuuming the Seats
Start by vacuuming the seats to remove any loose dirt, dust, and debris.
- Use Soft Brush Attachment: Attach a soft brush attachment to your vacuum cleaner to avoid scratching the leather surface.
- Vacuum Thoroughly: Vacuum the entire surface of the seats, paying close attention to seams, crevices, and other hard-to-reach areas where dirt tends to accumulate.
- Remove Debris: Remove any large debris or objects from the seats before vacuuming.
4.3. Cleaning the Leather
Cleaning removes embedded dirt and grime, preparing the leather for conditioning.
- Apply Leather Cleaner: Spray a small amount of leather cleaner onto a microfiber towel or directly onto the leather surface.
- Gently Wipe: Gently wipe the leather in a circular motion, working the cleaner into the surface. Avoid applying too much pressure or saturating the leather.
- Use Soft-Bristled Brush: For stubborn dirt or grime, use a soft-bristled brush to gently scrub the leather.
- Wipe Off Excess Cleaner: Use a clean, dry microfiber towel to wipe off any excess cleaner from the leather surface.
- Allow to Dry: Allow the leather to air dry completely before proceeding to the next step. This usually takes about 15-30 minutes.
4.4. Conditioning the Leather
Conditioning replenishes the leather’s natural oils, restoring its suppleness and preventing cracking.
- Apply Leather Conditioner: Apply a small amount of leather conditioner to a foam or microfiber applicator pad.
- Evenly Distribute: Evenly distribute the conditioner over the leather surface, using a circular motion. Ensure that all areas of the seats are covered, including the seams and crevices.
- Massage into Leather: Gently massage the conditioner into the leather, allowing it to penetrate the surface.
- Allow to Absorb: Allow the conditioner to absorb into the leather for at least 30 minutes. For best results, allow it to absorb overnight.
- Wipe Off Excess Conditioner: Use a clean, dry microfiber towel to wipe off any excess conditioner from the leather surface.
4.5. Applying Heat (Optional)
Applying gentle heat can help the conditioner penetrate deeper into the leather, especially if it is severely hardened.
- Use Heat Gun or Hair Dryer: Use a heat gun or hair dryer on a low setting to gently warm the leather surface.
- Apply Heat Evenly: Move the heat source back and forth over the leather, avoiding prolonged exposure to any one area.
- Massage Conditioner: While the leather is warm, gently massage the conditioner into the surface to help it penetrate.
- Allow to Cool: Allow the leather to cool completely before wiping off any excess conditioner.
4.6. Applying Leather Protectant
Protecting the leather from future damage is crucial for long-term maintenance.
- Apply Leather Protectant: Spray a small amount of leather protectant onto a microfiber towel or directly onto the leather surface.
- Evenly Distribute: Evenly distribute the protectant over the leather surface, using a circular motion.
- Allow to Dry: Allow the protectant to dry completely before using the seats. This usually takes about 15-30 minutes.
4.7. Final Inspection and Touch-Ups
After completing the cleaning, conditioning, and protection steps, perform a final inspection of the seats.
- Check for Missed Spots: Check for any missed spots or areas that need additional attention.
- Apply Additional Conditioner: If necessary, apply additional conditioner to areas that are still stiff or dry.
- Buff the Leather: Use a clean, dry microfiber towel to buff the leather surface, enhancing its shine and appearance.
4.8. Maintenance Tips
Regular maintenance is key to keeping your leather seats soft and supple.
- Clean Regularly: Clean your leather seats every 1-3 months, depending on usage and environmental conditions.
- Condition Regularly: Condition your leather seats every 3-6 months to replenish their natural oils.
- Protect from Sunlight: Park your car in a shaded area or use a windshield sunshade to protect the leather from direct sunlight.
- Address Spills Immediately: Clean up any spills or stains immediately to prevent them from setting into the leather.
By following this step-by-step guide, you can effectively soften hard leather car seats and maintain their condition for years to come. Regular cleaning, conditioning, and protection are essential for preserving the beauty and comfort of your car’s leather interior.
alt: Professional car detailing service cleaning and conditioning leather car seats, ensuring long-lasting protection and suppleness
5. Advanced Techniques for Severely Hardened Leather
When dealing with severely hardened leather car seats, standard cleaning and conditioning may not be enough. Here are some advanced techniques to restore suppleness to extremely stiff leather.
5.1. Leather Rejuvenator Oil Treatment
Leather rejuvenator oils are specially formulated to penetrate deep into the leather fibers, restoring moisture and flexibility.
- Apply Rejuvenator Oil: Apply a generous amount of leather rejuvenator oil to the hardened areas of the leather seats.
- Massage into Leather: Gently massage the oil into the leather, working it into the cracks and crevices.
- Cover with Plastic Wrap: Cover the treated areas with plastic wrap to help the oil penetrate deeper into the leather.
- Apply Heat: Use a heat gun or hair dryer on a low setting to gently warm the plastic-wrapped areas. This will help the oil penetrate further into the leather.
- Allow to Soak: Allow the oil to soak into the leather for at least 24-48 hours.
- Remove Plastic Wrap: Remove the plastic wrap and wipe off any excess oil with a clean microfiber towel.
- Condition the Leather: Follow up with a leather conditioner to further nourish and protect the leather.
5.2. Steam Treatment
Steam can help to loosen the leather fibers and allow conditioning products to penetrate more effectively.
- Use a Steamer: Use a handheld steamer to gently steam the hardened areas of the leather seats.
- Move the Steamer: Move the steamer back and forth over the leather, avoiding prolonged exposure to any one area.
- Wipe with Microfiber Towel: As you steam the leather, gently wipe it with a clean microfiber towel to remove dirt and debris.
- Apply Conditioner: Immediately after steaming, apply a generous amount of leather conditioner to the treated areas.
- Massage into Leather: Gently massage the conditioner into the leather, allowing it to penetrate the surface.
- Allow to Absorb: Allow the conditioner to absorb into the leather for at least 30 minutes.
- Wipe Off Excess Conditioner: Wipe off any excess conditioner with a clean, dry microfiber towel.
5.3. Wet Towel and Iron Method
This technique uses heat and moisture to soften the leather fibers.
- Dampen a Towel: Dampen a clean microfiber towel with warm water.
- Place Towel on Leather: Place the damp towel over the hardened area of the leather.
- Iron the Towel: Use an iron on a low setting to gently iron the towel, applying heat and moisture to the leather.
- Check Leather Condition: Periodically check the leather’s condition to avoid overheating or damaging it.
- Remove Towel: Remove the towel and allow the leather to cool.
- Apply Conditioner: Apply a generous amount of leather conditioner to the treated area.
- Massage into Leather: Gently massage the conditioner into the leather, allowing it to penetrate the surface.
- Allow to Absorb: Allow the conditioner to absorb into the leather for at least 30 minutes.
- Wipe Off Excess Conditioner: Wipe off any excess conditioner with a clean, dry microfiber towel.
5.4. Using Obenauf’s Leather Oil
As mentioned in the original article, Obenauf’s Leather Oil is highly effective for restoring severely hardened leather.
- Apply Obenauf’s Leather Oil: Apply a generous amount of Obenauf’s Leather Oil to the hardened areas of the leather seats.
- Massage into Leather: Gently massage the oil into the leather, working it into the cracks and crevices.
- Allow to Soak: Allow the oil to soak into the leather for at least 24-48 hours.
- Wipe Off Excess Oil: Wipe off any excess oil with a clean microfiber towel.
- Repeat Treatment: Repeat the treatment multiple times over a week, as needed, to achieve the desired softness.
5.5. Professional Leather Restoration
If the leather is severely damaged or you are not comfortable performing these advanced techniques yourself, consider hiring a professional leather restoration service. Professionals have the expertise, tools, and products to restore even the most severely hardened leather.
These advanced techniques can help to restore suppleness to severely hardened leather car seats. Always exercise caution and follow the manufacturer’s instructions when using any leather care product or tool. Regular maintenance and proper care are essential for preventing leather from becoming severely hardened in the first place.
6. Preventing Leather Car Seats from Hardening
Prevention is always better than cure. Implementing a proactive maintenance routine can help prevent your leather car seats from hardening, keeping them soft, supple, and comfortable for years to come.
6.1. Regular Cleaning
Regular cleaning removes dirt, dust, and grime that can accumulate on the leather surface and cause it to dry out.
- Frequency: Clean your leather seats every 1-3 months, depending on usage and environmental conditions.
- Use a Leather Cleaner: Use a pH-balanced leather cleaner specifically designed for automotive leather.
- Gentle Cleaning: Gently wipe the leather with a soft microfiber towel, avoiding harsh scrubbing or abrasive materials.
- Vacuum First: Vacuum the seats before cleaning to remove loose dirt and debris.
6.2. Consistent Conditioning
Conditioning replenishes the leather’s natural oils, keeping it soft and supple.
- Frequency: Condition your leather seats every 3-6 months, depending on the climate and the leather’s condition.
- Use a Leather Conditioner: Use a high-quality leather conditioner that contains natural oils and moisturizers.
- Even Application: Apply the conditioner evenly over the leather surface, using a foam or microfiber applicator pad.
- Allow Absorption: Allow the conditioner to absorb into the leather for at least 30 minutes before wiping off any excess.
6.3. Protecting from Sunlight
Sunlight is a major cause of leather hardening and fading.
- Park in Shade: Park your car in a shaded area or inside a garage whenever possible.
- Use Sunshades: Use windshield sunshades to block out sunlight when parking in direct sun.
- Apply UV Protectant: Apply a leather protectant with UV protection to shield the leather from harmful UV rays.
6.4. Controlling Humidity
Maintaining a stable humidity level inside your car can help prevent leather from drying out or becoming moldy.
- Use a Dehumidifier: In humid climates, use a car dehumidifier to reduce moisture levels inside the car.
- Avoid Dampness: Avoid leaving damp items, such as wet towels or clothing, inside the car.
- Ventilation: Ensure proper ventilation inside the car to prevent moisture buildup.
6.5. Promptly Addressing Spills
Spills can stain and damage leather if not addressed promptly.
- Clean Immediately: Clean up any spills or stains immediately with a clean, dry microfiber towel.
- Use Leather Cleaner: If necessary, use a leather cleaner to remove stubborn stains.
- Avoid Harsh Cleaners: Avoid using harsh chemicals or abrasive materials that can damage the leather.
6.6. Using Seat Covers
Seat covers can provide an extra layer of protection against wear and tear, sunlight, and spills.
- Choose Leather-Friendly Covers: Choose seat covers made from breathable, leather-friendly materials.
- Ensure Proper Fit: Ensure that the seat covers fit properly and do not rub against the leather surface.
- Clean Regularly: Clean the seat covers regularly to prevent dirt and grime from accumulating.
6.7. Regular Inspections
Regularly inspect your leather seats for signs of wear, cracking, or dryness.
- Visual Inspection: Perform a visual inspection every few weeks to check for any signs of damage.
- Touch Test: Feel the leather to assess its suppleness and moisture content.
- Address Issues Promptly: Address any issues promptly to prevent them from worsening.
6.8. Professional Detailing
Consider having your leather seats professionally detailed every year or two.
- Professional Expertise: Professional detailers have the expertise, tools, and products to thoroughly clean, condition, and protect your leather seats.
- Long-Term Maintenance: Professional detailing can help to extend the life of your leather seats and keep them looking their best.
By following these preventive measures, you can significantly reduce the risk of your leather car seats hardening and maintain their beauty and comfort for years to come.
7. Cost-Effective Solutions
Maintaining leather car seats can be expensive, but several cost-effective solutions can help you keep your seats in good condition without breaking the bank.
7.1. DIY Cleaning Solutions
Instead of purchasing expensive leather cleaners, you can create your own DIY cleaning solutions using household ingredients.
- Mild Soap and Water: Mix a few drops of mild dish soap with warm water. Use a soft microfiber towel to gently wipe down the leather.
- Vinegar and Water: Mix equal parts of white vinegar and water. This solution can help to remove stains and odors.
- Baking Soda Paste: Mix baking soda with water to form a paste. Apply the paste to stains and allow it to sit for a few minutes before wiping it off.
7.2. Affordable Leather Conditioners
You don’t have to spend a fortune on leather conditioners to keep your seats soft and supple.
- Obenauf’s Leather Oil: As mentioned earlier, Obenauf’s Leather Oil is a cost-effective option for conditioning and restoring leather.
- Mink Oil: Mink oil is a natural conditioner that can help to soften and protect leather.
- Beeswax Products: Leather conditioners containing beeswax can help to moisturize and protect leather.
7.3. Repurposing Household Items
Many household items can be repurposed for leather care.
- Microfiber Cloths: Use old microfiber cloths for cleaning and conditioning leather.
- Soft-Bristled Brushes: Use old toothbrushes or paintbrushes for cleaning seams and crevices.
- Spray Bottles: Reuse empty spray bottles for DIY cleaning solutions and leather protectants.
7.4. Buying in Bulk
Purchasing leather care products in bulk can save you money in the long run.
- Leather Cleaner: Buy a large bottle of leather cleaner and refill smaller spray bottles as needed.
- Leather Conditioner: Buy a large container of leather conditioner and use it for regular maintenance.
- Microfiber Towels: Buy a bulk pack of microfiber towels for cleaning and conditioning.
7.5. Focusing on High-Wear Areas
Instead of treating the entire seat, focus on high-wear areas that need the most attention.
- Driver’s Seat: Pay special attention to the driver’s seat, as it experiences the most wear and tear.
- Side Bolsters: Focus on the side bolsters, as they can become stiff and cracked over time.
- Armrests: Treat the armrests, as they can accumulate dirt and grime.
7.6. Regular Maintenance
Regular maintenance can prevent costly repairs and replacements in the future.
- Clean Regularly: Clean your leather seats every 1-3 months to remove dirt and grime.
- Condition Regularly: Condition your leather seats every 3-6 months to replenish their natural oils.
- Protect from Sunlight: Park your car in a shaded area or use sunshades to protect the leather from sunlight.
7.7. DIY Repair Kits
For minor cracks and scratches, consider using a DIY leather repair kit instead of hiring a professional.
- Color-Matching Compounds: Use color-matching compounds to fill in cracks and scratches.
- Leather Fillers: Use leather fillers to repair tears and holes.
- Texture Pads: Use texture pads to match the texture of the repaired area to the surrounding leather.
By implementing these cost-effective solutions, you can keep your leather car seats in good condition without spending a fortune. Regular maintenance, DIY cleaning solutions, and affordable leather care products can help you maintain the beauty and comfort of your car’s interior.
8. Addressing Specific Issues
Leather car seats can develop various specific issues over time. This section provides targeted solutions for common problems such as cracking, fading, stains, and odors.
8.1. Cracking
Cracking is a common issue with leather car seats, especially in high-wear areas.
- Cause: Loss of moisture and natural oils, leading to dryness and brittleness.
- Solution:
- Clean the Leather: Clean the cracked areas with a pH-balanced leather cleaner.
- Apply Leather Rejuvenator: Apply a leather rejuvenator oil to the cracked areas.
- Massage into Cracks: Gently massage the oil into the cracks, allowing it to penetrate the leather.
- Cover with Plastic Wrap: Cover the treated areas with plastic wrap to help the oil penetrate deeper.
- Apply Heat: Use a heat gun or hair dryer on a low setting to gently warm the plastic-wrapped areas.
- Allow to Soak: Allow the oil to soak into the leather for at least 24-48 hours.
- Remove Plastic Wrap: Remove the plastic wrap and wipe off any excess oil with a clean microfiber towel.
- Condition the Leather: Follow up with a leather conditioner to further nourish and protect the leather.
8.2. Fading
Fading occurs when the leather loses its color due to sun exposure and wear.
- Cause: Exposure to UV rays, causing the leather to lose its pigment.
- Solution:
- Clean the Leather: Clean the faded areas with a pH-balanced leather cleaner.
- Apply Leather Dye: Apply a leather dye or color restorer that matches the original color of the leather.
- Even Application: Apply the dye evenly over the faded areas, using a foam applicator pad.
- Allow to Dry: Allow the dye to dry completely, following the manufacturer’s instructions.
- Apply Leather Conditioner: Apply a leather conditioner to protect the dyed areas and restore moisture.
- Protect from Sunlight: Use a leather protectant with UV protection to prevent further fading.
8.3. Stains
Stains can be caused by spills, food, or dye transfer from clothing.
- Cause: Absorption of liquids or dyes into the leather.
- Solution:
- Clean the Stain Immediately: Clean the stain as soon as possible with a clean, dry microfiber towel.
- Use Leather Cleaner: If the stain persists, use a pH-balanced leather cleaner to gently clean the area.
- Try DIY Solutions: For specific stains, try DIY solutions such as vinegar and water or baking soda paste.
- Blot, Don’t Rub: Blot the stain gently, avoiding rubbing, which can spread the stain and damage the leather.
- Allow to Dry: Allow the area to dry completely before applying leather conditioner.
8.4. Odors
Odors can be caused by mold, mildew, or trapped spills.
- Cause: Bacterial growth or absorption of unpleasant odors into the leather.
- Solution:
- Clean the Leather: Clean the affected areas with a pH-balanced leather cleaner.
- Use Odor Eliminator: Use a leather-safe odor eliminator to neutralize the odor.
- Baking Soda: Sprinkle baking soda over the affected areas and allow it to sit for several hours before vacuuming it up.
- Ventilate the Car: Ventilate the car by opening the windows and doors to allow fresh air to circulate.
- Use a Dehumidifier: Use a car dehumidifier to reduce moisture levels and prevent mold and mildew growth.
8.5. Scratches
Scratches can occur from keys, buckles, or other sharp objects.
- Cause: Surface damage to the leather from abrasive objects.
- Solution:
- Clean the Leather: Clean the scratched areas with a pH-balanced leather cleaner.
- Apply Leather Filler: Apply a leather filler to fill in the scratches.
- Smooth the Filler: Smooth the filler with a putty knife or applicator pad.
- Allow to Dry: Allow the filler to dry completely, following the manufacturer’s instructions.
- Sand the Area: Gently sand the area with fine-grit sandpaper to smooth the surface.
- Apply Leather Dye: Apply a leather dye or color restorer that matches the original color of the leather.
- Apply Leather Conditioner: Apply a leather conditioner to protect the repaired areas and restore moisture.
By addressing these specific issues with targeted solutions, you can maintain the beauty and longevity of your leather car seats. Regular maintenance and prompt attention to problems can help prevent more severe damage in the future.
9. The Science Behind Leather Care
Understanding the science behind leather care can help you make informed decisions about the products and techniques you use.
9.1. Leather Structure
Leather is a natural material made from animal skin. It consists of three layers:
- Epidermis: The outer layer, which is removed during the tanning process.
- Dermis: The middle layer, which is the main part of the leather.
- Hypodermis: The inner layer, which is removed during the tanning process.
The dermis is composed of collagen fibers, which provide strength and flexibility to the leather.
9.2. Tanning Process
The tanning process converts raw animal skin into durable leather. There are several tanning methods:
- Vegetable Tanning: Uses natural tannins from plants to tan the leather. This method produces a firm, durable leather that is often used for saddles and belts.
- Chrome Tanning: Uses chromium salts to tan the leather. This method produces a soft, flexible leather that is often used for clothing and upholstery.
- Aldehyde Tanning: Uses aldehydes to tan the leather. This method produces a very soft, washable leather that is often used for gloves and baby shoes.
9.3. Leather Properties
Leather has several unique properties that make it a desirable material for car seats:
- Durability: Leather is strong and resistant to wear and tear.
- Flexibility: Leather is flexible and can conform to the shape of the seat.
- Breathability: Leather is breathable and allows air to circulate, keeping the seat cool and comfortable.
- Aesthetics: Leather has a luxurious appearance and feel.
9.4. Leather Deterioration
Leather can deteriorate over time due to several factors:
- Loss of Moisture: Leather loses moisture due to evaporation, heat, and sunlight, causing it to dry out and crack.
- UV Damage: UV rays from the sun break down the collagen fibers in the leather, causing it to fade