How to Fix Headlining in Car: A Comprehensive Guide

Is your car’s headliner starting to sag? Don’t worry, CARDIAGTECH.NET is here to help you restore your car’s interior to its former glory! This comprehensive guide provides effective methods and expert tips on how to fix headlining in car. Learn about headliner repair, headliner adhesive and headliner replacement cost.
1. Understanding the Car Headliner
The headliner, also known as headlining, is the fabric material adhered to the interior roof of your car. It serves multiple purposes:
- Aesthetics: Provides a smooth, finished look to the interior roof.
- Acoustics: Absorbs sound and reduces noise levels inside the car.
- Insulation: Helps regulate temperature by buffering against external cold and heat.
Typically, a headliner comprises several layers, including a foam backing (often polyurethane) that is sprayed or attached to a headliner board. This foam layer provides cushioning and enhances insulation against both heat and noise. Without a functional headliner, the car’s interior can become significantly hotter when parked in the sun, and wind noise can become more noticeable, especially at higher speeds. Furthermore, headliners improve the acoustics of customized audio systems.
Car headliner is a fabric that is secured to the roof framing
Alt text: Close-up of a car headliner, showing the fabric attached to the roof framing, enhancing interior aesthetics and insulation.
2. Common Causes of Sagging Headliners
A sagging car headliner can detract from the overall appearance of your vehicle’s interior. The fabric separates from the backing board due to several factors:
- Heat and Sunlight: Prolonged exposure to high temperatures can melt the adhesive, causing the fabric to loosen and sag.
- Moisture: Humidity and water leaks can seep into the headliner, causing the foam backing to absorb moisture, lose its shape, and ultimately sag.
- Poor Installation: Improper installation, such as using insufficient glue or incorrect techniques, can lead to premature sagging.
- Physical Damage: Passengers, especially children and pets, can inadvertently pull or scratch the headliner, causing it to detach over time.
Inadequate waterproofing can also allow water to penetrate the roof liner foam, accelerating the deterioration of the adhesive.
3. Assessing the Damage: Is DIY Repair Possible?
Before you start any repair, determine the extent of the damage. Minor sagging, particularly around the edges, is often manageable with DIY methods. However, extensive sagging or damage might necessitate professional attention. Here’s a quick checklist:
- Location of Sagging: Is it localized (e.g., corners) or widespread?
- Severity: Is the fabric slightly loose, or is it hanging down significantly?
- Condition of the Fabric: Is the fabric torn, stained, or otherwise damaged?
- Your Skill Level: Are you comfortable with DIY repairs, or would you prefer professional assistance?
4. Essential Tools and Materials for Headliner Repair
Having the right tools and materials is crucial for a successful DIY headliner repair. Here’s a comprehensive list:
| Tool/Material | Description | Purpose |
|---|---|---|
| Headliner Adhesive | Special high-temperature adhesive spray | Reattaching the fabric to the backing board. Ordinary glue is insufficient. |
| Sequin Pins | Small, decorative pins | Temporarily holding the fabric in place while the adhesive dries. |
| Clear-Headed Twist Pins | Saggy stoppers designed for headliners | Providing a secure, discreet hold without damaging the fabric. |
| Steam Cleaner | Device that emits hot steam | Softening the old adhesive and helping the fabric reattach. |
| Paint Roller | Smooth roller for painting | Ensuring the fabric sets evenly without creases or wrinkles after steaming. |
| Microfiber Cloths | Soft cloths for cleaning | Cleaning the headliner surface before applying adhesive. |
| Masking Tape | Adhesive tape for painting | Protecting surrounding areas from adhesive overspray. |
| Safety Glasses & Gloves | Protective gear | Ensuring safety while working with adhesives and tools. |
| Razor Blade or Utility Knife | Sharp cutting tool | Trimming excess fabric after reattaching. |
| Vacuum Cleaner | Device for suctioning dirt | Removing loose debris and dust from the headliner surface. |
| Isopropyl Alcohol | Cleaning solution | Cleaning stubborn stains or adhesive residue. |
| Stiff Brush | Cleaning tool | Gently scrubbing the headliner surface to remove dirt and grime. |
| Headliner Fabric (Optional) | New fabric for replacement | Replacing severely damaged or stained fabric. Ensure it matches the original in color and texture. |
| Foam Backing (Optional) | Replacement foam | Replacing deteriorated foam backing. This can be purchased in sheets or rolls. |
| Headliner Board (Optional) | Stiff board for headliner | Replacing a damaged or warped headliner board. |
| Heat Gun (Optional) | Device that emits hot air | Softening stubborn adhesive for easier removal. Use with caution to avoid damaging the fabric or headliner board. |
| Sewing Machine (Optional) | Device for sewing | Repairing minor tears or reinforcing edges of the headliner fabric. |
| Upholstery Staples | Fastening devices | Securing fabric to the headliner board in areas that are difficult to glue. |
| Staple Gun | Device that shoots staples | Applying upholstery staples. Ensure it’s designed for fine fabrics to avoid damaging the headliner. |
| Trim Removal Tool Set | Set of plastic tools | Removing interior trim pieces without causing damage. |
| Respirator Mask | Protective mask | Protecting against fumes from adhesives and cleaning solutions. |
| Drop Cloths | Protective cloths | Protecting the car’s interior from spills and overspray. |
| Shop Light | Portable light | Providing adequate lighting for detailed work. |
| Measuring Tape | Tool for measuring dimensions | Measuring the headliner dimensions for fabric replacement or custom fitting. |
| Clamps | Clamping tools | Holding fabric in place while adhesive dries, especially around edges and curves. |
| Seam Ripper | Small tool for removing stitches | Removing old stitching when replacing fabric or repairing seams. |
| Needle and Thread | Sewing implements | Hand-sewing small repairs or reinforcing seams. |
| Pattern Material | Paper or plastic sheeting | Creating a template for cutting new fabric. |
| Fabric Scissors | Sharp scissors for cutting fabric | Cutting new headliner fabric to the correct size and shape. |
| Spray Bottle | Bottle for spraying liquids | Applying cleaning solutions or adhesive removers. |
| Putty Knife | Tool with a flat blade | Scraping off old adhesive or residue. |
| Sandpaper | Abrasive paper | Smoothing rough surfaces on the headliner board before applying new adhesive. Use fine-grit sandpaper to avoid damaging the board. |
| Wood Filler | Substance used to fill holes | Repairing small holes or imperfections in the headliner board. |
| Putty Knife | A tool with a flat blade | Applying wood filler smoothly and evenly. |
| Primer | Coating applied before paint | Preparing the headliner board for painting if necessary. |
| Headliner Paint | Special paint for headliners | Painting the headliner board to match the fabric or restore its original appearance. |
| Foam Roller | Roller for applying paint | Applying primer and paint smoothly and evenly. |
| Plastic Sheeting | Protective covering | Protecting the car’s interior from paint overspray. |
| Painter’s Tape | Adhesive tape for painting | Masking off areas that should not be painted. |
You can find these tools and materials at your local auto parts store or online retailers like CARDIAGTECH.NET, where quality and affordability meet. Don’t hesitate to reach out to us via Whatsapp at +1 (641) 206-8880 for expert advice on selecting the best products for your headliner repair needs.
5. Step-by-Step Guide to Fixing a Sagging Headliner Without Removal
5.1. The Old-Fashioned Gluing Method
This method works best for minor sagging, especially around the edges or corners of the headliner.
- Preparation:
- Clean the sagging area with a microfiber cloth and isopropyl alcohol to remove any dirt or debris.
- Mask off the surrounding areas with masking tape to protect them from overspray.
- Application:
- Spray a thin, even coat of headliner adhesive onto both the back of the fabric and the corresponding area on the headliner board.
- Wait a few minutes for the adhesive to become tacky.
- Reattaching:
- Carefully press the fabric back into place, smoothing out any wrinkles or bubbles.
- Use a paint roller to ensure even contact and adhesion.
- Securing:
- Use sequin pins to hold the fabric in place while the adhesive dries completely (usually 24-48 hours).
5.2. Pinning It Down
This is a quick and inexpensive fix suitable for more significant sagging.
- Preparation:
- Gently push the sagging fabric back into its original position.
- Pinning:
- Insert sequin pins through the fabric and into the foam backing board, spacing them evenly (about 1-2 inches apart).
- Arrange the pins in a pattern for a more visually appealing result.
5.3. Clear-Headed Twist Pins (Saggy Stoppers)
These pins are designed specifically for headliner repair and provide a discreet, secure hold.
- Insertion:
- Push the clear-headed twist pins through the fabric and into the headliner board.
- Twisting:
- Twist the pins to lock them in place, ensuring they grip the fabric securely.
- Space the pins evenly across the sagging area.
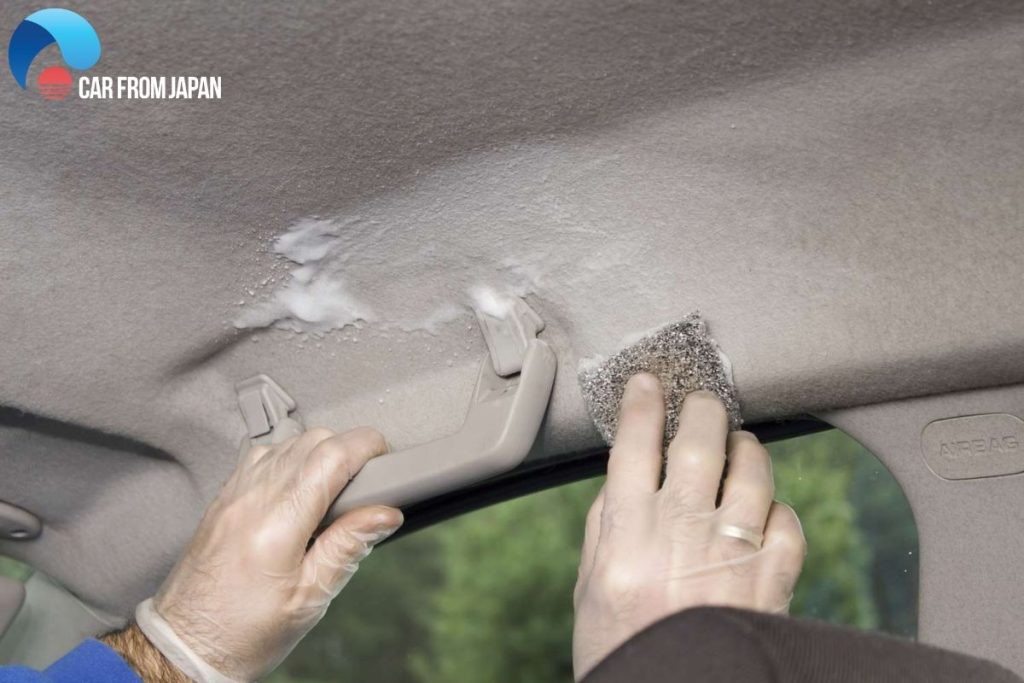
5.4. Steam Cleaner and Paint Roller Combo
This method can help reactivate the old adhesive, making it useful for more extensive sagging.
- Steaming:
- Use a steam cleaner to gently heat the sagging area, softening the old adhesive.
- Avoid applying too much steam, which can damage the fabric.
- Rolling:
- Immediately after steaming, use a paint roller to smooth the fabric back into place, ensuring even contact with the headliner board.
- Work in small sections, overlapping each pass to ensure complete adhesion.
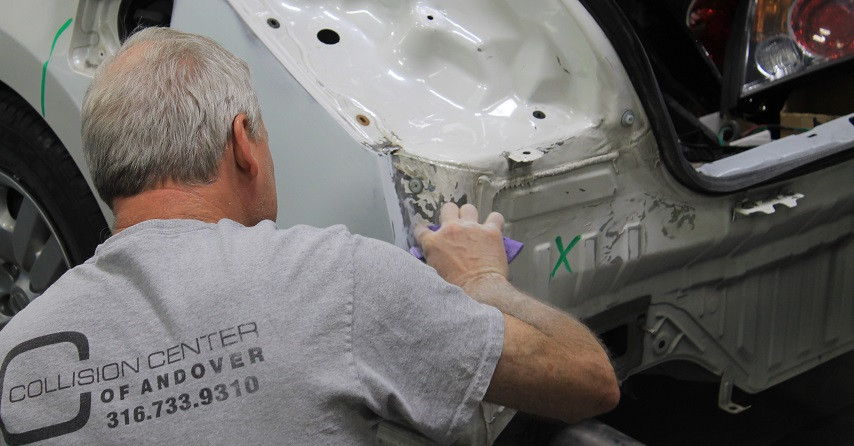
 How to fix sagging headliner
Alt text: Automotive technician repairing a sagging car headliner using adhesive and tools.
6. Preventing Future Sagging: Proactive Measures
Prevention is always better than cure. Here are some tips to help prevent your car’s headliner from sagging in the first place:
- Park in the Shade: Avoid parking your car in direct sunlight for extended periods, especially during hot weather.
- Use Sunshades: Use sunshades to reduce the amount of heat that enters your car’s interior.
- Maintain Interior Cleanliness: Regularly clean your car’s interior to remove dust and debris that can contribute to headliner deterioration.
- Monitor Humidity: Address any leaks or sources of moisture inside your car promptly.
- Gentle Handling: Advise passengers, especially children and pets, to avoid pulling or scratching the headliner.
- Avoid Home Remedies: Refrain from using home treatment procedures like hairspray, stapling, or excessive pinning, which can cause further damage.
7. Knowing When to Call a Professional
While DIY methods can be effective for minor sagging, certain situations warrant professional assistance. Consider seeking professional help if:
- The sagging is extensive and covers a large area of the headliner.
- The fabric is severely damaged or torn.
- You are uncomfortable performing the repair yourself.
- You have tried DIY methods without success.
8. Headliner Replacement Cost: What to Expect
Replacing a headliner can range in cost depending on the vehicle type, complexity, and materials used.
| Vehicle Type | Estimated Cost | Notes |
|---|---|---|
| Sedan/Hatchback/Coupe (Simple Design) | $300 – $750 | Common models like Accord/Corolla, with no ceiling accessories. |
| SUV/Crossover (Sunroof/Moonroof) | $500 – $900 | Larger vehicles like RAV4/X-Trail, often involving additional complexities due to sunroof/moonroof. |
| Luxury Vehicle (High-Quality Ceiling) | $1,000 – $6,000 | High-end models like BMW, requiring specialized materials and expertise due to the complexity of the headliner and the need to maintain its luxury feel. |
These costs include labor and materials. Keep in mind that luxury vehicles or those with complex ceiling designs may incur higher costs due to the increased labor and specialized materials required.
9. Why Choose CARDIAGTECH.NET for Your Auto Repair Needs?
At CARDIAGTECH.NET, we understand the challenges you face as auto repair professionals. From the physical demands of the job to the constant need to update your skills and knowledge, we know you need reliable, high-quality tools and equipment to get the job done right.
Here’s how CARDIAGTECH.NET can help:
- Wide Selection of Tools: We offer a comprehensive range of tools and equipment, from headliner adhesives and saggy stoppers to steam cleaners and trim removal tools.
- Quality and Durability: Our products are sourced from trusted manufacturers, ensuring they can withstand the rigors of daily use in a busy auto repair shop.
- Competitive Pricing: We understand the importance of cost-effectiveness. That’s why we offer competitive pricing on all our products, helping you maximize your profitability.
- Expert Support: Our team of knowledgeable professionals is always ready to assist you with product selection, technical advice, and troubleshooting. Contact us via Whatsapp at +1 (641) 206-8880 for personalized support.
- Convenient Ordering: Our user-friendly website, CARDIAGTECH.NET, makes it easy to browse our catalog, place orders, and track your shipments.
We know you need solutions that enhance efficiency, accuracy, and safety. That’s why we’re committed to providing you with the tools and support you need to succeed.
10. Benefits of Using Quality Repair Tools from CARDIAGTECH.NET
Investing in high-quality tools from CARDIAGTECH.NET offers numerous advantages:
- Improved Efficiency: High-quality tools can help you complete repairs faster and more efficiently, reducing downtime and increasing productivity.
- Enhanced Accuracy: Precision tools ensure accurate repairs, minimizing the risk of errors and rework.
- Increased Safety: Reliable tools are less likely to fail or cause accidents, ensuring a safer working environment for you and your team.
- Greater Durability: Durable tools last longer, reducing the need for frequent replacements and saving you money in the long run.
- Enhanced Reputation: Using high-quality tools can enhance your reputation for quality workmanship, attracting more customers and boosting your bottom line.
Address: 276 Reock St, City of Orange, NJ 07050, United States.
Whatsapp: +1 (641) 206-8880.
Website: CARDIAGTECH.NET
11. Call to Action: Upgrade Your Repair Capabilities Today
Don’t let a sagging headliner diminish your car’s appeal or your repair shop’s reputation. With the right tools and techniques, you can restore headliners to their former glory and provide exceptional service to your customers.
Ready to take your auto repair capabilities to the next level?
Contact CARDIAGTECH.NET today for expert advice and personalized solutions. Our team is standing by to help you select the perfect tools and equipment for your specific needs. Reach out to us via Whatsapp at +1 (641) 206-8880 or visit our website at CARDIAGTECH.NET to explore our extensive catalog.
Let CARDIAGTECH.NET be your trusted partner in success. Together, we can elevate the standards of auto repair and deliver unparalleled value to your customers.
12. FAQ: Addressing Common Concerns About Headliner Repair
Here are some frequently asked questions about car headliner repair:
12.1. How do you know if your ceiling is sagging?
Signs of a sagging headliner include:
- A cracking sound when the car is shaking or when slamming the doors.
- Drooping plasterboard sheeting or cornice.
- Visible cracking.
- Tiny circles or blisters forming lines produced by nails or screws.
12.2. Is it OK to fix the headliner sagging myself?
Yes, you can fix minor headliner issues yourself. Replacement kits are available online and at auto parts retailers. These kits typically include small screws that can be inserted into the foam backing to maintain the inner layer of a sinking headliner.
12.3. Can I paint a headliner?
While it may seem appealing, painting a headliner is not recommended. Achieving a satisfactory result without getting paint on the trim and glass requires significant preparation. The time, effort, and money would be better spent on a proper replacement. Additionally, paint is unlikely to withstand the temperature-related expansion and contraction that occurs inside a car.
12.4. Does car insurance cover the cost of car headliner replacement?
Unfortunately, most car insurance policies do not cover the cost of headliner replacement, as it is considered part of the vehicle’s interior upholstery, trim, and headliner, which are typically excluded from coverage.
12.5. What causes a car headliner to sag?
Heat, humidity, age, and physical damage are common causes of sagging headliners. Over time, the adhesive that holds the fabric to the headliner board can deteriorate, causing the fabric to separate and sag.
12.6. How long does it take to fix a sagging headliner?
The time it takes to fix a sagging headliner depends on the extent of the damage and the method used. Minor repairs, such as gluing small areas, can be completed in a few hours. More extensive repairs, such as replacing the entire headliner, can take a full day or longer.
12.7. Can I drive with a sagging headliner?
Yes, you can drive with a sagging headliner, but it can be distracting and obstruct your vision. It’s best to repair it as soon as possible to ensure your safety and comfort.
12.8. What is the best adhesive for repairing a car headliner?
High-temperature headliner adhesive is the best option for repairing a car headliner. It is specifically designed to withstand the high temperatures that can occur inside a car, and it provides a strong, durable bond. You can get it from CARDIAGTECH.NET, contact us via Whatsapp at +1 (641) 206-8880.
12.9. Can I use staples to fix a sagging headliner?
While staples can be used to temporarily hold the fabric in place, they are not a long-term solution. Staples can damage the fabric and the headliner board, and they can also come loose over time.
12.10. How can I clean my car’s headliner without causing it to sag?
To clean your car’s headliner without causing it to sag, use a soft cloth and a mild detergent solution. Gently wipe the headliner surface, avoiding excessive moisture. You can also use a vacuum cleaner with a brush attachment to remove dust and debris.