How To Fix Hole In Leather Car Seat Like A Pro
Is your car’s leather seat marred by unsightly holes? At CARDIAGTECH.NET, we understand how frustrating this can be. Discover the ultimate guide on how to fix a hole in your leather car seat, restoring its beauty and comfort. With our expert advice, you’ll learn how to tackle those pesky imperfections. We’ll cover everything from leather repair kits to professional techniques, ensuring a seamless finish every time. Let’s dive into auto upholstery repair, car seat restoration, and leather care solutions.
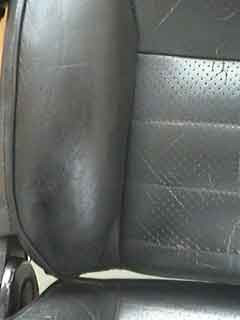
1. Understanding Leather Car Seat Damage
Before diving into the repair process, let’s understand the common causes of leather car seat damage.
1.1. Common Causes of Holes in Leather Car Seats
Leather car seats, while luxurious and durable, are susceptible to wear and tear. Here are some common culprits:
- Friction: Constant rubbing against the seat, especially when getting in and out of the car, can wear down the leather over time.
- Sharp Objects: Keys, pens, or other sharp items in pockets can puncture or scratch the leather.
- UV Exposure: Prolonged exposure to sunlight can dry out the leather, making it brittle and prone to cracking and tearing.
- Accidents: Spills, stains, and other accidents can damage the leather if not cleaned promptly.
- Age and Wear: Over time, the natural oils in the leather deplete, leading to dryness and eventual damage.
1.2. Types of Leather Used in Car Seats
Understanding the type of leather in your car seat is crucial for selecting the right repair method. Common types include:
- Aniline Leather: This is the most natural-looking leather, retaining the hide’s original surface and markings. It’s also the most delicate and requires special care.
- Semi-Aniline Leather: A step up in durability, semi-aniline leather is treated with a light surface coating for added protection.
- Protected (Pigmented) Leather: This is the most common type in cars, featuring a polymer surface coating that provides excellent resistance to wear, stains, and fading.
- Nappa Leather: Known for its softness and suppleness, Nappa leather is often used in luxury vehicles.
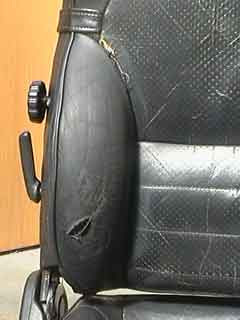
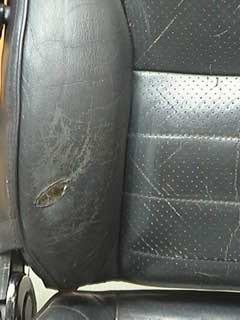
1.3. Assessing the Damage
Before starting any repair, assess the extent of the damage. Is it a small puncture, a tear, or a larger hole? This assessment will determine the tools and materials you’ll need. Remember, early intervention can prevent small issues from becoming major problems. Regular leather care can extend the lifespan of your car seats.
2. Essential Tools and Materials
Having the right tools and materials is essential for a successful leather car seat repair. Here’s a comprehensive list:
2.1. Leather Repair Kits
A leather repair kit typically includes:
- Leather Cleaner: To remove dirt, grease, and grime from the surface.
- Leather Prep: To prepare the leather for repair by removing any loose fibers and the manufactured finish.
- Leather Glue: To adhere the backing patch to the underside of the leather.
- Heavy Filler: To fill the hole or tear, creating a smooth, even surface.
- Leather Colorant: Matched to the color of your car seat, to blend the repair seamlessly.
- Leather Finish: To seal the colorant and protect the repaired area from wear.
- Backing Patch: A piece of canvas or leather to provide a solid foundation for the filler.
- Application Tools: Spatulas, palette knives, sponges, and an airbrush for applying the various products.
- Abrasive Pad: For gently prepping the surface of the leather.
- Alcohol Cleaner: To remove any remaining dirt or dust before proceeding with the repair.
CARDIAGTECH.NET offers a wide range of high-quality leather repair kits to suit various needs and budgets.
2.2. Additional Tools
In addition to the items in a standard repair kit, you may need the following:
| Tool | Description | Usage |
|---|---|---|
| Scalpel or Scissors | For trimming loose leather edges. | To tidy the area around the hole before applying the backing patch. |
| Tweezers | To insert the backing patch under the leather. | For precise placement of the backing patch. |
| Hair Dryer | To speed up the drying process of the filler and colorant. | To ensure each layer dries properly before applying the next. |
| Sandpaper | Fine-grit sandpaper to smooth the filler. | To achieve a smooth, even surface after filling the hole. |
| Mixing Cups | For mixing colorant and finish. | To prepare the colorant and finish for application. |
| Protective Gloves | To protect your hands from chemicals. | To ensure safety during the repair process. |
2.3. Where to Buy Supplies
You can purchase leather repair kits and individual tools from various sources:
- CARDIAGTECH.NET: Offers a curated selection of high-quality leather repair products.
- Automotive Supply Stores: Carry a range of leather repair products specifically designed for car seats.
- Craft Stores: Offer various tools and materials that can be used for leather repair.
- Online Retailers: Provide a wide selection of products, often at competitive prices.
3. Step-by-Step Guide to Fixing a Hole in a Leather Car Seat
Follow these steps to repair a hole in your leather car seat and restore its original appearance.
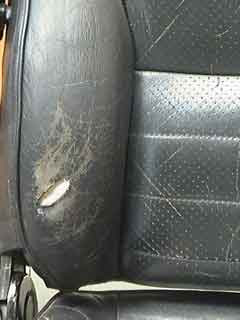
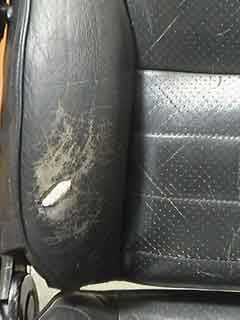
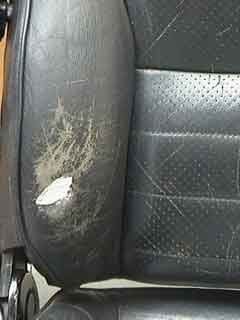
3.1. Step 1: Cleaning and Preparing the Area
Preparing the leather car seat
Begin by thoroughly cleaning the damaged area. Use a leather cleaner to remove any dirt, grease, or grime. This step ensures that the repair materials will adhere properly.
- Apply Leather Cleaner: Spray the cleaner onto a soft cloth and gently wipe the area.
- Remove Residue: Use a clean, damp cloth to remove any cleaner residue.
- Dry the Area: Allow the area to air dry completely before proceeding.
Next, prepare the leather for repair using the Leather Prep & abrasive pad included in the Colourant Kit. Gently rub the surface of the leather to remove any grease and oils that have accumulated. This step will also remove any loose fibers and remove the manufactured finish allowing the colorant, applied later in this tutorial, to adhere to the leather properly. After prepping, wipe the leather down with the Alcohol Cleaner, this will remove any dirt or dust from the area before moving on to the next step.
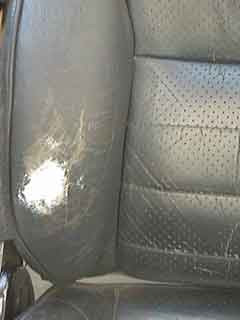
3.2. Step 2: Trimming the Edges
 Tidying the area around the hole
Inspect the hole and trim any loose or frayed edges using a scalpel or scissors. This creates a clean, even surface for the repair.
- Carefully Trim: Cut away any protruding leather to create a smooth edge.
- Avoid Damage: Be careful not to damage the surrounding leather.
- Smooth Surface: Ensure the edges are as even as possible.
3.3. Step 3: Inserting the Backing Patch
 Applying the backing patch
A backing patch provides a solid foundation for the filler. Cut the patch slightly larger than the hole and insert it under the leather.
- Cut the Patch: Cut a piece of canvas or leather slightly larger than the hole. It should be enough to completely cover the repair with an additional 1cm of material surrounding the hole.
- Apply Leather Glue: Use the Leather Glue onto the spatula supplied and feed this underneath the edges of the hole to coat the underside of the leather surrounding it, taking care not to move the canvas patch. When all edges have been glued, apply pressure to bond the leather to the patch and allow to dry.
- Secure the Patch: Press the leather down onto the patch and hold it in place until the glue dries.
When done the patch should lie flat under the repair, and the 1cm surrounding material we left should be underneath the leather on all sides.
3.4. Step 4: Applying the Leather Filler
 Filling the hole with heavy filler
Apply the leather filler in thin layers, allowing each layer to dry before adding the next. This prevents cracking and ensures a smooth finish.
- Apply Thin Layers: Use a small amount of the Heavy Filler using the end of the palette knife and place a thin layer into the hole over the backing patch.
- Dry Each Layer: Use a hair dryer to speed up the drying process, ensuring each layer is completely dry before applying the next.
- Repeat: Continue applying thin layers until the filler is level with the surrounding leather.
Keep applying the heavy filler in thin layers, it is crucial to use thin layers as the filler shrinks as it dries and may not cure properly if the layers applied are too thick. As a general rule, at least 5-6 thin layers should be used to build up the filler until the filler level is built up to just below the top of the hole.
3.5. Step 5: Sanding the Filler
 Multiple layers of filler
Once the filler is dry, use fine-grit sandpaper to smooth out any imperfections. This ensures a seamless blend with the surrounding leather.
- Use Fine-Grit Sandpaper: Gently sand the filled area in a circular motion.
- Check for Smoothness: Periodically check the surface to ensure it is smooth and even.
- Remove Dust: Wipe away any sanding dust with a clean cloth.
3.6. Step 6: Applying the Leather Colorant
 Applying the final layer of filler
Apply the leather colorant to match the color of your car seat. Use an airbrush for an even application.
- Mix the Colorant: If necessary, mix the colorant to match your car seat’s color.
- Apply in Thin Coats: Spray thin coats of colorant over the repaired area, allowing each coat to dry before applying the next.
- Blend the Edges: Feather the colorant out to blend with the surrounding leather.
3.7. Step 7: Applying the Leather Finish
Multiple layers of filler
The leather finish seals the colorant and protects the repaired area from wear. Apply several thin coats, allowing each coat to dry before applying the next.
- Apply Thin Coats: Spray thin coats of finish over the repaired area.
- Allow to Dry: Let each coat dry completely before applying the next.
- Check for Coverage: Ensure the entire area is evenly coated.
3.8. Step 8: Final Inspection and Maintenance
 Finished leather car seat repair
Inspect the repaired area for any imperfections. Clean and condition the leather regularly to maintain its appearance and prevent future damage.
- Inspect the Repair: Check for any unevenness or color discrepancies.
- Clean the Leather: Use a leather cleaner to remove any dirt or grime.
- Condition the Leather: Apply a leather conditioner to keep the leather soft and supple.
4. Advanced Repair Techniques
For more complex damage, consider these advanced techniques.
4.1. Dealing with Large Tears
Large tears may require additional support. Use a larger backing patch or multiple patches to provide a strong foundation for the filler.
- Reinforce the Backing: Use a heavy-duty canvas or leather for the backing patch.
- Apply Multiple Layers: Apply the filler in multiple thin layers, allowing each layer to dry completely.
- Consider Professional Help: For very large tears, consider consulting a professional leather repair specialist.
4.2. Matching Leather Colors
Matching the color of the repair to the original leather is crucial for a seamless finish. Use a color matching kit or consult a professional for assistance.
- Use a Color Matching Kit: These kits include a range of colorants that can be mixed to match your leather.
- Test the Color: Apply a small amount of colorant to an inconspicuous area to test the match.
- Adjust as Needed: Adjust the colorant mixture until you achieve a perfect match.
4.3. Restoring Heavily Worn Areas
Heavily worn areas may require more extensive restoration. This may include replacing the leather or re-dyeing the entire seat.
- Replace the Leather: If the leather is severely damaged, consider replacing it with new leather.
- Re-Dye the Seat: Re-dyeing can restore the color and appearance of the entire seat.
- Seek Professional Help: For extensive restoration, consult a professional upholstery shop.
5. Maintenance and Prevention Tips
Preventing damage is always better than repairing it. Follow these tips to keep your leather car seats in top condition.
5.1. Regular Cleaning and Conditioning
Regular cleaning and conditioning keep the leather soft and supple, preventing cracks and tears.
- Clean Regularly: Clean your leather seats every few months with a leather cleaner.
- Condition Regularly: Apply a leather conditioner after cleaning to keep the leather moisturized.
- Use Quality Products: Use only products specifically designed for leather car seats.
5.2. Protecting from UV Exposure
UV exposure can dry out the leather, making it brittle and prone to damage.
- Park in the Shade: Whenever possible, park your car in the shade to minimize UV exposure.
- Use a Sunshade: Use a sunshade to protect the interior of your car from the sun.
- Apply UV Protectant: Use a leather conditioner with UV protectant to shield the leather from the sun’s harmful rays.
5.3. Avoiding Sharp Objects
Avoid placing sharp objects on the leather seats to prevent punctures and scratches.
- Remove Sharp Objects: Remove keys, pens, and other sharp objects from your pockets before sitting down.
- Use Seat Covers: Use seat covers to protect the leather from wear and tear.
- Be Careful: Be mindful of what you place on the seats to avoid damage.
6. Common Mistakes to Avoid
Avoid these common mistakes to ensure a successful leather car seat repair.
6.1. Using Too Much Filler
Applying too much filler can result in cracking and unevenness. Apply the filler in thin layers, allowing each layer to dry completely.
- Apply Thin Layers: Use a small amount of filler for each layer.
- Dry Each Layer: Ensure each layer is completely dry before applying the next.
- Avoid Overfilling: Avoid overfilling the hole, as this can make the repair more noticeable.
6.2. Not Matching the Color Correctly
Not matching the color correctly can result in a visible repair. Use a color matching kit or consult a professional for assistance.
- Use a Color Matching Kit: These kits include a range of colorants that can be mixed to match your leather.
- Test the Color: Apply a small amount of colorant to an inconspicuous area to test the match.
- Adjust as Needed: Adjust the colorant mixture until you achieve a perfect match.
6.3. Skipping Preparation Steps
Skipping preparation steps, such as cleaning and trimming the edges, can result in poor adhesion and an uneven finish.
- Clean Thoroughly: Clean the area thoroughly to remove any dirt or grime.
- Trim Edges: Trim any loose or frayed edges to create a smooth surface.
- Prepare the Leather: Use a leather prep to remove any remaining finish and prepare the leather for repair.
7. DIY vs. Professional Repair
Deciding whether to repair the leather car seat yourself or hire a professional depends on the extent of the damage and your comfort level.
7.1. When to DIY
DIY repair is suitable for small holes, tears, and scratches. If you are comfortable with basic repair techniques and have the necessary tools and materials, you can save money by doing it yourself.
- Small Damage: Small holes, tears, and scratches are easy to repair with a DIY kit.
- Basic Skills: If you have basic repair skills, you can achieve good results.
- Cost Savings: DIY repair can save you money compared to professional repair.
7.2. When to Seek Professional Help
For large tears, extensive damage, or if you are not comfortable with DIY repair, it’s best to seek professional help. A professional can ensure a seamless repair and prevent further damage.
- Large Damage: Large tears and extensive damage require professional expertise.
- Complex Repairs: Complex repairs, such as replacing the leather or re-dyeing the entire seat, should be done by a professional.
- Guaranteed Results: Professional repair ensures a seamless finish and prevents further damage.
8. Cost of Leather Car Seat Repair
The cost of leather car seat repair varies depending on the extent of the damage and whether you choose DIY or professional repair.
8.1. DIY Repair Costs
DIY repair kits typically range from $20 to $100, depending on the quality and contents of the kit. Additional tools and materials may add to the cost.
| Item | Estimated Cost |
|---|---|
| Leather Repair Kit | $20 – $100 |
| Additional Tools | $10 – $50 |
| Total DIY Cost | $30 – $150 |
8.2. Professional Repair Costs
Professional repair costs can range from $100 to $500 or more, depending on the extent of the damage and the shop’s rates.
| Type of Repair | Estimated Cost |
|---|---|
| Small Hole or Tear | $100 – $200 |
| Large Tear | $200 – $400 |
| Extensive Restoration | $400+ |
9. Choosing the Right Products from CARDIAGTECH.NET
CARDIAGTECH.NET offers a variety of high-quality products for leather car seat repair. Here are some recommendations.
9.1. Leather Repair Kit Recommendations
Choose a kit that includes all the essential tools and materials for your specific repair needs.
- Basic Kit: For small holes and scratches, a basic kit with cleaner, filler, colorant, and finish is sufficient.
- Advanced Kit: For larger tears and more extensive damage, choose a kit with additional backing patches, multiple colorants, and advanced application tools.
9.2. Individual Product Recommendations
If you only need specific items, consider these individual product recommendations.
- Leather Cleaner: Use a gentle, pH-balanced cleaner to avoid damaging the leather.
- Leather Conditioner: Choose a conditioner with UV protectant to keep the leather soft and protected from the sun.
- Heavy Filler: Select a filler that is flexible and durable for long-lasting repairs.
- Leather Colorant: Ensure the colorant matches your car seat’s color for a seamless finish.
- Leather Finish: Use a finish that is resistant to wear and tear to protect the repaired area.
9.3. Why Choose CARDIAGTECH.NET
CARDIAGTECH.NET offers high-quality products, expert advice, and excellent customer service. Our products are designed to deliver professional results, whether you’re a DIY enthusiast or a professional repair technician.
10. The Science Behind Leather Repair
Understanding the science behind leather repair can help you achieve better results.
10.1. Leather Composition and Structure
Leather is a natural material composed of collagen fibers. These fibers provide strength and flexibility. When leather is damaged, these fibers are disrupted, leading to tears and holes.
- Collagen Fibers: These provide strength and flexibility.
- Natural Oils: These keep the leather soft and supple.
- Surface Coating: This protects the leather from wear and tear.
10.2. How Repair Products Work
Repair products work by filling in the gaps in the damaged leather and restoring its original structure.
- Cleaners: Remove dirt and grime to prepare the surface for repair.
- Fillers: Fill in the gaps in the damaged leather, creating a smooth surface.
- Colorants: Restore the color of the leather, blending the repair seamlessly.
- Finishes: Seal the colorant and protect the repaired area from wear.
10.3. Chemical Reactions in Leather Repair
Understanding the chemical reactions involved in leather repair can help you choose the right products and techniques.
- Adhesion: Leather glues work by creating a strong bond between the leather and the backing patch.
- Polymerization: Leather fillers polymerize to form a solid, durable mass that fills in the gaps in the damaged leather.
- Cross-Linking: Leather finishes cross-link to form a protective layer that is resistant to wear and tear.
11. Customer Success Stories
Here are some success stories from customers who have used CARDIAGTECH.NET products to repair their leather car seats.
11.1. Restoring a Vintage Car Seat
John, a vintage car enthusiast, used CARDIAGTECH.NET products to restore the leather seats in his 1967 Mustang. “The seats were cracked and torn, but with the help of CARDIAGTECH.NET’s leather repair kit, I was able to bring them back to life. The color match was perfect, and the finish is incredibly durable.”
11.2. Repairing a Daily Driver
Sarah, a busy mom, used CARDIAGTECH.NET products to repair a tear in her daily driver’s leather seat. “My kids are tough on the car, and the leather seat had a large tear. I was able to repair it myself with CARDIAGTECH.NET’s kit, and it looks as good as new. I saved a lot of money by doing it myself.”
11.3. Professional Upholstery Shop
Mike, a professional upholstery shop owner, uses CARDIAGTECH.NET products for his business. “I rely on CARDIAGTECH.NET for high-quality products that deliver professional results. My customers are always impressed with the finished product.”
12. FAQs About Leather Car Seat Repair
Here are some frequently asked questions about leather car seat repair.
12.1. Can I use household products to clean leather car seats?
No, household products can damage the leather. Use only products specifically designed for leather car seats.
12.2. How often should I clean and condition my leather car seats?
Clean and condition your leather seats every few months to keep them in top condition.
12.3. Can I repair a large tear myself?
Large tears may require professional help. Consider consulting a professional leather repair specialist.
12.4. How do I match the color of the repair to the original leather?
Use a color matching kit or consult a professional for assistance.
12.5. What is the best way to protect leather car seats from UV exposure?
Park in the shade, use a sunshade, and apply a leather conditioner with UV protectant.
12.6. Can I use a hair dryer to speed up the drying process?
Yes, a hair dryer can be used to speed up the drying process, but be careful not to overheat the leather.
12.7. What is the best type of leather filler to use?
Choose a filler that is flexible and durable for long-lasting repairs.
12.8. How many layers of filler should I apply?
Apply the filler in thin layers, allowing each layer to dry completely.
12.9. Can I re-dye the entire seat myself?
Re-dyeing the entire seat may require professional help.
12.10. What is the best way to store leather repair products?
Store leather repair products in a cool, dry place away from direct sunlight.
13. Conclusion: Restore Your Car Seat Today
Don’t let holes and tears ruin the beauty and comfort of your car’s leather seats. With the right tools, materials, and techniques, you can restore your car seat to its original condition. CARDIAGTECH.NET is your trusted partner for all your leather repair needs. From high-quality products to expert advice, we have everything you need to achieve professional results.
Ready to get started? Visit CARDIAGTECH.NET today and explore our wide selection of leather repair kits and individual products. Contact us at +1 (641) 206-8880 or visit our location at 276 Reock St, City of Orange, NJ 07050, United States, for expert assistance and personalized recommendations.
Don’t wait—restore your car seat today and enjoy a comfortable and stylish ride. Our team at CARDIAGTECH.NET is ready to assist you with all your auto upholstery repair, car seat restoration, and leather care solutions.