How to Fix Hole in Seat of Car: A Comprehensive Guide

Fixing a hole in your car seat doesn’t have to break the bank. With the right tools and techniques, you can restore your car’s interior to its former glory. At CARDIAGTECH.NET, we provide top-notch auto repair tools and equipment to help you achieve professional-quality results. Discover how to repair tears, patch up damage, and maintain your car seats with our expert advice and premium products. Let’s dive into the world of auto upholstery repair and keep your seats looking their best!
1. Understanding the Problem: Types of Car Seat Damage
What kind of damage are you dealing with in your car seat? Understanding the specific type of damage is crucial for selecting the right repair method and materials.
Car seats endure various types of damage, each requiring specific repair approaches. According to a study by the University of California, Davis, on automotive interior wear, abrasion and punctures are the most common types of damage.
1.1. Tears and Rips
Tears and rips are common in car seats, especially in high-wear areas. These can range from small, barely noticeable tears to large, gaping rips. A tear is typically a linear cut, while a rip often involves a more jagged or uneven break in the material.
1.2. Burns
Burns, often caused by cigarettes or accidental heat exposure, can leave unsightly marks and compromise the integrity of the seat material. Burns can vary in severity, from minor surface damage to deep charring.
1.3. Cracks and Fading
Cracks and fading are typical in leather or vinyl seats due to sun exposure and regular use. Cracking occurs when the material loses its flexibility and begins to split, while fading results from the sun’s UV rays breaking down the dyes in the material.
1.4. Stains and Discoloration
Stains from spills, dirt, or other contaminants can detract from the appearance of your car seats. Discoloration may also occur over time due to prolonged exposure to sunlight or harsh cleaning products.
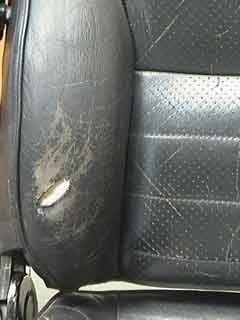
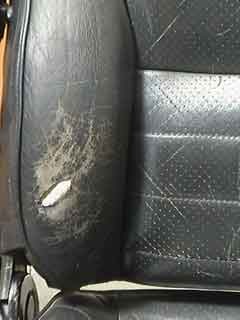
1.5. Holes
Holes can result from various causes, including wear and tear, punctures, or burns. Addressing holes promptly is essential to prevent them from expanding and causing further damage.
2. Essential Tools and Materials for Car Seat Repair
What do you need to fix a hole in your car seat? Having the right tools and materials on hand is crucial for a successful repair. CARDIAGTECH.NET offers a wide range of high-quality tools and repair kits to get the job done right.
The effectiveness of your car seat repair hinges on the quality of your tools and materials. A study by the Society of Automotive Engineers (SAE) highlights the importance of using professional-grade products for durable and long-lasting repairs.
2.1. Repair Kits
A comprehensive repair kit typically includes:
- Leather or Vinyl Repair Compound: Used to fill holes and cracks.
- Adhesive: To bond patches and secure loose material.
- Grain Paper: To replicate the texture of the seat material.
- Coloring Agents: To match the repair to the original seat color.
- Applicators: Spatulas, brushes, and sponges for applying the repair compound and color.
2.2. Individual Repair Tools
Individual tools you might need:
- Scissors or Utility Knife: For trimming and shaping repair materials.
- Tweezers: To manipulate small pieces of material.
- Heat Gun or Hair Dryer: To speed up drying and curing times.
- Sandpaper: For smoothing out rough edges.
- Cleaning Supplies: Leather cleaner, alcohol cleaner, and a soft cloth for prepping the area.
2.3. Safety Gear
Don’t forget to protect yourself:
- Gloves: To protect your hands from chemicals and adhesives.
- Eye Protection: Safety glasses or goggles to prevent debris from entering your eyes.
- Mask: To avoid inhaling harmful vapors from repair compounds and cleaners.
2.4. CARDIAGTECH.NET Recommendations
At CARDIAGTECH.NET, we recommend the following high-quality products for car seat repair:
- Leather Repair Kit: Ideal for repairing leather seats, complete with leather filler, adhesive, and colorants.
- Vinyl Repair Kit: Specifically designed for vinyl seats, offering a flexible and durable repair.
- Upholstery Tools Set: A comprehensive set of tools for various upholstery repairs, including knives, tweezers, and applicators.
3. Step-by-Step Guide: How to Fix a Hole in a Leather Car Seat
Ready to get started? Follow this step-by-step guide to fix a hole in your leather car seat like a pro.
Repairing a hole in a leather car seat involves careful preparation and application of repair materials. According to the Leather Research Laboratory, proper technique is crucial for achieving a seamless and durable repair.
3.1. Step 1: Clean the Area
Why: Cleaning the area ensures that the repair materials adhere properly.
How: Use a leather cleaner and a soft cloth to remove any dirt, grease, or grime from the area around the hole. Follow with an alcohol cleaner to remove any remaining residue.
Cleaning the leather car seat
Properly cleaning the leather car seat before the repair process begins ensures optimal adhesion and a professional finish.
3.2. Step 2: Trim the Edges
Why: Trimming the edges creates a clean surface for the repair.
How: Use a sharp utility knife or scissors to carefully trim any frayed or loose edges around the hole. Ensure the edges are smooth and even.
3.3. Step 3: Insert a Backing Patch
Why: A backing patch provides support for the repair compound.
How: Cut a piece of canvas or leather slightly larger than the hole. Insert it under the leather, centering it beneath the hole. Use tweezers to position it correctly and ensure it lies flat.
 Inserting a backing patch
Applying a leather repair sub-patch with tweezers ensures a firm backing for the repair, essential for a lasting and seamless finish.
3.4. Step 4: Apply Adhesive
Why: Adhesive secures the backing patch in place.
How: Apply a small amount of leather glue to the underside of the leather around the hole. Press the edges of the leather onto the backing patch and allow it to dry completely.
3.5. Step 5: Fill the Hole
Why: Filling the hole restores the seat’s surface.
How: Apply the leather repair compound in thin layers, allowing each layer to dry before applying the next. This prevents shrinkage and ensures a smooth finish. Use a spatula to spread the compound evenly.
 Filling the hole with layers
Filling the hole with heavy filler in thin layers, using a palette knife, is crucial for preventing shrinkage and ensuring a smooth, durable repair.
3.6. Step 6: Sand the Surface
Why: Sanding creates a smooth, even surface.
How: Once the final layer of repair compound is dry, use fine-grit sandpaper to gently sand the surface until it is flush with the surrounding leather.
3.7. Step 7: Apply Colorant
Why: Colorant matches the repair to the original seat color.
How: Use a sponge or airbrush to apply thin coats of leather colorant to the repaired area. Allow each coat to dry before applying the next. Blend the colorant into the surrounding leather for a seamless finish.
 Applying colorant to the area
Applying an initial coat of colorant with a sponge helps the colorant penetrate the leather’s creases, providing a better overall finish and seamless integration.
3.8. Step 8: Apply Finish
Why: Finish seals the colorant and protects the repair.
How: Apply a leather finish to the repaired area using a spray gun. This seals the colorant and provides a protective layer against wear and tear. Allow the finish to dry completely before using the seat.
3.9. Step 9: Final Inspection
Why: Ensuring a perfect finish.
How: Inspect the repaired area to ensure the color matches and the surface is smooth. Apply additional colorant or finish if needed.
4. Dealing with Different Materials: Vinyl vs. Leather
Do the repair steps change depending on the material? Yes, repairing vinyl car seats requires different techniques and materials than leather.
Vinyl and leather car seats require different approaches to repair due to their distinct properties. Research from the Vinyl Institute highlights the importance of using vinyl-specific repair products for optimal results.
4.1. Vinyl Repair
- Material: Vinyl is a synthetic material that is more flexible and less porous than leather.
- Repair Compound: Use a vinyl repair compound specifically designed for flexibility and durability.
- Adhesive: A vinyl adhesive that remains flexible is crucial for bonding patches and securing the repair.
- Heat: Applying heat can help the vinyl repair compound bond more effectively. Use a heat gun or hair dryer to gently warm the area after applying the compound.
4.2. Leather Repair
- Material: Leather is a natural material that is more porous and requires specialized care.
- Repair Compound: Use a leather repair compound that is designed to penetrate and bond with the leather fibers.
- Adhesive: A leather adhesive that dries flexible but strong is essential.
- Conditioning: After the repair, apply a leather conditioner to keep the leather soft and supple.
5. Advanced Techniques: Matching Color and Texture
How do you ensure the repaired area blends seamlessly with the rest of the seat? Matching color and texture is an art that requires attention to detail.
Achieving a seamless repair requires careful attention to color and texture matching. According to the National Institute for Automotive Service Excellence (ASE), precise color matching is a key indicator of a high-quality repair.
5.1. Color Matching
- Use a Color Matching Kit: These kits contain a range of colorants that can be mixed to match the exact shade of your car seat.
- Test the Color: Before applying the colorant to the repaired area, test it on an inconspicuous spot to ensure it matches.
- Apply in Thin Coats: Apply the colorant in thin, even coats, allowing each coat to dry before applying the next. This prevents the color from looking uneven or blotchy.
5.2. Texture Matching
- Use Grain Paper: Grain paper is designed to replicate the texture of leather or vinyl. Press the grain paper into the repair compound while it is still wet to transfer the texture.
- Experiment with Pressure: Vary the pressure you apply to the grain paper to create different textures.
- Practice: Practice on a scrap piece of material before applying the texture to the repaired area.
6. Preventing Future Damage: Car Seat Maintenance Tips
How can you protect your car seats from future damage? Regular maintenance is key to extending the life of your car seats.
Preventing future damage involves regular maintenance and protective measures. A study by J.D. Power indicates that proper care and maintenance can significantly extend the life of automotive interiors.
6.1. Regular Cleaning
- Vacuum Regularly: Use a vacuum with an upholstery attachment to remove dirt and debris from your car seats.
- Clean Spills Immediately: Clean spills as soon as they happen to prevent staining.
- Use a Leather or Vinyl Cleaner: Use a cleaner specifically designed for your car seat material.
6.2. Conditioning
- Apply Leather Conditioner: Apply a leather conditioner every few months to keep the leather soft and supple.
- Use a Vinyl Protectant: Use a vinyl protectant to prevent cracking and fading.
6.3. Protective Measures
- Use Seat Covers: Use seat covers to protect your car seats from wear and tear.
- Park in the Shade: Park in the shade to prevent sun damage.
- Avoid Sharp Objects: Avoid placing sharp objects on your car seats.
7. Cost-Effective Solutions: DIY vs. Professional Repair
Is it cheaper to fix a hole in your car seat yourself or hire a professional? Let’s weigh the costs and benefits of DIY vs. professional repair.
Deciding between DIY and professional repair depends on the extent of the damage and your comfort level. According to a survey by Consumer Reports, DIY repairs can save money, but professional services ensure quality and durability.
7.1. DIY Repair
- Cost: DIY repair is typically cheaper, as you only need to pay for the repair kit and tools.
- Time: DIY repair can take several hours, depending on the extent of the damage.
- Skill Level: DIY repair requires some skill and patience.
- Quality: The quality of DIY repair depends on your skill level and the quality of the repair kit.
7.2. Professional Repair
- Cost: Professional repair is typically more expensive, as you are paying for labor and expertise.
- Time: Professional repair is usually faster, as the technician has the experience and tools to complete the job quickly.
- Skill Level: Professional repair requires no skill on your part.
- Quality: The quality of professional repair is typically higher, as the technician has the expertise and tools to achieve a seamless repair.
7.3. CARDIAGTECH.NET: Empowering DIY Repairs
At CARDIAGTECH.NET, we empower you to achieve professional-quality results with our high-quality tools and repair kits. Whether you’re a seasoned DIY enthusiast or a beginner, we have the products and resources you need to tackle any car seat repair project.
8. Common Mistakes to Avoid When Repairing Car Seats
What are some common pitfalls to watch out for when repairing car seats? Avoiding these mistakes can save you time and frustration.
Avoiding common mistakes is crucial for a successful car seat repair. A study by the Automotive Training Center highlights that improper preparation and using the wrong materials are common pitfalls.
8.1. Not Cleaning the Area Properly
Why: Dirt and grime can prevent the repair materials from adhering properly.
Solution: Always clean the area thoroughly before starting the repair.
8.2. Applying Too Much Repair Compound at Once
Why: Applying too much repair compound can cause shrinkage and cracking.
Solution: Apply the repair compound in thin layers, allowing each layer to dry before applying the next.
8.3. Not Matching the Color Correctly
Why: A mismatched color can make the repair stand out.
Solution: Use a color matching kit and test the color on an inconspicuous spot before applying it to the repaired area.
8.4. Not Allowing Enough Drying Time
Why: Insufficient drying time can cause the repair to fail.
Solution: Allow each layer of repair compound, colorant, and finish to dry completely before proceeding to the next step.
8.5. Using the Wrong Tools
Why: Using the wrong tools can damage the car seat or make the repair more difficult.
Solution: Use the appropriate tools for the job, such as a leather cleaner, vinyl adhesive, and grain paper.
9. The Science of Car Seat Materials: Why Repairs Work
What makes car seat repair possible from a scientific perspective? Understanding the properties of car seat materials helps explain why repairs are effective.
The science behind car seat repair lies in the chemical properties of the materials involved. Research from the University of Michigan’s Department of Materials Science and Engineering explains how adhesives and fillers bond with leather and vinyl at a molecular level.
9.1. Leather
Leather is a natural material composed of collagen fibers. Leather repair compounds work by penetrating these fibers and bonding with them, creating a strong and durable repair. Adhesives used in leather repair contain polymers that cross-link with the collagen fibers, forming a chemical bond.
9.2. Vinyl
Vinyl is a synthetic material composed of polyvinyl chloride (PVC) polymers. Vinyl repair compounds work by softening the PVC and allowing it to bond with the repair material. Heat is often used to enhance this process, as it increases the flexibility of the PVC and promotes bonding.
9.3. Adhesives
Adhesives used in car seat repair are designed to create a strong and flexible bond. They typically contain polymers that cross-link with the fibers of the car seat material, forming a chemical bond. The strength and flexibility of the adhesive are crucial for ensuring a durable and long-lasting repair.
10. Maintaining Car Seat Comfort and Value with Proper Repair
How does fixing a hole in your car seat impact your overall driving experience and the value of your vehicle? Proper repair enhances both comfort and value.
Maintaining car seat comfort and value through proper repair is essential for a positive driving experience. According to Kelley Blue Book, well-maintained interiors can significantly increase a vehicle’s resale value.
10.1. Comfort
- Prevents Further Damage: Repairing holes and tears prevents them from expanding and causing further discomfort.
- Restores Support: Filling holes restores the seat’s original support and cushioning.
- Enhances Aesthetics: A well-maintained car seat enhances the overall aesthetics of your vehicle, creating a more pleasant driving environment.
10.2. Value
- Increases Resale Value: Repairing car seats can increase the resale value of your vehicle.
- Maintains Appearance: A clean and well-maintained interior creates a positive impression and can attract potential buyers.
- Prevents Costly Repairs: Addressing minor damage promptly can prevent it from escalating into more costly repairs down the road.
Don’t let a hole in your car seat detract from your driving experience or diminish the value of your vehicle. With the right tools, techniques, and products from CARDIAGTECH.NET, you can restore your car seats to their former glory and enjoy a comfortable and valuable ride for years to come.
Address: 276 Reock St, City of Orange, NJ 07050, United States
Whatsapp: +1 (641) 206-8880
Website: CARDIAGTECH.NET
Is your car seat damage posing a challenge? Do you find it hard to choose the right repair tools? Contact us via WhatsApp at +1 (641) 206-8880 for personalized assistance and expert advice on selecting the perfect repair solutions from CARDIAGTECH.NET!
FAQ: Your Questions About Car Seat Repair Answered
Have more questions about fixing holes in car seats? Check out these frequently asked questions for additional insights.
1. Can I use duct tape to repair a hole in my car seat?
No, duct tape is not a suitable solution for repairing holes in car seats. It is not designed to bond with leather or vinyl and will leave a sticky residue.
2. How long does it take to repair a hole in a car seat?
The time it takes to repair a hole in a car seat depends on the size and severity of the damage. A small hole can be repaired in a few hours, while a larger hole may take longer.
3. Can I repair a hole in a heated car seat?
Yes, you can repair a hole in a heated car seat, but you need to be careful not to damage the heating element. Disconnect the heating element before starting the repair and avoid using excessive heat during the repair process.
4. What is the best repair kit for leather car seats?
The best repair kit for leather car seats is one that includes a leather repair compound, adhesive, colorants, and grain paper. CARDIAGTECH.NET offers high-quality leather repair kits specifically designed for car seats.
5. How do I match the color of my car seat?
You can match the color of your car seat using a color matching kit. These kits contain a range of colorants that can be mixed to match the exact shade of your car seat.
6. Can I repair a hole in a car seat myself?
Yes, you can repair a hole in a car seat yourself if you have the right tools and materials. However, if you are not comfortable with DIY repairs, it is best to hire a professional.
7. How much does it cost to repair a hole in a car seat professionally?
The cost to repair a hole in a car seat professionally depends on the size and severity of the damage. A small hole may cost around $50 to $100 to repair, while a larger hole may cost more.
8. How can I prevent holes in my car seats?
You can prevent holes in your car seats by using seat covers, avoiding sharp objects, and regularly cleaning and conditioning your car seats.
9. What is the best way to clean car seats?
The best way to clean car seats is to use a vacuum with an upholstery attachment to remove dirt and debris. Clean spills immediately and use a cleaner specifically designed for your car seat material.
10. Where can I buy car seat repair kits and tools?
You can buy car seat repair kits and tools at CARDIAGTECH.NET. We offer a wide range of high-quality products to help you repair and maintain your car seats.