How to Fix Interior Fabric in Car: A Comprehensive Guide
Fixing interior fabric in your car can restore its appearance and value. CARDIAGTECH.NET provides expert guidance on repairing various types of fabric damage, saving you money and enhancing your DIY skills. Let’s explore fabric restoration, automotive upholstery repair, and DIY car care, ensuring your vehicle’s interior looks its best with professional-quality results.
1. The Advantages and Disadvantages of DIY Fabric Car Interior Repair
Deciding whether to tackle fabric car interior repair yourself or hire a professional involves weighing the pros and cons. Understanding these factors can help you make the best choice for your situation.
1.1. Pros of DIY Fabric Car Interior Repair
- Cost Savings: This is often the most significant advantage. Repairing fabric yourself can save hundreds or even thousands of dollars compared to professional services. The table below illustrates potential savings:
| FABRIC CAR INTERIOR DAMAGE | PROFESSIONAL REPAIR COST RANGE | DIY REPAIR COST RANGE |
|---|---|---|
| Fabric Scratches and Scuffs | $150 – $300 | $19.95 – $50 (DIY Fabric Repair Kit from CARDIAGTECH.NET + other materials needed) |
| Worn Fabric and Discoloration | $150 – $1,000 | Varies depending on the extent of damage and materials used. |
| Fabric Cuts, Rips, and Tears | $200 – $1,000 | Varies depending on the extent of damage and materials used. |
| Fabric Burn Marks and Holes | $200 – $1,000 | Varies depending on the extent of damage and materials used. |
| Fabric Depressed Damages (Large Rips) | $500 – $2,000 | Varies significantly based on materials and if seat foam needs replacing. |
Alt text: Cost comparison table for professional vs DIY fabric car interior repair.
- Skill Development: DIY repairs provide valuable experience and teach new skills. You’ll gain knowledge about the materials you’re working with, useful tools, and effective repair methods that can be applied to future projects.
- Self-Sufficiency: Repairing your car’s fabric interior yourself empowers you to become your own car care expert. Familiarity with the repair process gives you confidence and reduces reliance on professional services.
1.2. Cons of DIY Fabric Car Interior Repair
- Time Investment: DIY projects require a significant investment of time and effort. Success depends on the amount of time and energy you dedicate to the repair.
- Variable Results: The outcome of a DIY repair can vary based on factors such as your skill level, the quality of your repair kit, the tools and materials used, and the time invested. Beginners may experience less consistent results.
- Potential Complications: There’s always a risk that things might not go as planned. Repairs could cost more than expected, or the damage could worsen if steps are missed or done incorrectly. Careful preparation and attention to detail are essential.
Remember, even if you feel unsure, CARDIAGTECH.NET offers expert support seven days a week. Email us at [email protected] with photos of the damage, and our team will help you achieve the best possible results.
2. Step-by-Step Guide: DIY Repairing Fabric Scratches and Scuffs
Fabric scratches and scuffs are common issues that can be effectively addressed with a DIY approach. Follow these steps to restore your car’s interior.
2.1. Assessing the Damage Severity
Use the DIY repair meter below to assess if this method suits your damage:
| REQUIRED METHOD | REPAIR METER | DAMAGE TYPES |
|---|---|---|
| DIY FABRIC CAR INTERIOR REPAIR | – Fabric Scratches and Scuffs – Pet and Children Damage – Worn Fabric and Discoloration – Sun Damage – Stain Damage from Solids and Liquids |
|
| MINOR | ||
Alt text: DIY repair meter for fabric scratches and scuffs assessment.
2.2. Essential Materials Needed
Gather these materials before starting your repair:
- DIY Fabric Repair Kit (available at CARDIAGTECH.NET):
- Repair fibers
- Fabric glue
- Tweezers
- Mesh
- Backing fabric
- Mixing jar
- Mixing ball
- Additional Tools:
- Scissors or cutter
- Rubber band
- Clear hairspray
2.3. Detailed Repair Process
- Prepare the Damaged Area: Trim any loose threads or jagged edges. Clean the area thoroughly with a household cleaner to remove dirt and debris.
- Mix and Shake Repair Fibers: Fill the mixing jar with the color fibers. Add the metal ball, secure the lid, and shake for at least 30 seconds to ensure even mixing. Remove the metal ball and use the mesh secured with a rubber band to create a sifter.
- Apply Fabric Glue: Apply a thin, even layer of fabric glue to the damaged area, working from the outside in to avoid air bubbles. Ensure the entire area is covered evenly.
- Sift Repair Fibers: Hold the mixing jar upside down above the adhesive and gently tap to sift the fibers onto the glue. Completely cover the glue with fibers and gently pack them down with a spatula. Duplicate any fabric patterns (lines or swirls) using the spatula.
- Allow Drying Time: Let the repaired area dry for 24 hours. Once fully dry, blow off any excess fibers. To protect the repaired area from wear, spray a clear hairspray over it.
If you encounter challenges during the repair, contact CARDIAGTECH.NET for personalized advice.
3. Step-by-Step Guide: DIY Repairing Worn Fabric and Discoloration
Worn fabric and discoloration can diminish the look of your car’s interior. Here’s how to address these issues effectively.
3.1. Evaluating the Level of Wear
Use the DIY repair meter below to assess if this method suits your damage:
| REQUIRED METHOD | REPAIR METER | DAMAGE TYPES |
|---|---|---|
| DIY FABRIC CAR INTERIOR REPAIR | – Fabric Scratches and Scuffs – Pet and Children Damage – Worn Fabric and Discoloration – Sun Damage – Stain Damage from Solids and Liquids |
|
| MINOR | ||
Alt text: DIY repair meter for worn fabric and discoloration assessment.
3.2. Required Materials
Gather the following materials:
- DIY Fabric Repair Kit (available at CARDIAGTECH.NET):
- Repair fibers
- Fabric glue
- Tweezers
- Mesh
- Backing fabric
- Mixing jar
- Mixing ball
- Additional Tools:
- Scissors or cutter
- Rubber band
- Clear hairspray
3.3. Repair Instructions
- Prepare the Damaged Area: Trim loose threads and clean the area with a household cleaner.
- Mix and Match Repair Fibers: Fill the jar with color fibers. Use the color matching guide to find the right color, or mix and match to achieve the desired shade. Add the metal ball, secure the lid, and shake for 30 seconds. Remove the ball and use the mesh and rubber band to create a sifter.
- Apply Fabric Glue: Apply glue to the damaged area, under the edges, and around the perimeter. Ensure even coverage.
- Sift Repair Fibers: Hold the jar upside down and gently tap to cover the glue completely. Gently pack down the fibers with the spatula.
- Allow Drying Time: Let the fibers dry for 24 hours. Blow off excess fibers and protect the area with clear hairspray.
CARDIAGTECH.NET’s support team is available for additional assistance.
4. Repairing Fabric Cuts, Rips, and Tears: A DIY Guide
Cuts, rips, and tears can significantly detract from your car’s interior. Follow these steps to repair them effectively.
4.1. Important Considerations
For larger cuts, rips, and tears, sewing the backing fabric to the material before applying repair fibers adds strength and durability.
4.2. Repair Meter for Cuts, Rips, and Tears
| REQUIRED METHOD | REPAIR METER | DAMAGE TYPES |
|---|---|---|
| DIY FABRIC CAR INTERIOR REPAIR + ADVICE | – Fabric Cuts, Rips, and Tears – Fabric Burn Marks and Holes |
|
| MODERATE | ||
Alt text: Repair meter for fabric cuts, rips, and tears assessment.
4.3. Required Materials
- DIY Fabric Repair Kit (available at CARDIAGTECH.NET):
- Repair fibers
- Fabric glue
- Tweezers
- Mesh
- Backing fabric
- Mixing jar
- Mixing ball
- Additional Tools:
- Scissors or cutter
- Rubber band
- Clear hairspray
- Sewing kit (for large repairs)
4.4. Step-by-Step Instructions
- Prepare the Damaged Area: Trim loose threads and clean the area with a household cleaner.
- Insert Backing Fabric: Cut a piece of backing fabric with rounded edges larger than the damaged area. Use the spatula to insert it.
- Prepare Color Mixture: Use the color matching guide to find your main and secondary colors.
- Apply Fabric Glue: Apply glue to the damaged area, under the edges, and around the perimeter.
- Sift Repair Fibers: Hold the jar upside down and gently tap to cover the glue. Pack down the fibers with the spatula.
- Allow Drying Time: Let the fibers dry for 24 hours. Blow off excess fibers and protect the area with clear hairspray.
Contact CARDIAGTECH.NET for additional support and guidance.
5. How to Repair Fabric Burn Marks and Holes
Burn marks and holes require careful attention to restore your car’s interior. Here’s how to handle these repairs effectively.
5.1. Important Considerations
As with cuts and tears, sewing the backing fabric to the material can add strength and durability to the repair.
5.2. DIY Repair Meter for Burn Marks and Holes
| REQUIRED METHOD | REPAIR METER | DAMAGE TYPES |
|---|---|---|
| DIY FABRIC REPAIR + PROFESSIONAL ADVICE | – Fabric Cuts, Rips, and Tears – Fabric Burn Marks and Holes |
|
| MODERATE | ||
Alt text: DIY repair meter for fabric burn marks and holes assessment.
5.3. Materials Needed
- DIY Fabric Repair Kit (available at CARDIAGTECH.NET):
- Repair fibers
- Fabric glue
- Tweezers
- Mesh
- Backing fabric
- Mixing jar
- Mixing ball
- Additional Tools:
- Household cleaner
- Scissors
- Cotton balls or cotton batting
- Rubber band
- Clear hairspray
- Sewing kit (for large repairs)
5.4. Repair Steps
- Prepare the Damaged Area: Trim any jagged edges or burn marks and clean the area. If padding is missing, insert cotton balls or batting evenly.
- Insert Backing Fabric: Cut a piece of backing fabric larger than the damaged area and insert it with the spatula.
- Mix Repair Fibers: Fill the jar with color fibers and use the color matching guide. Add the metal ball, secure the lid, and shake for 30 seconds. Use the mesh and rubber band to create a sifter.
- Apply Fabric Glue: Apply a thin layer of glue to the damaged area, under the edges, and around the perimeter.
- Sift Repair Fibers: Hold the jar upside down and gently tap to cover the glue. Pack down the fibers with the spatula.
- Allow Drying Time: Let the fibers dry for 24 hours. Blow off excess fibers and protect with clear hairspray.
CARDIAGTECH.NET offers expert support for any challenges you may encounter.
6. Repairing Fabric Depressed Damages: A Comprehensive Guide
Depressed damages, especially large rips, require special attention to ensure a durable repair.
6.1. Important Considerations for Depressed Damages
These repairs require backing fabric to hold the repair together. Filling any missing foam before inserting the backing fabric is also recommended. Use filler materials like foam, old cloth pieces, or cotton. Secure the fillers with fabric glue or foam adhesive to prevent bulging.
6.2. DIY Repair Meter for Fabric Depressed Damages
| REQUIRED METHOD | REPAIR METER | DAMAGE TYPES |
|---|---|---|
| EXPERT FABRIC CAR INTERIOR DIY REPAIR | – Fabric Depressed Damages | |
| SEVERE | ||
Alt text: DIY repair meter for fabric depressed damages assessment.
6.3. Materials Needed
- DIY Fabric Repair Kit (available at CARDIAGTECH.NET):
- Repair fibers
- Fabric glue
- Tweezers
- Mesh
- Backing fabric
- Mixing jar
- Mixing ball
- Additional Tools:
- Household cleaner
- Scissors
- Foam/Old cloth pieces/Cotton balls or cotton batting
- Fabric glue or foam adhesive
- Rubber band
- Clear hairspray
- Sewing kit (for large repairs)
6.4. Detailed Repair Process
- Prepare the Damaged Area: Trim loose threads and clean the area. Insert cotton balls or batting if padding is missing.
- Fill Depression and Insert Backing Fabric: Fill the depressed area with filler materials, avoiding overfilling. Secure with fabric glue or foam adhesive. Cut and insert the backing fabric, sewing it to the material for heavy wear areas.
- Mix Repair Fibers: Fill the jar with color fibers. Add the metal ball, secure the lid, and shake for 30 seconds. Use the mesh and rubber band to create a sifter.
- Apply Fabric Glue: Apply glue to the damaged area, under the edges, and around the perimeter.
- Sift Repair Fibers: Hold the jar upside down and gently tap to cover the glue. Pack down the fibers with the spatula, duplicating any fabric patterns.
- Allow Drying Time: Let the fibers dry for 24 hours. Blow off excess fibers and protect with clear hairspray.
CARDIAGTECH.NET provides expert advice and support for these complex repairs.
7. Maintaining Your Fabric Car Interior Damage-Free
Preventing damage is crucial to keeping your car’s interior in top condition. Here are some tips to help maintain your fabric car interior damage-free:
- Park in Shaded Areas: Avoid direct sun exposure to prevent sun damage and extend the life of your car fabric interior.
- Vacuum Regularly: Regular vacuuming prevents dirt buildup, which can damage fabric seats.
- Avoid Eating and Drinking Inside the Car: Food and drinks are major culprits in staining and ruining car interiors.
- Invest in Quality Window Tint: Window tints with UV protection help maintain your car fabric interior in good condition.
- Be Mindful of Sharp Objects: Properly place and cover sharp objects to prevent punctures and tears.
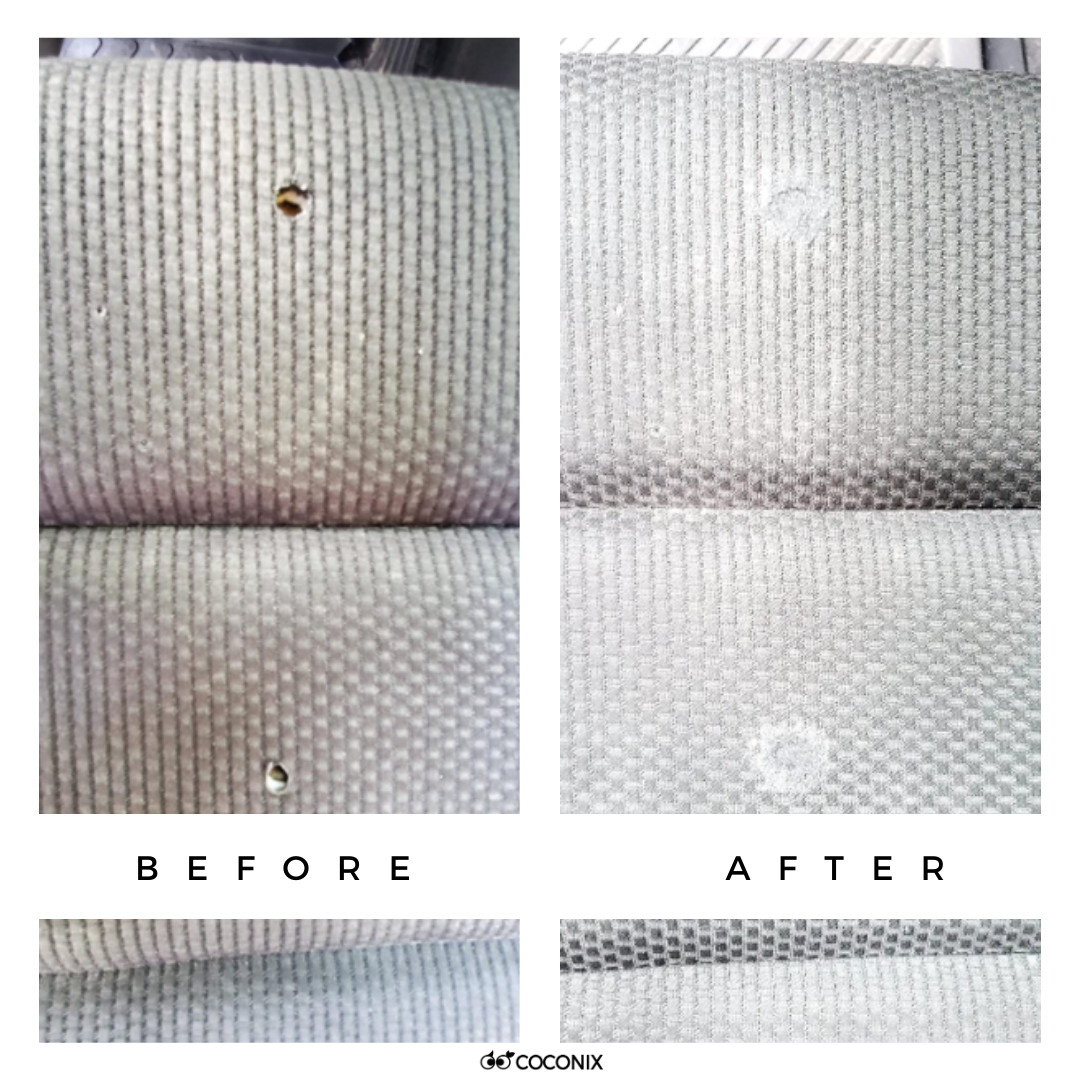
8. See the Incredible Results of DIY Fabric Car Interior Repair
Check out this amazing before-and-after image of a DIY fabric car interior repair.
Before and after DIY fabric car interior repair
Alt text: Impressive before and after results of a DIY fabric car interior repair.
Real Customer Success
S. Ellis shared on August 29, 2020:
“Not perfect, and didn’t expect that, but turned out much better than expected. Easy to use. Spend the extra time on the mixing/blending process. Do not overly use the glue or you will get seepage around the mending area as I did. If I re-apply a second time, I think it will turn out even better.”
DIY repairs require preparation, the right kit, time, effort, and patience. With CARDIAGTECH.NET’s support and the DIY community, you can achieve professional results. Contact us at [email protected] for personalized advice on your repair.
9. Bonus: How to Clean Your Fabric Car Interior
Use this infographic to keep your car’s fabric seats and interior clean.
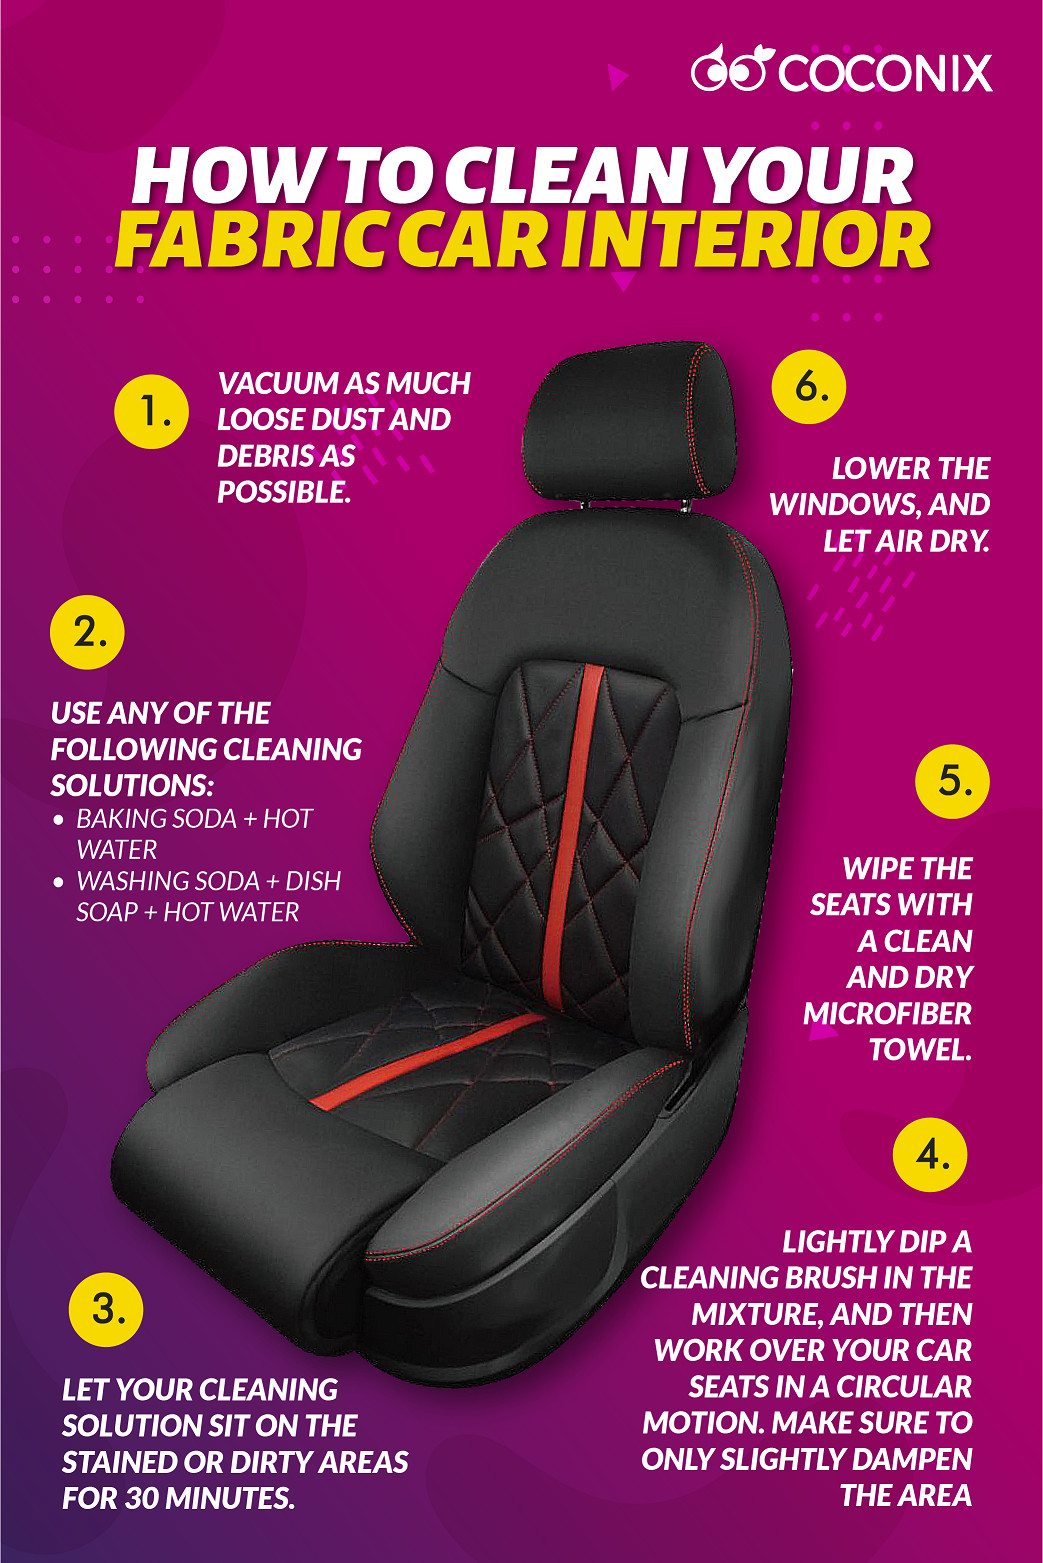 Infographic on how to clean your fabric car interior
Alt text: Step-by-step infographic on cleaning your car’s fabric interior.
10. Frequently Asked Questions (FAQs) About Fixing Interior Fabric in Cars
10.1. What is the best way to clean car interior fabric?
Vacuum the area, apply a fabric cleaner, scrub gently, and wipe clean. For tough stains, use a specialized stain remover.
10.2. Can I use household cleaners on my car’s fabric interior?
It’s best to use cleaners specifically designed for car interiors to avoid damage or discoloration.
10.3. How do I remove stains from car seats?
Apply a stain remover, let it sit for a few minutes, and blot with a clean cloth. Repeat as necessary.
10.4. What tools do I need for DIY fabric repair?
A fabric repair kit, scissors, tweezers, and a spatula are essential tools.
10.5. How can I prevent fabric damage in my car?
Park in shaded areas, vacuum regularly, avoid eating in the car, and use seat covers.
10.6. Is it cheaper to repair or replace car seat fabric?
Repairing is usually cheaper for minor damage, but replacement may be necessary for severe damage.
10.7. How long does it take to repair fabric damage?
Repair time varies depending on the extent of the damage, but most DIY repairs can be completed in a few hours.
10.8. Can I repair a burn hole in my car seat?
Yes, with a fabric repair kit and careful application of repair fibers.
10.9. What is the best fabric repair kit for cars?
Look for a kit that includes a variety of color fibers, fabric glue, and necessary tools like the DIY Fabric Repair Kit from CARDIAGTECH.NET.
10.10. How do I match the color of my car’s fabric for repair?
Use a color matching guide or mix and match fibers to achieve the desired shade.
11. Act Now: Get Expert Advice and Repair Tools from CARDIAGTECH.NET
Are you facing challenges with your car’s interior fabric? Don’t let scratches, tears, or stains diminish the beauty and value of your vehicle. At CARDIAGTECH.NET, we understand the difficulties you face – the physical demands of auto repair, the constant need to update your skills, and the pressure to deliver quality results under tight deadlines.
11.1. Overcome Your Challenges with CARDIAGTECH.NET
- Enhance Efficiency: Reduce repair time and increase your productivity with our high-quality tools and repair kits.
- Ensure Accuracy and Safety: Work with precision and confidence, minimizing errors and ensuring the safety of your repairs.
- Save on Costs: Provide cost-effective solutions to your customers, increasing their satisfaction and loyalty.
- Boost Revenue: Grow your business by offering top-notch repair services that set you apart from the competition.
- Build Trust: Enhance your reputation as a reliable and skilled auto repair professional.
11.2. Transform Your Auto Repair Experience Today
Contact CARDIAGTECH.NET now to discover how our specialized tools and expert advice can revolutionize your auto repair process. Our dedicated team is ready to assist you with personalized recommendations tailored to your specific needs.
- Address: 276 Reock St, City of Orange, NJ 07050, United States
- WhatsApp: +1 (641) 206-8880
- Website: CARDIAGTECH.NET
11.3. Don’t Wait, Restore Your Car’s Interior Now
Take the first step towards a flawless car interior. Contact CARDIAGTECH.NET today and let us help you achieve professional-quality results with ease and confidence.
This comprehensive guide, brought to you by CARDIAGTECH.NET, provides all the information you need to fix interior fabric in your car, from understanding the pros and cons of DIY repair to step-by-step instructions for various types of damage. With our expert advice and high-quality repair kits, you can restore your car’s interior to its original beauty and maintain it for years to come.