How To Fix Leather Rips In Car Seats Like A Pro
Leather rips in car seats can be frustrating, but they don’t have to ruin your vehicle’s interior. This comprehensive guide from CARDIAGTECH.NET offers simple yet effective solutions for repairing damaged leather, restoring your car’s aesthetic appeal, and increasing its resale value. Discover the secrets to professional-quality leather repair, from patching seam tears to concealing surface cracks, ensuring your car seats look as good as new with leather repair solutions and auto upholstery repair techniques.
1. Understanding Leather Damage in Car Seats
Leather car seats, while luxurious, are susceptible to wear and tear. Recognizing the type of damage is the first step toward a successful repair. Let’s look at the common types of leather damage:
- Seam Tears: These occur along the stitched seams of the seat and are often the easiest to repair.
- Surface Tears and Cracks: These appear on the surface of the leather, often due to dryness, UV exposure, and regular use.
- Holes: These can be caused by sharp objects or excessive wear.
- Fading and Discoloration: While not a rip, discoloration detracts from the overall appearance of the leather.
Understanding the causes can help prevent future damage:
- Sun Exposure: Park in shaded areas or use a sunshade to minimize UV damage.
- Lack of Conditioning: Regularly condition the leather to keep it supple and prevent cracks.
- Friction: Avoid sliding across the seats, which can cause wear over time.
2. Essential Tools and Materials for Leather Repair
Before starting any repair, gather the necessary tools and materials. Using the right equipment ensures a professional-looking finish and saves time.
| Tool/Material | Description | Where to Buy | Price Range (USD) |
|---|---|---|---|
| Leather Repair Kit | Contains adhesive, color compounds, patch fabric, and applicators. | Auto parts stores, online retailers (e.g., CARDIAGTECH.NET), specialized leather repair shops | $20 – $50 |
| Leather Filler | Used to fill deep cracks and holes. | Auto parts stores, online retailers, leather supply stores | $10 – $30 |
| Leather Glue | Specifically designed for leather bonding; ensures a strong, flexible hold. | Leather supply stores, online retailers, craft stores | $8 – $25 |
| Patch Fabric (Denim/Leather) | Provides a backing for tears and holes; choose a material that matches the leather’s thickness and texture. | Fabric stores, online retailers, leather supply stores | $5 – $20 |
| Colorant Kit | Includes various color pigments to match the original leather color; essential for seamless blending. | Leather supply stores, online retailers, specialized auto detailing shops | $25 – $60 |
| Leather Conditioner | Hydrates and protects the leather after repair; prevents future cracks and maintains suppleness. | Auto parts stores, online retailers, leather supply stores | $10 – $30 |
| Cleaning Supplies | Leather cleaner, alcohol wipes, and microfiber cloths to prepare the surface and remove residue. | Auto parts stores, general retailers | $10 – $20 |
| Sandpaper (Fine Grit) | Smooths out imperfections and prepares the surface for color application; use a very fine grit to avoid scratching the leather. | Hardware stores, auto parts stores | $5 – $10 |
| Application Tools | Spatulas, brushes, and sponges for applying filler, colorant, and conditioner; ensures even distribution. | Craft stores, auto detailing supply stores | $5 – $15 |
| Heat Gun/Hair Dryer | Dries filler and colorant faster; use with caution to avoid overheating the leather. | Hardware stores, beauty supply stores | $15 – $50 |
| Scissors/Utility Knife | Cuts patch fabric and trims excess material; ensure sharp blades for clean cuts. | Hardware stores, craft stores | $10 – $25 |
| Sewing Kit (Optional) | For reinforcing seams after repair; includes needles, thread, and a leather sewing awl. | Craft stores, fabric stores | $10 – $30 |
| Safety Gloves | Protects hands from chemicals and adhesives; essential for skin safety. | Hardware stores, auto parts stores | $5 – $15 |
| Masking Tape | Protects surrounding areas from accidental staining or adhesive spread; ensures clean lines. | Hardware stores, general retailers | $5 – $10 |
| Lighting | Ensures clear visibility during repair; essential for matching colors accurately. | Hardware stores, general retailers | $10 – $50 |
| Magnifying Glass | Allows for close inspection of damage and repair work; helpful for detailed tasks. | General retailers, craft stores | $10 – $30 |
| Protective Sheeting | Protects car interior from spills and debris; keeps work area clean. | Hardware stores, general retailers | $5 – $15 |
| Emery Board (Nail File) | Sanding away excess fabric glue and removing the shiny finish in the area immediately surrounding the damage | Beauty supply stores, drugstores | $3 – $8 |
3. Step-by-Step Guide: How to Fix Seam Tears in Leather Car Seats
Seam tears are common but relatively straightforward to repair. Here’s how to do it:
3.1 Preparing the Area:
- Clean the area around the tear with a leather cleaner and a soft cloth.
- Ensure the area is dry before proceeding.
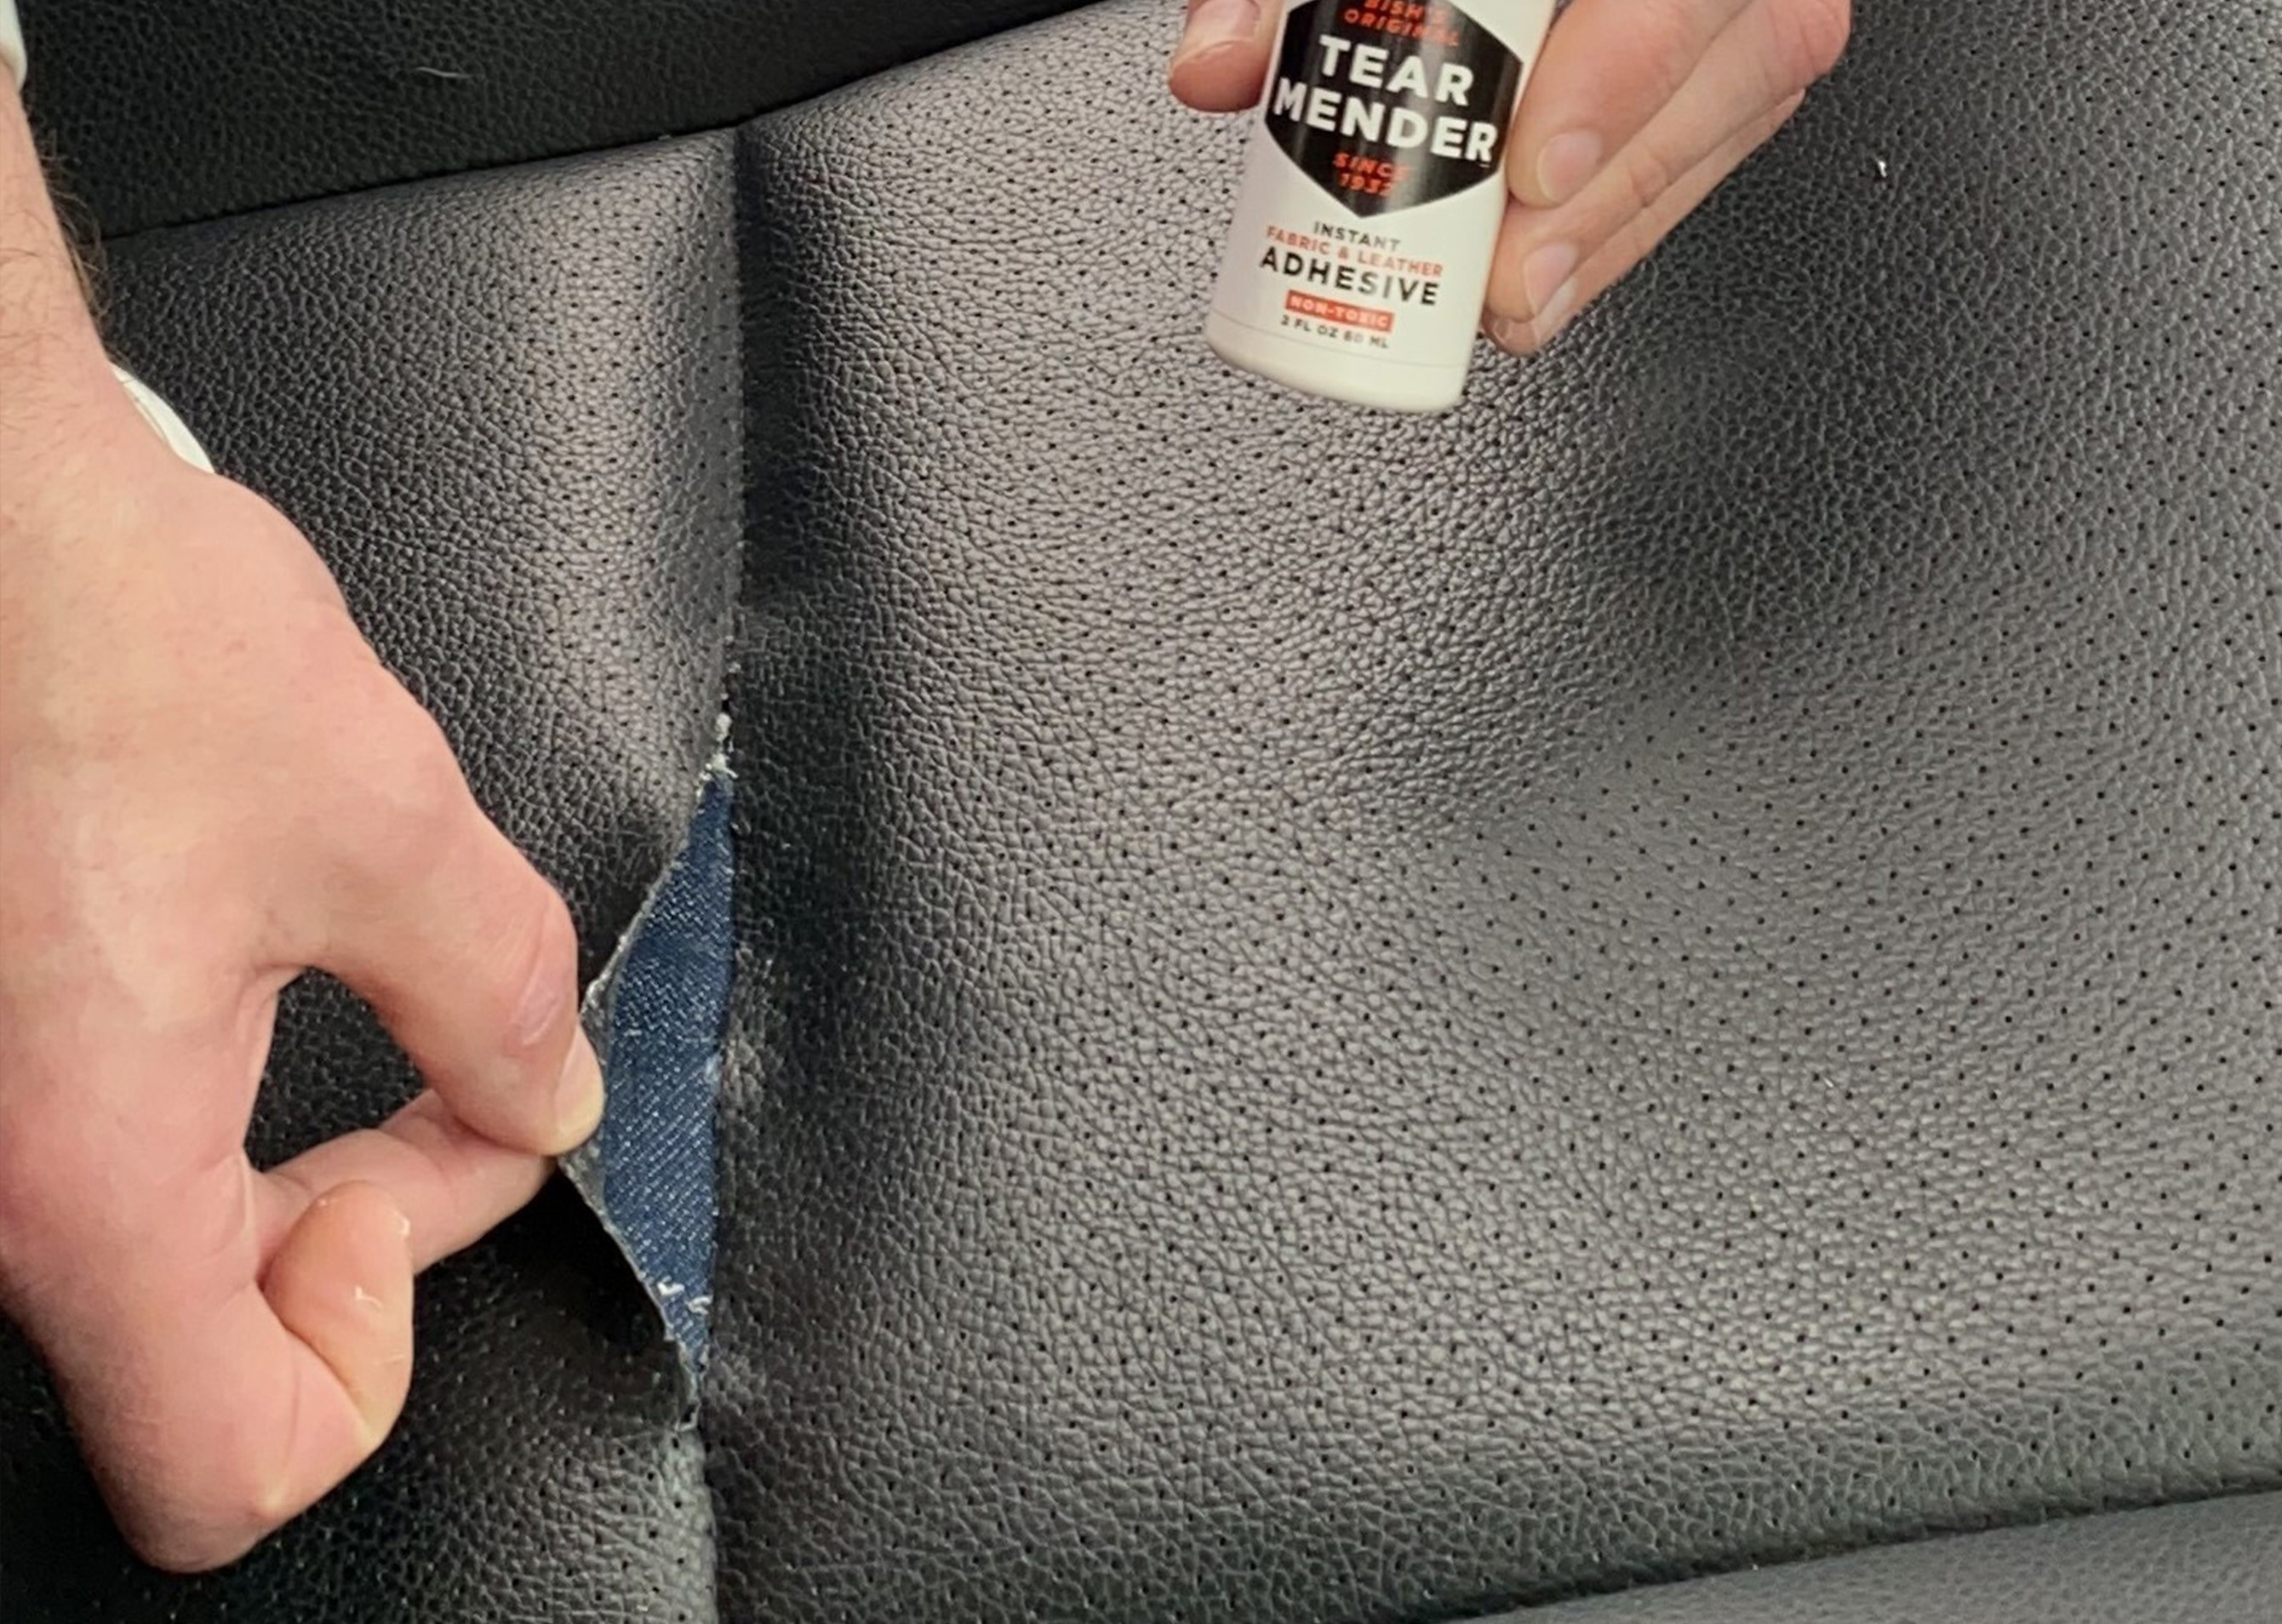
3.2 Cutting and Inserting the Patch:
- Cut a piece of denim or leather patch slightly larger than the torn area.
- Insert the patch into the hole, centering it under the tear.
Placing Denim Patch Inside Leather Car Seat Rip
3.3 Applying Leather Glue:
- Apply a thin layer of leather glue to the patch.
- Carefully press the edges of the tear onto the patch.
3.4 Clamping and Drying:
- Use clamps or weights to hold the leather in place.
- Allow the glue to dry for at least 24 hours.
3.5 Stitching (Optional):
- For added strength, stitch the seam using a leather sewing awl and thread.
- Follow the existing stitch pattern to maintain the original look.
4. Repairing Surface Tears and Cracks on Leather Car Seats
Surface damage requires a different approach to achieve a seamless finish.
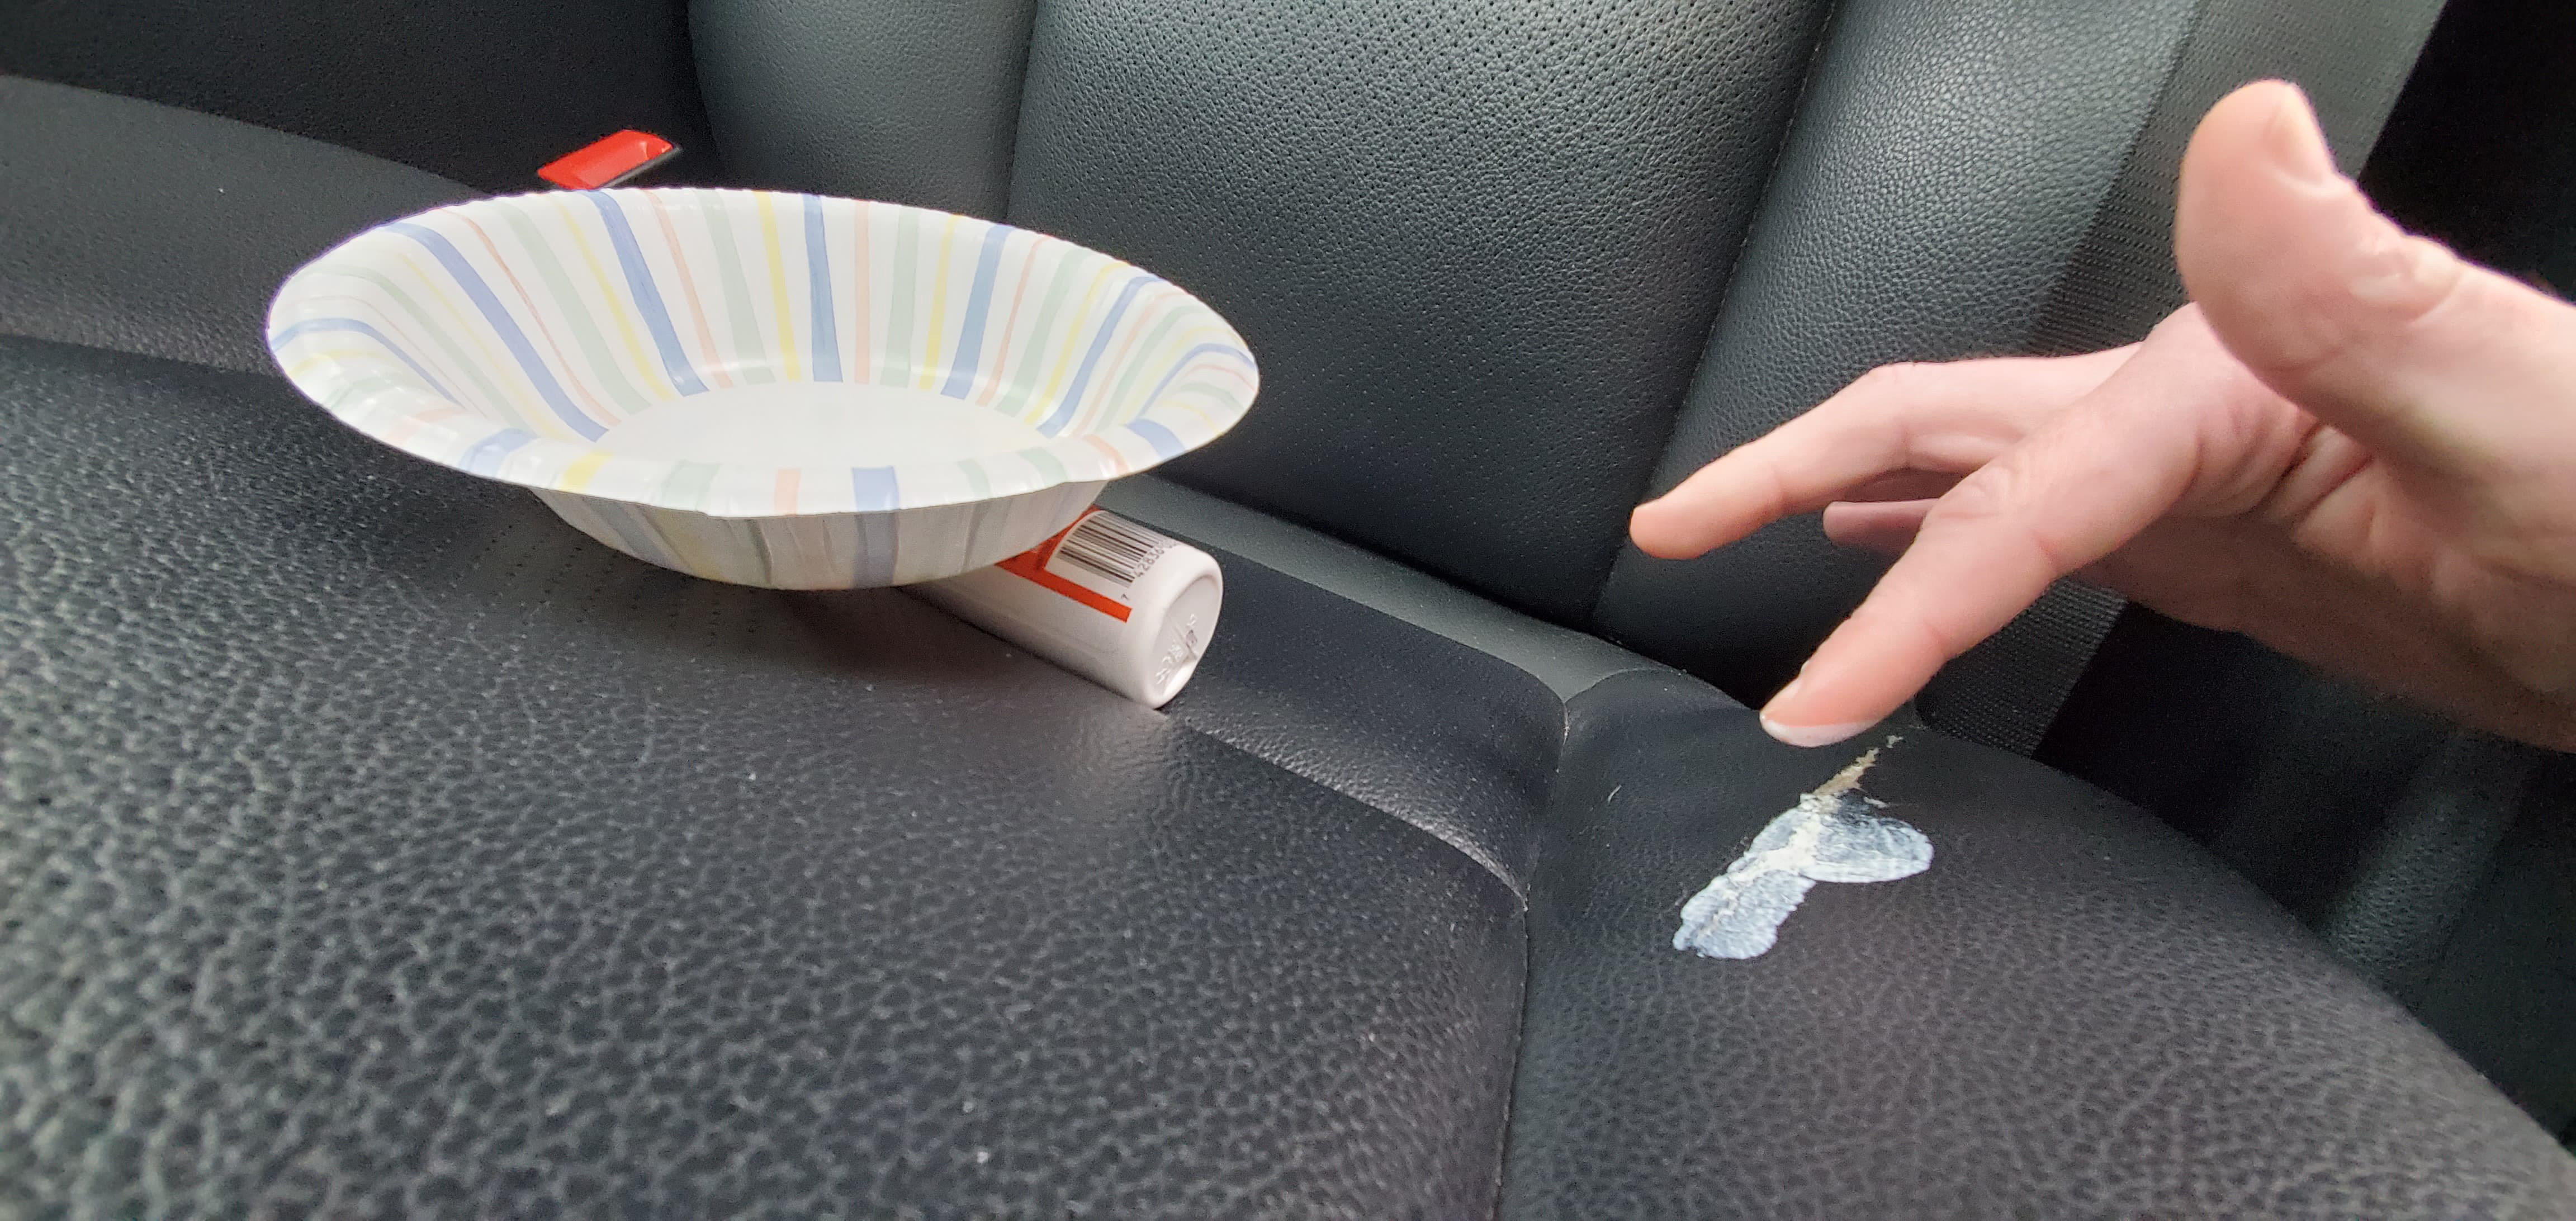
4.1 Cleaning and Preparing the Surface:
- Thoroughly clean the damaged area with leather cleaner.
- Use an alcohol wipe to remove any remaining residue.
 Using Alcohol Wipe To Clean Leather Car Seat Tear For Color Compound Application
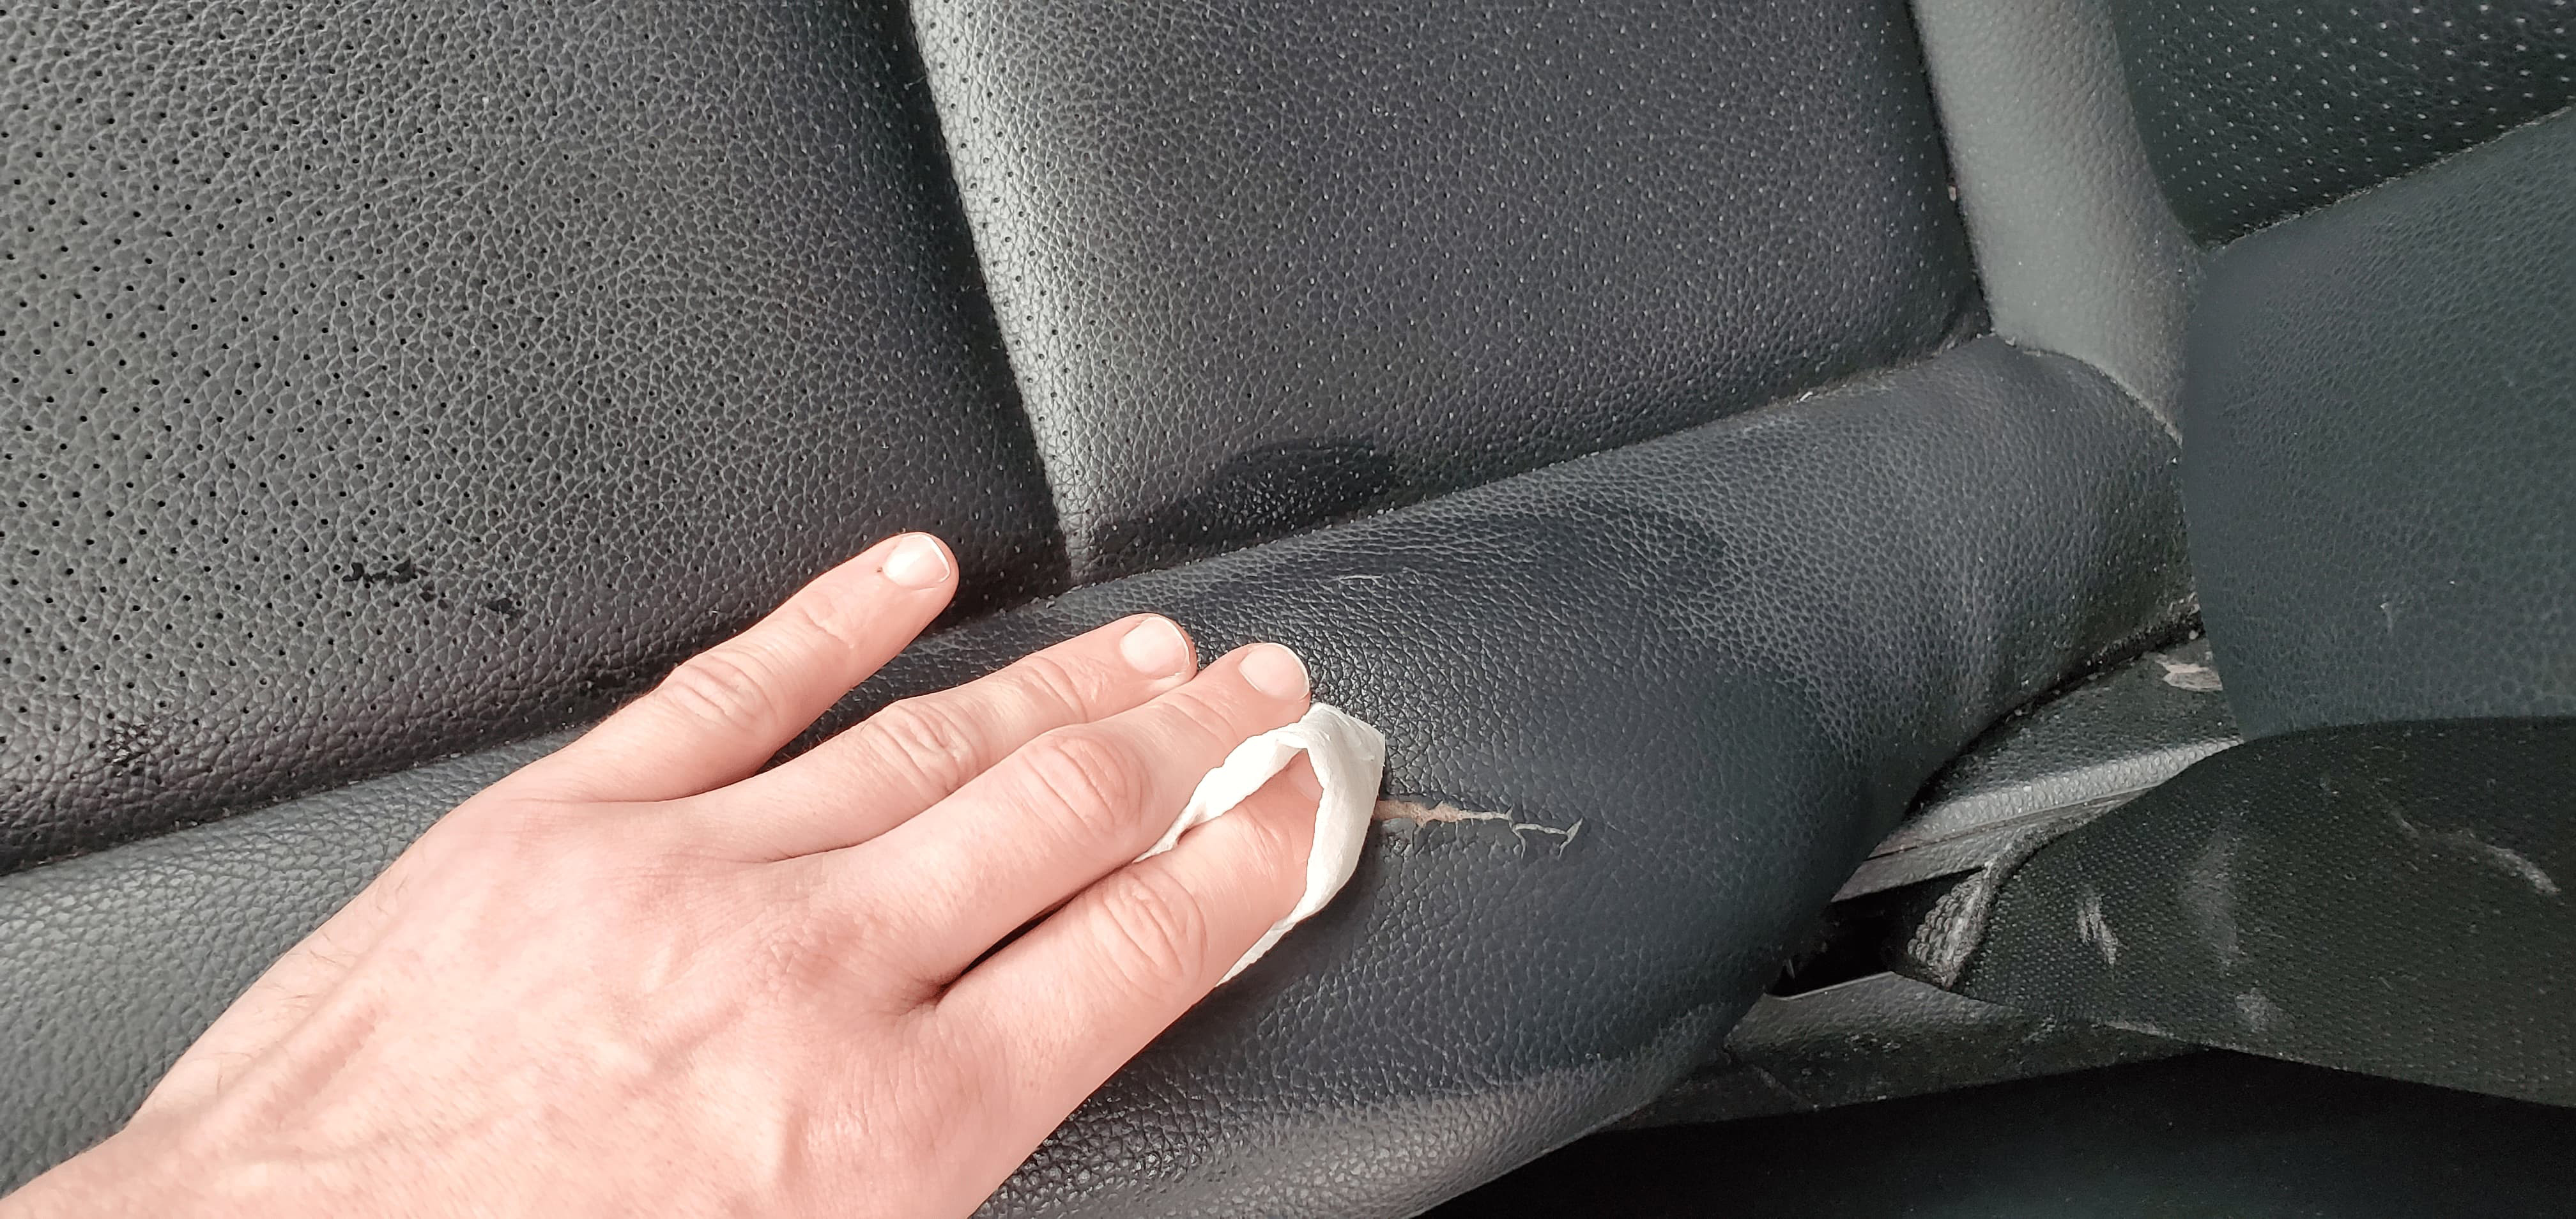
4.2 Applying Leather Filler:
- Apply a small amount of leather filler to the cracks and tears.
- Use a spatula to spread the filler evenly.
 Using Finger Apply Tear Mender Into The Cracked Leather
4.3 Sanding and Smoothing:
- Once the filler is dry, gently sand the area with fine-grit sandpaper.
- Smooth the surface until it is flush with the surrounding leather.
 Use An Eemory Board To Smooth The Surface Of The Tear
4.4 Color Matching and Application:
- Mix the colorants to match the original leather color.
- Apply the colorant in thin layers, allowing each layer to dry before applying the next.
- Use a sponge to blot the final coat for a textured finish.
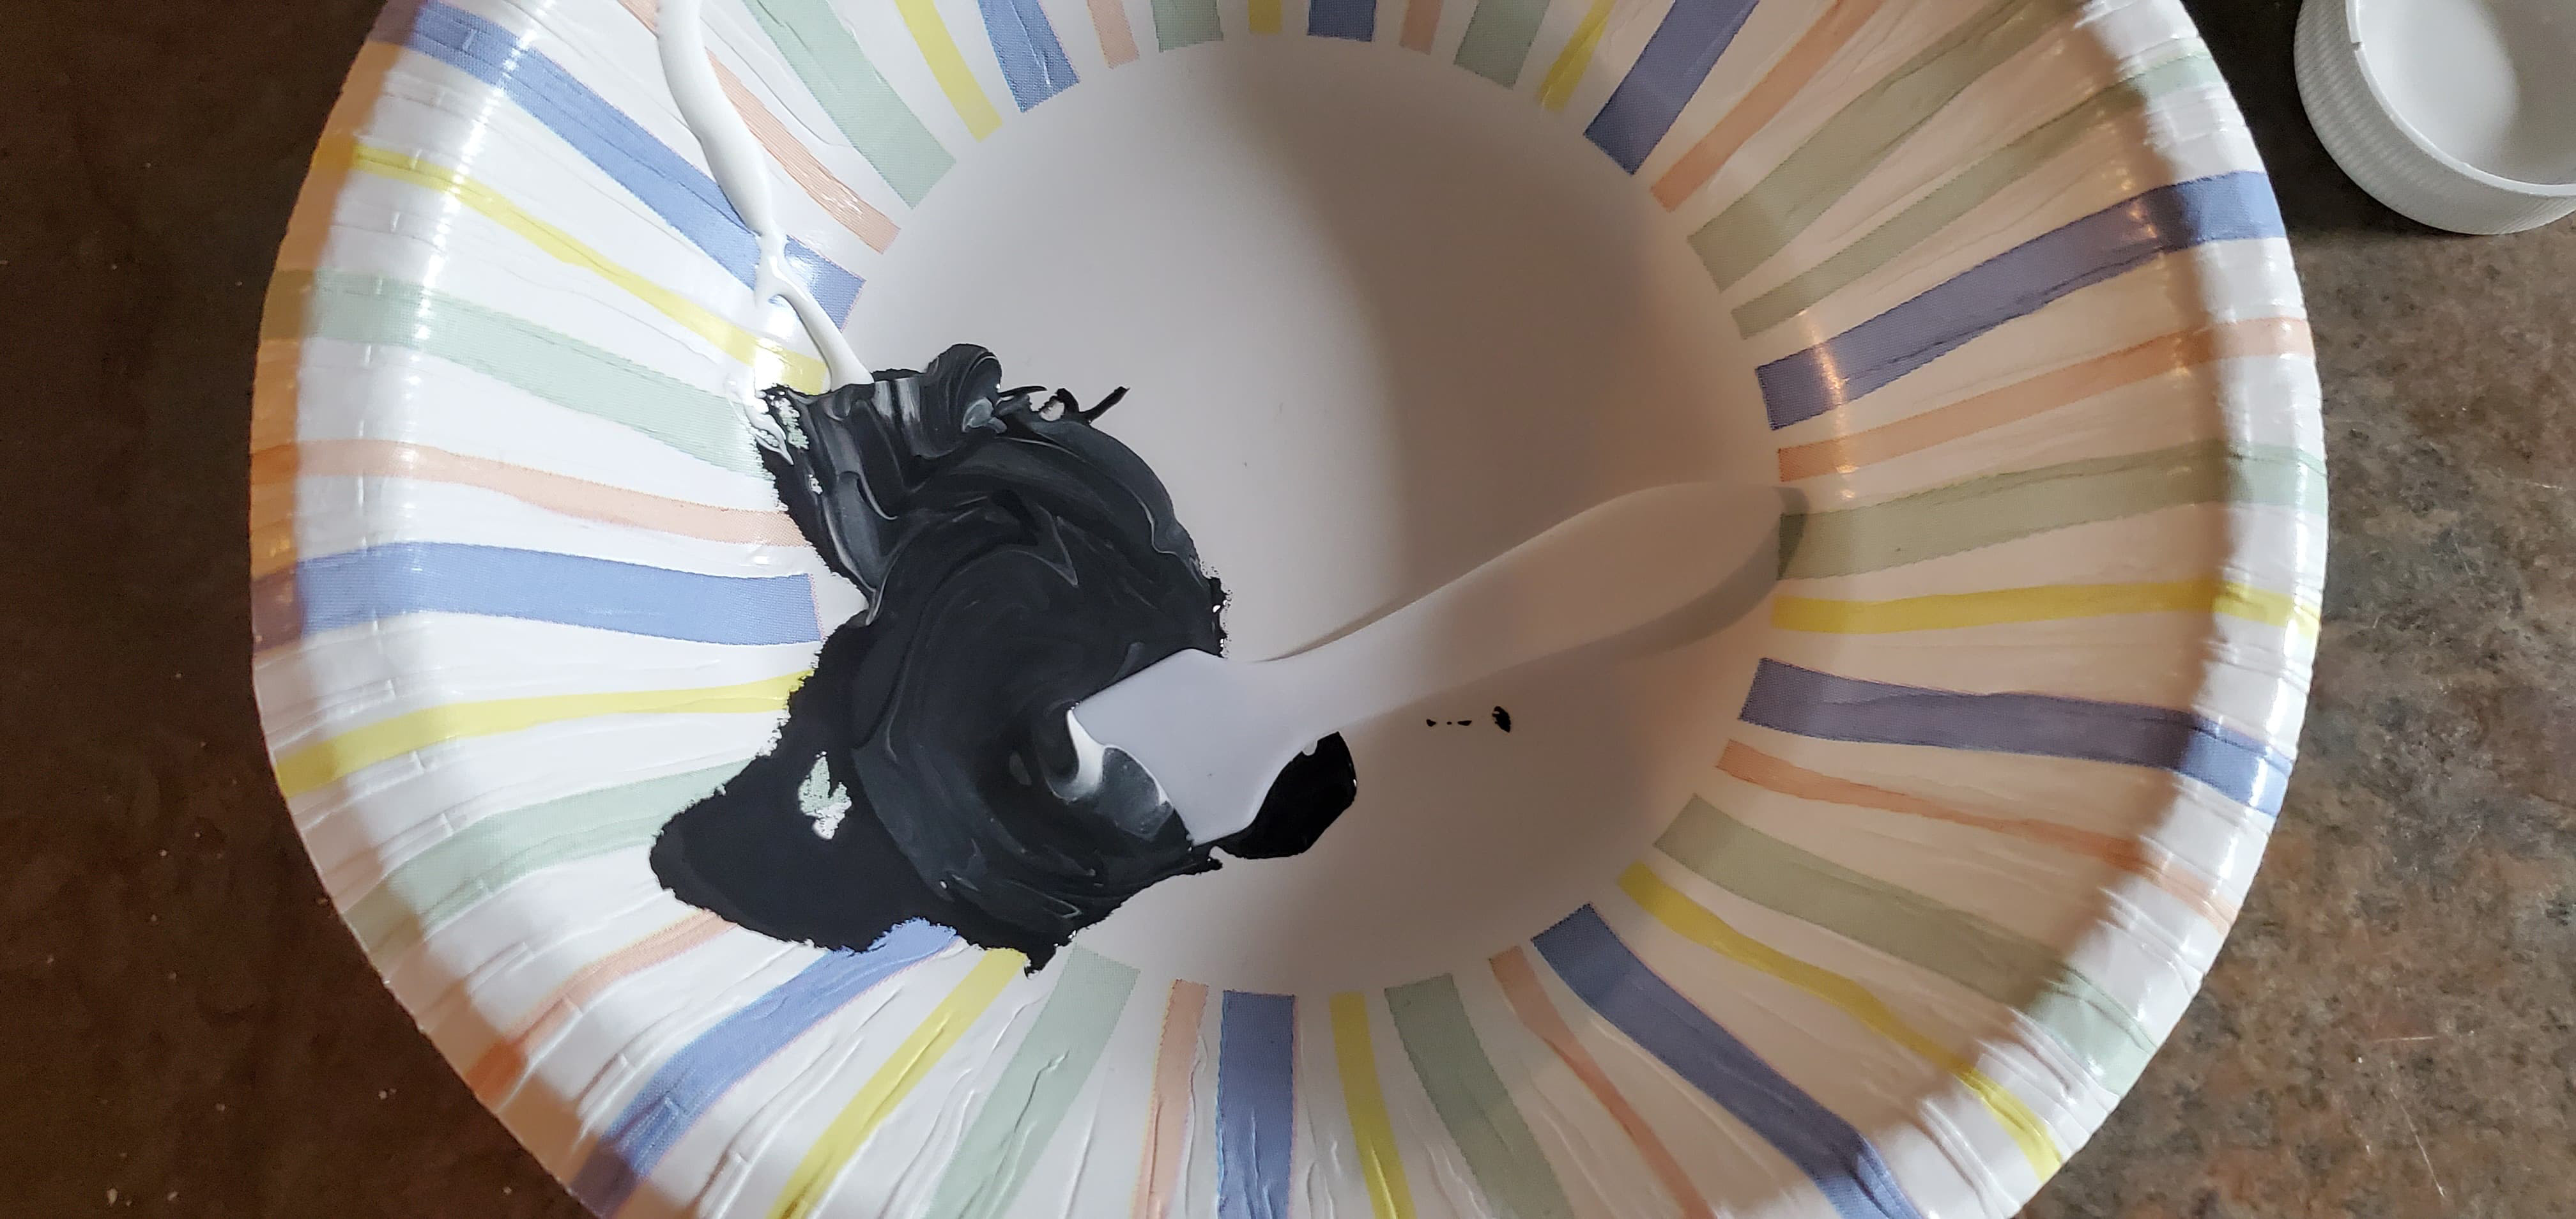 Mix The Colors Together Until You Reach A Match For Your Leather
4.5 Applying Leather Conditioner:
- Once the colorant is dry, apply a leather conditioner to protect and hydrate the repaired area.
5. Addressing Holes in Leather Car Seats
Holes require a more substantial repair to ensure durability.
5.1 Preparing the Area:
- Clean the area around the hole thoroughly.
- Trim any frayed edges.
5.2 Inserting a Backing Material:
- Cut a piece of leather or denim slightly larger than the hole.
- Insert the backing material and secure it with leather glue.
5.3 Filling the Hole:
- Apply leather filler in layers, allowing each layer to dry.
- Sand the filler smooth after it dries completely.
5.4 Color Matching and Finishing:
- Match the color and apply it in thin layers.
- Finish with a leather conditioner.
6. Advanced Techniques for Leather Car Seat Repair
For more challenging repairs, consider these advanced techniques.
6.1 Using a Heat Gun for Faster Drying:
- A heat gun can speed up the drying process for fillers and colorants.
- Use it carefully to avoid overheating the leather.
6.2 Grain Matching for Seamless Repairs:
- Use a grain matching tool to replicate the original leather texture.
- Press the tool into the filler while it is still wet.
6.3 Professional Leather Repair Kits:
- Invest in a high-quality leather repair kit for comprehensive solutions.
- These kits often include specialized tools and materials.
7. Maintaining and Preventing Future Damage to Leather Car Seats
Prevention is key to prolonging the life of your leather car seats.
7.1 Regular Cleaning and Conditioning:
- Clean your leather seats every few months with a leather cleaner.
- Apply a leather conditioner to keep the leather supple and prevent cracks.
7.2 Protecting from Sun Exposure:
- Use a sunshade or park in shaded areas to minimize UV damage.
- Consider applying a UV protectant to the leather.
7.3 Avoiding Sharp Objects:
- Be careful with sharp objects that could puncture or tear the leather.
- Avoid placing heavy or abrasive items directly on the seats.
7.4 Promptly Addressing Spills:
- Clean spills immediately to prevent staining and damage.
- Use a soft cloth to blot the spill, avoiding rubbing.
7.5 Professional Detailing:
- Consider professional detailing services for thorough cleaning and conditioning.
- Professional detailers have the expertise and tools to maintain leather seats.
8. Cost Analysis: DIY vs. Professional Leather Repair
Deciding whether to repair leather car seats yourself or hire a professional depends on the extent of the damage and your comfort level.
DIY Leather Repair
Pros:
- Cost-Effective: DIY repairs are significantly cheaper than professional services.
- Convenience: You can perform the repairs at your own pace and convenience.
- Personal Satisfaction: Repairing your own car seats can be rewarding.
Cons:
- Time-Consuming: DIY repairs can take several hours, depending on the complexity.
- Skill Required: Achieving a professional-looking finish requires some skill and patience.
- Potential for Mistakes: Mistakes can lead to further damage or unsatisfactory results.
Estimated Costs:
- Leather Repair Kit: $20 – $50
- Leather Cleaner and Conditioner: $20 – $40
- Additional Tools (if needed): $10 – $30
- Total: $50 – $120
Professional Leather Repair
Pros:
- High-Quality Results: Professionals have the expertise and tools to achieve a seamless finish.
- Time-Saving: Professional repairs are completed quickly and efficiently.
- Convenience: You don’t have to spend time and effort on the repairs yourself.
Cons:
- Expensive: Professional services can be costly, especially for extensive damage.
- Scheduling: You need to schedule an appointment and wait for the repairs to be completed.
Estimated Costs:
- Minor Repairs (small tears, cracks): $100 – $300
- Moderate Repairs (larger tears, holes): $300 – $600
- Extensive Repairs (complete seat restoration): $600 – $1500+
Cost Comparison Table
| Repair Type | DIY Cost (USD) | Professional Cost (USD) |
|---|---|---|
| Small Tears/Cracks | $50 – $80 | $100 – $300 |
| Medium Tears/Holes | $80 – $120 | $300 – $600 |
| Complete Seat Restoration | N/A | $600 – $1500+ |
9. Choosing the Right Leather Repair Kit
Selecting the right leather repair kit is crucial for a successful DIY repair. Consider the following factors:
- Type of Damage: Choose a kit that addresses the specific type of damage you need to repair.
- Color Matching: Ensure the kit includes a range of colorants to match your leather.
- Quality of Materials: Opt for kits with high-quality adhesives, fillers, and colorants.
- Ease of Use: Look for kits with clear instructions and easy-to-use applicators.
- Brand Reputation: Choose a reputable brand known for producing effective leather repair products.
Top Recommended Leather Repair Kits
| Kit Name | Features | Price (USD) |
|---|---|---|
| CARDIAGTECH Premium Leather Repair Kit | Comprehensive kit with multiple colorants, filler, adhesive, and applicators. Ideal for various types of damage. | $45 |
| Fortivo Leather Repair Kit | Includes heat-activated repair compound for durable repairs. | $35 |
| Coconix Leather and Vinyl Repair Kit | Versatile kit for both leather and vinyl repairs, with a wide range of color options. | $40 |
| Magicfly Leather Repair Kit | Easy-to-use kit with pre-mixed colors and detailed instructions. | $30 |
| LeatherNu Complete Leather Repair Kit | Professional-grade kit with advanced color matching and grain replication tools. | $60 |
10. Real-Life Examples of Successful Leather Car Seat Repairs
Seeing successful repairs can inspire confidence and provide valuable insights.
Example 1: Seam Tear Repair
- Problem: A 4-inch seam tear on the driver’s seat.
- Solution: Cleaned the area, inserted a denim patch, applied leather glue, and stitched the seam.
- Result: A strong, seamless repair that blended with the original upholstery.
Example 2: Surface Crack Repair
- Problem: Extensive surface cracks on the passenger seat.
- Solution: Cleaned the surface, applied leather filler, sanded smooth, matched the color, and applied leather conditioner.
- Result: A smooth, restored surface that looked as good as new.
Example 3: Hole Repair
- Problem: A small hole caused by a sharp object on the back seat.
- Solution: Cleaned the area, inserted a leather backing, filled the hole with leather filler, sanded smooth, matched the color, and applied leather conditioner.
- Result: A durable, invisible repair that prevented further damage.
11. Common Mistakes to Avoid During Leather Repair
Avoiding common mistakes ensures a successful and long-lasting repair.
- Using the Wrong Products: Always use products specifically designed for leather repair.
- Applying Too Much Filler: Apply filler in thin layers to avoid cracking and shrinking.
- Poor Color Matching: Take the time to match the color accurately for a seamless finish.
- Skipping Surface Preparation: Thoroughly clean and prepare the surface before applying any products.
- Rushing the Drying Process: Allow products to dry completely before proceeding to the next step.
12. Frequently Asked Questions (FAQs) About Leather Car Seat Repair
Q1: Can I use super glue to repair leather car seats?
No, super glue is not recommended for leather repair. It can dry hard and inflexible, causing further damage.
Q2: How do I match the color of my leather car seats?
Use a colorant kit with a range of pigments and mix them until you achieve a close match. Test the color on an inconspicuous area before applying it to the damaged area.
Q3: How long does it take for leather filler to dry?
Leather filler typically takes 2-4 hours to dry, depending on the thickness of the application and the ambient temperature.
Q4: Can I repair a large hole in my leather car seat?
Yes, but it may require more extensive repair techniques, such as inserting a backing material and applying multiple layers of filler.
Q5: How do I prevent future damage to my leather car seats?
Regularly clean and condition your leather seats, protect them from sun exposure, and avoid sharp objects.
Q6: Is it better to repair or replace damaged leather car seats?
It depends on the extent of the damage. Minor tears and cracks can be repaired, but extensive damage may require replacement.
Q7: Can I use household cleaners on my leather car seats?
No, household cleaners can damage leather. Use a cleaner specifically designed for leather.
Q8: How often should I condition my leather car seats?
Condition your leather seats every 3-6 months to keep them supple and prevent cracks.
Q9: What is the best way to clean leather car seats?
Use a soft cloth and a leather cleaner to gently wipe the surface. Avoid rubbing or using abrasive materials.
Q10: Can I repair leather car seats in hot weather?
Yes, but avoid direct sunlight, which can cause the repair materials to dry too quickly and unevenly.
13. Call to Action: Contact CARDIAGTECH for Expert Auto Repair Tools and Solutions
Facing challenges in your auto repair tasks? At CARDIAGTECH.NET, we understand the difficulties you encounter daily, from physically demanding work to keeping up with the latest automotive technology. That’s why we offer a range of high-quality auto repair tools designed to enhance your efficiency, precision, and safety.
14. Unlock the Potential of Your Auto Repair Business with CARDIAGTECH
Imagine reducing repair times, increasing your accuracy, and providing top-notch service that keeps your customers coming back. With CARDIAGTECH.NET, this vision can become a reality. Our tools are built to withstand the rigors of daily use, ensuring durability and reliability.
Ready to take your auto repair business to the next level? Contact CARDIAGTECH today for expert advice and support.
- Address: 276 Reock St, City of Orange, NJ 07050, United States
- WhatsApp: +1 (641) 206-8880
- Website: CARDIAGTECH.NET
Don’t let damaged leather car seats detract from your vehicle’s appearance. With the right tools and techniques, you can restore your car’s interior to its former glory with CARDIAGTECH.NET.