**How to Fix Leather Upholstery in Car: A Comprehensive Guide**
Fixing leather upholstery in your car can significantly improve its appearance and value. At CARDIAGTECH.NET, we provide expert solutions and premium tools to restore your car’s interior to its former glory, ensuring professional-quality results. Addressing issues like leather cracking, tears, and wear with the right methods will extend the life and beauty of your car’s leather, and enhance driving experience. By using our top-tier repair products and following these steps, you can maintain the luxurious feel of your car’s interior.
Table of Contents
- Understanding Leather Damage in Cars
- Essential Tools and Materials for Leather Repair
- Step-by-Step Guide to Repairing Minor Leather Damage
- How to Fix Cracks in Leather Car Seats
- Repairing Tears and Holes in Leather Upholstery
- Restoring Color and Finish to Leather Seats
- Maintaining and Protecting Your Car’s Leather Upholstery
- Common Mistakes to Avoid When Repairing Leather
- DIY vs. Professional Leather Repair: Which Is Right for You?
- Cost-Effective Tips for Leather Upholstery Repair
- Advanced Techniques for Leather Restoration
- The Role of Climate in Leather Upholstery Damage
- Innovative Products for Leather Repair at CARDIAGTECH.NET
- Extending the Life of Your Car’s Leather Interior
- FAQ: Addressing Common Leather Repair Questions
1. Understanding Leather Damage in Cars
What are the common types of leather damage in car interiors and how do they occur?
Leather damage in car interiors can manifest in several forms, each with distinct causes. According to a study by the University of California, Davis, Department of Materials Science and Engineering, daily wear and environmental factors contribute significantly to leather degradation. Understanding these types and causes is the first step in effective repair and maintenance.
-
Cracking: Cracking happens when the leather loses its natural oils and moisture, causing it to dry out and split. The primary causes include:
- Sun Exposure: Prolonged exposure to direct sunlight can dry out the leather, leading to cracks. UV rays degrade the leather’s surface, diminishing its flexibility.
- Temperature Fluctuations: Extreme temperature changes cause the leather to expand and contract, weakening its structure over time.
- Lack of Maintenance: Neglecting regular cleaning and conditioning deprives the leather of essential moisture and oils.
-
Fading: Fading is the loss of color intensity, making the leather look bleached or discolored. Factors contributing to fading include:
- UV Radiation: Similar to cracking, UV radiation breaks down the dyes in the leather, causing the color to fade.
- Chemical Exposure: Harsh cleaning products or spills can strip the leather of its color.
-
Stains: Stains result from spills, dirt, or dyes transferring onto the leather surface. Common sources include:
- Food and Drinks: Spills from coffee, soda, or food can leave persistent stains if not cleaned immediately.
- Ink and Dyes: Ink from pens or dyes from clothing can transfer onto the leather.
- Body Oils and Sweat: Over time, body oils and sweat can penetrate the leather, causing discoloration and stains.
-
Scratches: Scratches are surface-level damages that can detract from the leather’s appearance. They are typically caused by:
- Sharp Objects: Keys, zippers, or other sharp objects can scratch the leather.
- Pets: Pets’ claws can easily scratch leather surfaces.
-
Tears and Holes: Tears and holes are more severe forms of damage, often resulting from:
- Sharp Impacts: Accidental impacts from sharp objects can puncture the leather.
- Wear and Tear: Constant friction and pressure can weaken the leather, leading to tears over time.
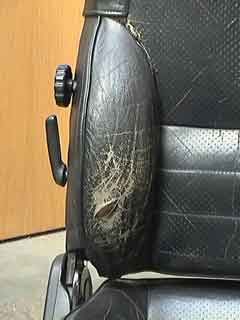
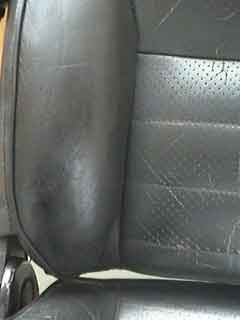
Damaged leather car seat requiring repair
2. Essential Tools and Materials for Leather Repair
What tools and materials are needed for effective leather upholstery repair in a car?
Having the right tools and materials is crucial for successful leather upholstery repair. According to research from the Leather Research Laboratory at the University of Northampton, using high-quality products ensures a durable and aesthetically pleasing result. Here’s a list of essential items:
-
Leather Cleaner: Removes dirt, oil, and grime from the leather surface.
-
Leather Conditioner: Moisturizes the leather, preventing it from drying out and cracking.
-
Leather Repair Kit: Includes essential items for repairing tears, holes, and cracks. A comprehensive kit typically contains:
- Leather Filler: Used to fill in cracks, holes, and imperfections.
- Leather Glue: Bonds leather pieces together securely.
- Leather Patches: Provides a backing for larger repairs.
- Colorant: Matches the original color of the leather for seamless repairs.
- Leather Finish: Seals and protects the repaired area.
-
Application Tools: Ensures precise and even application of repair products. Key tools include:
- Palette Knife or Spatula: Applies filler smoothly and evenly.
- Sponge: Applies cleaner, conditioner, and colorant.
- Airbrush: Sprays colorant and finish for a professional look.
- Tweezers: Handles small patches and materials with precision.
-
Preparation Tools: Prepares the leather surface for repair. Essential tools include:
- Leather Prep: Removes the manufactured finish, allowing colorant to adhere properly.
- Abrasive Pad: Gently rubs the leather surface to remove loose fibers and grease.
- Alcohol Cleaner: Removes any remaining dirt or dust.
- Scalpel or Scissors: Trims and tidies damaged areas.
-
Safety Gear: Protects your skin and eyes during the repair process. Necessary items include:
- Gloves: Protects hands from chemicals and dyes.
- Eye Protection: Prevents splashes and fumes from irritating the eyes.
Investing in quality tools and materials from CARDIAGTECH.NET will significantly improve the outcome of your leather repair project, ensuring a professional and long-lasting result.
3. Step-by-Step Guide to Repairing Minor Leather Damage
How can minor leather damage be effectively repaired using a step-by-step approach?
Repairing minor leather damage involves a systematic approach to ensure the best possible outcome. Citing a guide from the Society of Automotive Engineers (SAE), following these steps will help you restore your car’s leather upholstery effectively.
-
Clean the Leather Surface:
- Use a leather cleaner to remove dirt, oil, and grime from the damaged area.
- Apply the cleaner with a soft sponge or cloth, gently rubbing the surface.
- Wipe away any excess cleaner with a clean, damp cloth and allow the area to dry completely.
-
Prepare the Area:
- For small scratches or scuffs, use a leather prep solution to remove the original finish.
- Gently rub the area with an abrasive pad to smooth out any rough edges.
- Wipe the area with an alcohol cleaner to remove any remaining residue.
-
Apply Leather Filler:
- For minor cracks or scratches, apply a small amount of leather filler using a palette knife.
- Spread the filler evenly over the damaged area, ensuring it fills the imperfections.
- Remove any excess filler with the edge of the palette knife.
- Allow the filler to dry completely, which may take 20-30 minutes. Use a hairdryer to speed up the drying process if needed.
-
Sand the Filled Area:
- Once the filler is dry, use fine-grit sandpaper (e.g., 600-grit) to gently sand the filled area.
- Smooth the surface until it is level with the surrounding leather.
- Be careful not to sand too aggressively, as this can damage the surrounding leather.
- Wipe away any sanding dust with a clean cloth.
-
Apply Colorant:
- Select a colorant that matches the original color of the leather. CARDIAGTECH.NET offers a wide range of colorants to ensure a perfect match.
- Apply the colorant with a sponge or airbrush. For small areas, a sponge works well. For larger areas, an airbrush provides a more even finish.
- Apply thin, even coats of colorant, allowing each coat to dry before applying the next.
- Typically, 2-3 coats are sufficient to achieve the desired color.
-
Apply Leather Finish:
- Once the colorant is dry, apply a leather finish to seal and protect the repaired area.
- Use an airbrush to apply thin, even coats of finish, allowing each coat to dry before applying the next.
- Apply 2-3 coats of finish for optimal protection.
-
Condition the Leather:
- After the finish is dry, apply a leather conditioner to moisturize the leather and keep it supple.
- Apply the conditioner with a soft cloth, gently rubbing it into the leather.
- Allow the conditioner to soak in for 10-15 minutes, then wipe away any excess with a clean cloth.
 Preparing the leather car seat for repair
4. How to Fix Cracks in Leather Car Seats
What is the most effective method for repairing cracks in leather car seats?
Repairing cracks in leather car seats requires a detailed approach to restore the leather’s integrity and appearance. According to a study by the Leather Conservation Centre, proper preparation and the use of quality fillers are crucial for a lasting repair.
-
Clean the Leather:
- Use a leather cleaner to remove dirt and grime from the cracked area. This ensures that the repair materials adhere properly.
- Apply the cleaner with a soft sponge, gently rubbing the surface.
- Wipe away any excess cleaner with a clean, damp cloth and allow the area to dry.
-
Prepare the Cracks:
- Use a leather prep solution to remove the original finish around the cracks. This helps the filler bond better with the leather.
- Gently rub the area with an abrasive pad to smooth out any rough edges and remove loose fibers.
- Wipe the area with an alcohol cleaner to remove any remaining residue.
-
Apply Leather Filler:
- Use a palette knife to apply a small amount of leather filler into the cracks.
- Work the filler into the cracks, ensuring it fills them completely.
- Apply the filler in thin layers, allowing each layer to dry before applying the next. This prevents the filler from shrinking and cracking as it dries.
- Use a hairdryer to speed up the drying process between layers.
-
Smooth the Filler:
- Once the cracks are filled, use the palette knife to smooth the filler, making it level with the surrounding leather.
- Remove any excess filler from the surface.
- Allow the final layer of filler to dry completely.
-
Sand the Area:
- Use fine-grit sandpaper (e.g., 600-grit) to gently sand the filled area.
- Smooth the surface until it is level with the surrounding leather.
- Be careful not to sand too aggressively, as this can damage the surrounding leather.
- Wipe away any sanding dust with a clean cloth.
-
Apply Colorant:
- Select a colorant that matches the original color of the leather. CARDIAGTECH.NET offers a wide range of colorants to ensure a perfect match.
- Apply the colorant with a sponge or airbrush. For small areas, a sponge works well. For larger areas, an airbrush provides a more even finish.
- Apply thin, even coats of colorant, allowing each coat to dry before applying the next.
- Typically, 2-3 coats are sufficient to achieve the desired color.
-
Apply Leather Finish:
- Once the colorant is dry, apply a leather finish to seal and protect the repaired area.
- Use an airbrush to apply thin, even coats of finish, allowing each coat to dry before applying the next.
- Apply 2-3 coats of finish for optimal protection.
-
Condition the Leather:
- After the finish is dry, apply a leather conditioner to moisturize the leather and keep it supple.
- Apply the conditioner with a soft cloth, gently rubbing it into the leather.
- Allow the conditioner to soak in for 10-15 minutes, then wipe away any excess with a clean cloth.
5. Repairing Tears and Holes in Leather Upholstery
What is the best approach for repairing tears and holes in leather car upholstery?
Repairing tears and holes in leather upholstery requires a more involved process to ensure structural integrity and a seamless appearance. According to research from the Automotive Upholstery Association of America (AUAA), using a leather patch and appropriate adhesive is essential for a durable repair.
-
Prepare the Area:
-
Clean the leather around the tear or hole with a leather cleaner to remove any dirt, oil, or grime.
-
Use a scalpel or scissors to trim any frayed edges or loose pieces of leather around the damage.
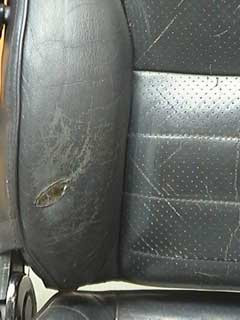 Tidying the area around the hole in the leather car seat
-
-
Create a Backing Patch:
-
Cut a leather or canvas patch slightly larger than the tear or hole.
-
The patch should be large enough to extend at least 1 cm beyond the edges of the damage.
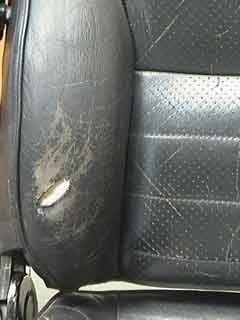 Applying the backing patch to the leather car seat
-
-
Insert the Backing Patch:
- Use tweezers or a spatula to insert the backing patch underneath the leather around the tear or hole.
- Ensure the patch lies flat and covers the entire damaged area.
-
Apply Leather Glue:
- Apply leather glue to the edges of the tear or hole, as well as to the underside of the surrounding leather where the patch will adhere.
- Use a small brush or applicator to apply the glue evenly.
-
Adhere the Patch:
- Press the edges of the tear or hole onto the backing patch, ensuring they are firmly bonded to the patch.
- Use your fingers or a roller to apply even pressure and ensure a strong bond.
- Remove any excess glue with a clean cloth.
- Allow the glue to dry completely, which may take several hours or overnight.
-
Apply Leather Filler:
- Once the glue is dry, apply leather filler to the repaired area, filling in any gaps or imperfections.
- Use a palette knife to spread the filler evenly over the patch and the surrounding leather.
- Apply the filler in thin layers, allowing each layer to dry before applying the next.
- Use a hairdryer to speed up the drying process between layers.
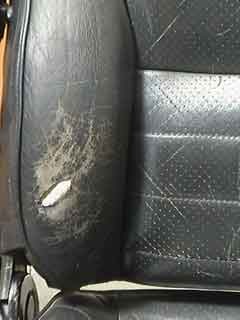 Filling the hole in the leather car seat with heavy filler
 -
Smooth and Sand:
- After the filler is completely dry, use fine-grit sandpaper (e.g., 600-grit) to gently sand the filled area.
- Smooth the surface until it is level with the surrounding leather.
- Wipe away any sanding dust with a clean cloth.
 Adding more layers of filler to the leather car seat
 -
Apply Colorant:
-
Select a colorant that matches the original color of the leather. CARDIAGTECH.NET offers a wide range of colorants to ensure a perfect match.
-
Apply the colorant with a sponge or airbrush. For small areas, a sponge works well. For larger areas, an airbrush provides a more even finish.
-
Apply thin, even coats of colorant, allowing each coat to dry before applying the next.
-
Typically, 2-3 coats are sufficient to achieve the desired color.
 Applying the final layer of filler to the leather car seat
-
-
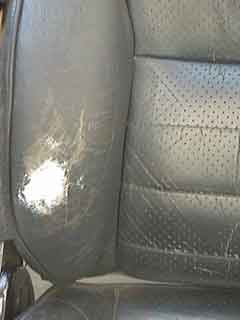
Apply Leather Finish:
- Once the colorant is dry, apply a leather finish to seal and protect the repaired area.
- Use an airbrush to apply thin, even coats of finish, allowing each coat to dry before applying the next.
- Apply 2-3 coats of finish for optimal protection.
-
Condition the Leather:
- After the finish is dry, apply a leather conditioner to moisturize the leather and keep it supple.
- Apply the conditioner with a soft cloth, gently rubbing it into the leather.
- Allow the conditioner to soak in for 10-15 minutes, then wipe away any excess with a clean cloth.
6. Restoring Color and Finish to Leather Seats
How can the color and finish of leather car seats be effectively restored?
Restoring the color and finish of leather car seats involves careful preparation and the application of high-quality colorants and finishes. According to the Society of Leather Technologists and Chemists (SLTC), proper color matching and application techniques are essential for achieving a professional result.
-
Clean the Leather:
- Use a leather cleaner to remove any dirt, oil, or grime from the leather surface.
- This ensures that the colorant adheres properly.
- Apply the cleaner with a soft sponge, gently rubbing the surface.
- Wipe away any excess cleaner with a clean, damp cloth and allow the area to dry completely.
-
Prepare the Surface:
- Use a leather prep solution to remove the original finish from the leather.
- This allows the new colorant to penetrate the leather and bond effectively.
- Gently rub the area with an abrasive pad to smooth out any rough spots and remove loose fibers.
- Wipe the area with an alcohol cleaner to remove any remaining residue.
-
Apply Colorant:
-
Select a high-quality leather colorant that matches the original color of your car seats. CARDIAGTECH.NET offers a wide range of colorants to ensure a perfect match.
-
Test the colorant on an inconspicuous area of the leather to ensure it is a good match.
-
Apply the colorant with an airbrush for the best results. An airbrush provides a smooth, even finish and allows for precise application.
-
If you don’t have an airbrush, you can use a sponge or a soft cloth.
-
Apply thin, even coats of colorant, allowing each coat to dry completely before applying the next.
-
Typically, 2-3 coats are sufficient to achieve the desired color.
Adding more layers of filler to the leather car seat
-
-
Apply Leather Finish:
-
Once the colorant is dry, apply a leather finish to seal and protect the newly colored leather.
-
A leather finish provides a protective layer that helps prevent wear and tear and keeps the leather looking its best.
-
Use an airbrush to apply thin, even coats of finish, allowing each coat to dry completely before applying the next.
-
Typically, 2-3 coats of finish are sufficient for optimal protection.
 Finishing the job by applying the final coats
-
-
Condition the Leather:
- After the finish is dry, apply a high-quality leather conditioner to moisturize the leather and keep it supple.
- A leather conditioner helps prevent the leather from drying out and cracking, extending its lifespan.
- Apply the conditioner with a soft cloth, gently rubbing it into the leather.
- Allow the conditioner to soak in for 10-15 minutes, then wipe away any excess with a clean cloth.
7. Maintaining and Protecting Your Car’s Leather Upholstery
What are the best practices for maintaining and protecting leather upholstery in cars to prevent damage?
Maintaining and protecting your car’s leather upholstery is essential for preserving its appearance and longevity. According to the Bureau of Automotive Repair, regular maintenance can prevent costly repairs and keep your car’s interior looking its best.
-
Regular Cleaning:
- Clean your leather upholstery regularly to remove dirt, oil, and grime.
- Use a pH-balanced leather cleaner and a soft cloth to gently wipe down the surfaces.
- Avoid using harsh chemicals or abrasive cleaners, as they can damage the leather.
- Clean spills immediately to prevent staining.
-
Conditioning:
- Apply a leather conditioner every 2-3 months to keep the leather supple and prevent it from drying out and cracking.
- Apply the conditioner with a soft cloth, gently rubbing it into the leather.
- Allow the conditioner to soak in for 10-15 minutes, then wipe away any excess with a clean cloth.
-
Protect from Sunlight:
- Park your car in the shade or use a windshield sunshade to protect the leather from direct sunlight.
- UV rays can cause the leather to fade, dry out, and crack over time.
-
Use Seat Covers:
- Consider using seat covers to protect your leather upholstery from wear and tear, especially if you frequently transport passengers or pets.
- Choose seat covers made from breathable materials to prevent moisture buildup.
-
Avoid Sharp Objects:
- Be careful when placing sharp objects on the leather seats, as they can scratch or tear the surface.
- Avoid wearing clothing with sharp zippers or buttons that can damage the leather.
-
Professional Detailing:
- Have your car’s interior professionally detailed at least once a year to ensure thorough cleaning and conditioning.
- Professional detailers have the expertise and equipment to properly care for your leather upholstery.
-
Ventilation:
- Ensure proper ventilation in your car to prevent moisture buildup, which can lead to mold and mildew growth on the leather.
- Open windows or use the air conditioning system to circulate air and reduce humidity.
8. Common Mistakes to Avoid When Repairing Leather
What are the common mistakes to avoid when repairing leather upholstery to ensure a successful outcome?
Avoiding common mistakes during leather repair is crucial for achieving a professional and long-lasting result. According to the Leather Industries of America (LIA), improper techniques and product choices can lead to further damage and unsatisfactory outcomes.
-
Using Harsh Cleaners:
- Avoid using harsh chemicals, solvents, or abrasive cleaners on leather upholstery.
- These can strip the leather of its natural oils, causing it to dry out and crack.
- Always use a pH-balanced leather cleaner specifically designed for automotive leather.
-
Applying Too Much Product:
- Applying too much cleaner, conditioner, or colorant can saturate the leather and lead to discoloration or damage.
- Always apply products in thin, even layers, allowing each layer to dry before applying the next.
-
Skipping Surface Preparation:
- Failing to properly prepare the leather surface before applying repair products can result in poor adhesion and an uneven finish.
- Always clean, prep, and degrease the leather before applying fillers, colorants, or finishes.
-
Using the Wrong Filler:
- Using the wrong type of filler for the specific type of damage can lead to an unstable or unsightly repair.
- Choose a leather filler that is specifically designed for repairing cracks, tears, or holes in automotive leather.
-
Improper Color Matching:
- Using a colorant that doesn’t match the original color of the leather can result in a visible and unprofessional-looking repair.
- Always test the colorant on an inconspicuous area of the leather before applying it to the entire damaged area.
- CARDIAGTECH.NET offers a wide range of colorants to ensure a perfect match.
-
Rushing the Drying Process:
- Rushing the drying process by applying heat or using a hairdryer too aggressively can cause the filler or colorant to shrink, crack, or bubble.
- Allow products to dry naturally whenever possible, and use heat sparingly and evenly.
-
Ignoring Maintenance:
- Neglecting regular cleaning and conditioning after the repair can cause the leather to deteriorate and the repair to fail over time.
- Establish a regular maintenance routine to keep your leather upholstery in good condition.
9. DIY vs. Professional Leather Repair: Which Is Right for You?
When should you consider DIY leather repair versus hiring a professional for your car’s upholstery?
Deciding between DIY and professional leather repair depends on the extent of the damage, your skill level, and the tools available. According to a report by the National Institute for Automotive Service Excellence (ASE), certain repairs require specialized knowledge and equipment that only professionals possess.
DIY Leather Repair:
-
Pros:
- Cost-Effective: DIY repairs are generally less expensive than hiring a professional.
- Convenience: You can perform the repairs at your own pace and on your own schedule.
- Personal Satisfaction: Completing the repair yourself can be rewarding.
-
Cons:
- Time-Consuming: DIY repairs can be time-consuming, especially if you are not experienced.
- Requires Skill: Leather repair requires some skill and attention to detail.
- Risk of Mistakes: If you make a mistake, you could potentially damage the leather further.
-
Suitable for:
- Minor scratches, scuffs, or small cracks.
- Simple cleaning and conditioning tasks.
- Those with some experience in DIY repairs.
Professional Leather Repair:
-
Pros:
- Expertise: Professionals have the knowledge, skills, and experience to perform high-quality repairs.
- Quality Results: Professional repairs typically result in a more seamless and durable finish.
- Time-Saving: Hiring a professional saves you time and effort.
-
Cons:
- Expensive: Professional repairs can be more expensive than DIY repairs.
- Less Convenient: You may need to schedule an appointment and drop off your car.
-
Suitable for:
- Large tears, holes, or extensive damage.
- Complex repairs that require specialized tools and techniques.
- Those who want a professional-quality finish and are willing to pay for it.
10. Cost-Effective Tips for Leather Upholstery Repair
What are some cost-effective strategies for repairing and maintaining leather upholstery in your car?
Repairing and maintaining leather upholstery doesn’t have to break the bank. Here are some cost-effective tips, drawing from insights by the Automotive Service Association (ASA):
-
Regular Cleaning and Conditioning:
- Preventative care is always more cost-effective than repairs. Regularly clean and condition your leather seats to prevent cracks, fading, and stains.
- Use affordable, high-quality leather cleaners and conditioners from CARDIAGTECH.NET to keep your leather in top condition.
-
DIY for Minor Repairs:
- Tackle minor scratches, scuffs, and small cracks yourself with a DIY leather repair kit.
- These kits are relatively inexpensive and can save you a significant amount of money compared to professional repairs.
-
Spot Cleaning:
- Address spills and stains immediately with a spot cleaner to prevent them from setting in and causing permanent damage.
- Use a soft cloth and a gentle cleaner to blot the stain, working from the outside in.
-
Use Seat Covers:
- Protect your leather seats from wear and tear with seat covers.
- Choose durable, affordable seat covers that fit snugly and provide good protection.
-
Park in the Shade:
- Park your car in the shade whenever possible to protect the leather from direct sunlight, which can cause fading and cracking.
- Use a windshield sunshade to further reduce the amount of sunlight that enters the car.
-
Shop Around for Supplies:
- Compare prices from different suppliers to find the best deals on leather repair products and tools.
- Check online retailers and local auto parts stores for sales and discounts.
-
Bundle Products:
- Purchase leather repair products in bundles to save money.
- Many retailers offer discounts when you buy multiple items together.
-
Attend Workshops:
- Consider attending a DIY leather repair workshop to learn valuable skills and techniques.
- These workshops can teach you how to perform basic repairs and maintenance tasks, saving you money on professional services.
11. Advanced Techniques for Leather Restoration
What advanced techniques can be used for more complex leather upholstery restoration projects?
For more complex leather upholstery restoration projects, advanced techniques are necessary to achieve professional-quality results. Citing the Society of Automotive Upholstery Specialists (SAUS), these techniques require specialized knowledge, skills, and equipment.
-
Hot Air Welding:
- Hot air welding is a technique used to repair tears and holes in leather by melting the edges of the damaged area and bonding them together.
- This technique requires a specialized hot air welding tool and a steady hand.
- Hot air welding is best suited for repairing small tears and holes in areas that are not subject to excessive stress.
-
Leather Grafting:
- Leather grafting involves replacing a damaged section of leather with a new piece of leather that is carefully matched to the original.
- This technique requires precise cutting, gluing, and stitching skills.
- Leather grafting is ideal for repairing large tears, holes, or areas of extensive damage.
-
Color Matching and Tinting:
- Achieving a perfect color match is essential for seamless leather restoration.
- Advanced color matching techniques involve using specialized software and equipment to analyze the color of the original leather and create a custom-tinted colorant.
- This technique requires a high level of skill and attention to detail.
-
Grain Matching:
- Matching the grain pattern of the replacement leather to the grain pattern of the original leather is crucial for achieving a seamless repair.
- Advanced grain matching techniques involve carefully selecting and positioning the replacement leather to ensure that the grain patterns align perfectly.
- This technique requires a keen eye and a steady hand.
-
Steam Treatment:
- Steam treatment can be used to restore the shape and suppleness of leather upholstery that has become stretched or wrinkled.
- This technique involves using a specialized steam cleaning machine to gently heat and moisturize the leather, allowing it to return to its original shape.
- Steam treatment is best suited for restoring the shape of leather seats and panels that have become distorted over time.
-
Leather Reconditioning:
-
Leather reconditioning is a comprehensive restoration process that involves cleaning, repairing, and refinishing the leather upholstery.
-
This process typically includes:
- Deep cleaning to remove dirt, oil, and grime.
- Repairing cracks, tears, and holes.
- Refinishing the leather with a custom-tinted colorant.
- Applying a protective finish to seal and protect the leather.
-
Leather reconditioning can restore even the most heavily damaged leather upholstery to like-new condition.
-
12. The Role of Climate in Leather Upholstery Damage
How does climate affect leather upholstery in cars, and what preventative measures can be taken?
Climate plays a significant role in the condition of leather upholstery in cars. According to research from the National Weather Service, extreme temperatures and humidity levels can accelerate leather degradation.
-
Hot and Dry Climates:
-
Effect: Hot and dry climates can cause leather to dry out and crack due to the lack of moisture.
-
Preventative Measures:
- Regularly condition the leather with a high-quality leather conditioner to keep it moisturized.
- Park the car in the shade or use a windshield sunshade to protect the leather from direct sunlight.
- Consider using seat covers to protect the leather from excessive heat.
-
-
Cold and Dry Climates:
-
Effect: Cold and dry climates can also cause leather to dry out and crack, as well as become stiff and brittle.
-
Preventative Measures:
- Regularly condition the leather to keep it supple and prevent it from drying out.
- Avoid using harsh chemicals or cleaners that can strip the leather of its natural oils.
- Warm up the car gradually to prevent sudden temperature changes that can stress the leather.
-
-
Humid Climates:
-
Effect: Humid climates can cause leather to absorb moisture, leading to mold, mildew, and discoloration.
-
Preventative Measures:
- Ensure proper ventilation in the car to reduce humidity levels.
- Use dehumidifiers or moisture absorbers to remove excess moisture from the air.
- Clean the leather regularly with a leather cleaner that contains mold and mildew inhibitors.
- Avoid parking the car in damp or shady areas.
-
-
Coastal Climates:
-
Effect: Coastal climates can expose leather to salt air, which can cause corrosion and damage.
-
Preventative Measures:
- Regularly clean the leather to remove salt deposits.
- Apply a leather protectant that is designed to resist salt and corrosion.
- Wash the car frequently to remove salt buildup on the exterior.
-
-
Extreme Temperature Fluctuations:
-
Effect: Extreme temperature fluctuations can cause the leather to expand and contract, leading to cracks and tears over time.
-
Preventative Measures:
- Park the car in a garage or covered area to minimize temperature fluctuations.
- Use a climate control system to maintain a consistent temperature inside the car.
- Condition the leather regularly to keep it flexible and resilient.
-
13. Innovative Products for Leather Repair at CARDIAGTECH.NET
What innovative leather repair products does CARDIAGTECH.NET offer to enhance repair outcomes?
CARDIAGTECH.NET is committed to providing innovative products for leather repair, ensuring enhanced outcomes and professional-quality results. Here are some of our standout offerings:
-
Advanced Leather Repair Kits:
- Our advanced leather repair kits include everything you need to repair cracks, tears, and holes in leather upholstery.
- These kits feature high-quality fillers, colorants, and finishes that are designed to provide a seamless and durable repair.
- The kits also include specialized tools and accessories, such as palette knives, sponges, and applicators, to ensure precise and easy application.
-
Custom-Tinted Colorants:
- CARDIAGTECH.NET offers custom-tinted colorants that are precisely matched to the original color of your leather upholstery.
- Our color-matching technology ensures a seamless repair that is virtually invisible.
- We can create custom colorants for any make and model of car, as well as for a wide range of leather types and finishes.
-
Leather Protection Sprays:
- Our leather protection sprays provide