How To Fix Light Scratches On Car Paint
Are you tired of seeing those unsightly light scratches ruining your car’s otherwise flawless finish? CARDIAGTECH.NET offers a comprehensive guide on how to address these blemishes, enhancing your vehicle’s appearance and protecting its value. Discover effective techniques and the right tools to restore your car’s paint to its former glory, including scratch removal and paint correction methods.
1. Understanding Car Paint and Scratches
Car paint consists of multiple layers, each serving a specific purpose. Understanding these layers helps in identifying the severity of the scratch and the appropriate repair method.
- Clear Coat: The outermost layer, providing gloss and protection against UV rays and environmental contaminants.
- Base Coat: The layer that provides the color of the car.
- Primer: Enhances adhesion between the metal and the paint layers.
- Metal: The body of the car.
1.1 Types of Scratches
Identifying the type of scratch is crucial for selecting the right repair technique. Scratches can be categorized based on their depth:
- Clear Coat Scratches: Only affect the clear coat layer. These are the easiest to fix.
- Base Coat Scratches: Penetrate the clear coat and reach the base coat layer, revealing the car’s color.
- Primer Scratches: Go through the clear coat and base coat, exposing the primer layer.
- Deep Scratches: Reach the metal, requiring more extensive repair to prevent rust.
1.2 Assessing the Damage
Before starting any repair, thoroughly assess the damage. Clean the area and examine the scratch in good lighting. Use your fingernail to gently feel the scratch; if your nail catches, it’s likely a base coat or deeper scratch.
2. Essential Tools and Materials
Having the right tools and materials is essential for effective scratch repair. Here’s a comprehensive list:
- Car Wash Soap: To clean the area before and after repair.
- Microfiber Towels: For cleaning and buffing without scratching the paint.
- Detailing Clay: To remove contaminants from the paint surface.
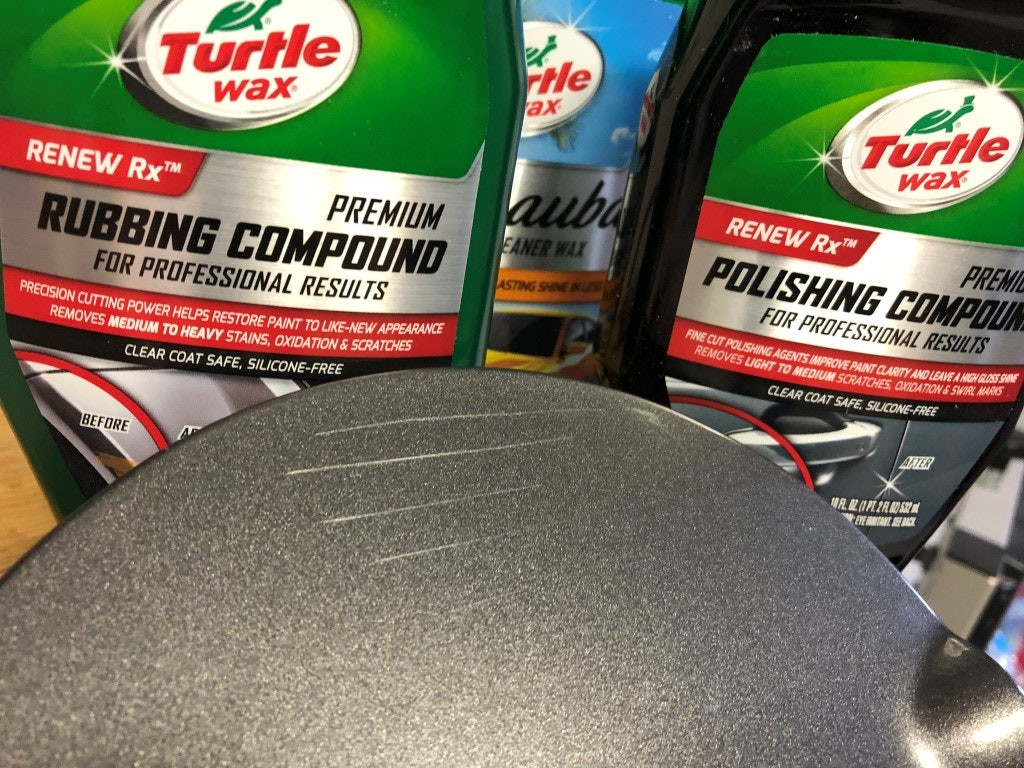
- Scratch Removal Kit: Contains compounds and applicators for removing light scratches.
- Polishing Compound: To refine the paint surface after scratch removal.
- Wax or Sealant: To protect the repaired area and restore shine.
- Touch-Up Paint: For deeper scratches that reach the base coat or primer.
- Fine-Grit Sandpaper: For leveling the scratch before applying touch-up paint.
- Rubbing Compound: To level imperfections and remove oxidation.
- Polishing Pads: For machine polishing to achieve a flawless finish.
- Dual-Action Polisher: For efficient and even polishing.
- Masking Tape: To protect surrounding areas from accidental damage.
- Gloves: To protect your hands from chemicals.
- Safety Glasses: To protect your eyes from debris.
- Water Spray Bottle: To keep the surface wet during sanding.
- Detailing Swabs: For precise application of touch-up paint.
3. Step-by-Step Guide to Fixing Light Scratches
Follow these steps to effectively remove light scratches from your car’s paint:
3.1 Cleaning the Area
- Wash the Car: Use car wash soap and water to thoroughly clean the area around the scratch. This removes dirt and grime that could interfere with the repair process.
- Dry the Area: Use a clean microfiber towel to dry the area completely.
- Clay Bar Treatment (Optional): If the paint feels rough, use detailing clay to remove any embedded contaminants. Follow the instructions on the clay bar packaging.
3.2 Applying Scratch Removal Compound
- Apply Compound: Put a small amount of scratch removal compound onto a microfiber applicator pad.
- Rub the Scratch: Gently rub the compound onto the scratch using a circular motion. Apply moderate pressure and work the compound into the scratch for several minutes.
- Buff the Area: Use a clean microfiber towel to buff away the excess compound. Check the scratch to see if it has been reduced or eliminated.
- Repeat if Necessary: If the scratch is still visible, repeat the process.
3.3 Polishing the Area
- Apply Polishing Compound: After removing the scratch, apply a small amount of polishing compound to a clean polishing pad.
- Polish the Area: Use a circular motion to polish the area, refining the paint surface and restoring shine.
- Buff the Area: Use a clean microfiber towel to buff away the excess polishing compound.
3.4 Applying Wax or Sealant
- Apply Wax/Sealant: Apply a thin layer of wax or sealant to the repaired area using a clean applicator pad.
- Let it Cure: Allow the wax or sealant to cure according to the product instructions (usually 15-30 minutes).
- Buff the Area: Use a clean microfiber towel to buff the area, revealing a glossy, protected finish.
3.5 Addressing Deeper Scratches
For scratches that penetrate the clear coat and reach the base coat, a different approach is required:
- Clean the Area: As with light scratches, start by thoroughly cleaning and drying the area around the scratch.
- Sand the Scratch (Optional): If the scratch has jagged edges, use fine-grit sandpaper (3000-grit) to gently smooth the edges. Keep the area wet while sanding to prevent scratching the surrounding paint.
- Apply Touch-Up Paint: Use a fine brush or detailing swab to carefully apply touch-up paint to the scratch. Apply thin layers, allowing each layer to dry before applying the next.
- Level the Paint: Once the touch-up paint is dry, use fine-grit sandpaper (3000-grit or higher) to gently level the paint with the surrounding surface. Keep the area wet while sanding.
- Polish the Area: Use polishing compound and a polishing pad to polish the area, restoring shine and removing any sanding marks.
- Apply Wax or Sealant: Protect the repaired area by applying a layer of wax or sealant.
4. Advanced Techniques for Scratch Removal
For more challenging scratches or for those seeking a professional-grade finish, consider these advanced techniques:
4.1 Machine Polishing
Using a dual-action polisher can significantly improve the effectiveness of scratch removal and paint correction.
- Prepare the Car: Wash and dry the car thoroughly. Use detailing clay to remove any contaminants from the paint surface.
- Apply Compound: Apply a small amount of cutting compound to a cutting pad.
- Polish the Area: Use the dual-action polisher to polish the area with overlapping passes. Apply moderate pressure and keep the polisher moving to prevent overheating the paint.
- Refine the Finish: Switch to a polishing pad and apply polishing compound. Polish the area again to refine the finish and remove any remaining imperfections.
- Apply Wax or Sealant: Protect the repaired area by applying a layer of wax or sealant.
4.2 Wet Sanding
Wet sanding involves using fine-grit sandpaper with water to level imperfections in the paint. This technique is typically used for deeper scratches or orange peel (uneven paint texture).
- Prepare the Area: Wash and dry the car thoroughly. Mask off the area around the scratch to protect the surrounding paint.
- Soak Sandpaper: Soak a sheet of fine-grit sandpaper (2000-grit or higher) in water for several minutes.
- Sand the Scratch: Gently sand the scratch using a back-and-forth motion. Keep the area wet by spraying it with water.
- Inspect the Surface: After sanding, inspect the surface to ensure that the scratch is level with the surrounding paint.
- Polish the Area: Use polishing compound and a polishing pad to polish the area, restoring shine and removing any sanding marks.
- Apply Wax or Sealant: Protect the repaired area by applying a layer of wax or sealant.
4.3 Using Fillers
For very deep scratches that reach the metal, fillers like Bondo can be used to fill the scratch before sanding and painting.
- Clean the Area: Thoroughly clean the area around the scratch to remove any dirt, grease, or rust.
- Apply Filler: Mix the filler according to the manufacturer’s instructions and apply it to the scratch using a spreader or putty knife.
- Let it Dry: Allow the filler to dry completely.
- Sand the Filler: Use coarse-grit sandpaper to sand down the excess filler, shaping it to match the contour of the surrounding surface.
- Refine the Surface: Use fine-grit sandpaper to smooth the surface and remove any scratches left by the coarse-grit sandpaper.
- Prime the Area: Apply a thin layer of primer to the filled area.
- Paint the Area: Apply several thin layers of touch-up paint, allowing each layer to dry before applying the next.
- Polish the Area: Use polishing compound and a polishing pad to polish the area, restoring shine and removing any imperfections.
- Apply Wax or Sealant: Protect the repaired area by applying a layer of wax or sealant.
5. Preventative Measures to Avoid Scratches
Prevention is always better than cure. Here are some tips to minimize the risk of scratches:
- Wash Your Car Regularly: Regular washing removes dirt and debris that can cause scratches.
- Use Quality Washing Tools: Use soft microfiber towels and sponges to avoid scratching the paint.
- Avoid Automatic Car Washes: These can cause swirl marks and scratches due to the abrasive brushes.
- Park Carefully: Avoid parking in tight spaces where your car might get scratched.
- Apply Paint Protection: Use wax, sealant, or ceramic coating to protect your car’s paint from scratches and environmental damage.
- Use Car Covers: When parking outdoors, use a car cover to protect your car from scratches and the elements.
6. Choosing the Right Products
Selecting the right products is crucial for achieving the best results. Here are some recommended products for scratch removal:
6.1 Scratch Removal Kits
- Meguiar’s ScratchX 2.0: Effective for removing light scratches and swirl marks.
- 3M Scratch and Scuff Removal Kit: A comprehensive kit for removing light to moderate scratches.
- Chemical Guys Scratch and Swirl Remover: Designed to remove scratches and enhance paint clarity.
6.2 Polishing Compounds
- Meguiar’s Ultimate Compound: A versatile compound for removing scratches, swirl marks, and oxidation.
- 3D One Car Scratch & Swirl Remover: An all-in-one polish that removes scratches and enhances shine.
- Griot’s Garage Correcting Cream: A high-quality compound for removing imperfections and restoring paint.
6.3 Waxes and Sealants
- Meguiar’s Ultimate Wax: Provides long-lasting protection and a deep, glossy shine.
- Chemical Guys Butter Wet Wax: Easy to apply and provides excellent protection.
- GTechniq C2 Liquid Crystal: A durable sealant that provides long-lasting protection.
6.4 Touch-Up Paints
- OEM Touch-Up Paint: The best option for matching your car’s original color. Available from dealerships or online retailers.
- Dupli-Color Exact-Match Automotive Paint: Provides a close match to your car’s color and is easy to apply.
- AutomotiveTouchup: Offers custom-matched touch-up paint for a wide range of vehicles.
7. Understanding Paint Correction
Paint correction is the process of removing imperfections from a vehicle’s paint, including scratches, swirl marks, water spots, and oxidation. It involves using abrasive compounds and polishing pads to level the paint surface, restoring a smooth, glossy finish.
7.1 Steps Involved in Paint Correction
- Washing and Decontamination: Thoroughly wash and dry the vehicle. Use detailing clay to remove any embedded contaminants from the paint surface.
- Taping: Use masking tape to protect delicate areas such as trim, emblems, and rubber seals.
- Compounding: Apply a cutting compound to a cutting pad and use a dual-action polisher to remove scratches and swirl marks.
- Polishing: Switch to a polishing pad and apply polishing compound to refine the finish and remove any remaining imperfections.
- Finishing: Apply a finishing polish to further enhance the gloss and clarity of the paint.
- Protection: Apply a layer of wax, sealant, or ceramic coating to protect the corrected paint and maintain its shine.
7.2 Tools Required for Paint Correction
- Dual-Action Polisher: For efficient and even polishing.
- Cutting Pads: For removing scratches and swirl marks.
- Polishing Pads: For refining the finish and removing imperfections.
- Finishing Pads: For enhancing the gloss and clarity of the paint.
- Cutting Compound: For removing scratches and swirl marks.
- Polishing Compound: For refining the finish and removing imperfections.
- Finishing Polish: For enhancing the gloss and clarity of the paint.
- Microfiber Towels: For cleaning and buffing.
- Masking Tape: To protect delicate areas.
8. Ceramic Coatings for Scratch Resistance
Ceramic coatings provide a durable, protective layer that can help prevent scratches and other damage to your car’s paint. These coatings form a chemical bond with the paint, creating a hard, glossy surface that is resistant to scratches, UV rays, and chemical contaminants.
8.1 Benefits of Ceramic Coatings
- Scratch Resistance: Provides a hard, protective layer that helps prevent scratches and swirl marks.
- UV Protection: Protects the paint from fading and oxidation caused by UV rays.
- Chemical Resistance: Resists damage from chemical contaminants such as acid rain, bird droppings, and road salt.
- Hydrophobic Properties: Makes the paint surface water-repellent, reducing water spots and making it easier to clean.
- Enhanced Gloss: Provides a deep, glossy shine that enhances the appearance of the car.
- Long-Lasting Protection: Can last for several years with proper maintenance.
8.2 Applying Ceramic Coatings
Applying a ceramic coating requires careful preparation and attention to detail. It is recommended to have the coating professionally installed for the best results.
- Preparation: Wash and decontaminate the car thoroughly. Use detailing clay to remove any embedded contaminants from the paint surface.
- Paint Correction: Correct any imperfections in the paint, such as scratches and swirl marks, before applying the coating.
- Surface Preparation: Use a panel wipe or degreaser to remove any remaining oils or residue from the paint surface.
- Coating Application: Apply the ceramic coating to the applicator pad and spread it evenly over the paint surface.
- Curing: Allow the coating to cure according to the manufacturer’s instructions.
- Buffing: Use a clean microfiber towel to buff the surface, removing any excess coating and revealing a glossy finish.
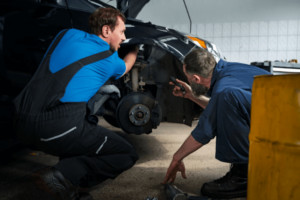
9. DIY vs. Professional Scratch Repair
Deciding whether to tackle scratch repair yourself or hire a professional depends on the severity of the scratch, your skill level, and your budget.
9.1 DIY Scratch Repair
Pros:
- Cost-Effective: DIY scratch repair is generally cheaper than hiring a professional.
- Convenient: You can perform the repair at your own pace and on your own schedule.
- Learning Experience: DIY scratch repair can be a rewarding learning experience.
Cons:
- Time-Consuming: DIY scratch repair can be time-consuming, especially if you are not experienced.
- Risk of Damage: If not done properly, DIY scratch repair can cause further damage to the paint.
- Limited Results: DIY scratch repair may not achieve the same level of results as professional repair.
9.2 Professional Scratch Repair
Pros:
- High-Quality Results: Professional scratch repair can achieve flawless results.
- Expertise: Professionals have the knowledge and experience to properly assess and repair scratches.
- Time-Saving: Hiring a professional saves you time and effort.
Cons:
- Expensive: Professional scratch repair can be expensive.
- Inconvenient: You may need to leave your car at the repair shop for several days.
10. Cost of Scratch Repair
The cost of scratch repair varies depending on the severity of the scratch, the size of the area to be repaired, and the type of repair method used.
10.1 DIY Scratch Repair Costs
DIY scratch repair can cost anywhere from $20 to $100, depending on the products and tools you need.
- Scratch Removal Kit: $20 – $50
- Polishing Compound: $10 – $20
- Wax or Sealant: $10 – $30
- Touch-Up Paint: $10 – $20
- Sandpaper: $5 – $10
- Microfiber Towels: $10 – $20
10.2 Professional Scratch Repair Costs
Professional scratch repair can cost anywhere from $100 to $1000 or more, depending on the extent of the damage and the type of repair required.
- Light Scratch Removal: $100 – $300
- Base Coat Scratch Repair: $300 – $600
- Deep Scratch Repair: $500 – $1000+
- Paint Correction: $300 – $1000+
- Ceramic Coating: $500 – $2000+
11. Maintaining Your Car’s Paint After Scratch Repair
After repairing scratches, it’s important to maintain your car’s paint to prevent future damage. Here are some tips:
- Wash Your Car Regularly: Regular washing removes dirt and debris that can cause scratches.
- Use Quality Washing Tools: Use soft microfiber towels and sponges to avoid scratching the paint.
- Apply Paint Protection: Use wax, sealant, or ceramic coating to protect your car’s paint from scratches and environmental damage.
- Park Carefully: Avoid parking in tight spaces where your car might get scratched.
- Use Car Covers: When parking outdoors, use a car cover to protect your car from scratches and the elements.
12. Common Mistakes to Avoid
Avoiding common mistakes can save you time, money, and frustration when repairing scratches.
- Using the Wrong Products: Using the wrong products can damage the paint and make the scratch worse.
- Applying Too Much Pressure: Applying too much pressure when sanding or polishing can damage the paint.
- Sanding Without Water: Sanding without water can cause scratches and swirl marks.
- Polishing in Direct Sunlight: Polishing in direct sunlight can cause the compound to dry out and become difficult to remove.
- Skipping Preparation: Skipping preparation steps such as washing and decontaminating the paint can lead to poor results.
13. Real-World Examples and Case Studies
To illustrate the effectiveness of these techniques, let’s look at some real-world examples and case studies.
13.1 Case Study 1: Light Scratch Removal on a Black Sedan
A black sedan had several light scratches on the door panel. The owner used a scratch removal kit and followed the steps outlined in this guide. After cleaning the area, applying the compound, and polishing, the scratches were completely removed, restoring the car’s glossy finish.
13.2 Case Study 2: Deep Scratch Repair on a Red SUV
A red SUV had a deep scratch on the rear quarter panel that reached the metal. The owner used Bondo to fill the scratch, sanded it smooth, applied primer and touch-up paint, and then polished the area. The repair was not perfect, but it significantly improved the appearance of the car and prevented rust.
13.3 Example 3: Paint Correction on a White Truck
A white truck had swirl marks, water spots, and oxidation on the paint. The owner hired a professional detailer to perform paint correction. After compounding, polishing, and finishing, the truck’s paint looked like new, with a deep, glossy shine.
14. The Science Behind Scratch Removal
Understanding the science behind scratch removal can help you appreciate the techniques and products used.
14.1 How Scratch Removal Compounds Work
Scratch removal compounds contain fine abrasives that gently level the paint surface, removing the edges of the scratch and making it less visible. These compounds also contain lubricants and polishing agents that help restore shine and clarity to the paint.
14.2 The Role of Abrasives
Abrasives are the key ingredients in scratch removal compounds and polishing compounds. They come in various grits, ranging from coarse to very fine. Coarse abrasives are used to remove scratches and imperfections, while fine abrasives are used to refine the finish and restore shine.
14.3 The Importance of Lubrication
Lubrication is essential when sanding or polishing paint. It helps reduce friction and heat, preventing damage to the paint surface. Lubricants also help carry away debris and prevent the abrasives from clogging.
15. Environmental Considerations
When repairing scratches, it’s important to consider the environmental impact of the products and techniques used.
15.1 Using Eco-Friendly Products
Choose eco-friendly scratch removal compounds, polishing compounds, and waxes that are biodegradable and free of harsh chemicals.
15.2 Proper Disposal of Waste
Dispose of used sandpaper, polishing pads, and other waste materials properly. Do not dump chemicals down the drain or into the environment.
15.3 Conserving Water
Conserve water when washing and rinsing your car. Use a water-efficient nozzle and avoid letting the water run unnecessarily.
16. The Psychology of a Clean Car
A clean, well-maintained car can have a positive impact on your mental and emotional well-being.
16.1 Pride of Ownership
Owning a clean, scratch-free car can instill a sense of pride and satisfaction.
16.2 First Impressions
A clean car can make a positive first impression on others, whether you’re meeting clients, going on a date, or simply driving around town.
16.3 Stress Relief
Washing and detailing your car can be a relaxing and therapeutic activity.
17. Future Trends in Car Paint Repair
The automotive industry is constantly evolving, and new technologies are emerging that promise to make car paint repair easier, more effective, and more environmentally friendly.
17.1 Self-Healing Paints
Self-healing paints contain polymers that can repair minor scratches and swirl marks when exposed to heat or sunlight.
17.2 Nanotechnology Coatings
Nanotechnology coatings use nanoparticles to create a durable, protective layer that is resistant to scratches, UV rays, and chemical contaminants.
17.3 Laser Scratch Removal
Laser scratch removal uses lasers to precisely level the paint surface, removing scratches without damaging the surrounding paint.
18. Tools and Equipment Available at CARDIAGTECH.NET
CARDIAGTECH.NET offers a range of tools and equipment that can help you effectively repair light scratches on your car paint. Here are some of the products you can find on our website:
- Dual-Action Polishers: Our dual-action polishers provide efficient and even polishing, helping you remove scratches and swirl marks with ease.
- Polishing Pads: We offer a variety of polishing pads, including cutting pads, polishing pads, and finishing pads, to suit your specific needs.
- Scratch Removal Compounds: Our scratch removal compounds contain fine abrasives that gently level the paint surface, removing the edges of the scratch and making it less visible.
- Polishing Compounds: Our polishing compounds are designed to refine the finish and restore shine to your car’s paint.
- Microfiber Towels: We offer high-quality microfiber towels that are soft, absorbent, and gentle on your car’s paint.
- Detailing Clay: Our detailing clay can help you remove embedded contaminants from the paint surface, preparing it for scratch repair.
Purchasing tools and equipment from CARDIAGTECH.NET ensures you’re getting high-quality products designed for automotive professionals. Our products are durable, reliable, and effective, helping you achieve professional-grade results.
19. The Importance of Staying Updated
The world of automotive technology is ever-changing, with new techniques and tools constantly emerging. Staying updated with the latest trends and best practices ensures you’re always equipped to handle any scratch repair situation effectively.
19.1 Following Industry Experts
Keep an eye on leading automotive detailing experts and influencers who regularly share their knowledge and experiences.
19.2 Attending Workshops and Seminars
Participating in workshops and seminars can provide hands-on experience and deeper insights into advanced repair techniques.
19.3 Online Forums and Communities
Engage in online forums and communities dedicated to car care and detailing. These platforms offer a wealth of information and allow you to connect with fellow enthusiasts and professionals.
20. Frequently Asked Questions (FAQs)
Here are some frequently asked questions about fixing light scratches on car paint:
Q1: Can I use toothpaste to remove scratches from my car?
While toothpaste may work on very light scratches, it’s not as effective as dedicated scratch removal compounds and can potentially damage your paint.
Q2: How do I know if a scratch is too deep to fix myself?
If your fingernail catches on the scratch, it’s likely too deep to fix with simple scratch removal compounds and may require touch-up paint or professional repair.
Q3: Can I use a household cleaner to wash my car before scratch repair?
No, household cleaners can be too harsh and may damage your car’s paint. Use a dedicated car wash soap.
Q4: How often should I wax my car to protect it from scratches?
Waxing your car every 3-6 months can help protect it from scratches and environmental damage.
Q5: What is the best way to remove swirl marks from my car’s paint?
Swirl marks can be removed with a dual-action polisher and polishing compound. Follow the steps outlined in this guide.
Q6: Can ceramic coatings prevent scratches?
Yes, ceramic coatings provide a durable, protective layer that can help prevent scratches and swirl marks.
Q7: What is the difference between polishing compound and rubbing compound?
Rubbing compound is more abrasive and is used to remove scratches and imperfections, while polishing compound is less abrasive and is used to refine the finish and restore shine.
Q8: How do I match the touch-up paint to my car’s color?
Use the paint code located on your car’s VIN plate to order touch-up paint that matches your car’s color.
Q9: Is it safe to use a pressure washer to wash my car?
Yes, but use a low-pressure setting and keep the nozzle at a safe distance to avoid damaging the paint.
Q10: How do I store my car care products properly?
Store your car care products in a cool, dry place away from direct sunlight and extreme temperatures.
Conclusion
Fixing light scratches on your car paint doesn’t have to be a daunting task. With the right tools, techniques, and information, you can effectively remove scratches, restore your car’s shine, and protect its value. Remember to assess the damage, choose the right products, follow the steps carefully, and take preventative measures to avoid future scratches. And for those looking for the best tools and equipment, don’t forget to check out CARDIAGTECH.NET.
Ready to restore your car’s flawless finish? Contact CARDIAGTECH.NET today at 276 Reock St, City of Orange, NJ 07050, United States or call us at +1 (641) 206-8880. Visit our website CARDIAGTECH.NET for a wide range of tools and equipment to help you with your car paint repair needs. Our experts are ready to assist you in selecting the perfect tools to address your specific challenges and enhance your work efficiency. Don’t let scratches ruin your car’s appearance any longer!
light scratches on car paint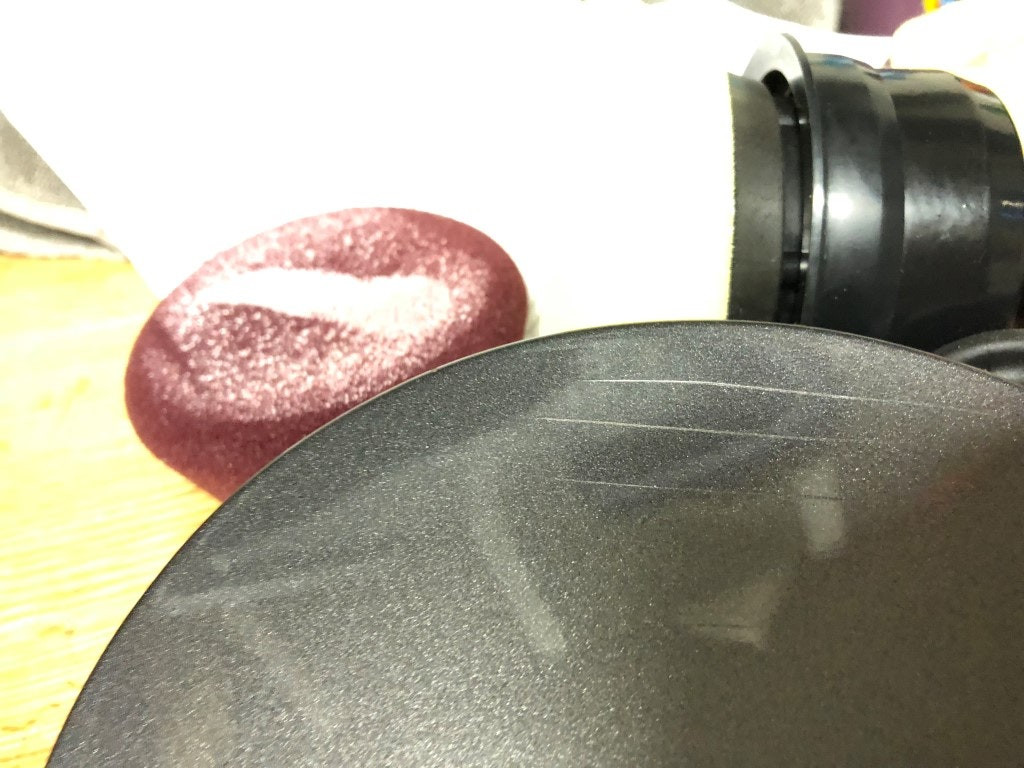 polishing with Meguiar’s machine-based tools