How to Fix Mirror on Car: A Comprehensive Guide
Fixing a car mirror involves replacing either the glass or the entire assembly, with the latter generally being simpler. At CARDIAGTECH.NET, we understand the inconvenience and safety concerns of driving with a damaged side mirror, and we’re here to guide you through the repair process. This comprehensive guide provides step-by-step instructions, helpful tips, and essential information to get you back on the road safely. We offer a range of tools and equipment to make your car mirror repair efficient and effective, ensuring you have everything you need for a seamless experience.
1. Understanding the Basics of Car Mirror Repair
What are the main components of a car side mirror?
The main components of a car side mirror include the mirror glass, the housing, the mounting bracket, and, in many modern cars, an electric motor for adjustment. According to a study by the National Highway Traffic Safety Administration (NHTSA), side mirrors are crucial for reducing blind spots and ensuring safer lane changes, making their proper function essential for road safety. These components work together to provide drivers with a clear view of their surroundings, and any damage to these parts can significantly impair visibility. Understanding these components is the first step in knowing how to fix mirror on car effectively.
1.1. Types of Side Mirrors
What are the different types of car side mirrors?
Different types of car side mirrors include manual mirrors, power mirrors, heated mirrors, and mirrors with integrated turn signals or blind-spot monitoring systems. Manual mirrors require manual adjustment, while power mirrors can be adjusted electronically from inside the car. Heated mirrors have a heating element to defog or defrost the mirror surface, enhancing visibility in cold weather. Mirrors with integrated turn signals or blind-spot monitoring systems add extra safety features. According to a report by the Insurance Institute for Highway Safety (IIHS), features like blind-spot monitoring can significantly reduce the risk of accidents.
1.2. Tools and Materials Needed
What tools and materials are required to fix a car mirror?
To fix a car mirror, you typically need a replacement mirror assembly or glass, a screwdriver set, a socket set, a trim panel removal tool, a utility knife, safety glasses, and gloves. Depending on the repair, you might also need adhesive, a heat gun, and a new wiring harness. A trim panel removal tool helps to remove interior panels without causing damage, and a socket set is necessary for unscrewing the mounting bolts. Safety glasses and gloves protect you from glass shards and sharp edges. The right tools not only make the job easier but also ensure a safer and more professional repair. CARDIAGTECH.NET offers a wide selection of high-quality tools to meet all your auto repair needs.
2. Preparing for the Repair
2.1. Assessing the Damage
How do I assess the damage to my car mirror?
To assess the damage to your car mirror, check whether the glass is cracked or broken, if the housing is damaged, or if the mirror is loose or detached. Also, inspect the electrical components if you have a power mirror. According to automotive repair expert Chris “Moose” Pyle from JustAnswer, replacing the entire mirror assembly is often easier than replacing just the glass, especially if the housing is damaged or the mirror has electrical components. Knowing the extent of the damage helps you decide whether to replace the glass only or the entire assembly.
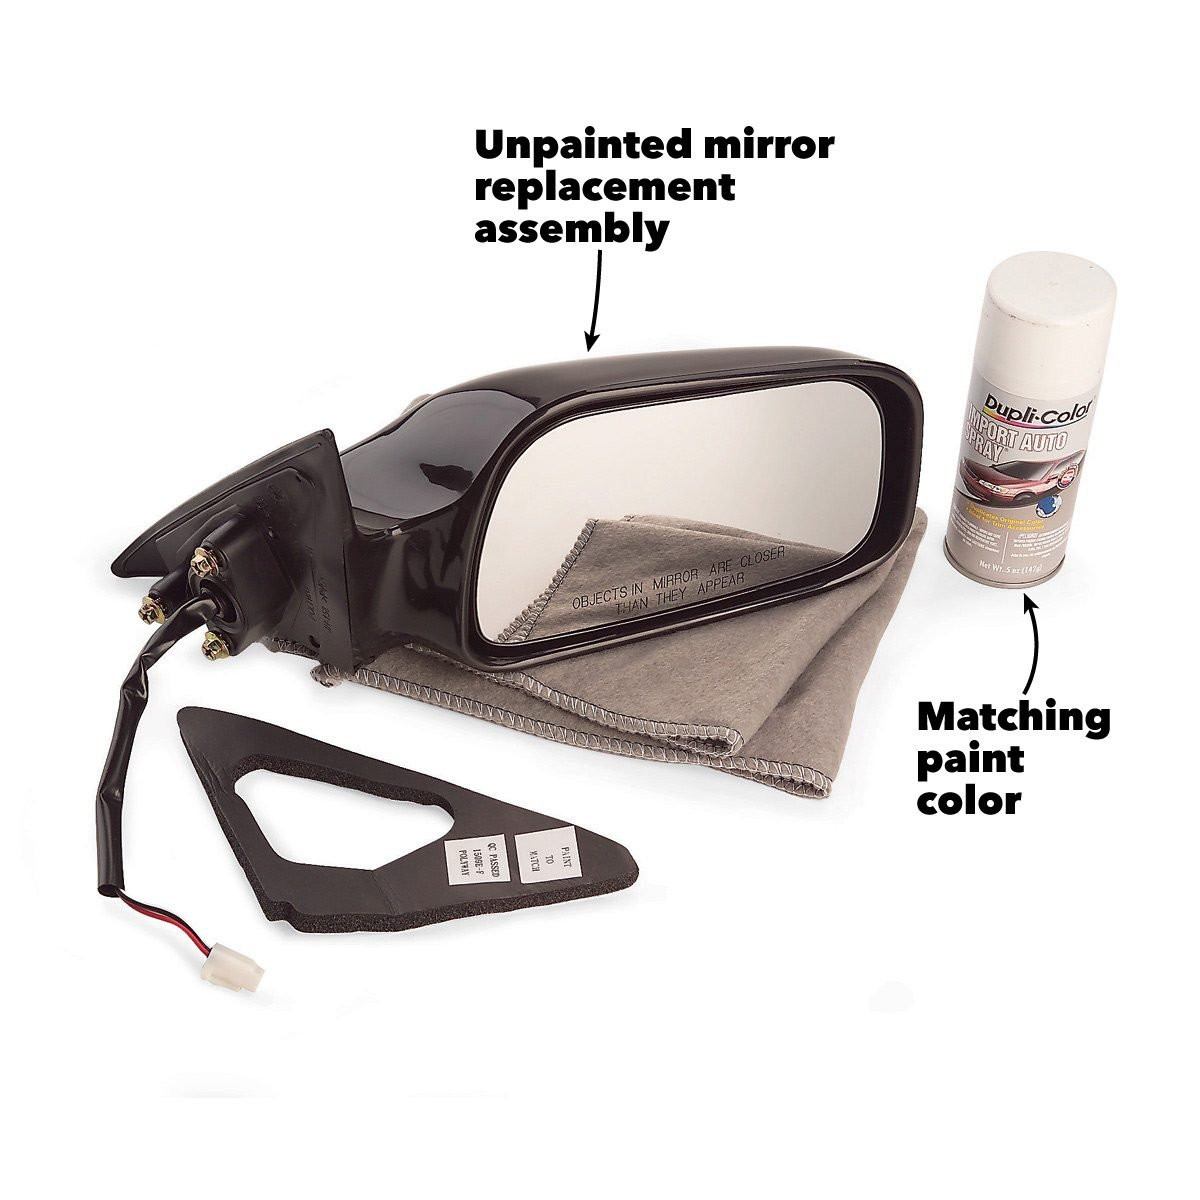
2.2. Ordering the Replacement Mirror
Where can I order a replacement car mirror?
You can order a replacement car mirror from online retailers like CARDIAGTECH.NET, auto parts stores, or directly from the car manufacturer. When ordering, make sure to specify the make, model, and year of your car to get the correct part. Also, check if you need a left-side (driver) or right-side (passenger) mirror. Ordering from CARDIAGTECH.NET ensures you get high-quality, compatible parts delivered quickly. Always verify the part number and specifications to avoid any compatibility issues.
2.3. Safety Precautions
What safety precautions should I take when fixing a car mirror?
When fixing a car mirror, wear safety glasses and gloves to protect yourself from glass shards and sharp edges. Disconnect the car battery to prevent electrical shock if you’re working with power mirrors. Work in a well-lit area and ensure the car is parked on a level surface. According to OSHA guidelines, using proper protective equipment is crucial for preventing injuries during auto repairs. Taking these precautions will help you perform the repair safely and efficiently.
3. Step-by-Step Guide to Replacing the Entire Side Mirror Assembly
3.1. Removing the Old Mirror
How do I remove the old side mirror assembly?
- Access the Mounting Bolts: Locate the mounting bolts or screws, usually behind a plastic cover on the inside of the car door.
- Remove the Cover: Use a trim panel removal tool to gently pry off the cover.
- Disconnect Electrical Connections: If it’s a power mirror, disconnect the electrical connector.
- Unscrew the Bolts: Use a socket wrench to remove the mounting bolts.
- Remove the Old Mirror: Carefully remove the old mirror assembly.
According to a repair manual from Haynes, ensuring all electrical connections are safely disconnected prevents damage to the car’s electrical system. Taking your time and using the right tools will help you avoid damaging the door or the mirror assembly.
Removing Side Mirror
3.2. Installing the New Mirror
How do I install the new side mirror assembly?
- Position the New Mirror: Place the new mirror assembly in the correct position on the door.
- Align the Mounting Holes: Align the mounting holes with the holes on the door.
- Secure with Bolts: Use the socket wrench to tighten the mounting bolts securely.
- Reconnect Electrical Connections: If it’s a power mirror, reconnect the electrical connector.
- Test the Mirror: Test the mirror to ensure it adjusts properly.
- Replace the Cover: Replace the plastic cover over the mounting bolts.
According to a guide by Popular Mechanics, ensuring the mounting bolts are properly tightened prevents the mirror from vibrating or coming loose while driving. Double-checking all connections and functions ensures the new mirror works correctly.
3.3. Reassembling the Door Panel
How do I reassemble the door panel after replacing the mirror?
- Align the Panel: Align the door panel with the door.
- Reconnect Electrical Connections: Reconnect any electrical connections for power windows or door locks.
- Push in Fasteners: Push the Christmas tree-shaped fasteners back into their holes.
- Replace Screws: Replace any screws that were removed.
- Test Functionality: Test the power windows and door locks to ensure they work.
According to a DIY guide by Family Handyman, using a trim panel removal tool to reattach the fasteners prevents damage to the door panel. Ensuring all components are correctly reconnected restores the door to its original functionality.
4. Replacing the Mirror Glass Only
4.1. Removing the Broken Glass
How do I remove the broken mirror glass?
- Wear Safety Glasses and Gloves: Protect yourself from glass shards.
- Heat the Glass: Use a heat gun to warm the adhesive behind the glass (be careful not to overheat).
- Pry off the Glass: Use a plastic pry tool or a utility knife to gently pry the broken glass from the mirror housing.
- Clean the Surface: Clean any remaining adhesive from the mirror housing using a solvent.
According to an article in AutoZone’s resource library, heating the glass softens the adhesive, making it easier to remove without damaging the mirror housing. Cleaning the surface thoroughly ensures the new glass adheres properly.
4.2. Installing the New Glass
How do I install the new mirror glass?
- Apply Adhesive: Apply a thin layer of adhesive to the back of the new mirror glass.
- Position the Glass: Carefully position the new glass in the mirror housing.
- Press Firmly: Press firmly on the glass to ensure it adheres to the housing.
- Secure with Tape: Use masking tape to hold the glass in place while the adhesive dries.
- Allow to Dry: Allow the adhesive to dry for the recommended time (usually 24 hours).
- Remove Tape: Remove the masking tape.
According to a guide by Advance Auto Parts, using the correct type of adhesive is essential for ensuring the glass stays in place. Allowing sufficient drying time ensures a strong and durable bond.
Installing the new car mirror glass into the mirror housing
4.3. Tips for a Clean Installation
What are some tips for ensuring a clean mirror glass installation?
- Cleanliness: Ensure both the mirror housing and the new glass are clean and free of debris before applying adhesive.
- Even Pressure: Apply even pressure when pressing the glass into the housing to avoid cracking.
- Avoid Overheating: When using a heat gun, avoid overheating the glass or housing.
- Use Quality Adhesive: Use a high-quality adhesive recommended for automotive mirrors.
Following these tips ensures a professional and long-lasting repair. Regular maintenance, as suggested by the National Institute for Automotive Service Excellence (ASE), can also extend the life of your mirrors.
5. Dealing with Power Mirrors
5.1. Understanding Power Mirror Components
What are the key components of a power mirror system?
The key components of a power mirror system include the mirror glass, the electric motor, the wiring harness, and the control switch. The electric motor adjusts the mirror’s position, the wiring harness provides power, and the control switch allows the driver to adjust the mirror from inside the car. According to a technical report by the Society of Automotive Engineers (SAE), these components must function correctly for the power mirror to operate effectively. Understanding these components helps in troubleshooting and repairing power mirror issues.
5.2. Troubleshooting Electrical Issues
How do I troubleshoot electrical issues in a power mirror?
- Check the Fuse: Check the fuse for the power mirror in the car’s fuse box.
- Inspect the Wiring: Inspect the wiring harness for any damage or loose connections.
- Test the Switch: Use a multimeter to test the control switch.
- Test the Motor: Use a multimeter to test the electric motor.
According to automotive diagnostic expert Mike Meyers, using a multimeter to test electrical components can quickly identify the source of the problem. Ensuring all connections are secure and the fuse is intact can often resolve common power mirror issues.
5.3. Replacing the Motor
How do I replace the electric motor in a power mirror?
- Remove the Mirror Glass: Remove the mirror glass to access the motor.
- Disconnect the Wiring: Disconnect the wiring harness from the motor.
- Remove the Old Motor: Unscrew the mounting screws and remove the old motor.
- Install the New Motor: Install the new motor and secure it with the mounting screws.
- Reconnect the Wiring: Reconnect the wiring harness to the motor.
- Reinstall the Mirror Glass: Reinstall the mirror glass.
According to a repair guide by Chilton, carefully disconnecting and reconnecting the wiring harness prevents damage to the electrical system. Ensuring the new motor is securely mounted ensures proper operation of the power mirror.
6. Painting the Replacement Mirror
6.1. Preparing the Surface
How do I prepare the replacement mirror for painting?
- Clean the Surface: Clean the surface of the mirror housing with soap and water.
- Sand the Surface: Lightly sand the surface with fine-grit sandpaper.
- Apply Primer: Apply a thin layer of automotive primer.
- Allow to Dry: Allow the primer to dry completely.
According to automotive painting expert Kevin Tetz, properly preparing the surface ensures the paint adheres correctly and provides a smooth finish. Sanding and priming create a uniform surface for the paint to bond to.
6.2. Applying the Paint
How do I apply the paint to the replacement mirror?
- Apply Base Coat: Apply a thin, even layer of automotive base coat paint.
- Allow to Dry: Allow the base coat to dry completely.
- Apply Additional Coats: Apply additional coats as needed for full coverage.
- Apply Clear Coat: Apply a thin, even layer of automotive clear coat.
- Allow to Dry: Allow the clear coat to dry completely.
According to a guide by Eastwood, applying thin, even layers of paint prevents runs and ensures a professional-looking finish. Using a clear coat protects the paint from scratches and UV damage.
6.3. Tips for a Professional Finish
What are some tips for achieving a professional paint finish on a car mirror?
- Use Quality Paint: Use high-quality automotive paint and clear coat.
- Spray Evenly: Spray the paint evenly, using smooth, overlapping strokes.
- Avoid Runs: Avoid applying too much paint at once to prevent runs.
- Allow Sufficient Drying Time: Allow sufficient drying time between coats.
- Wet Sanding: Wet sand the clear coat with fine-grit sandpaper for a smooth finish.
- Buffing: Buff the clear coat to restore the shine.
Following these tips ensures a durable and professional-looking paint finish. Proper maintenance, as highlighted by the National Auto Body Council (NABC), also contributes to the longevity of the paint job.
7. Maintaining Your Car Mirrors
7.1. Regular Cleaning
How often should I clean my car mirrors?
You should clean your car mirrors regularly, ideally every time you wash your car or at least once a month. Use a glass cleaner and a microfiber cloth to remove dirt, dust, and grime. According to a study by the AAA Foundation for Traffic Safety, clean mirrors significantly improve visibility and reduce the risk of accidents.
7.2. Preventing Damage
How can I prevent damage to my car mirrors?
- Fold Mirrors In: Fold your mirrors in when parking in tight spaces to prevent them from being hit by passing cars.
- Avoid Obstacles: Be aware of your surroundings and avoid driving too close to obstacles.
- Use Protective Covers: Use protective covers during severe weather conditions.
Taking these precautions can help prevent damage and extend the life of your car mirrors.
7.3. Addressing Minor Scratches
How can I fix minor scratches on my car mirrors?
You can fix minor scratches on your car mirrors by using a glass scratch repair kit. Apply the compound to the scratched area, buff it with a microfiber cloth, and then clean the surface. According to a report by Consumer Reports, using a scratch repair kit can effectively remove minor scratches and restore the clarity of the glass.
8. Benefits of Professional Repair Services
8.1. Expertise and Experience
What are the benefits of using professional repair services for car mirror repairs?
Professional repair services offer expertise and experience in handling car mirror repairs, ensuring the job is done correctly and efficiently. Professionals have the right tools and knowledge to diagnose and fix complex issues, saving you time and potential frustration. According to a survey by the Bureau of Labor Statistics, professionally trained auto technicians are more likely to provide accurate and reliable repairs.
8.2. Warranty and Assurance
Do professional repair services offer warranties for their work?
Yes, many professional repair services offer warranties for their work, providing assurance that the repair is of high quality and will last. A warranty protects you from additional costs if the repair fails or if any issues arise after the service. Checking the warranty terms before hiring a professional ensures you are covered in case of any problems.
8.3. Time and Convenience
How do professional repair services save time and offer convenience?
Professional repair services save you time and offer convenience by handling the entire repair process, from diagnosing the problem to ordering parts and completing the repair. This allows you to focus on other tasks while ensuring your car mirror is fixed correctly. According to a study by J.D. Power, convenience and time savings are significant factors in customer satisfaction with auto repair services.
9. Common Mistakes to Avoid
9.1. Using the Wrong Tools
What are the risks of using the wrong tools for car mirror repair?
Using the wrong tools for car mirror repair can damage the mirror housing, door panel, or electrical components. Incorrect tools can also lead to injury. Always use the recommended tools for the job to ensure a safe and effective repair. According to safety guidelines from the National Safety Council, using the right tools is crucial for preventing accidents during auto repairs.
9.2. Neglecting Safety Precautions
What are the potential consequences of neglecting safety precautions during car mirror repair?
Neglecting safety precautions during car mirror repair can result in cuts, electrical shock, or eye injuries. Always wear safety glasses and gloves, and disconnect the car battery when working with electrical components. Following safety guidelines protects you from potential harm.
9.3. Improper Installation
What can happen if the car mirror is not installed properly?
If the car mirror is not installed properly, it can vibrate, come loose, or fall off while driving, posing a safety risk. Ensure the mirror is securely mounted and all connections are properly tightened. Regular inspections, as recommended by the Department of Motor Vehicles (DMV), can help identify and address any issues before they become serious.
10. Frequently Asked Questions (FAQs)
10.1. How much does it cost to replace a car mirror?
The cost to replace a car mirror can range from $50 to $500, depending on the type of mirror and whether you hire a professional. Mirrors with advanced features like heating or blind-spot monitoring tend to be more expensive. According to RepairPal, the average cost for a side mirror replacement is between $150 and $350, including parts and labor.
10.2. Can I drive with a broken side mirror?
In many jurisdictions, it is illegal to drive with a broken side mirror, as it impairs visibility and poses a safety risk. Check your local laws to ensure compliance. According to the National Highway Traffic Safety Administration (NHTSA), side mirrors are essential for safe driving, and driving with a broken mirror can result in a traffic ticket.
10.3. How long does it take to replace a car mirror?
Replacing a car mirror can take anywhere from 30 minutes to 2 hours, depending on the complexity of the repair and your experience level. Hiring a professional can often expedite the process. According to estimates from auto repair shops, a typical side mirror replacement takes about an hour.
10.4. What is the difference between a manual and power mirror?
A manual mirror is adjusted by hand, while a power mirror is adjusted electronically from inside the car. Power mirrors offer convenience and ease of adjustment, while manual mirrors are simpler and less expensive. The choice between manual and power mirrors depends on your preferences and budget.
10.5. How do I find the correct replacement mirror for my car?
To find the correct replacement mirror for your car, specify the make, model, and year of your car when ordering. Also, check if you need a left-side (driver) or right-side (passenger) mirror. Verify the part number and specifications to avoid any compatibility issues. CARDIAGTECH.NET offers a convenient search tool to help you find the right mirror for your vehicle.
10.6. Can I replace just the mirror glass without replacing the entire assembly?
Yes, you can often replace just the mirror glass without replacing the entire assembly, provided the housing is not damaged. This can save you money, but it requires more careful work. According to automotive repair expert Chris “Moose” Pyle from JustAnswer, replacing the entire mirror assembly is generally easier, especially for those without experience.
10.7. What type of adhesive should I use to install new mirror glass?
Use a high-quality adhesive specifically designed for automotive mirrors. These adhesives are formulated to withstand temperature changes and provide a strong, durable bond. According to a guide by Advance Auto Parts, using the correct adhesive is essential for ensuring the glass stays in place.
10.8. How do I prevent my car mirrors from fogging up in cold weather?
Use heated mirrors or apply an anti-fog coating to prevent your car mirrors from fogging up in cold weather. Heated mirrors have a heating element that warms the glass, while anti-fog coatings create a barrier that prevents condensation. Regularly cleaning your mirrors can also help reduce fogging.
10.9. What should I do if my power mirror is not working?
If your power mirror is not working, check the fuse, inspect the wiring, test the switch, and test the motor. A blown fuse, loose connection, or faulty switch or motor could be the cause. Using a multimeter to test electrical components can help identify the problem.
10.10. Where can I find a professional to replace my car mirror?
You can find a professional to replace your car mirror by searching online directories, asking for recommendations from friends or family, or contacting local auto repair shops. Check reviews and ratings to ensure you choose a reputable and reliable service. CARDIAGTECH.NET can also provide referrals to qualified technicians in your area.
11. Contact CARDIAGTECH.NET for Your Auto Repair Needs
At CARDIAGTECH.NET, we understand the challenges you face as auto repair professionals. The physical demands, constant exposure to harsh chemicals, and the need to stay updated with ever-evolving automotive technology can be overwhelming. That’s why we offer a comprehensive range of high-quality tools and equipment designed to enhance your efficiency, reduce repair times, and ensure precision and safety in every task.
Whether you’re dealing with damaged car mirrors or any other auto repair need, CARDIAGTECH.NET is here to help. Our extensive catalog includes everything from trim panel removal tools to socket sets and electrical testers, all designed to meet the demands of modern auto repair.
Ready to Elevate Your Auto Repair Experience?
Don’t let the challenges of your profession hold you back. Contact CARDIAGTECH.NET today and discover how our tools and equipment can transform your work. Visit our website or reach out to us via WhatsApp to explore our offerings and receive expert advice tailored to your specific needs.
Address: 276 Reock St, City of Orange, NJ 07050, United States
WhatsApp: +1 (641) 206-8880
Website: CARDIAGTECH.NET
Let CARDIAGTECH.NET be your partner in success. Together, we can overcome the hurdles and achieve excellence in auto repair.
By following this guide and utilizing the right tools, you can effectively fix your car mirror and ensure your safety on the road. Whether you choose to replace the entire assembly or just the glass, remember to prioritize safety and take your time to ensure a proper installation. With CARDIAGTECH.NET, you have access to the tools and resources you need to tackle any auto repair project with confidence.