How To Fix My AC In My Car: A Comprehensive Guide
Is your car’s AC blowing warm air? Don’t sweat it CARDIAGTECH.NET is here to help you understand how to fix my AC in my car. This comprehensive guide offers solutions, from simple DIY fixes to knowing when it’s time to consult a professional. Get ready to restore that refreshing blast of cold air and enjoy comfortable drives again, equipping yourself with auto AC repair knowledge, automotive AC troubleshooting, and car air conditioning maintenance tips.
1. Understanding Your Car’s AC System
Before diving into repairs, it’s crucial to understand the fundamental components of your car’s air conditioning system. These components work together to provide cool air inside your vehicle. A basic understanding of these parts will significantly aid in diagnosing and addressing any AC issues you may encounter.
Here are the key parts of a typical car AC system:
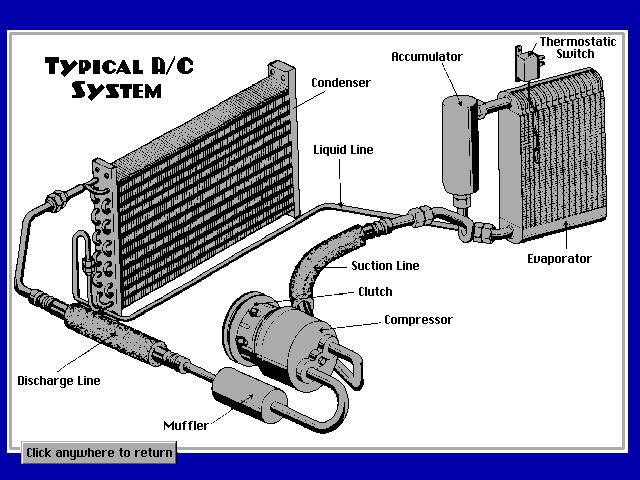
- Compressor: The compressor is the heart of the AC system, responsible for pressurizing the refrigerant. This process is essential for the refrigerant to absorb heat effectively. A malfunctioning compressor can lead to a complete loss of cooling.
- Condenser: Located near the radiator, the condenser cools the high-pressure refrigerant gas, turning it into a liquid. This heat exchange is vital for the cooling process.
- Receiver Drier/Accumulator: This component filters the refrigerant and removes moisture, preventing damage to other AC parts. A saturated or clogged drier can reduce the system’s efficiency.
- Expansion Valve/Orifice Tube: This metering device controls the flow of refrigerant into the evaporator, reducing its pressure and temperature. A faulty valve can cause inconsistent cooling.
- Evaporator: Positioned inside the dashboard, the evaporator is where the cold air is produced. The liquid refrigerant absorbs heat from the air passing over it, cooling the cabin.
- Refrigerant Lines: These hoses and lines transport the refrigerant between the various components of the AC system. Leaks in these lines can cause a loss of refrigerant and cooling ability.
Car AC System Components
2. Identifying Common Car AC Problems
Diagnosing the problem is the first step in effectively fixing your car’s AC. Here are some common issues you might encounter:
- AC Blows Warm Air: This is a frequent problem often caused by low refrigerant levels, a faulty compressor, or a blocked condenser.
- Weak Airflow: Restricted airflow can result from a clogged cabin air filter, a failing blower motor, or blocked vents.
- AC Works Intermittently: Intermittent cooling can be due to electrical issues, a failing compressor clutch, or a partially blocked expansion valve.
- Strange Noises: Unusual sounds like rattling or hissing can indicate a failing compressor, a refrigerant leak, or debris in the system.
- Unpleasant Odors: Musty or moldy smells suggest mold or mildew growth in the evaporator core or vents.
- Leaking Refrigerant: Visible leaks under the car or oily residue on AC components are signs of a refrigerant leak, which can compromise cooling performance.
3. Gathering Essential Tools and Equipment
Before attempting any AC repairs, ensure you have the necessary tools and equipment. Having the right tools will make the job easier, safer, and more efficient. CARDIAGTECH.NET provides top-quality tools designed for automotive AC repair, ensuring you’re well-equipped for any task.
Here’s a list of essential tools and equipment:
- AC Manifold Gauge Set: Used to measure the pressure in the AC system, essential for diagnosing refrigerant levels and system performance.
- Vacuum Pump: Used to remove air and moisture from the AC system before recharging, ensuring optimal performance and preventing damage.
- Refrigerant Recharge Kit: Includes refrigerant, a charging hose, and a gauge for adding refrigerant to the system.
- Leak Detector: Helps locate refrigerant leaks using UV dye or electronic sensors.
- Socket Set and Wrenches: Necessary for removing and installing AC components.
- Screwdrivers: Various sizes and types for removing panels and accessing components.
- Pliers: Useful for disconnecting hoses and clamps.
- Safety Glasses and Gloves: Essential for protecting your eyes and skin from refrigerant and other chemicals.
- Multimeter: Used to test electrical components, such as the compressor clutch and blower motor.
- Cabin Air Filter: A new cabin air filter to improve airflow and air quality.
- AC Vent Cleaner: Used to remove mold and mildew from the AC vents, eliminating unpleasant odors.
- Work Light: Provides ample illumination for working in the engine bay or under the dashboard.
- Service Manual: A detailed guide specific to your car model, providing valuable information on AC system components and repair procedures.
4. Step-by-Step Guide to Fixing Common AC Problems
4.1. Addressing Low Refrigerant Levels
Low refrigerant is one of the most common reasons for an AC system blowing warm air. Here’s how to address it:
- Check Refrigerant Levels: Use an AC manifold gauge set to measure the pressure on both the high and low sides of the system. Compare the readings to the specifications in your car’s service manual.
- Locate the Low-Pressure Port: Typically found on the accumulator or refrigerant line.
- Connect the Recharge Kit: Attach the recharge hose to the low-pressure port.
- Add Refrigerant: Follow the instructions on the recharge kit to add refrigerant slowly. Monitor the pressure gauge to avoid overcharging.
- Test the AC: Start the car and turn on the AC to the maximum setting. Check if the air is blowing cold.
Safety Tip: Always wear safety glasses and gloves when working with refrigerant. Avoid overcharging the system, as it can damage the compressor.
4.2. Clearing Blocked or Broken Fans
Blocked or broken condenser fans can significantly affect the AC system’s cooling efficiency. Here’s how to inspect and resolve this issue:
- Inspect the Condenser Fans: Locate the fans in front of the condenser, usually behind the grille.
- Remove Debris: Clear away any leaves, bugs, or dirt that may be blocking the fans.
- Check Fan Operation: Turn on the AC and observe if the fans are spinning. If they are not, check the electrical connections and fuses.
- Test the Fan Motor: Use a multimeter to check if the fan motor is receiving power. If not, trace the wiring to identify any breaks or shorts.
- Replace the Fan Motor: If the motor is faulty, replace it with a new one. Ensure the replacement fan matches the specifications of the original.
Condenser Fan Inspection
4.3. Replacing a Dirty Cabin Air Filter
A clogged cabin air filter can restrict airflow and reduce the AC system’s cooling performance. Replacing it is a simple but effective maintenance task:
- Locate the Cabin Air Filter: Consult your car’s service manual to find the location of the cabin air filter, usually behind the glove compartment or under the dashboard.
- Remove the Old Filter: Open the filter housing and remove the old, dirty filter.
- Install the New Filter: Insert the new cabin air filter, ensuring it is oriented correctly.
- Reassemble the Housing: Close the filter housing and secure it.
- Test the Airflow: Turn on the AC and check if the airflow has improved.
Tip: Replace the cabin air filter every 12,000 to 15,000 miles, or more frequently if you drive in dusty conditions.
4.4. Detecting and Repairing AC Leaks
Refrigerant leaks can cause a gradual loss of cooling performance. Detecting and repairing leaks promptly is crucial for maintaining an efficient AC system:
- Visual Inspection: Examine all AC components, including hoses, fittings, and the compressor, for signs of oily residue, which indicates a leak.
- Use a UV Leak Detection Kit: Add UV dye to the AC system and use a UV light to locate leaks. The dye will glow at the site of the leak.
- Electronic Leak Detector: Use an electronic leak detector to sniff for refrigerant leaks. This tool can detect even small leaks that are difficult to find visually.
- Repair Leaks: Depending on the location and severity of the leak, you may need to replace hoses, fittings, or even the entire compressor.
- Evacuate and Recharge the System: After repairing the leak, use a vacuum pump to evacuate the system, then recharge it with the correct amount of refrigerant.
Note: For significant leaks or complex repairs, it’s best to consult a professional mechanic.
4.5. Addressing Electrical Problems
Electrical issues can prevent the AC system from functioning correctly. Here’s how to troubleshoot and address these problems:
- Check Fuses and Relays: Inspect the fuses and relays related to the AC system in the fuse box. Replace any blown fuses or faulty relays.
- Test the Compressor Clutch: Use a multimeter to check if the compressor clutch is receiving power when the AC is turned on. If not, there may be a wiring problem.
- Inspect Wiring: Examine the wiring harness for any damaged or corroded wires. Repair or replace any faulty wiring.
- Check the AC Control Panel: Ensure the AC control panel is functioning correctly. If not, the panel may need to be replaced.
- Consult a Professional: For complex electrical issues, it’s best to seek assistance from a qualified mechanic.
4.6. Handling a Failing Compressor or Compressor Clutch
A failing compressor or compressor clutch can result in a complete loss of cooling. Here’s how to diagnose and address this issue:
- Listen for Unusual Noises: A loud rattling or clunking noise when the AC is turned on can indicate a failing compressor.
- Check Compressor Clutch Engagement: Observe if the compressor clutch is engaging when the AC is turned on. If it is not, the clutch may be faulty.
- Test Compressor Performance: Use an AC manifold gauge set to check the pressure readings when the AC is running. Low or erratic readings can indicate a failing compressor.
- Replace the Compressor Clutch: If the clutch is faulty, you can replace it separately from the compressor. This is a more affordable option if the compressor is still functioning correctly.
- Replace the Compressor: If the compressor is failing, replace it with a new one. Ensure the replacement compressor matches the specifications of the original.
- Evacuate and Recharge the System: After replacing the compressor or clutch, use a vacuum pump to evacuate the system, then recharge it with the correct amount of refrigerant.
AC Compressor Clutch
4.7. Eliminating Unpleasant Odors
Musty or moldy smells from the AC vents indicate mold or mildew growth in the system. Here’s how to eliminate these odors:
- Clean the Vents: Use an AC vent and duct cleaner to spray into the vents, killing mold and bacteria.
- Clean the Evaporator Core: Some AC vent cleaners can also be sprayed into the evaporator core housing to clean the evaporator. Follow the instructions on the cleaner carefully.
- Run the AC on High: Run the AC on high with the windows open for several minutes to help dry out the system and eliminate odors.
- Check the Drain Hose: Ensure the AC drain hose is not blocked. A blocked drain hose can cause moisture to build up in the evaporator core housing, promoting mold growth.
- Replace the Dryer: If the odors persist, the receiver drier may need to be replaced. A saturated dryer can contribute to mold growth.
5. When to Seek Professional Help
While many AC issues can be resolved with DIY repairs, some problems require professional assistance. It’s crucial to know when to seek help from a qualified mechanic to avoid further damage and ensure safety.
Here are situations when professional help is necessary:
- Complex Refrigerant Leaks: If you cannot locate the leak or if the leak is in a difficult-to-access area, a professional mechanic has the tools and expertise to find and repair it.
- Compressor Replacement: Replacing the compressor requires specialized tools and knowledge. Incorrect installation can cause further damage to the AC system.
- Electrical Problems: Complex electrical issues, such as shorts or wiring problems, can be challenging to diagnose and repair without the proper equipment and training.
- System Evacuation and Recharge: Evacuating and recharging the AC system requires a vacuum pump and refrigerant handling equipment. Improper handling of refrigerant can be harmful to the environment.
- Uncertain Diagnosis: If you are unsure about the cause of the AC problem, a professional mechanic can perform a thorough diagnosis and recommend the appropriate repairs.
6. Maintaining Your Car’s AC System for Longevity
Regular maintenance is essential for keeping your car’s AC system in top condition and preventing costly repairs. Here are some maintenance tips:
- Regularly Check Refrigerant Levels: Periodically check the refrigerant levels using an AC manifold gauge set. If the levels are low, have the system checked for leaks.
- Replace the Cabin Air Filter: Replace the cabin air filter every 12,000 to 15,000 miles to ensure good airflow and air quality.
- Inspect and Clean the Condenser: Regularly inspect the condenser for debris and clean it to ensure proper airflow.
- Run the AC Regularly: Run the AC for at least 10 minutes each month, even in the winter, to keep the compressor lubricated and prevent seals from drying out.
- Check Belts and Hoses: Inspect the belts and hoses related to the AC system for cracks or wear. Replace them as needed.
- Professional Service: Schedule a professional AC service every 2-3 years to have the system inspected, evacuated, and recharged.
7. Understanding Car AC Repair Costs
Car AC repair costs can vary widely depending on the problem, the type of car, and the repair shop. Understanding these costs can help you budget for repairs and avoid overpaying.
Here are some typical AC repair costs:
| Repair | Average Cost |
|---|---|
| AC System Inspection and Diagnostics | $75 – $150 |
| AC Recharge (at mechanic shop) | $150 – $300 |
| AC Hose Repair or Replacement | $200 – $400 |
| Compressor Clutch Replacement | $450 – $850 |
| New Compressor Installation | $800 – $1500 |
| New Car AC Installation or System Replacement | $2000 – $4000+ |
Factors Affecting AC Repair Costs:
- Cause of the Problem: Some repairs, such as replacing a hose or recharging the system, are relatively inexpensive. Others, like compressor replacement, are more costly.
- Type of Car: Luxury or high-performance cars typically have higher repair costs due to more expensive parts and specialized labor.
- Labor Costs: Labor rates vary depending on the repair shop and location.
- DIY vs. Professional Repair: DIY repairs can save on labor costs, but they require the right tools, knowledge, and safety precautions.
8. Why Choose CARDIAGTECH.NET for Your AC Repair Needs
When it comes to car AC repair, having the right tools and expertise is essential. CARDIAGTECH.NET offers a wide range of high-quality automotive tools and equipment designed to make AC repairs easier, safer, and more efficient.
Here are some reasons to choose CARDIAGTECH.NET:
- High-Quality Tools: CARDIAGTECH.NET provides durable and reliable tools that meet the needs of both DIY enthusiasts and professional mechanics.
- Wide Selection: Whether you need an AC manifold gauge set, a vacuum pump, or a refrigerant recharge kit, CARDIAGTECH.NET has you covered.
- Expert Advice: The knowledgeable staff at CARDIAGTECH.NET can provide expert advice and guidance on selecting the right tools and equipment for your specific needs.
- Competitive Prices: CARDIAGTECH.NET offers competitive prices on all its products, ensuring you get the best value for your money.
- Customer Satisfaction: CARDIAGTECH.NET is committed to customer satisfaction and provides excellent customer service and support.
By choosing CARDIAGTECH.NET, you can be confident that you are getting the best tools and equipment to tackle your car AC repairs.
9. Real-World Examples of DIY AC Fixes
Here are a few real-world examples of how DIY AC fixes can save you time and money:
- Example 1: Low Refrigerant
- Problem: AC blowing warm air.
- Solution: Checked refrigerant levels with a manifold gauge set, found levels were low, and recharged the system with a refrigerant recharge kit.
- Savings: Saved $150 – $300 compared to a professional AC recharge.
- Example 2: Clogged Cabin Air Filter
- Problem: Weak airflow from AC vents.
- Solution: Located and replaced the dirty cabin air filter with a new one.
- Savings: Saved $50 – $100 compared to having a mechanic replace the filter.
- Example 3: Blocked Condenser Fans
- Problem: AC not cooling effectively.
- Solution: Inspected the condenser fans and cleared away leaves and debris blocking the airflow.
- Savings: Avoided a costly diagnosis and repair by resolving the issue with a simple cleaning.
These examples illustrate how simple DIY fixes can address common AC problems and save you money on professional repairs.
10. Call to Action
Don’t let a malfunctioning AC system ruin your driving experience. Whether you’re a seasoned mechanic or a DIY enthusiast, CARDIAGTECH.NET has the tools and equipment you need to fix your car’s AC and stay cool on the road.
Ready to get started? Contact CARDIAGTECH.NET today for expert advice and top-quality tools. Our team is here to help you find the right solutions for your AC repair needs.
Contact Information:
- Address: 276 Reock St, City of Orange, NJ 07050, United States
- WhatsApp: +1 (641) 206-8880
- Website: CARDIAGTECH.NET
Visit our website or contact us via WhatsApp to explore our wide selection of automotive tools and equipment. Let CARDIAGTECH.NET help you stay cool and comfortable behind the wheel.
FAQ: How to Fix My AC in My Car
- Why is my car AC blowing warm air instead of cold?
- The most common reasons include low refrigerant levels, a faulty compressor, a clogged condenser, or electrical issues.
- How do I check the refrigerant level in my car’s AC system?
- Use an AC manifold gauge set to measure the pressure on both the high and low sides of the system. Compare the readings to the specifications in your car’s service manual.
- What tools do I need to recharge my car’s AC system?
- You will need a refrigerant recharge kit, which typically includes refrigerant, a charging hose, and a gauge.
- Can I replace the cabin air filter myself?
- Yes, replacing the cabin air filter is a simple DIY task. Consult your car’s service manual to find the location of the filter and follow the instructions for replacement.
- How often should I replace the cabin air filter?
- Replace the cabin air filter every 12,000 to 15,000 miles, or more frequently if you drive in dusty conditions.
- What causes a musty smell from my car’s AC vents?
- A musty smell indicates mold or mildew growth in the evaporator core or vents.
- How can I eliminate the musty smell from my car’s AC system?
- Use an AC vent and duct cleaner to spray into the vents and evaporator core housing. Run the AC on high with the windows open for several minutes.
- What are the signs of a refrigerant leak in my car’s AC system?
- Signs include visible leaks under the car, oily residue on AC components, and a gradual loss of cooling performance.
- When should I seek professional help for my car’s AC problems?
- Seek professional help for complex refrigerant leaks, compressor replacement, electrical problems, or if you are unsure about the cause of the AC problem.
- How can I maintain my car’s AC system for longevity?
- Regularly check refrigerant levels, replace the cabin air filter, inspect and clean the condenser, run the AC regularly, and schedule a professional AC service every 2-3 years.