How To Fix Paint Blisters On Car: A Comprehensive Guide
Paint blisters on your car can be a real eyesore, but don’t worry. CARDIAGTECH.NET is here to guide you through fixing them and restoring your car’s smooth finish. With the right techniques, proper auto body tools, and high-quality automotive paint products, you can achieve a professional-looking repair. Learn how to tackle paint bubbling, clear coat failure, and other paint defects with confidence, and consider CARDIAGTECH.NET for all your auto repair equipment needs.
1. Understanding Paint Blisters on Cars
Paint blisters on a car, also known as paint bubbles, are raised areas under the paint’s surface that look like small bumps or blisters. These blemishes detract from your vehicle’s appearance and can lead to more significant paint damage if left unattended. Understanding the root causes and different types of paint blisters is the first step in effective repair.
1.1. Causes of Paint Blisters
Several factors can contribute to paint blisters, including:
- Moisture: Trapped moisture beneath the paint film is a common culprit. This can occur due to improper surface preparation, leaks, or high humidity during painting.
- Contamination: Dirt, oil, wax, or other contaminants on the surface before painting can prevent proper adhesion, leading to blisters.
- Improper Preparation: Inadequate sanding or cleaning of the surface before applying paint can compromise the bond between the paint and the substrate.
- Incompatible Products: Using incompatible primers, paints, or clear coats can cause chemical reactions that result in blistering.
- Poor Application: Applying paint too thickly or in unfavorable conditions (e.g., direct sunlight, high temperatures) can trap solvents and create bubbles.
1.2. Types of Paint Blisters
Paint blisters can manifest in various forms:
- Small Blisters: These are typically caused by minor contamination or trapped moisture.
- Large Blisters: Larger blisters often indicate more severe moisture issues or significant surface contamination.
- Localized Blisters: These occur in specific areas and may be due to localized contamination or damage.
- Widespread Blisters: Widespread blistering usually suggests a systemic problem, such as improper surface preparation or incompatible products.
Understanding the specific type and cause of the paint blisters will help you choose the most appropriate repair method.
Paint Bubbles on Car Door
2. Essential Tools and Materials
Before you begin, gather the necessary tools and materials. Having everything on hand will streamline the repair process and ensure a professional finish. Here’s a comprehensive list:
2.1. Safety Gear
- Safety Glasses: Protect your eyes from dust, debris, and chemical splashes.
- Respirator or Dust Mask: Essential for preventing inhalation of paint fumes and dust particles.
- Gloves: Protect your hands from solvents, paints, and other chemicals.
2.2. Surface Preparation
- Wax and Grease Remover: For cleaning the surface and removing contaminants.
- Clean Microfiber Cloths: For wiping down surfaces and applying cleaning solutions.
- Sandpaper: Various grits (e.g., 180, 320, 400, 600) for sanding down the affected areas and feathering the edges.
- Sanding Block: Provides a flat, even surface for sanding.
- Tack Cloth: For removing fine dust particles after sanding.
2.3. Repair Materials
- Body Filler (Bondo): For filling in imperfections and creating a smooth surface.
- Putty Knife: For applying body filler evenly.
- Automotive Primer: To provide a base for the paint and improve adhesion.
- Automotive Paint: Matching the original color of your car.
- Clear Coat: To protect the paint and provide a glossy finish.
2.4. Application Tools
- Spray Gun: For applying primer, paint, and clear coat (if using a professional setup).
- Aerosol Cans: Alternative to a spray gun, suitable for smaller repairs.
- Mixing Cups and Sticks: For accurately mixing paint and clear coat.
- Masking Tape and Paper: To protect surrounding areas from overspray.
2.5. Additional Tools
- Heat Gun (Optional): To help dry body filler and paint more quickly.
- Razor Blade or Utility Knife: For carefully removing loose paint.
- Detail Brushes: For touch-up work.
- Polishing Compound and Pads: For buffing and polishing the repaired area.
CARDIAGTECH.NET offers a wide range of professional-grade tools and equipment to help you tackle any auto repair project with confidence. Consider investing in quality tools to ensure the best possible results. Contact us at +1 (641) 206-8880 for expert advice on selecting the right tools for your needs.
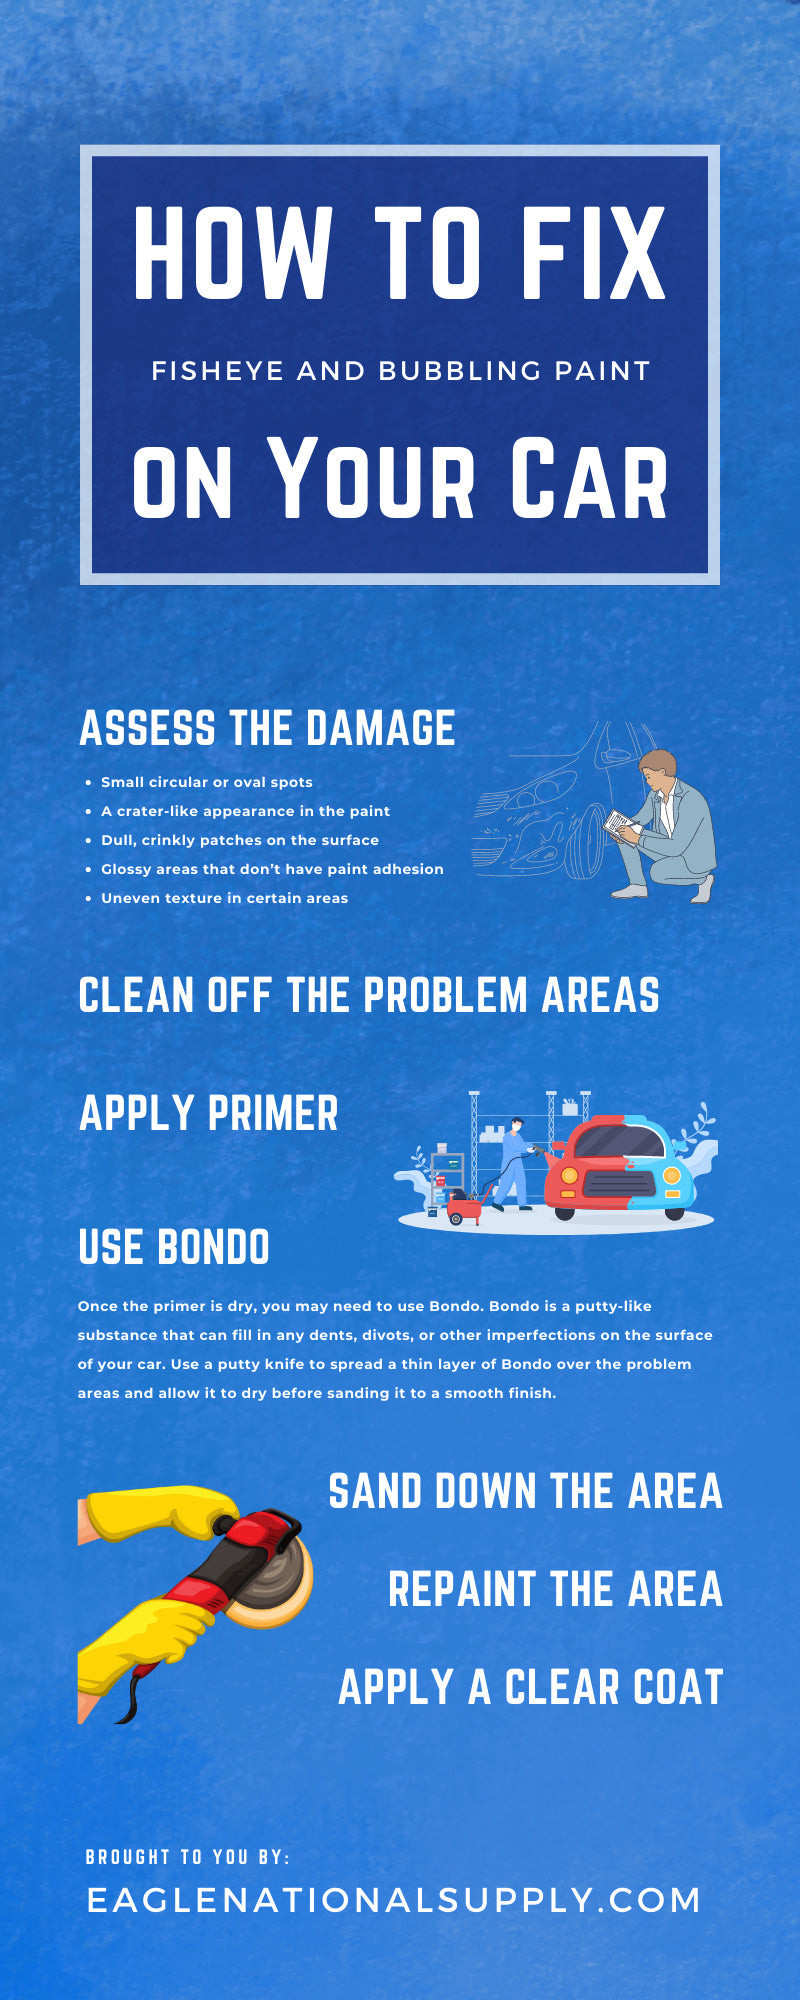
3. Step-by-Step Guide to Fixing Paint Blisters
Follow these steps to effectively repair paint blisters and restore your car’s finish:
3.1. Preparation and Assessment
Step 1: Clean the Area
Begin by thoroughly cleaning the affected area with wax and grease remover. Use a clean microfiber cloth to wipe away any dirt, oil, or contaminants. This step is crucial for ensuring proper adhesion of the repair materials.
Step 2: Assess the Damage
Carefully inspect the paint blisters to determine their extent and cause. Use a razor blade or utility knife to gently remove any loose or flaking paint around the blisters. Be careful not to damage the surrounding paint.
Step 3: Sand the Area
Using 180-grit sandpaper, sand down the paint blisters and the surrounding area. The goal is to remove the blisters and create a smooth transition between the damaged and undamaged paint. Use a sanding block to ensure a flat, even surface. Gradually move to finer grits like 320 and 400 to smooth out the scratches.
3.2. Applying Body Filler (if necessary)
Step 1: Mix the Body Filler
If the sanding process reveals any dents or imperfections, you’ll need to use body filler. Follow the manufacturer’s instructions to mix the body filler with the hardener. Typically, you’ll need a small amount of hardener to activate the filler.
Step 2: Apply the Filler
Use a putty knife to apply a thin, even layer of body filler over the damaged area. Press the filler into any dents or imperfections, and feather the edges to blend with the surrounding surface.
Step 3: Allow to Dry
Allow the body filler to dry completely. This may take 20-30 minutes, depending on the product and environmental conditions. A heat gun can be used to speed up the drying process, but be careful not to overheat the filler.
Step 4: Sand the Filler
Once the filler is dry, sand it down using progressively finer grits of sandpaper (e.g., 320, 400). Use a sanding block to maintain a flat, even surface. The goal is to create a smooth, seamless transition between the filler and the surrounding paint.
3.3. Priming and Painting
Step 1: Clean the Area Again
After sanding, use a tack cloth to remove any fine dust particles from the surface. This will ensure proper adhesion of the primer and paint.
Step 2: Mask the Surrounding Area
Use masking tape and paper to protect the surrounding areas from overspray. Cover any areas that you don’t want to be painted, ensuring a clean, crisp line.
Step 3: Apply Primer
Apply a thin, even coat of automotive primer to the repaired area. Hold the spray gun or aerosol can about 8-10 inches from the surface and use smooth, overlapping strokes. Allow the primer to dry completely before proceeding.
Step 4: Sand the Primer
Once the primer is dry, lightly sand it with 600-grit sandpaper to create a smooth surface for the paint. Use a tack cloth to remove any dust particles.
Step 5: Apply Paint
Apply several thin, even coats of automotive paint to the primed area. Match the paint to the original color of your car for a seamless repair. Allow each coat to dry before applying the next.
Step 6: Apply Clear Coat
After the paint has dried, apply several thin, even coats of clear coat to protect the paint and provide a glossy finish. Allow each coat to dry before applying the next.
3.4. Finishing Touches
Step 1: Remove Masking
Carefully remove the masking tape and paper.
Step 2: Wet Sand (Optional)
If there are any imperfections in the clear coat, you can wet sand it with 2000-grit sandpaper. Be very careful not to sand through the clear coat.
Step 3: Polish and Buff
Use a polishing compound and a polishing pad to buff the repaired area. This will remove any swirl marks or imperfections and create a smooth, glossy finish.
Step 4: Wax
Apply a coat of wax to protect the paint and enhance the shine.
By following these steps carefully, you can effectively repair paint blisters and restore your car’s finish. Remember to take your time, use high-quality materials, and follow all safety precautions.
4. Advanced Techniques for Difficult Cases
While the above steps cover most common scenarios, some cases require more advanced techniques. Here are a few tips for dealing with difficult paint blisters:
4.1. Dealing with Extensive Moisture Damage
If the paint blisters are caused by extensive moisture damage, you may need to take additional steps to dry out the affected area. This could involve using a heat gun to carefully dry the area or removing interior trim to allow for better ventilation. Ensure the area is completely dry before proceeding with repairs.
4.2. Addressing Contamination Issues
If contamination is the primary cause of the paint blisters, it’s essential to thoroughly clean the surface before any repair work. Use a high-quality wax and grease remover, and consider using a degreaser to remove any stubborn contaminants. In some cases, you may need to use a specialized cleaner designed for removing specific types of contamination.
4.3. Blending Techniques for Seamless Repairs
Achieving a seamless repair can be challenging, especially when dealing with metallic paints. Blending the new paint with the surrounding paint is crucial for a professional finish. Here are some tips for blending:
- Feather the Edges: When sanding, feather the edges of the repair area to create a smooth transition.
- Use a Blending Solvent: A blending solvent can help to dissolve the edges of the new paint and blend it with the surrounding paint.
- Apply Multiple Thin Coats: Apply several thin coats of paint, gradually extending the coverage area with each coat.
- Polish Carefully: Use a fine polishing compound to carefully blend the edges of the repair area.
4.4. Using Specialized Tools
Certain specialized tools can make the repair process easier and more effective. These include:
- Infrared Curing Lamps: These lamps can be used to quickly dry body filler and paint, reducing the overall repair time.
- Paint Thickness Gauges: These gauges can be used to measure the thickness of the paint layers, ensuring that the new paint matches the original paint.
- Color Matching Systems: These systems use spectrophotometers to accurately match the color of the new paint to the original paint.
Investing in these tools can significantly improve the quality and efficiency of your repairs. CARDIAGTECH.NET offers a wide range of specialized tools to help you achieve professional results. Visit CARDIAGTECH.NET to explore our selection.
5. Preventing Future Paint Blisters
Prevention is always better than cure. Here are some tips for preventing paint blisters and maintaining your car’s finish:
5.1. Proper Surface Preparation
Thorough surface preparation is the key to preventing paint blisters. Always clean the surface with wax and grease remover before painting, and ensure that the surface is free of any contaminants. Sand the surface to create a smooth, even base for the paint.
5.2. Using Quality Products
Using high-quality primers, paints, and clear coats is essential for a durable, long-lasting finish. Avoid using cheap or low-quality products, as they are more likely to cause problems such as paint blisters.
5.3. Controlling the Environment
Painting in the right environmental conditions is crucial for preventing paint blisters. Avoid painting in direct sunlight, high humidity, or extreme temperatures. The ideal temperature range for painting is between 60 and 80 degrees Fahrenheit, and the humidity should be below 70%.
5.4. Regular Maintenance
Regularly washing and waxing your car can help to protect the paint and prevent damage. Waxing creates a protective layer that shields the paint from UV rays, dirt, and other contaminants.
5.5. Addressing Leaks and Moisture Issues
Promptly address any leaks or moisture issues in your car to prevent moisture from getting trapped under the paint. Check for leaks around windows, doors, and seals, and repair them as soon as possible.
6. Choosing the Right Products from CARDIAGTECH.NET
Selecting the right products is crucial for achieving a professional and lasting repair. CARDIAGTECH.NET offers a wide range of high-quality tools and materials to meet all your auto repair needs. Here are some recommendations based on different repair scenarios:
6.1. Essential Surface Preparation Products
- Wax and Grease Remover: CARDIAGTECH.NET offers a variety of wax and grease removers that effectively clean the surface, ensuring proper adhesion of repair materials.
- Sandpaper Assortment: Choose a selection of sandpaper grits to handle various stages of surface preparation, from removing blisters to creating a smooth base.
- Tack Cloths: Essential for removing fine dust particles after sanding, ensuring a clean surface for painting.
6.2. High-Quality Repair Materials
- Body Fillers: CARDIAGTECH.NET provides durable and easy-to-use body fillers for filling in imperfections and creating a seamless surface.
- Automotive Primers: Select a primer that is compatible with your paint type, ensuring optimal adhesion and protection against corrosion.
- Automotive Paints: Find the perfect color match for your vehicle with our extensive range of high-quality automotive paints.
- Clear Coats: Protect your paint job and add a glossy finish with our durable and long-lasting clear coats.
6.3. Professional Application Tools
- Spray Guns: Choose from a variety of spray guns designed for professional application of primers, paints, and clear coats.
- Aerosol Cans: Convenient for smaller repairs, aerosol cans provide a consistent and even spray pattern.
- Mixing Cups and Sticks: Accurately measure and mix paints and clear coats with our high-quality mixing cups and sticks.
6.4. Specialized Equipment
- Infrared Curing Lamps: Speed up the drying process for body fillers and paints with our efficient infrared curing lamps.
- Paint Thickness Gauges: Ensure consistent paint thickness with our accurate paint thickness gauges.
- Color Matching Systems: Achieve a perfect color match with our advanced color matching systems.
Investing in quality products from CARDIAGTECH.NET can significantly improve the outcome of your repairs. Our expert team is available to provide guidance and support, ensuring you select the right tools and materials for your specific needs. Contact us at +1 (641) 206-8880 for personalized assistance.
7. The Importance of Safety Precautions
When working with automotive paints, chemicals, and tools, it’s essential to prioritize safety. Here are some important safety precautions to keep in mind:
7.1. Personal Protective Equipment (PPE)
Always wear appropriate PPE, including safety glasses, a respirator or dust mask, and gloves. These items will protect you from chemical splashes, dust particles, and harmful fumes.
7.2. Ventilation
Work in a well-ventilated area to avoid inhaling harmful fumes. If working indoors, open windows and doors or use a ventilation system to circulate fresh air.
7.3. Fire Safety
Keep flammable materials away from heat sources and open flames. Automotive paints and solvents are highly flammable, so it’s essential to take precautions to prevent fires. Keep a fire extinguisher nearby and know how to use it.
7.4. Chemical Handling
Follow the manufacturer’s instructions for handling and storing automotive paints, chemicals, and solvents. Avoid contact with skin and eyes, and never ingest these materials. If you come into contact with chemicals, wash the affected area immediately with soap and water.
7.5. Tool Safety
Use tools according to the manufacturer’s instructions and take precautions to prevent injuries. Wear safety glasses when sanding or grinding, and use caution when working with power tools.
7.6. Disposal of Waste
Dispose of waste materials properly. Automotive paints, chemicals, and solvents should be disposed of according to local regulations. Never pour these materials down the drain or into the environment.
By following these safety precautions, you can minimize the risk of accidents and injuries while working on your car.
8. Common Mistakes to Avoid
Repairing paint blisters can be a challenging task, and it’s easy to make mistakes. Here are some common mistakes to avoid:
8.1. Skipping Surface Preparation
One of the biggest mistakes is skipping or rushing the surface preparation process. Proper surface preparation is essential for ensuring proper adhesion of the repair materials. Always clean the surface thoroughly and sand it to create a smooth, even base.
8.2. Using Incompatible Products
Using incompatible primers, paints, or clear coats can lead to problems such as paint blisters, peeling, or cracking. Always use products that are designed to work together.
8.3. Applying Paint Too Thickly
Applying paint too thickly can trap solvents and create bubbles or blisters. Apply several thin coats of paint, allowing each coat to dry before applying the next.
8.4. Painting in Unfavorable Conditions
Painting in direct sunlight, high humidity, or extreme temperatures can affect the quality of the finish. Paint in a controlled environment with the right temperature and humidity levels.
8.5. Neglecting Safety Precautions
Neglecting safety precautions can lead to accidents and injuries. Always wear appropriate PPE, work in a well-ventilated area, and follow the manufacturer’s instructions for handling and storing automotive paints and chemicals.
8.6. Not Blending Properly
Failing to blend the new paint with the surrounding paint can result in a noticeable repair. Feather the edges of the repair area and use a blending solvent to create a seamless transition.
8.7. Rushing the Process
Rushing the repair process can lead to mistakes and a poor-quality finish. Take your time and pay attention to detail to ensure the best possible results.
By avoiding these common mistakes, you can increase your chances of achieving a professional and long-lasting repair.
9. Cost Analysis: DIY vs. Professional Repair
Deciding whether to fix paint blisters yourself or hire a professional depends on several factors, including your skill level, the extent of the damage, and your budget. Here’s a cost analysis to help you make the right decision:
9.1. DIY Repair Costs
DIY repair costs can vary depending on the tools and materials you need to purchase. Here’s a breakdown of the typical costs:
- Safety Gear: $20 – $50 (safety glasses, respirator, gloves)
- Surface Preparation Materials: $30 – $50 (wax and grease remover, sandpaper, tack cloths)
- Repair Materials: $50 – $100 (body filler, primer, paint, clear coat)
- Application Tools: $50 – $200 (spray gun or aerosol cans, mixing cups, masking tape)
- Additional Tools: $50 – $200 (heat gun, polishing compound, pads)
Total DIY Cost: $200 – $600
9.2. Professional Repair Costs
Professional repair costs can vary depending on the extent of the damage and the labor rates in your area. Here’s a general estimate:
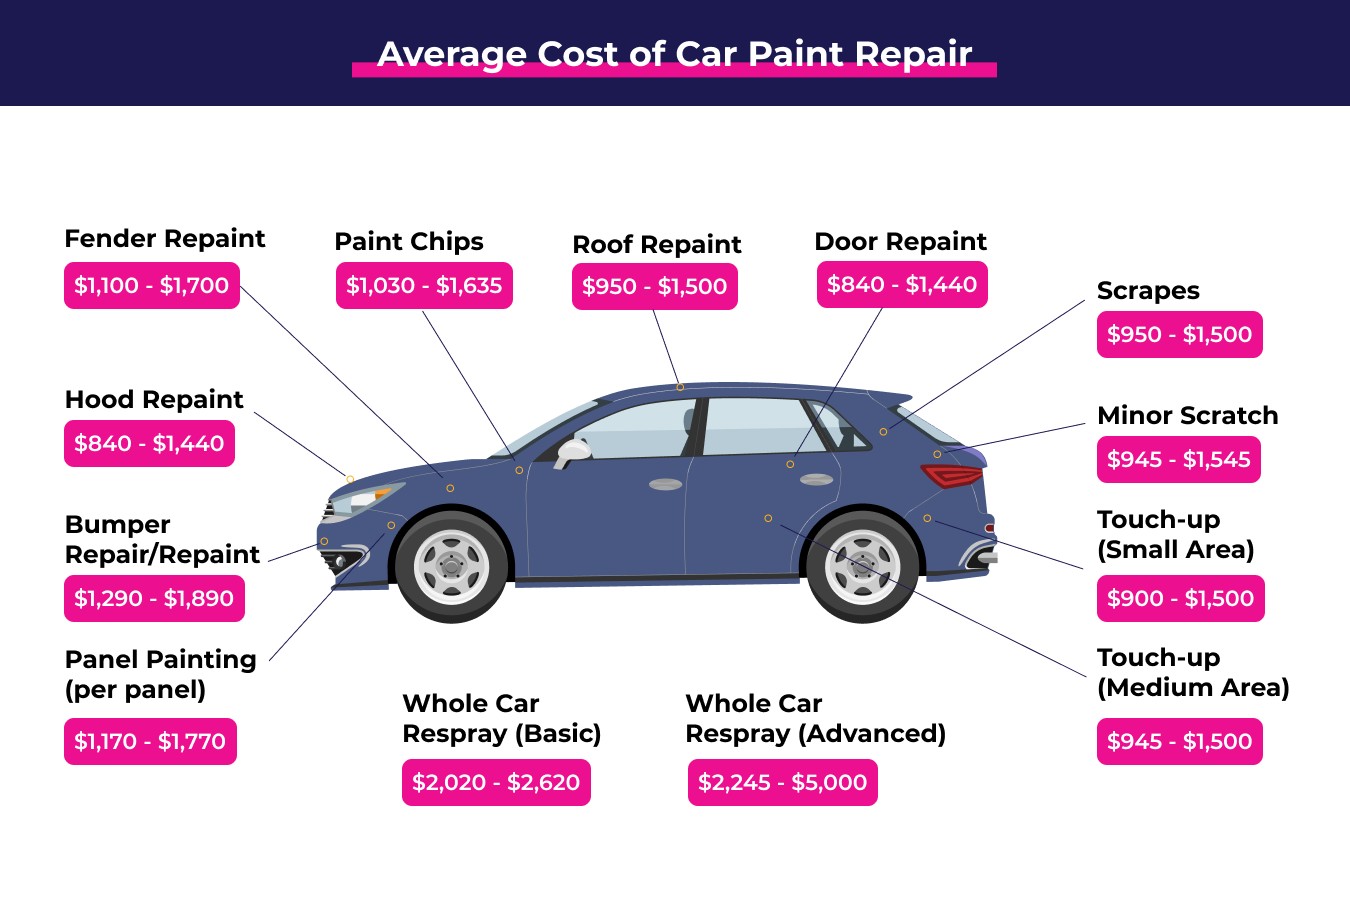
- Minor Paint Blisters: $200 – $500
- Moderate Paint Blisters: $500 – $1000
- Extensive Paint Blisters: $1000 – $3000+
9.3. Factors to Consider
- Skill Level: If you have experience with auto body repairs, DIY may be a cost-effective option. If you’re a beginner, professional repair may be a better choice.
- Extent of Damage: Minor paint blisters may be easy to repair yourself, while extensive damage may require professional expertise.
- Time Investment: DIY repair can be time-consuming, while professional repair is typically faster.
- Quality of Finish: Professional repair typically results in a higher-quality finish, especially for complex repairs.
9.4. When to Choose DIY
- You have experience with auto body repairs.
- The damage is minor and localized.
- You have the time and patience to complete the repair.
- You want to save money on labor costs.
9.5. When to Choose Professional Repair
- You have no experience with auto body repairs.
- The damage is extensive or complex.
- You want a high-quality finish.
- You don’t have the time or patience to complete the repair.
By carefully considering these factors, you can make an informed decision about whether to fix paint blisters yourself or hire a professional.
10. Testimonials and Success Stories
Hearing from others who have successfully repaired paint blisters can provide inspiration and confidence. Here are a few testimonials and success stories:
10.1. Testimonial 1: John, DIY Enthusiast
“I had some paint blisters on my car door, and I was hesitant to tackle the repair myself. But after watching some online tutorials and gathering the right tools from CARDIAGTECH.NET, I decided to give it a try. The process was straightforward, and I was able to achieve a professional-looking finish. I saved a lot of money by doing it myself, and I’m proud of the results.”
10.2. Testimonial 2: Sarah, Car Owner
“I noticed some paint blisters on my car’s hood and decided to take it to a professional auto body shop. They did an excellent job of repairing the damage, and the paint looks as good as new. It was worth the investment to have it done right.”
10.3. Success Story: Restoring a Classic Car
A classic car enthusiast decided to restore an old vehicle with extensive paint blisters. He spent weeks carefully sanding, filling, priming, and painting the car. The result was a stunning restoration that brought the car back to its original glory.
10.4. Community Forum Success
In an online automotive forum, a user shared their success in repairing paint blisters using products and tools recommended by CARDIAGTECH.NET. They provided step-by-step instructions and photos, inspiring other users to tackle similar repairs.
These testimonials and success stories demonstrate that repairing paint blisters is achievable with the right tools, materials, and techniques. Whether you choose to do it yourself or hire a professional, the key is to take your time and pay attention to detail.
Frequently Asked Questions (FAQ)
Here are some frequently asked questions about fixing paint blisters on cars:
1. What causes paint blisters on cars?
Paint blisters are typically caused by moisture trapped under the paint, contamination on the surface before painting, improper surface preparation, or using incompatible products.
2. Can I fix paint blisters myself, or should I hire a professional?
Whether you can fix paint blisters yourself depends on your skill level, the extent of the damage, and your budget. If you have experience with auto body repairs, DIY may be a cost-effective option. If you’re a beginner, professional repair may be a better choice.
3. What tools and materials do I need to fix paint blisters?
You will need safety gear (safety glasses, respirator, gloves), surface preparation materials (wax and grease remover, sandpaper, tack cloths), repair materials (body filler, primer, paint, clear coat), and application tools (spray gun or aerosol cans, mixing cups, masking tape).
4. How do I prepare the surface before painting?
Thoroughly clean the surface with wax and grease remover to remove any dirt, oil, or contaminants. Sand the surface to create a smooth, even base for the paint.
5. How do I apply body filler to repair dents or imperfections?
Mix the body filler with the hardener according to the manufacturer’s instructions. Apply a thin, even layer of filler over the damaged area and feather the edges to blend with the surrounding surface. Allow the filler to dry completely before sanding.
6. How many coats of paint should I apply?
Apply several thin, even coats of paint, allowing each coat to dry before applying the next. This will prevent the paint from running or sagging and ensure a smooth, even finish.
7. How do I blend the new paint with the surrounding paint?
Feather the edges of the repair area and use a blending solvent to create a seamless transition. Apply multiple thin coats of paint, gradually extending the coverage area with each coat.
8. What safety precautions should I take when working with automotive paints and chemicals?
Always wear appropriate PPE, work in a well-ventilated area, keep flammable materials away from heat sources, and follow the manufacturer’s instructions for handling and storing automotive paints and chemicals.
9. How can I prevent paint blisters in the future?
Ensure proper surface preparation, use quality products, control the environment, regularly wash and wax your car, and address any leaks or moisture issues promptly.
10. Where can I find high-quality tools and materials for auto body repairs?
CARDIAGTECH.NET offers a wide range of high-quality tools and materials for auto body repairs. Visit our website to explore our selection and contact us for expert advice.
Conclusion
Fixing paint blisters on your car can be a rewarding project that restores your vehicle’s appearance and protects its value. By understanding the causes of paint blisters, gathering the right tools and materials, following the step-by-step guide, and taking the necessary safety precautions, you can achieve professional-quality results.
Whether you choose to tackle the repair yourself or hire a professional, CARDIAGTECH.NET is here to support you with high-quality tools, materials, and expert advice. Our extensive selection of products and our commitment to customer satisfaction make us the ideal partner for all your auto repair needs.
Don’t let paint blisters detract from your car’s appearance any longer. Take action today and restore your vehicle’s finish to its former glory. Visit CARDIAGTECH.NET or contact us at +1 (641) 206-8880 to get started. Let us help you achieve a flawless and long-lasting repair. Our address is 276 Reock St, City of Orange, NJ 07050, United States. We’re here to help you every step of the way. Contact us on Whatsapp for immediate assistance.