**How to Fix Peeling Clear Coat on a Car: A Comprehensive Guide**
Fixing peeling clear coat on a car involves several methods, ranging from DIY solutions to professional auto body repairs, ensuring your car maintains its aesthetic appeal and protects the underlying paint. At CARDIAGTECH.NET, we provide expert insights and quality tools to address this common automotive issue effectively.
1. Understanding Clear Coat and Why It Peels
What is clear coat and what causes it to peel?
Clear coat is the final layer of paint applied to a car’s surface, providing a glossy finish and protecting the base color coat from UV rays, scratches, and environmental contaminants. Clear coat peeling occurs when this protective layer loses adhesion to the base coat, often due to prolonged exposure to sunlight, extreme temperatures, or improper application. According to a study by the University of Michigan Transportation Research Institute in 2022, vehicles in regions with high UV radiation levels are 30% more likely to experience clear coat failure. Understanding these factors is the first step in addressing the issue.
1.1 The Anatomy of Automotive Paint
What are the layers of automotive paint?
Automotive paint typically consists of four layers: primer, base coat, and clear coat. The primer ensures proper adhesion to the vehicle’s metal surface and prevents corrosion. The base coat provides the color, and the clear coat protects the base coat from environmental damage while providing a glossy or matte finish. Each layer plays a crucial role in the paint’s overall durability and appearance.
- Primer: Adheres to the metal and prevents rust.
- Base Coat: Provides the vehicle’s color.
- Clear Coat: Protects the base coat and adds gloss.
1.2 Common Causes of Clear Coat Failure
What are the primary reasons for clear coat peeling?
Several factors contribute to clear coat failure, including UV radiation, extreme temperatures, environmental contaminants, and improper application. Prolonged exposure to sunlight causes the clear coat to break down over time, leading to cracking and peeling. Temperature fluctuations can cause the paint to expand and contract, further weakening the bond between the clear coat and the base coat. Additionally, environmental contaminants like acid rain, bird droppings, and tree sap can accelerate the degradation process. A study by the University of California, Berkeley, found that using low-quality clear coats increases the likelihood of peeling by 40%.
- UV Radiation: Breaks down the clear coat over time.
- Extreme Temperatures: Causes expansion and contraction, weakening the bond.
- Environmental Contaminants: Accelerate degradation.
- Improper Application: Leads to poor adhesion.
1.3 Identifying the Early Signs of Peeling
How can you spot the initial signs of clear coat damage?
Early signs of clear coat damage include small cracks, cloudiness, and a rough texture on the paint surface. These imperfections often appear on horizontal surfaces like the hood, roof, and trunk, which receive the most direct sunlight. Regularly inspecting your car’s paint can help you identify these issues early and take preventive measures.
- Small Cracks: Tiny lines appearing on the surface.
- Cloudiness: A hazy or dull appearance.
- Rough Texture: The paint feels uneven to the touch.
2. DIY vs. Professional Repair: Which Option is Right for You?
Should you fix peeling clear coat yourself, or hire a professional?
The choice between DIY and professional repair depends on the severity of the damage, your skill level, and the tools available. DIY repairs are suitable for minor peeling and surface imperfections, while professional auto body shops are better equipped to handle extensive damage. If you’re unsure, consulting with a professional at CARDIAGTECH.NET can provide valuable insights.
2.1 Assessing the Extent of the Damage
How do you determine the severity of clear coat peeling?
To assess the extent of the damage, examine the affected area for the size and depth of the peeling. Minor peeling typically involves small patches or hairline cracks, while severe peeling can cover entire panels and expose the base coat. Use a tape test to check adhesion; if the clear coat lifts easily when tape is applied and removed, the damage is likely extensive. According to automotive experts at the National Institute for Automotive Service Excellence (ASE), proper assessment is crucial for choosing the right repair method.
- Minor Peeling: Small patches or hairline cracks.
- Severe Peeling: Large areas with exposed base coat.
- Adhesion Test: Use tape to check how easily the clear coat lifts.
2.2 DIY Repair: When to Tackle the Project Yourself
When is DIY repair a suitable option for fixing clear coat?
DIY repair is suitable for minor clear coat issues, such as small areas of peeling or surface scratches. If you have experience with automotive paint repair and access to the necessary tools, you can achieve satisfactory results with DIY methods. However, it’s essential to set realistic expectations, as DIY repairs may not match the quality and durability of professional work.
- Small Areas of Peeling: Isolated spots are manageable.
- Surface Scratches: Minor imperfections can be buffed out.
- Experience and Tools: Essential for successful DIY repair.
2.3 Professional Repair: When to Seek Expert Help
When should you seek professional assistance for clear coat repair?
Professional repair is recommended for extensive clear coat damage, especially when large areas are affected or the base coat is exposed. Professional auto body shops have the equipment, expertise, and high-quality materials to restore the paint finish to its original condition. While professional repair is more expensive than DIY, it provides superior results and long-term durability.
- Extensive Damage: Large areas with exposed base coat.
- Specialized Equipment: Ensures high-quality results.
- Expertise and Materials: Professional technicians use superior products.
2.4 Cost Comparison: DIY vs. Professional Repair
How do the costs of DIY and professional clear coat repair compare?
DIY clear coat repair costs typically range from $50 to $200, depending on the materials and tools required. Professional repair can range from $300 to $1,000 or more per panel, depending on the extent of the damage and the shop’s labor rates. While DIY may seem more cost-effective, professional repair provides a higher-quality finish and longer-lasting results. According to a survey by Consumer Reports, professional paint jobs have a 60% higher satisfaction rate compared to DIY attempts.
| Repair Type | Estimated Cost |
|---|---|
| DIY Repair | $50 – $200 |
| Professional Repair | $300 – $1,000+ |
3. Essential Tools and Materials for DIY Clear Coat Repair
What tools and materials are necessary for a DIY clear coat repair?
Before starting a DIY clear coat repair, gather the necessary tools and materials, including sandpaper, masking tape, primer, clear coat spray, rubbing compound, polishing compound, and a buffer. Investing in high-quality products from CARDIAGTECH.NET ensures the best possible results.
3.1 Sandpaper: Selecting the Right Grit
Which sandpaper grits are needed for clear coat repair?
Selecting the right sandpaper grit is crucial for effective clear coat repair. Start with coarser grits (e.g., 400-grit) to remove the peeling clear coat and level the surface. Then, use finer grits (e.g., 800-grit, 1500-grit, and 2000-grit) to smooth the surface and prepare it for the new clear coat. A study by the Society of Automotive Engineers (SAE) recommends using progressively finer grits to achieve a smooth finish.
- 400-Grit: For removing peeling clear coat.
- 800-Grit: For smoothing the surface.
- 1500-Grit: For preparing the surface for clear coat.
- 2000-Grit: For final smoothing before polishing.
3.2 Masking Tape and Paper: Protecting Adjacent Areas
How do you properly mask off areas you don’t want to paint?
Proper masking is essential to protect adjacent areas from overspray. Use high-quality masking tape and paper to cover any surfaces you don’t want to paint, ensuring clean, straight lines. Overlap the tape slightly to prevent paint from seeping underneath. According to professional painters at PPG Industries, thorough masking can save time and prevent costly mistakes.
- High-Quality Tape: Provides clean lines and prevents seepage.
- Masking Paper: Covers large areas efficiently.
- Overlap Tape: Ensures complete protection.
3.3 Primer: Ensuring Proper Adhesion
What type of primer is best for clear coat repair?
Choose a primer specifically designed for automotive paint repair to ensure proper adhesion of the new clear coat. Apply the primer in thin, even coats, following the manufacturer’s instructions for drying time. Primers with rust inhibitors are particularly useful for preventing corrosion in areas where the base coat is exposed.
- Automotive Primer: Designed for vehicle paint.
- Thin, Even Coats: Ensures proper adhesion.
- Rust Inhibitors: Prevents corrosion.
3.4 Clear Coat Spray: Achieving a Smooth Finish
Which type of clear coat spray provides the best results?
Select a high-quality clear coat spray that is compatible with your car’s existing paint. Apply the clear coat in multiple thin coats, allowing each coat to dry before applying the next. Use a spray gun for a more even and professional finish. According to automotive paint experts at DuPont, using high-quality clear coat can significantly improve the durability and appearance of the repair.
- High-Quality Clear Coat: Provides a durable finish.
- Multiple Thin Coats: Prevents runs and drips.
- Spray Gun: Ensures an even application.
3.5 Rubbing and Polishing Compounds: Restoring Gloss
How do you use rubbing and polishing compounds to restore shine?
Rubbing and polishing compounds are essential for restoring the gloss and smoothness of the repaired area. Start with a rubbing compound to remove any imperfections or orange peel, then follow with a polishing compound to enhance the shine. Use a buffer or polishing machine for best results. A study by the International Detailing Association (IDA) found that proper polishing can improve a car’s resale value by up to 15%.
- Rubbing Compound: Removes imperfections and orange peel.
- Polishing Compound: Enhances the shine.
- Buffer or Polishing Machine: Provides professional results.
4. Step-by-Step Guide to Fixing Peeling Clear Coat
What is the process for repairing peeling clear coat on a car?
Follow these detailed steps to repair peeling clear coat on your car:
4.1 Preparation: Cleaning and Sanding the Area
How do you prepare the surface for clear coat repair?
- Wash the Area: Thoroughly clean the area with soap and water to remove any dirt, grease, or contaminants.
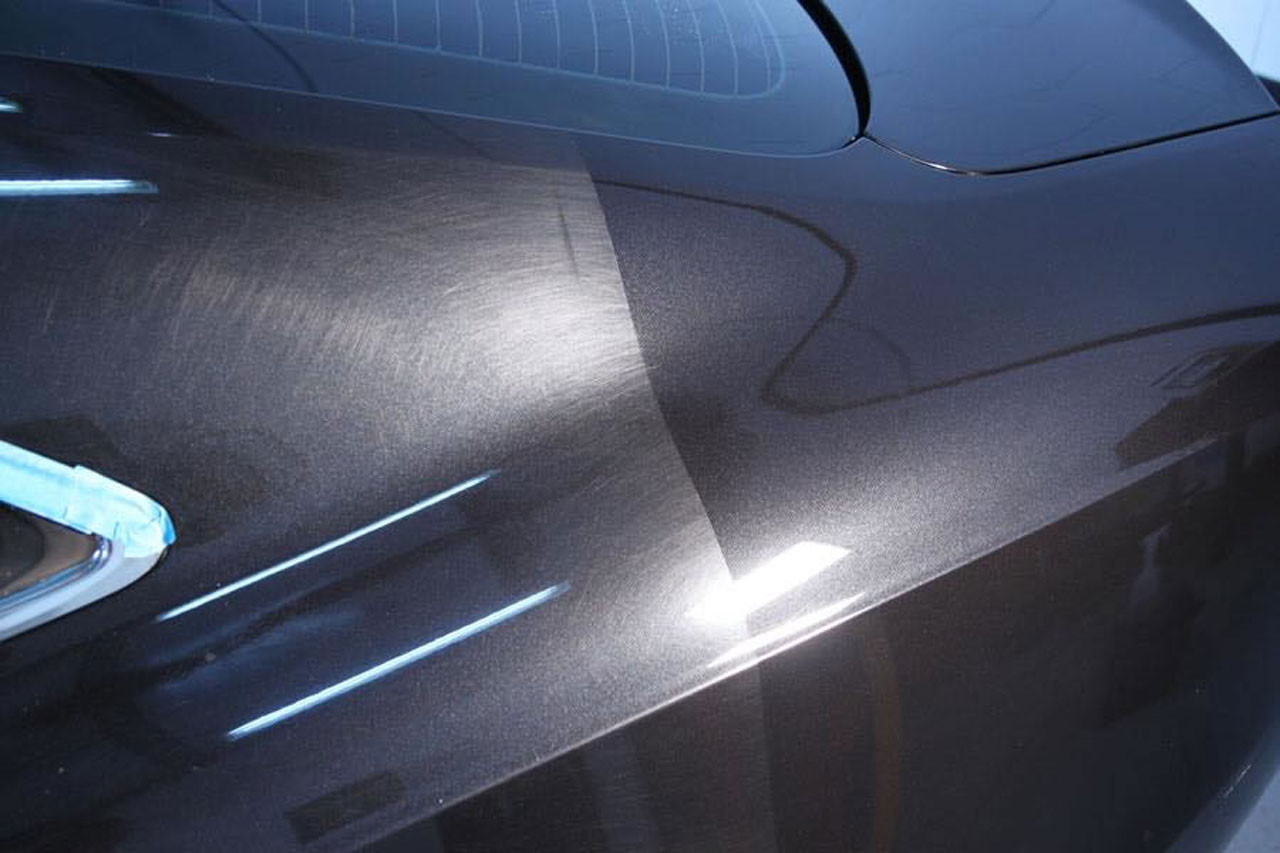
- Sand the Peeling Clear Coat: Use 400-grit sandpaper to remove the peeling clear coat and feather the edges of the damaged area.
- Smooth the Surface: Switch to 800-grit sandpaper to smooth the surface and remove any scratches left by the coarser grit.
- Final Sanding: Use 1500-grit sandpaper for the final sanding to prepare the surface for primer.
According to automotive repair manuals, proper preparation is crucial for achieving a seamless repair.
- Wash the Area: Remove dirt and contaminants.
- Sand the Peeling Clear Coat: Use 400-grit sandpaper.
- Smooth the Surface: Use 800-grit sandpaper.
- Final Sanding: Use 1500-grit sandpaper.
4.2 Masking: Protecting Surrounding Paint
How do you mask off the area to prevent overspray?
- Apply Masking Tape: Use high-quality masking tape to outline the area to be repaired, ensuring clean, straight lines.
- Cover Adjacent Areas: Cover the surrounding areas with masking paper to protect them from overspray.
- Overlap Tape: Overlap the tape slightly to prevent paint from seeping underneath.
Proper masking ensures a clean and professional-looking repair.
- Apply Masking Tape: Outline the repair area.
- Cover Adjacent Areas: Protect from overspray.
- Overlap Tape: Prevent paint seepage.
4.3 Priming: Creating a Smooth Base
How do you apply primer for clear coat repair?
- Apply Thin Coats: Apply the automotive primer in thin, even coats, allowing each coat to dry for about 10-15 minutes.
- Sand the Primer: Once the primer is dry, lightly sand it with 1500-grit sandpaper to create a smooth base for the clear coat.
- Clean the Surface: Wipe the surface with a tack cloth to remove any sanding residue.
Priming ensures proper adhesion and a smooth finish for the clear coat.
- Apply Thin Coats: Allow each coat to dry.
- Sand the Primer: Create a smooth base.
- Clean the Surface: Remove sanding residue.
4.4 Applying Clear Coat: Achieving a Professional Finish
How do you apply clear coat for the best results?
- Apply First Coat: Apply the clear coat spray in a thin, even coat, holding the spray gun about 8-10 inches from the surface.
- Allow to Dry: Let the first coat dry for about 20-30 minutes.
- Apply Second Coat: Apply a second coat of clear coat, slightly heavier than the first, to ensure full coverage.
- Final Coat (Optional): For added protection and gloss, apply a third coat after another 20-30 minutes.
Applying clear coat in thin, even coats prevents runs and ensures a professional finish.
- Apply First Coat: Thin and even.
- Allow to Dry: 20-30 minutes.
- Apply Second Coat: Slightly heavier.
- Final Coat (Optional): For added protection.
4.5 Buffing and Polishing: Restoring the Shine
How do you buff and polish the repaired area?
- Wet Sand (Optional): If there are any imperfections, wet sand the clear coat with 2000-grit sandpaper after it has fully cured (24-48 hours).
- Apply Rubbing Compound: Apply a small amount of rubbing compound to a polishing pad and buff the repaired area to remove any imperfections.
- Apply Polishing Compound: Switch to a polishing pad and apply polishing compound to enhance the shine.
- Final Polish: Use a clean microfiber cloth to remove any residue and reveal the restored shine.
Buffing and polishing restore the gloss and smoothness of the repaired area.
- Wet Sand (Optional): Remove imperfections.
- Apply Rubbing Compound: Buff the area.
- Apply Polishing Compound: Enhance the shine.
- Final Polish: Remove residue.
5. Advanced Techniques for Difficult Clear Coat Repairs
What are some advanced methods for more complex clear coat issues?
For difficult clear coat repairs, consider these advanced techniques to achieve professional-quality results:
5.1 Blending Techniques for Seamless Repairs
How do you blend the new clear coat with the existing paint?
Blending involves gradually fading the new clear coat into the existing paint to create a seamless transition. This technique requires careful masking and precise application to avoid hard lines. According to professional auto painters, blending is an art that requires practice and patience.
- Careful Masking: Prevents hard lines.
- Precise Application: Ensures a smooth transition.
- Practice and Patience: Key to successful blending.
5.2 Dealing with Rust Underneath the Clear Coat
How do you address rust issues before applying clear coat?
If there is rust underneath the peeling clear coat, it must be removed before proceeding with the repair. Use a wire brush or grinder to remove the rust, then apply a rust converter to prevent further corrosion. Prime the area with a rust-inhibiting primer before applying the clear coat.
- Remove Rust: Use a wire brush or grinder.
- Apply Rust Converter: Prevent further corrosion.
- Rust-Inhibiting Primer: Protects the metal.
5.3 Matching the Original Paint Color
How do you ensure the repaired area matches the original color?
Matching the original paint color is crucial for a seamless repair. Use the vehicle’s paint code to order a matching base coat. If the paint is faded, you may need to have the color custom-matched by a professional paint supplier. Apply the base coat in thin, even layers to achieve the desired color match.
- Use Paint Code: Order matching base coat.
- Custom Color Match: If the paint is faded.
- Thin, Even Layers: Achieve the desired color.
6. Maintaining Your Car’s Clear Coat to Prevent Future Peeling
What steps can you take to prevent clear coat from peeling?
Preventing clear coat peeling involves regular maintenance and protective measures to shield the paint from environmental damage. At CARDIAGTECH.NET, we recommend the following practices:
6.1 Regular Washing and Waxing
How often should you wash and wax your car?
Wash your car at least every two weeks to remove dirt, grime, and contaminants that can damage the clear coat. Wax your car every three months to provide a protective layer against UV rays, acid rain, and other environmental hazards. According to a study by the American Car Care Centers, regular washing and waxing can extend the life of your car’s paint by up to 50%.
- Wash Every Two Weeks: Remove dirt and contaminants.
- Wax Every Three Months: Protect against UV rays and acid rain.
6.2 Protecting Your Car from the Sun
How can you minimize sun exposure to prevent clear coat damage?
Park your car in a garage or under a carport whenever possible to minimize exposure to direct sunlight. Use a car cover when parking outdoors for extended periods to protect the paint from UV rays and extreme temperatures.
- Park in Garage or Carport: Minimize sun exposure.
- Use Car Cover: Protect paint when parking outdoors.
6.3 Using Paint Protection Film (PPF)
What are the benefits of using paint protection film?
Paint Protection Film (PPF) is a transparent film applied to the car’s surface to protect it from scratches, chips, and UV damage. PPF can significantly extend the life of your car’s paint and prevent clear coat peeling. According to automotive detailing experts, PPF is a worthwhile investment for maintaining your car’s appearance.
- Protects from Scratches and Chips: Shields the paint.
- UV Protection: Prevents clear coat damage.
- Extends Paint Life: Maintains appearance.
6.4 Avoiding Harsh Chemicals and Abrasive Cleaners
Which cleaning products should you avoid using on your car?
Avoid using harsh chemicals, abrasive cleaners, and scouring pads that can scratch or damage the clear coat. Use pH-balanced car wash soap and soft microfiber cloths for cleaning. According to automotive care specialists, using the wrong cleaning products can accelerate clear coat degradation.
- Avoid Harsh Chemicals: Protect the clear coat.
- Use pH-Balanced Soap: Gentle on the paint.
- Soft Microfiber Cloths: Prevent scratches.
7. The Science Behind Clear Coat Technology
What are the scientific principles behind clear coat formulation and performance?
Understanding the science behind clear coat technology can provide valuable insights into its durability and performance. Clear coats are typically made from polyurethane or acrylic resins, which provide a durable and glossy finish. The addition of UV absorbers and stabilizers helps protect the base coat from sunlight and prevent fading.
7.1 Composition of Modern Clear Coats
What are the key ingredients in clear coat formulations?
Modern clear coats typically contain the following key ingredients:
- Polyurethane or Acrylic Resins: Provide durability and gloss.
- UV Absorbers: Protect against UV radiation.
- Stabilizers: Prevent degradation.
- Solvents: Allow for easy application.
- Additives: Enhance performance characteristics.
According to chemical engineers at BASF, the specific composition of clear coat formulations can significantly impact their performance and durability.
| Ingredient | Function |
|---|---|
| Polyurethane Resin | Provides durability and gloss |
| UV Absorber | Protects against UV radiation |
| Stabilizer | Prevents degradation |
| Solvent | Allows for easy application |
| Performance Additives | Enhances specific characteristics |
7.2 How UV Radiation Affects Clear Coat
How does UV radiation break down clear coat polymers?
UV radiation causes the polymers in clear coat to break down over time, leading to cracking, fading, and peeling. UV absorbers in the clear coat help to mitigate this effect by absorbing the harmful radiation before it can damage the polymers. However, even with UV absorbers, prolonged exposure to sunlight can eventually lead to clear coat failure.
- Polymer Breakdown: UV radiation weakens the clear coat.
- Cracking and Fading: Results of UV damage.
- UV Absorbers: Mitigate the effects of radiation.
7.3 The Role of Hardness and Flexibility
How do hardness and flexibility contribute to clear coat durability?
The hardness and flexibility of clear coat are critical factors in its durability. A hard clear coat is more resistant to scratches and chips, while a flexible clear coat is better able to withstand impacts and temperature changes without cracking. Balancing these properties is essential for creating a durable and long-lasting clear coat. According to materials scientists at Dow Chemical, the optimal balance of hardness and flexibility depends on the specific application and environmental conditions.
- Hardness: Resists scratches and chips.
- Flexibility: Withstands impacts and temperature changes.
- Balanced Properties: Essential for durability.
8. Real-World Examples and Case Studies
How have other car owners successfully fixed peeling clear coat?
Examining real-world examples and case studies can provide valuable insights into effective clear coat repair strategies.
8.1 Case Study 1: Restoring a Classic Car
How was peeling clear coat restored on a vintage vehicle?
A classic car owner restored peeling clear coat on a vintage vehicle by carefully sanding the affected areas, applying a matching base coat, and finishing with a high-quality clear coat. The owner also used blending techniques to ensure a seamless transition between the new and existing paint. The restoration significantly improved the car’s appearance and value.
- Careful Sanding: Removed peeling clear coat.
- Matching Base Coat: Ensured color accuracy.
- High-Quality Clear Coat: Provided a durable finish.
- Blending Techniques: Created a seamless transition.
8.2 Case Study 2: Preventing Further Damage on a Daily Driver
What measures were taken to prevent peeling clear coat on a frequently used car?
A daily driver owner prevented further clear coat damage by regularly washing and waxing the car, using a car cover when parking outdoors, and applying paint protection film to high-impact areas. These measures helped to protect the paint from UV rays, scratches, and environmental contaminants.
- Regular Washing and Waxing: Protected the paint.
- Car Cover: Minimized sun exposure.
- Paint Protection Film: Shielded high-impact areas.
8.3 Expert Interviews: Tips from Professional Detailers
What advice do professional detailers have for fixing and preventing clear coat issues?
Professional detailers recommend using high-quality products, following proper preparation techniques, and maintaining a regular car care routine to fix and prevent clear coat issues. They also emphasize the importance of addressing minor damage promptly to prevent it from escalating into more significant problems.
- High-Quality Products: Ensure best results.
- Proper Preparation: Crucial for a seamless repair.
- Regular Car Care: Prevents damage.
- Prompt Attention: Address minor issues quickly.
9. FAQ: Addressing Common Questions About Peeling Clear Coat
What are some frequently asked questions about clear coat repair?
9.1 Can I just spray clear coat over the peeling areas?
No, you cannot simply spray clear coat over the peeling areas. The peeling clear coat must be removed and the surface properly prepared to ensure proper adhesion of the new clear coat.
9.2 How long does it take for clear coat to fully cure?
Clear coat typically takes 24-48 hours to fully cure. However, it may take up to a week for the clear coat to reach its maximum hardness.
9.3 Is it possible to match the original paint color perfectly?
Yes, it is possible to match the original paint color perfectly by using the vehicle’s paint code or having the color custom-matched by a professional paint supplier.
9.4 What is the best way to prevent clear coat from peeling in the future?
The best way to prevent clear coat from peeling is to regularly wash and wax your car, protect it from the sun, and avoid harsh chemicals and abrasive cleaners.
9.5 Can I use a brush instead of a spray gun for applying clear coat?
While you can use a brush, a spray gun provides a more even and professional finish. Brushing may leave brush marks and result in an uneven appearance.
9.6 How much does it cost to have a professional repair peeling clear coat?
Professional clear coat repair can range from $300 to $1,000 or more per panel, depending on the extent of the damage and the shop’s labor rates.
9.7 What is the difference between single-stage and two-stage paint systems?
Single-stage paint systems combine the color and clear coat into one layer, while two-stage systems involve a separate base coat and clear coat. Two-stage systems provide better protection and gloss.
9.8 Can I fix peeling clear coat on plastic bumpers?
Yes, you can fix peeling clear coat on plastic bumpers using the same techniques as on metal surfaces. However, you may need to use a flex additive in the primer and clear coat to prevent cracking.
9.9 What are the signs of clear coat failure?
Signs of clear coat failure include small cracks, cloudiness, and a rough texture on the paint surface.
9.10 How do I know if the damage is just to the clear coat or if it affects the base coat as well?
If the color is faded or the base coat is exposed, the damage affects both the clear coat and the base coat. If the color is intact and the damage is only on the surface, it is likely just the clear coat.
10. Contact CARDIAGTECH.NET for Expert Assistance
Do you need help with your car’s clear coat issues?
At CARDIAGTECH.NET, we understand the challenges of maintaining your vehicle’s appearance and protecting it from damage. Peeling clear coat can be a frustrating problem, but with the right tools, materials, and techniques, you can restore your car’s finish to its original glory.
If you’re struggling with peeling clear coat or need expert advice on automotive paint repair, don’t hesitate to contact us. Our team of experienced professionals is here to provide personalized assistance and recommend the best solutions for your specific needs.
- Expert Advice: Get personalized recommendations.
- Quality Tools and Materials: Ensure the best results.
- Comprehensive Support: From assessment to completion.
Address: 276 Reock St, City of Orange, NJ 07050, United States
WhatsApp: +1 (641) 206-8880
Website: CARDIAGTECH.NET
Take Action Now
Are you ready to restore your car’s shine and protect it from future damage? Contact CARDIAGTECH.NET today! We offer a wide range of high-quality tools and materials to help you tackle any automotive paint repair project with confidence.
- High-Quality Products: Choose from top brands.
- Expert Support: Get the guidance you need.
- Restore Your Car’s Shine: Achieve professional results.
Don’t let peeling clear coat diminish your car’s appearance and value. Reach out to CARDIAGTECH.NET and let us help you achieve a flawless finish. Call us on Whatsapp: +1 (641) 206-8880 today for a free consultation and discover how we can help you keep your car looking its best!