How To Fix Scratch Paint Car: A Comprehensive Guide

Your car’s paint job is its first line of defense against the elements and everyday wear and tear. Scratches not only detract from its appearance but can also expose the metal underneath, leading to rust and further damage. At CARDIAGTECH.NET, we understand the importance of maintaining your car’s pristine condition. This guide will provide you with expert advice and step-by-step instructions on how to fix car paint scratches effectively, along with information on tools like paint depth gauges and polishing machines, helping you restore your vehicle’s beauty and value.
1. Understanding Car Paint Scratches
Before diving into the repair process, it’s crucial to understand the different types of scratches that can occur on your car’s paint. Knowing the depth and severity of the damage will help you choose the appropriate repair method and tools.
1.1. Clear Coat Scratches
Clear coat scratches are the most superficial type of damage, affecting only the outermost layer of your car’s paint. These scratches are often caused by minor abrasions, such as those from car washes, tree branches, or accidental brushes against other objects.
- Characteristics: Shallow, barely noticeable to the touch.
- Appearance: Often appear as swirl marks or fine lines on the surface of the paint.
- Repair Difficulty: Easiest to repair, often requiring only basic polishing techniques.
1.2. Base Coat Scratches
Base coat scratches penetrate through the clear coat and into the layer of colored paint beneath. These scratches are more noticeable than clear coat scratches and require a more involved repair process.
- Characteristics: Deeper than clear coat scratches, can be felt with a fingernail.
- Appearance: Show the color of the base coat, often appearing as a different shade than the surrounding paint.
- Repair Difficulty: Require touch-up paint and potentially sanding to blend the repair.
1.3. Primer Scratches
Primer scratches are the most severe type of damage, extending through the clear coat, base coat, and into the primer layer. These scratches expose the bare metal of the car and require immediate attention to prevent rust and further damage.
- Characteristics: Deepest type of scratch, exposes the gray or white primer layer.
- Appearance: Easily visible and can be felt as a distinct indentation.
- Repair Difficulty: Require professional-level repair techniques, including filling, sanding, and painting.
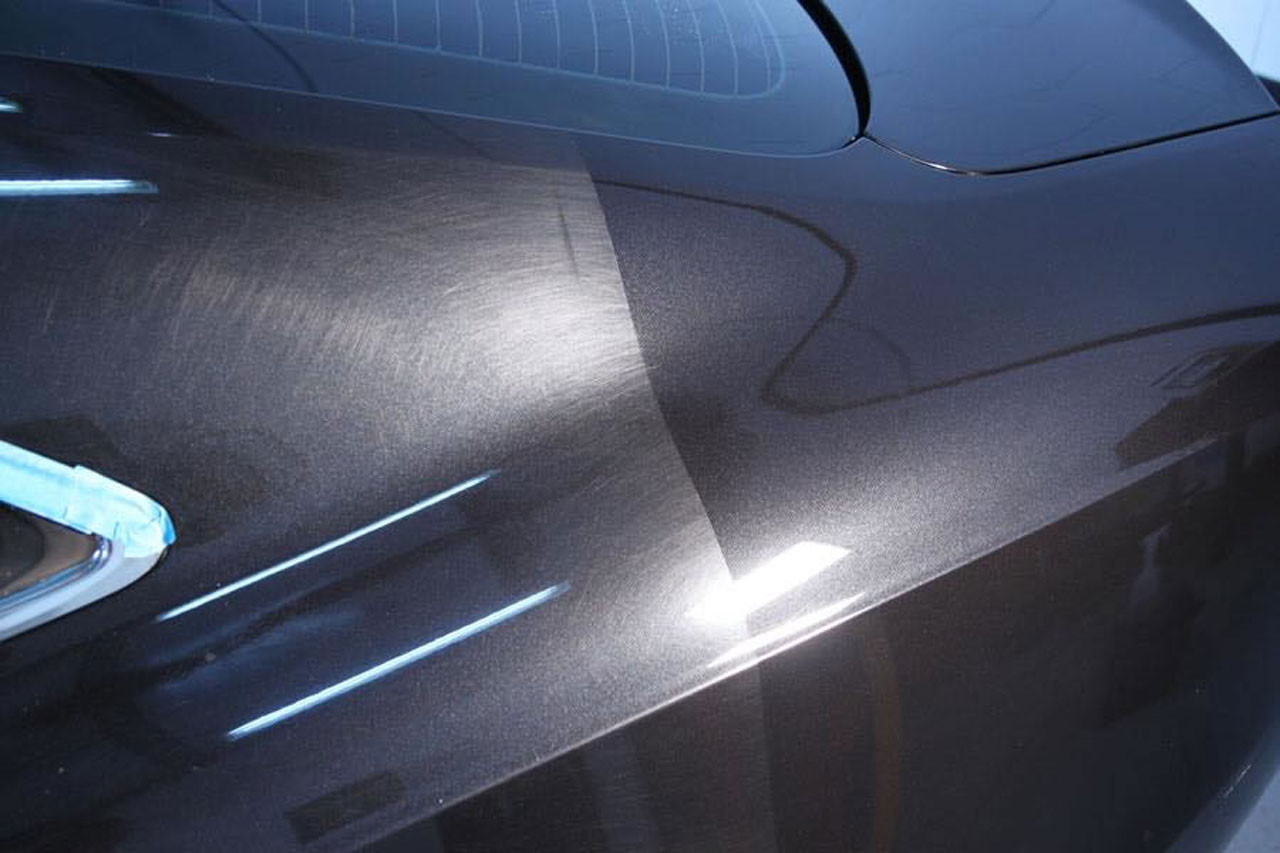
Car Scratch
Image alt: Close-up of a car scratch highlighting the different layers of paint damage
2. Identifying the Scratch Type
Before attempting any repairs, it’s crucial to accurately identify the type of scratch you’re dealing with. Here are a couple of methods to help you determine the severity of the damage:
2.1. The Fingernail Test
This is a simple and effective way to gauge the depth of a scratch.
- Clean the Area: Thoroughly clean the area around the scratch with car wash soap and water.
- Run Your Fingernail: Gently run your fingernail across the scratch, perpendicular to its length.
- Assess the Catch:
- No Catch: If your fingernail glides smoothly over the scratch without catching, it’s likely a clear coat scratch.
- Slight Catch: If your fingernail catches slightly, it’s likely a base coat scratch.
- Significant Catch: If your fingernail catches noticeably and gets stuck in the scratch, it’s likely a primer scratch.
2.2. The Polish Test
This method uses car polish to determine if the scratch can be easily buffed out.
- Apply Polish: Apply a small amount of car polish to a clean microfiber cloth.
- Rub the Scratch: Gently rub the polish onto the scratched area using a circular motion.
- Wipe Away Excess: Wipe away any excess polish with a clean section of the microfiber cloth.
- Inspect the Scratch:
- Scratch Disappears: If the scratch disappears or becomes significantly less noticeable, it’s likely a clear coat scratch.
- Scratch Remains: If the scratch remains visible, it’s likely a base coat or primer scratch.
3. Essential Tools and Materials
Having the right tools and materials is essential for achieving professional-quality scratch repairs. Here’s a comprehensive list of what you’ll need, with links to CARDIAGTECH.NET for convenient purchasing:
- Car Wash Soap: A pH-balanced soap designed specifically for automotive paint.
- Microfiber Cloths: Soft, lint-free cloths for cleaning, polishing, and applying products.
- Scratch Remover Compound: A mild abrasive compound for removing clear coat scratches.
- Car Polish: A finishing polish to restore shine and remove swirl marks.
- Touch-Up Paint: Matching paint to fill in base coat and primer scratches (available at CARDIAGTECH.NET).
- Paint Brush or Toothpick: For precise application of touch-up paint.
- Sandpaper: Various grits (1000, 2000, 3000) for sanding down imperfections.
- Rubbing Compound: A more aggressive abrasive compound for leveling touch-up paint.
- Wax or Sealant: To protect the repaired area and enhance shine.
- Detailing Clay: To remove contaminants from the paint surface.
- Masking Tape: To protect surrounding areas from accidental damage.
- Polishing Machine: For efficient and professional-level polishing (available at CARDIAGTECH.NET).
- Paint Depth Gauge: To measure paint thickness and avoid over-sanding (available at CARDIAGTECH.NET).
4. How to Fix Clear Coat Scratches
Clear coat scratches are the easiest to repair and can often be removed with just a few simple steps.
4.1. Step 1: Cleaning the Area
Thoroughly clean the area around the scratch with car wash soap and water. This will remove any dirt, grime, or contaminants that could interfere with the repair process.
- Rinse the Area: Rinse the area with clean water to remove any loose dirt or debris.
- Apply Car Wash Soap: Apply car wash soap to a soft sponge or microfiber cloth.
- Wash the Area: Gently wash the area around the scratch, using a circular motion.
- Rinse Thoroughly: Rinse the area thoroughly with clean water to remove all traces of soap.
- Dry the Area: Dry the area with a clean, lint-free microfiber cloth.
4.2. Step 2: Applying Scratch Remover
Apply a small amount of scratch remover compound to a clean microfiber cloth.
- Apply Compound: Apply a small amount of scratch remover compound to the microfiber cloth.
- Rub the Scratch: Rub the compound into the scratch using a circular motion, applying light pressure.
- Buff the Area: Continue buffing the area until the scratch disappears or becomes significantly less noticeable.
4.3. Step 3: Polishing the Area
Once the scratch is gone, apply a small amount of car polish to a clean microfiber cloth and buff the area to restore the shine.
- Apply Polish: Apply a small amount of car polish to the microfiber cloth.
- Buff the Area: Buff the area using a circular motion, applying light pressure.
- Wipe Away Excess: Wipe away any excess polish with a clean section of the microfiber cloth.
4.4. Step 4: Waxing the Area
Apply a coat of wax or sealant to protect the repaired area and enhance the shine.
- Apply Wax: Apply a thin, even layer of wax or sealant to the area.
- Allow to Cure: Allow the wax or sealant to cure according to the manufacturer’s instructions.
- Buff to a Shine: Buff the area with a clean microfiber cloth to reveal a deep, glossy shine.
5. How to Fix Base Coat Scratches
Base coat scratches require a more involved repair process, including the application of touch-up paint.
5.1. Step 1: Cleaning the Area
As with clear coat scratches, start by thoroughly cleaning the area around the scratch with car wash soap and water.
5.2. Step 2: Applying Touch-Up Paint
Apply a small amount of touch-up paint to the scratch using a fine-tipped brush or toothpick.
- Shake the Paint: Shake the touch-up paint container thoroughly to ensure the paint is properly mixed.
- Apply Thin Layers: Apply thin, even layers of paint to the scratch, allowing each layer to dry completely before applying the next.
- Avoid Over-Application: Avoid applying too much paint at once, as this can create a raised area that is difficult to blend.
5.3. Step 3: Sanding the Area
Once the touch-up paint is completely dry, lightly sand the area with 2000-grit sandpaper to smooth out any imperfections.
- Wet Sanding: Use wet sanding technique, keep the sandpaper and the surface wet.
- Light Pressure: Apply very light pressure and sand in a back-and-forth motion.
- Check Frequently: Frequently check the surface to avoid over-sanding.
5.4. Step 4: Applying Rubbing Compound
Apply a small amount of rubbing compound to a clean microfiber cloth and buff the area to remove any sanding marks.
5.5. Step 5: Polishing the Area
Apply a small amount of car polish to a clean microfiber cloth and buff the area to restore the shine.
5.6. Step 6: Waxing the Area
Apply a coat of wax or sealant to protect the repaired area and enhance the shine.
6. How to Fix Primer Scratches
Primer scratches are the most challenging to repair and may require professional assistance. However, if you’re confident in your abilities, here’s how to tackle them:
6.1. Step 1: Cleaning the Area
Thoroughly clean the area around the scratch with car wash soap and water.
6.2. Step 2: Sanding the Area
Sand the area with 1000-grit sandpaper to remove any rough edges or rust. Then, sand the area again with 2000-grit sandpaper to smooth out the surface.
6.3. Step 3: Applying Touch-Up Paint
Apply thin, even layers of touch-up paint to the scratch, allowing each layer to dry completely before applying the next.
6.4. Step 4: Sanding the Area Again
Once the touch-up paint is completely dry, lightly sand the area with 2000-grit sandpaper to smooth out any imperfections.
6.5. Step 5: Applying Rubbing Compound
Apply a small amount of rubbing compound to a clean microfiber cloth and buff the area to remove any sanding marks.
6.6. Step 6: Polishing the Area
Apply a small amount of car polish to a clean microfiber cloth and buff the area to restore the shine.
6.7. Step 7: Waxing the Area
Apply a coat of wax or sealant to protect the repaired area and enhance the shine.
Note: If the scratch is too deep or extensive to be repaired with these steps, it’s best to consult a professional auto body shop.
7. Advanced Techniques and Tools
For more advanced scratch repair, consider using these tools and techniques:
7.1. Polishing Machines
Polishing machines can significantly speed up the polishing process and produce a more uniform finish. There are two main types of polishing machines:
- Rotary Polishers: More powerful and aggressive, suitable for removing deep scratches and imperfections.
- Dual-Action Polishers: More forgiving and easier to control, ideal for polishing and waxing.
CARDIAGTECH.NET offers a range of high-quality polishing machines to suit your needs.
7.2. Paint Depth Gauges
Paint depth gauges measure the thickness of your car’s paint, allowing you to avoid over-sanding and damaging the underlying layers. This is especially important when dealing with base coat and primer scratches. CARDIAGTECH.NET offers a selection of accurate and reliable paint depth gauges.
7.3. Wet Sanding
Wet sanding involves using sandpaper with water to lubricate the surface and reduce friction. This technique produces a smoother finish and minimizes the risk of scratching the paint.
8. Preventing Car Scratches
Prevention is always better than cure. Here are some tips to help you minimize the risk of scratches on your car:
8.1. Regular Washing
Wash your car regularly to remove dirt, dust, and other debris that can scratch the paint.
8.2. Proper Washing Technique
Use a high-quality car wash soap, a soft sponge or mitt, and a gentle touch to avoid causing scratches while washing your car.
8.3. Microfiber Cloths
Use microfiber cloths to wash and dry your car to avoid damaging the paint.
8.4. Avoid Automatic Car Washes
Avoid using automatic car washes, as the brushes can cause scratches.
8.5. Waxing
Apply a fresh coat of wax regularly to protect the paint and make it more resistant to scratches.
8.6. Parking Considerations
Park in a garage or under a carport to protect your car from the elements. Avoid parking your car near trees or bushes that could scratch the paint.
8.7. Car Covers
Use a car cover to protect your car from scratches and other damage when it is parked outside.
9. Maintaining Your Car’s Paint
Keeping your car’s paint in good condition goes beyond just fixing scratches. Regular maintenance can help prevent future damage and keep your car looking its best.
9.1. Detailing Clay
Use detailing clay to remove embedded contaminants from the paint surface.
9.2. Paint Sealants
Apply paint sealants to provide long-lasting protection against the elements.
9.3. Professional Detailing
Consider professional detailing services for thorough cleaning, polishing, and protection.
10. Conclusion: Restore Your Car’s Beauty with CARDIAGTECH.NET
Fixing car paint scratches doesn’t have to be a daunting task. With the right knowledge, tools, and techniques, you can restore your car’s appearance and protect its value. Whether you’re dealing with minor clear coat scratches or more severe primer damage, this comprehensive guide has provided you with the information you need to tackle the job with confidence.
Remember, at CARDIAGTECH.NET, we’re committed to providing you with the highest quality tools and equipment for all your automotive repair needs. From polishing machines and paint depth gauges to touch-up paint and microfiber cloths, we have everything you need to achieve professional-quality results.
Don’t let scratches ruin the look of your car any longer. Take action today and restore its beauty with the help of CARDIAGTECH.NET.
Is the prospect of restoring your car’s flawless finish exciting? Do you want to save money by handling paint scratch repairs yourself? Or are you a professional auto detailer looking to enhance your toolkit? Contact CARDIAGTECH.NET now for expert advice on the best tools and materials for paint scratch removal. We will help you select the right tools, such as polishing machines or paint depth gauges, and provide advice on how to use them effectively. Don’t let scratches detract from your car’s appearance and value.
Contact CARDIAGTECH.NET today to discover how our premium tools can transform your vehicle.
- Address: 276 Reock St, City of Orange, NJ 07050, United States
- WhatsApp: +1 (641) 206-8880
- Website: CARDIAGTECH.NET
Frequently Asked Questions (FAQ)
1. How much does it cost to fix a car scratch?
The cost to fix a car scratch can vary widely depending on the severity of the damage, the type of paint, and the location of the repair. Minor clear coat scratches can often be repaired for as little as $50-$100 using DIY methods. More severe base coat or primer scratches may require professional repair, which can cost anywhere from $200 to $1000 or more.
2. Can I use toothpaste to remove car scratches?
While toothpaste may help to temporarily reduce the appearance of very minor clear coat scratches, it is not a substitute for proper scratch remover compounds and polishing techniques. Toothpaste is not designed for use on automotive paint and may even cause further damage.
3. How do I match the touch-up paint to my car’s color?
The best way to match touch-up paint to your car’s color is to find the paint code, which is typically located on a sticker inside the driver’s side doorjamb or in the glove compartment. You can then use this code to purchase the correct touch-up paint from an auto parts store or online retailer.
4. How long does it take to fix a car scratch?
The time it takes to fix a car scratch depends on the severity of the damage and the repair method used. Minor clear coat scratches can often be repaired in as little as 30 minutes to an hour. More severe base coat or primer scratches may require several hours or even days to repair properly.
5. Can I fix a car scratch myself, or should I take it to a professional?
Whether you can fix a car scratch yourself depends on your skill level, the tools you have available, and the severity of the damage. Minor clear coat scratches can often be repaired by DIYers with some basic tools and instructions. However, more severe base coat or primer scratches may require professional repair to achieve a seamless finish.
6. What is the best scratch remover for cars?
The best scratch remover for cars depends on the type of scratch you’re dealing with. For minor clear coat scratches, a mild abrasive compound like Meguiar’s ScratchX or 3M Scratch Remover is a good choice. For more severe scratches, you may need a more aggressive rubbing compound like Meguiar’s Ultimate Compound.
7. How do I prevent rust after fixing a car scratch?
To prevent rust after fixing a car scratch, it’s essential to properly seal the repaired area with touch-up paint, primer, and a protective layer of wax or sealant. You should also regularly inspect the area for any signs of rust and address them promptly.
8. What is the difference between rubbing compound and polishing compound?
Rubbing compound is a more aggressive abrasive compound used to remove heavier scratches, oxidation, and imperfections from the paint surface. Polishing compound is a milder abrasive compound used to refine the finish and restore shine after using rubbing compound.
9. Can I use a household cleaner to wash my car?
No, you should never use household cleaners to wash your car. Household cleaners are not designed for use on automotive paint and may contain harsh chemicals that can damage the paint and strip away the protective wax or sealant.
10. How often should I wax my car?
How often you should wax your car depends on the type of wax you use, the climate you live in, and how often you drive your car. In general, you should wax your car every 3-6 months to maintain its shine and protect the paint from the elements.