**How to Fix Small Tear in Leather Car Seat: A Detailed Guide**

Is your leather car seat sporting an unsightly tear? CARDIAGTECH.NET understands the frustration of damaged leather and offers a comprehensive guide on how to fix a small tear in your leather car seat, restoring its original beauty and comfort. This guide provides step-by-step instructions, essential tools, and expert tips to achieve a professional-quality repair. Learn about leather repair kits, heavy fillers, colorants, and leather care products, ensuring a long-lasting and visually appealing result.
1. Understanding the Challenge: Why Leather Car Seats Tear
Leather car seats, while luxurious and durable, are susceptible to tears over time. Understanding the common causes can help you prevent future damage and address current issues effectively.
1.1. Common Causes of Leather Tears
- Friction: Constant rubbing against clothing, especially with rough materials, can wear down the leather’s surface.
- Dryness: Leather can dry out and become brittle, making it more prone to cracking and tearing. According to a study by the Leather Research Institute, maintaining proper hydration can extend the lifespan of leather by up to 30%.
- Sharp Objects: Accidental contact with keys, tools, or other sharp objects can easily puncture or tear the leather.
- UV Exposure: Prolonged exposure to sunlight can cause the leather to fade and weaken. The University of California, Davis, Department of Textiles and Clothing found that UV radiation breaks down the collagen fibers in leather, reducing its strength.
- Lack of Maintenance: Neglecting regular cleaning and conditioning can lead to a buildup of dirt and grime, which accelerates wear and tear.
1.2. Identifying the Type of Tear
Before starting the repair, it’s essential to identify the type of tear. Small tears, punctures, and abrasions require different approaches.
- Small Tears: These are typically less than an inch long and can be repaired with a leather repair kit.
- Punctures: Small holes caused by sharp objects.
- Abrasions: Surface damage where the leather’s color is worn away.
1.3. Assessing the Damage
Examine the extent of the damage to determine the best course of action. Consider the size, location, and severity of the tear.
- Size: Measure the length and width of the tear.
- Location: Tears in high-stress areas, such as the seat bolster, may require additional reinforcement.
- Severity: Check if the tear has frayed edges or significant material loss.
2. Essential Tools and Materials for Leather Car Seat Repair
Having the right tools and materials is crucial for a successful leather car seat repair. CARDIAGTECH.NET recommends the following items:
2.1. Leather Repair Kit
A comprehensive leather repair kit typically includes:
- Leather Cleaner: To remove dirt and grime.
- Leather Prep: To prepare the surface for repair.
- Leather Glue: To adhere the backing patch.
- Heavy Filler: To fill the tear.
- Colorant: Matched to your car seat’s color.
- Leather Finish: To seal and protect the repair.
- Backing Patch: To provide a firm base for the filler.
- Applicator Sponges: For applying colorant and finish.
- Palette Knife: For applying filler.
- Tweezers: For positioning the backing patch.
- Abrasive Pad: For smoothing the repair.
2.2. Additional Tools
- Scissors or Scalpel: For trimming frayed edges.
- Heat Gun or Hair Dryer: To speed up drying time.
- Mixing Cups: For mixing colorant.
- Gloves: To protect your hands.
- Mask: To avoid inhaling chemicals.
- Soft Cloths: For cleaning and wiping.
2.3. Where to Buy Quality Repair Materials
CARDIAGTECH.NET offers a wide selection of high-quality leather repair products to ensure a professional finish. You can also find these products at:
- Automotive Supply Stores: Stores like AutoZone and Advance Auto Parts.
- Leather Specialty Shops: Stores specializing in leather care and repair.
- Online Retailers: Websites like Amazon and eBay.
3. Step-by-Step Guide: How to Fix a Small Tear in Leather Car Seat
Follow these detailed steps to repair a small tear in your leather car seat and restore its appearance.
3.1. Step 1: Preparing the Leather Car Seat
Clean the area around the tear to remove any dirt, grime, or oils.
- Apply Leather Cleaner: Spray leather cleaner onto a soft cloth and gently wipe the area around the tear.
- Rub with Leather Prep: Use a leather prep solution and an abrasive pad to gently rub the surface of the leather. This will remove any loose fibers and the manufactured finish, allowing the colorant to adhere properly.
- Wipe with Alcohol Cleaner: After prepping, wipe the leather down with an alcohol cleaner to remove any remaining dirt or dust.
Preparing leather car seat for repair by cleaning and prepping
3.2. Step 2: Tidy the Area
Remove any loose or protruding leather around the tear to create a smooth surface.
- Examine the Tear: Look for any leather sticking outwards, forming a lip.
- Trim the Lip: Using a scalpel or scissors, carefully remove the lip by cutting it away at the base. Be cautious not to damage the surrounding leather.
 Tidying leather tear area by trimming loose leather
3.3. Step 3: Apply the Backing Patch
Provide a firm base for the repair by applying a leather repair sub-patch.
- Cut the Patch: Take the backing patch and cut it to a size that completely covers the repair with an additional 1 cm of material surrounding the hole.
- Insert the Patch: Use tweezers to insert one side of the patch underneath the leather, ensuring the 1 cm excess is completely under the leather.
- Glue the Edges: Apply a small amount of leather glue onto the spatula and feed it underneath the edges of the hole to coat the underside of the leather.
- Bond the Leather: Apply pressure to bond the leather to the patch and allow it to dry.
 Applying backing patch to leather tear with glue
3.4. Step 4: Fill the Hole
Fill the tear with heavy filler in thin layers to create a smooth, even surface.
- Apply Thin Layers: Use the end of the palette knife to place a thin layer of heavy filler into the hole over the backing patch.
- Dry Each Layer: Allow each layer to dry for about 20 minutes. Use a hair dryer to speed up the drying process.
- Repeat: Apply at least 5-6 thin layers, building up the filler until it is just below the top of the hole.
- Remove Excess: Smooth the area with the sharper edge of the palette knife before drying each layer.
 Filling leather car seat tear with heavy filler
3.5. Step 5: Final Layer of Filler
Apply the final layer of filler to completely fill the hole, ensuring it is level with the surrounding leather.
- Apply Final Layer: Completely fill the hole so that it is even with the surrounding leather.
- Cure Properly: Allow this final layer to cure properly, as the filler can shrink as it dries.
- Add More Filler if Needed: If the filler shrinks below the desired level, add more repair filler.
- Clean the Area: Clean the area with alcohol cleaner to remove any unwanted filler and dust.
 Adding final layer of filler to leather tear for smooth finish
3.6. Step 6: Apply an Initial Coat of Colorant
Apply a colorant that has been matched to the color of your leather car seat.
- Apply Colorant: Take one of the sponges and apply a small amount of colorant to it.
- Rub Thoroughly: Rub the colorant into the area of the repair thoroughly. This allows the colorant to penetrate into the creases of the leather and valleys of the grain, giving a better overall finish.
3.7. Step 7: Finish the Job
Spray thin coats of colorant over the leather car seat to thoroughly blend in the repair.
- Spray Thin Coats: Use an airbrush to spray as many thin coats of color over the leather car seat.
- Allow to Cure: Ensure each coat is very thin and given sufficient time to cure before applying the next.
- Apply Finish: Apply 4 or 5 thin coats of the leather finish, allowing time for it to dry between each coat. The finish seals the colorant and prevents it from wearing.
- Allow to Cure: Allow 24 hours before using the item to ensure the filler, colorant, and finish have cured sufficiently.
 Spraying colorant for final touch on leather repair
4. Advanced Techniques for Leather Car Seat Repair
For more challenging repairs, consider these advanced techniques to achieve a flawless finish.
4.1. Using a Heat Gun for Faster Drying
A heat gun or hair dryer can significantly reduce the drying time for fillers and colorants.
- Even Heat Distribution: Use the heat gun in a sweeping motion to distribute heat evenly and prevent damage to the leather.
- Safe Distance: Maintain a safe distance (about 6-8 inches) to avoid overheating the repair area.
4.2. Custom Color Matching
Achieving a perfect color match is crucial for a seamless repair.
- Professional Matching: Some leather repair shops offer custom color matching services.
- DIY Matching: Use a color matching kit and follow the instructions carefully to blend the colorant to the exact shade of your leather.
4.3. Repairing Tears in High-Stress Areas
Tears in high-stress areas, such as the seat bolster, require additional reinforcement.
- Reinforced Backing: Use a stronger backing material, such as canvas or heavy-duty fabric.
- Extra Glue: Apply extra glue to the edges of the backing patch to ensure a secure bond.
5. Maintaining Your Leather Car Seats to Prevent Future Tears
Preventive maintenance is key to extending the life of your leather car seats and avoiding costly repairs.
5.1. Regular Cleaning and Conditioning
- Clean Regularly: Clean your leather car seats every 1-2 months to remove dirt and grime.
- Use Leather Conditioner: Apply a leather conditioner every 3-6 months to keep the leather hydrated and supple. According to the American Leather Research Laboratory, regular conditioning can reduce the risk of cracking by up to 40%.
5.2. Protecting from UV Exposure
- Park in the Shade: Park your car in the shade or use a car cover to protect the leather from direct sunlight.
- Use UV Protectant: Apply a UV protectant to the leather to prevent fading and weakening.
5.3. Avoiding Sharp Objects
- Be Careful: Avoid placing sharp objects on the leather seats.
- Use Seat Covers: Consider using seat covers to protect the leather from accidental damage.
6. Common Mistakes to Avoid When Repairing Leather Car Seats
Avoiding these common mistakes can help you achieve a professional-quality repair.
6.1. Applying Filler Too Thickly
Applying filler in thick layers can lead to uneven drying and cracking.
- Thin Layers: Always apply filler in thin layers and allow each layer to dry completely.
6.2. Not Preparing the Surface Properly
Failing to clean and prep the surface properly can prevent the colorant from adhering correctly.
- Thorough Cleaning: Ensure the leather is thoroughly cleaned and prepped before applying any repair products.
6.3. Using the Wrong Colorant
Using the wrong colorant can result in a mismatched repair that is visually unappealing.
- Color Matching: Always match the colorant to the exact shade of your leather.
7. Cost Analysis: DIY vs. Professional Leather Car Seat Repair
Deciding whether to repair your leather car seats yourself or hire a professional depends on the extent of the damage and your budget.
7.1. DIY Repair Costs
- Leather Repair Kit: $20 – $50
- Additional Tools: $10 – $30
- Total Cost: $30 – $80
7.2. Professional Repair Costs
- Small Tear Repair: $100 – $300
- Large Tear Repair: $300 – $800
- Full Seat Restoration: $500 – $1500
7.3. Factors to Consider
- Extent of Damage: Minor tears can be easily repaired with a DIY kit, while extensive damage may require professional attention.
- Your Skill Level: If you are comfortable with DIY projects and have some experience, a DIY repair may be a good option.
- Budget: Professional repairs can be expensive, so consider your budget when making your decision.
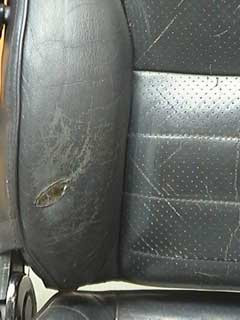
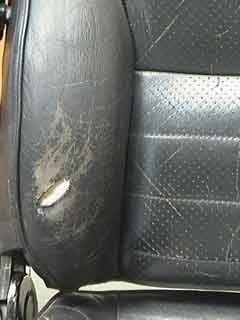
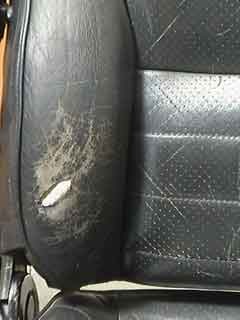
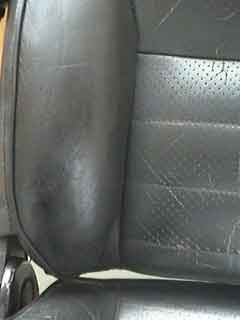
8. Real-World Examples: Before and After Photos
Seeing the results of successful leather car seat repairs can inspire you to tackle your own projects.
8.1. Small Tear Repair
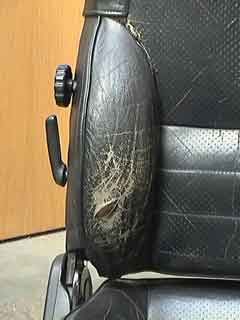 Before leather repair showing tear
8.2. After Small Tear Repair
Spraying colorant for final touch on leather repair
9. Expert Tips and Tricks for Leather Car Seat Repair
Here are some expert tips to help you achieve the best possible results.
9.1. Test the Colorant in an Inconspicuous Area
Before applying the colorant to the repair area, test it in an inconspicuous area to ensure a perfect match.
9.2. Use Multiple Thin Coats of Colorant
Applying multiple thin coats of colorant will result in a more even and natural-looking finish.
9.3. Be Patient and Take Your Time
Rushing the repair process can lead to mistakes. Take your time and follow each step carefully.
10. Why Choose CARDIAGTECH.NET for Your Automotive Repair Needs
CARDIAGTECH.NET is your trusted partner for all your automotive repair needs, offering high-quality products, expert advice, and exceptional customer service.
10.1. Wide Selection of Repair Tools and Materials
We offer a comprehensive selection of leather repair kits, tools, and materials to help you achieve professional results.
10.2. Expert Advice and Support
Our team of experienced professionals is available to provide expert advice and support throughout the repair process.
10.3. Commitment to Quality and Customer Satisfaction
We are committed to providing our customers with the highest quality products and exceptional customer service.
11. The Science Behind Leather Repair
Understanding the science behind leather repair can help you make informed decisions and achieve better results.
11.1. Leather Composition
Leather is primarily composed of collagen fibers, which provide strength and flexibility. According to a study by the Leather Research Institute, the arrangement and density of these fibers determine the leather’s durability.
11.2. How Repair Products Work
- Fillers: Fillers are designed to bond with the leather fibers and create a smooth, even surface.
- Colorants: Colorants penetrate the leather and restore its original color.
- Finishes: Finishes seal the colorant and protect the leather from wear and tear.
11.3. The Importance of pH Balance
Maintaining the proper pH balance is crucial for preserving the integrity of leather. Acidic or alkaline cleaners can damage the leather fibers and lead to premature aging.
12. FAQ: Frequently Asked Questions About Leather Car Seat Repair
Here are some frequently asked questions about leather car seat repair.
12.1. Can I repair a large tear in my leather car seat myself?
Large tears may require professional repair, but small tears can often be repaired with a DIY kit.
12.2. How do I match the color of my leather car seat?
Use a color matching kit or take a sample of your leather to a professional color matching service.
12.3. How long does it take to repair a leather car seat?
A small tear can typically be repaired in 2-4 hours, while larger repairs may take longer.
12.4. What is the best way to clean leather car seats?
Use a mild leather cleaner and a soft cloth to gently wipe the seats.
12.5. How often should I condition my leather car seats?
Condition your leather car seats every 3-6 months to keep them hydrated and supple.
12.6. Can I use household cleaners on leather car seats?
No, household cleaners can damage the leather. Use only products specifically designed for leather care.
12.7. How do I prevent future tears in my leather car seats?
Regular cleaning, conditioning, and protecting from UV exposure can help prevent future tears.
12.8. What is the best type of filler for leather repair?
Heavy filler is best for filling tears, while flexible filler is better for cracks and creases.
12.9. Can I repair a tear on a perforated leather car seat?
Yes, but it requires extra care to avoid clogging the perforations with filler or colorant.
12.10. How do I remove stains from leather car seats?
Use a specialized leather stain remover and follow the instructions carefully.
13. The Future of Leather Repair Technology
The field of leather repair is constantly evolving, with new technologies and products being developed to make repairs easier and more effective.
13.1. Self-Healing Leather
Researchers are developing self-healing leather that can repair minor scratches and tears on its own. According to a study by the Massachusetts Institute of Technology (MIT), embedding microcapsules containing healing agents into the leather can enable it to repair itself when damaged.
13.2. Advanced Color Matching Systems
Advanced color matching systems use spectrophotometers and computer algorithms to precisely match the color of any leather surface.
13.3. Eco-Friendly Repair Products
More and more companies are developing eco-friendly leather repair products that are safe for the environment and your health.
14. Conclusion: Restore Your Leather Car Seats Today
Repairing a small tear in your leather car seat is a manageable task with the right tools, materials, and knowledge. By following this comprehensive guide from CARDIAGTECH.NET, you can restore your car seats to their former glory and enjoy a comfortable and stylish ride. Remember to clean and condition your seats regularly to prevent future damage and maintain their beauty for years to come.
Ready to start your leather car seat repair project? Visit CARDIAGTECH.NET today to find everything you need, from leather repair kits to expert advice. Don’t let those small tears diminish the value and comfort of your vehicle. Take action now and bring back the pristine look of your leather interiors.
For expert advice and a wide selection of leather repair products, contact CARDIAGTECH.NET today!
Address: 276 Reock St, City of Orange, NJ 07050, United States
WhatsApp: +1 (641) 206-8880
Website: CARDIAGTECH.NET
Are you facing challenges in finding the right tools for your automotive repair needs? Do you struggle with time-consuming repairs and maintaining high standards? At CARDIAGTECH.NET, we understand these challenges and offer solutions to enhance your efficiency and precision. Contact us today, and let our experts guide you to the perfect tools that will elevate your work and ensure customer satisfaction. Don’t let these challenges hold you back – reach out now and experience the CARDIAGTECH.NET difference!