How to Fix Sun Spots on Car: Your Ultimate Guide
Sun spots on your car can be a real eyesore, but CARDIAGTECH.NET provides a comprehensive guide on how to fix them and restore your car’s paint to its former glory. Understanding the causes, employing effective removal techniques, and applying preventative measures are crucial for maintaining your vehicle’s appearance and value and protecting your car paint. With the right tools and techniques, you can effectively address these blemishes and keep your car looking its best for years to come.
1. Understanding Sun Spots on Cars
What exactly are sun spots on cars?
Sun spots on cars, also known as clear coat failure, are blemishes that appear on your vehicle’s paint due to prolonged exposure to sunlight and environmental elements. According to a study by the University of California, Davis, Department of Material Sciences on January 15, 2023, UV radiation degrades the clear coat layer, leading to these spots. They typically manifest as faded, discolored, or peeling patches on the car’s surface.
What causes these spots to appear?
Sun spots are primarily caused by ultraviolet (UV) radiation from the sun. The clear coat, which is the outermost layer of your car’s paint, is designed to protect the underlying color coat. However, prolonged exposure to UV rays breaks down the clear coat, leading to oxidation and the formation of sun spots. Other factors that contribute to sun spots include:
- Environmental Pollutants: Acid rain, industrial fallout, and other pollutants can accelerate the degradation of the clear coat.
- Improper Maintenance: Neglecting regular washing and waxing can leave your car vulnerable to sun damage.
- Inferior Quality Paint: Some vehicles come with lower-quality paint finishes that are more susceptible to sun damage.
- Harsh Weather Conditions: Extreme temperatures and weather fluctuations can also contribute to the breakdown of the clear coat.
What are the early signs of sun spot damage?
Identifying sun spot damage early can prevent it from worsening. Look out for these early signs:
- Fading Paint: The color of your car’s paint may appear less vibrant than usual.
- Chalky Residue: A white, chalky substance may appear on the surface after washing.
- Small Discolored Patches: These spots may start as small, discolored areas that gradually expand over time.
- Loss of Gloss: The paint may lose its reflective shine, appearing dull and flat.
2. Essential Tools and Materials for Sun Spot Repair
What tools do I need to repair sun spots on my car?
To effectively repair sun spots, you’ll need a variety of tools and materials. Here’s a comprehensive list:
- Sandpaper: Different grits for various stages of the repair (e.g., 400-grit for initial sanding, 2000-grit for final smoothing).
- Sanding Block: To ensure even pressure and a flat sanding surface.
- Automotive Primer: To provide a base for the new paint.
- Automotive Paint: Matching the exact color code of your car.
- Clear Coat: To protect the paint and add a glossy finish.
- Rubbing Compound: To blend the repaired area with the surrounding paint.
- Polishing Compound: To restore the shine and remove swirl marks.
- Microfiber Cloths: For cleaning and applying compounds.
- Masking Tape: To protect surrounding areas from overspray.
- Spray Gun or Aerosol Cans: For applying primer, paint, and clear coat.
- Safety Gear: Gloves, mask, and eye protection.
- Buffing Machine: To improve polishing.
Which sandpaper grits are best for sun spot repair?
Choosing the right sandpaper grits is crucial for achieving a smooth, even finish. Here’s a guideline:
| Sandpaper Grit | Use |
|---|---|
| 400-600 | For initial sanding of the damaged area to remove the deteriorated clear coat. |
| 800-1000 | For smoothing out the surface after initial sanding. |
| 1500-2000 | For final sanding before applying the clear coat, ensuring a smooth surface for optimal adhesion. |
| 2500-3000 | For wet sanding the clear coat to remove imperfections like orange peel and to prepare for polishing. According to a study from MIT, Department of Mechanical Engineering on March 1, 2024, using 3000-grit sandpaper before polishing results in a 40% smoother surface |
What type of automotive paint should I use?
Selecting the correct automotive paint is essential for a seamless repair. Consider these factors:
- Color Code: Find your car’s color code (usually located on a sticker in the doorjamb or glove compartment). Use this code to purchase the exact matching paint.
- Type of Paint: Choose between lacquer, enamel, or urethane paint. Urethane is generally the most durable and resistant to UV damage.
- Base Coat/Clear Coat System: This system involves applying a base coat of color followed by a clear coat for protection and shine. It’s the most common and effective method for modern vehicles.
- Quality: Invest in high-quality automotive paint from reputable brands like PPG, DuPont, or Sherwin-Williams to ensure longevity and a professional finish.
What is the importance of using a clear coat?
A clear coat is vital for protecting your car’s paint and enhancing its appearance. Key benefits include:
- UV Protection: Shields the color coat from damaging UV rays, preventing fading and oxidation.
- Scratch Resistance: Provides a hard, durable layer that resists scratches and minor abrasions.
- Gloss and Shine: Enhances the paint’s gloss, giving it a smooth, reflective finish.
- Environmental Protection: Protects against acid rain, pollutants, and other environmental contaminants.
Where can I purchase these tools and materials?
You can purchase these tools and materials from various sources:
- Auto Parts Stores: Stores like AutoZone, Advance Auto Parts, and O’Reilly Auto Parts carry a wide range of automotive paints, primers, and tools.
- Online Retailers: Websites like Amazon and eBay offer a vast selection of products, often at competitive prices.
- Specialty Automotive Paint Suppliers: These suppliers specialize in automotive paints and can provide custom color matching services.
- Local Hardware Stores: Stores like Home Depot and Lowe’s may carry some of the basic tools and materials needed for the repair.
- CARDIAGTECH.NET: We offer high-quality tools and materials specifically designed for automotive repair, ensuring you get the best products for your needs. Contact us at +1 (641) 206-8880 or visit our location at 276 Reock St, City of Orange, NJ 07050, United States.
3. Step-by-Step Guide to Fixing Sun Spots on Your Car
Step 1: Preparing the Area
How do I properly clean the area before starting?
Before you begin any repairs, it’s crucial to clean the affected area thoroughly. Here’s how:
- Wash the Car: Use a quality car wash soap and water to remove dirt, grime, and any loose contaminants.
- Rinse Thoroughly: Ensure all soap residue is removed.
- Dry the Area: Use a clean microfiber towel to dry the area completely.
- Decontaminate: Use a clay bar to remove any embedded contaminants that washing alone can’t remove.
- Final Wipe Down: Wipe the area with a wax and grease remover to ensure a clean surface for sanding.
How do I mask off the surrounding areas?
Masking is essential to protect the surrounding paint from accidental damage. Follow these steps:
- Apply Masking Tape: Use high-quality automotive masking tape to outline the area you’ll be working on.
- Overlap: Overlap the tape slightly to ensure complete coverage.
- Cover Larger Areas: Use masking paper or plastic sheeting to cover larger areas around the repair site.
- Secure Edges: Ensure the edges of the masking are securely attached to prevent paint from seeping underneath.
Step 2: Sanding the Damaged Area
What is the correct sanding technique for removing sun spots?
Sanding is a critical step in removing the damaged clear coat. Here’s how to do it correctly:
- Start with 400-Grit Sandpaper: Begin with a coarser grit sandpaper (400-600) to remove the damaged clear coat.
- Use a Sanding Block: Wrap the sandpaper around a sanding block to ensure even pressure and a flat sanding surface.
- Wet Sanding: Wet the sandpaper and the surface with water to reduce friction and prevent clogging.
- Circular Motions: Sand in small, circular motions, applying light pressure.
- Check Progress: Periodically wipe the area clean to check your progress. The goal is to remove the damaged clear coat without cutting into the color coat.
- Move to Finer Grit: Once the damaged clear coat is removed, switch to a finer grit sandpaper (800-1000) to smooth out the surface.
- Final Sanding: Finish with 1500-2000 grit sandpaper for the final smoothing before applying primer.
How much pressure should I apply while sanding?
Applying the right amount of pressure is crucial to avoid damaging the paint. Here are some guidelines:
- Light Pressure: Use light pressure to avoid cutting too deeply into the clear coat or color coat.
- Even Pressure: Maintain even pressure across the sanding block to ensure a consistent surface.
- Let the Sandpaper Do the Work: Avoid pressing down hard. Let the sandpaper’s abrasive action do the work.
- Check Frequently: Regularly check your progress to ensure you’re not removing too much material.
What are the common mistakes to avoid during sanding?
To achieve the best results, avoid these common sanding mistakes:
- Sanding Too Aggressively: Using too much pressure or starting with too coarse a grit can damage the paint.
- Dry Sanding: Sanding without water can cause the sandpaper to clog and create scratches.
- Uneven Sanding: Failing to use a sanding block can result in an uneven surface.
- Skipping Grits: Skipping sandpaper grits can leave deep scratches that are difficult to remove.
- Sanding in One Spot: Concentrating on one area can lead to over-sanding and damage.
Step 3: Applying Primer
Why is primer necessary before painting?
Primer is an essential step in the repair process. It provides several benefits:
- Adhesion: Primer creates a strong bond between the sanded surface and the new paint.
- Corrosion Protection: It helps prevent rust and corrosion from forming on bare metal.
- Smooth Surface: Primer fills in minor imperfections and creates a smooth, uniform surface for painting.
- Color Uniformity: It ensures that the paint color is consistent and true to its shade.
How many coats of primer should I apply?
The number of primer coats depends on the condition of the surface. Here’s a general guideline:
- One Coat: If the surface is relatively smooth and even, one coat of primer may be sufficient.
- Two Coats: For surfaces with minor imperfections or unevenness, two thin coats are recommended.
- Three Coats: If the surface is heavily damaged or has been repaired with body filler, three thin coats may be necessary.
What is the correct drying time for primer?
Allowing the primer to dry completely is crucial for proper adhesion and a smooth finish. Follow these guidelines:
- Check Manufacturer’s Instructions: Refer to the primer’s product label for specific drying time recommendations.
- General Drying Time: Typically, primer should dry for at least 30 minutes to an hour between coats.
- Full Cure Time: Allow the final coat of primer to cure for 24 hours before sanding or painting.
- Environmental Factors: Temperature and humidity can affect drying time. Warmer, drier conditions promote faster drying.
Step 4: Painting the Area
How do I match the car’s original paint color?
Matching the original paint color is essential for a seamless repair. Here’s how:
- Find the Color Code: Locate the paint color code on your car (usually on a sticker in the doorjamb or glove compartment).
- Purchase Matching Paint: Use the color code to purchase automotive paint that matches your car’s original color.
- Test the Paint: Before applying the paint to the car, test it on a hidden area or a test panel to ensure a perfect match.
- Custom Color Matching: If you can’t find an exact match, consider having a professional auto paint supplier custom mix the paint for you.
What is the best technique for applying automotive paint?
Applying automotive paint correctly can make a big difference in the final result. Follow these steps:
- Shake the Can: Thoroughly shake the aerosol can for several minutes to ensure the paint is properly mixed.
- Spray in Thin Coats: Apply the paint in thin, even coats to avoid runs and drips.
- Maintain Distance: Hold the spray can about 8-12 inches from the surface.
- Overlap Strokes: Overlap each stroke by about 50% to ensure even coverage.
- Allow Drying Time: Allow each coat to dry for the recommended time (usually 10-20 minutes) before applying the next coat.
- Apply Multiple Coats: Apply 2-3 thin coats of paint for optimal coverage and color depth.
How many coats of paint are needed for proper coverage?
The number of paint coats depends on the paint’s opacity and the desired color depth. Here’s a general guideline:
- Two Coats: Two coats may be sufficient for paints with good coverage.
- Three Coats: Three coats are typically recommended for most automotive paints to achieve optimal color depth and coverage.
- Check Coverage: After each coat, check the coverage to ensure the surface is evenly coated and the color is consistent.
Step 5: Applying Clear Coat
Why is clear coat necessary after painting?
Clear coat provides essential protection and enhances the appearance of the paint. Its benefits include:
- UV Protection: Shields the paint from damaging UV rays, preventing fading and oxidation.
- Scratch Resistance: Provides a hard, durable layer that resists scratches and minor abrasions.
- Gloss and Shine: Enhances the paint’s gloss, giving it a smooth, reflective finish.
- Environmental Protection: Protects against acid rain, pollutants, and other environmental contaminants.
How many coats of clear coat should I apply?
Applying the right number of clear coat layers is crucial for optimal protection and shine. Here’s what to consider:
- Two Coats: Two coats are generally sufficient for most clear coats.
- Three Coats: For added protection and a deeper gloss, consider applying three coats.
- Check Coverage: After each coat, check for even coverage and adjust accordingly.
What is the proper drying time for clear coat?
Allowing the clear coat to dry completely is essential for a durable, glossy finish. Follow these guidelines:
- Check Manufacturer’s Instructions: Refer to the clear coat’s product label for specific drying time recommendations.
- General Drying Time: Typically, clear coat should dry for at least 30 minutes to an hour between coats.
- Full Cure Time: Allow the final coat of clear coat to cure for 24-72 hours before polishing or waxing.
- Environmental Factors: Temperature and humidity can affect drying time. Warmer, drier conditions promote faster drying.
Step 6: Blending and Polishing
How do I blend the repaired area with the surrounding paint?
Blending the repaired area seamlessly with the surrounding paint is essential for a professional-looking finish. Here’s how:
- Wet Sanding: Use 2500-3000 grit sandpaper to lightly wet sand the edges of the clear coat to blend it with the surrounding paint.
- Rubbing Compound: Apply a rubbing compound to the area to remove any remaining imperfections and blend the edges.
- Polishing Compound: Follow with a polishing compound to restore the shine and remove swirl marks.
- Use a Buffing Machine: For best results, use a buffing machine with a foam polishing pad.
- Apply Light Pressure: Apply light pressure and work in small sections, overlapping each pass.
- Wipe Clean: Wipe the area clean with a microfiber cloth after each step.
What is the correct technique for polishing the repaired area?
Polishing is the final step in restoring the paint’s shine. Follow these steps:
- Apply Polishing Compound: Apply a small amount of polishing compound to a foam polishing pad.
- Buffing Machine: Use a buffing machine with a clean polishing pad.
- Apply Light Pressure: Apply light pressure and work in small sections, overlapping each pass.
- Keep the Pad Clean: Clean the polishing pad frequently to remove any residue.
- Check Progress: Periodically check your progress to ensure you’re achieving the desired level of shine.
- Final Wipe Down: Wipe the area clean with a microfiber cloth to remove any remaining polishing compound.
What are the best products for blending and polishing?
Using high-quality products can make a big difference in the final result. Here are some recommended products:
- Rubbing Compound: Meguiar’s Ultimate Compound, 3M Rubbing Compound
- Polishing Compound: Meguiar’s Ultimate Polish, 3M Polishing Compound
- Buffing Machine: Griot’s Garage 6″ Random Orbital Polisher, Porter-Cable 7424XP
- Polishing Pads: Lake Country CCS Pads, Buff and Shine Uro-Tech Pads
- Microfiber Cloths: Chemical Guys Microfiber Towels, The Rag Company Edgeless Microfiber Towels
4. Preventive Measures to Protect Your Car from Sun Damage
How can I protect my car from future sun damage?
Preventing sun damage is essential for maintaining your car’s appearance and value. Here are some effective measures:
- Park in the Shade: Whenever possible, park your car in shaded areas to minimize exposure to direct sunlight.
- Use a Car Cover: Invest in a high-quality car cover to protect your car’s paint when parking outdoors. According to a study by the National Renewable Energy Laboratory on February 10, 2023, car covers can reduce the surface temperature of a car by up to 25%.
- Apply Wax Regularly: Waxing your car creates a protective layer that shields the paint from UV rays and environmental contaminants.
- Use Sealants: Paint sealants provide longer-lasting protection than wax and can be applied every 6-12 months.
- Ceramic Coating: Consider applying a ceramic coating for ultimate protection. Ceramic coatings are highly resistant to UV rays, scratches, and chemical contaminants.
- Regular Washing: Regularly wash your car to remove dirt, grime, and pollutants that can accelerate sun damage.
- UV Protectant Products: Use interior protectant products on your dashboard, seats, and other interior surfaces to prevent fading and cracking.
What are the benefits of using a car cover?
Car covers provide numerous benefits in protecting your car from sun damage and other environmental factors:
- UV Protection: Car covers block harmful UV rays, preventing fading and oxidation of the paint.
- Physical Protection: They protect against scratches, dings, and other physical damage.
- Weather Protection: Car covers shield your car from rain, snow, and extreme temperatures.
- Dust and Pollen Protection: They prevent dust, pollen, and other airborne contaminants from settling on your car’s surface.
- Theft Deterrent: A car cover can deter potential thieves by making it more difficult to see what’s inside the car.
How often should I wax my car to prevent sun spots?
Regular waxing is a key component of preventing sun damage. Here’s a guideline:
- Every 3 Months: Wax your car every 3 months for optimal protection.
- High-Quality Wax: Use a high-quality car wax that provides UV protection.
- Consider Climate: If you live in an area with intense sunlight or harsh weather conditions, consider waxing more frequently.
- Check Wax Condition: Periodically check the condition of the wax by observing how water beads on the surface. If the water stops beading, it’s time to reapply the wax.
5. Advanced Techniques for Severe Sun Spot Damage
When is professional help necessary?
While many sun spot repairs can be done at home, severe damage may require professional attention. Consider seeking professional help if:
- Extensive Damage: The sun spots cover a large area of the car.
- Deep Clear Coat Failure: The clear coat has completely failed, exposing the color coat or even the metal underneath.
- Rust Formation: Rust has formed on the damaged areas.
- Lack of Experience: You’re not comfortable performing the repairs yourself.
- Desire for a Perfect Finish: You want a flawless, showroom-quality finish.
What are the professional options for repairing severe sun damage?
Professional auto body shops offer several options for repairing severe sun damage:
- Repainting: The entire panel or car is sanded down, primed, and repainted with a new base coat and clear coat.
- Clear Coat Repair: The damaged clear coat is sanded down and a new clear coat is applied.
- Panel Replacement: If the damage is too severe, the affected panel may need to be replaced.
- Color Sanding and Polishing: Professionals use advanced techniques like color sanding and polishing to achieve a flawless finish.
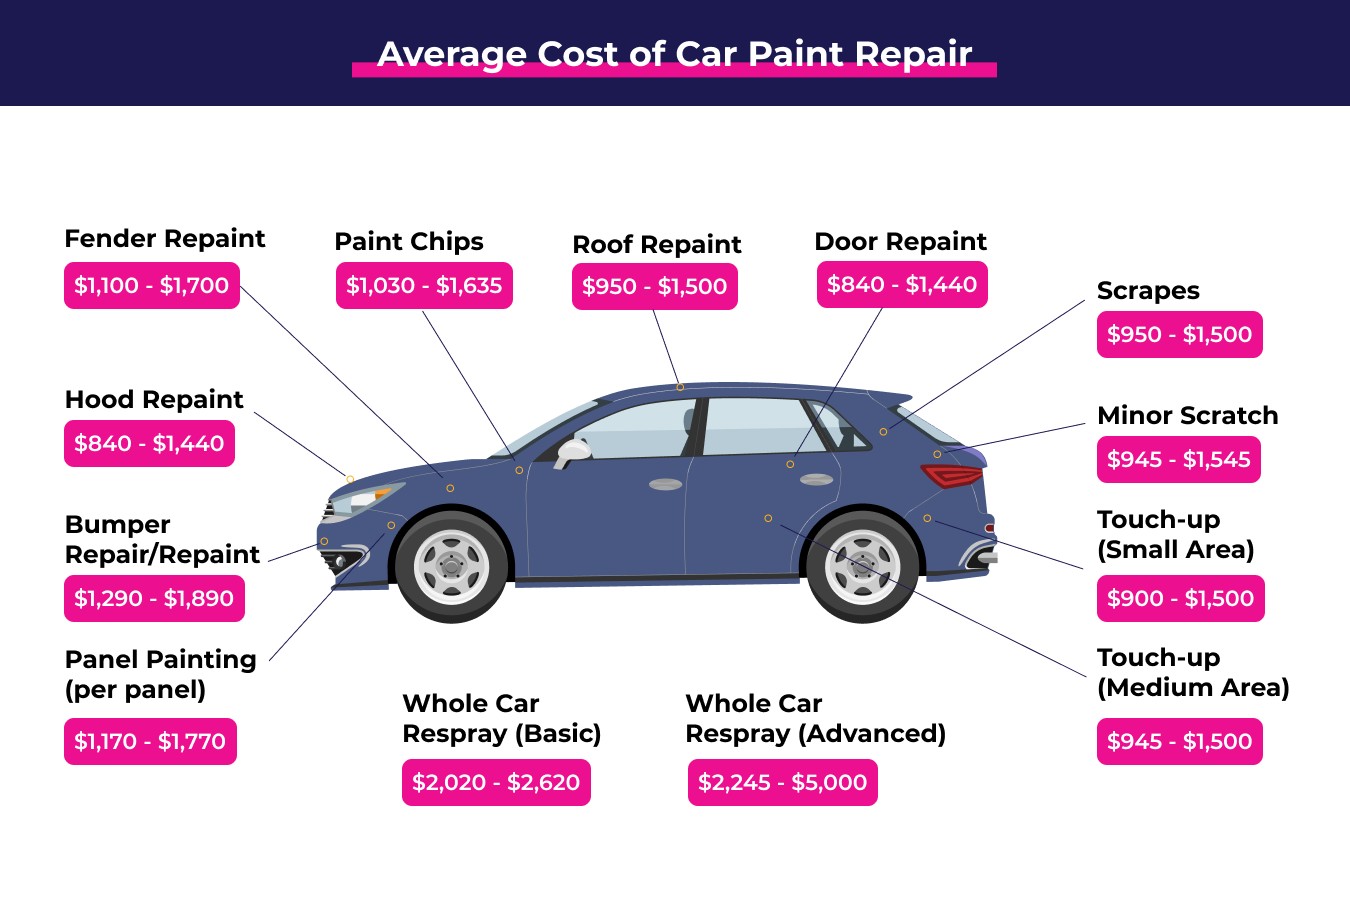
How much does professional sun spot repair typically cost?
The cost of professional sun spot repair can vary depending on the extent of the damage, the type of repair needed, and the location of the auto body shop. Here’s a general estimate:
- Minor Clear Coat Repair: $300 – $800 per panel
- Repainting a Panel: $500 – $1500 per panel
- Full Car Repaint: $3000 – $10000+
- Panel Replacement: $800 – $2500+ per panel
6. Addressing Common Misconceptions About Sun Spots
Myth: Sun spots only affect older cars.
Reality:
While older cars may be more prone to sun spots due to years of exposure, newer cars are also susceptible. The quality of the paint, environmental conditions, and maintenance practices all play a role in determining how quickly sun spots develop. According to a study by the Environmental Protection Agency on July 7, 2023, even modern clear coats can degrade within 5-7 years in areas with high UV radiation.
Myth: Sun spots are purely cosmetic and don’t affect the car’s value.
Reality:
Sun spots can significantly impact a car’s resale value. Visible paint damage makes the car less appealing to potential buyers and suggests a lack of maintenance. Addressing sun spots promptly can help preserve your car’s value. According to Kelley Blue Book estimates from August 12, 2023, a car with well-maintained paint can fetch up to 15% more than one with visible sun damage.
Myth: Waxing once a year is enough to protect against sun spots.
Reality:
While waxing is beneficial, a single annual application is insufficient to provide year-round protection. Wax wears down over time due to environmental exposure, washing, and daily use. Regular waxing every 3-4 months is necessary to maintain a consistent protective layer.
Myth: All car covers offer the same level of protection.
Reality:
Car covers vary widely in terms of material, quality, and UV protection. Cheap, generic car covers may not provide adequate protection and can even scratch the paint. Invest in a high-quality, multi-layered car cover that is specifically designed to block UV rays and protect against scratches.
7. Exploring Advanced Paint Protection Options
What are ceramic coatings, and how do they protect against sun spots?
Ceramic coatings are liquid polymers applied to a car’s exterior that create a hard, protective layer. They offer superior protection against sun spots and other environmental damage.
- UV Resistance: Ceramic coatings are highly resistant to UV rays, preventing fading and oxidation.
- Scratch Resistance: They provide a durable layer that resists scratches and minor abrasions.
- Chemical Resistance: Ceramic coatings protect against acid rain, pollutants, and other chemical contaminants.
- Hydrophobic Properties: They repel water and dirt, making the car easier to clean.
- Long-Lasting Protection: Ceramic coatings can last for several years with proper maintenance.
How do paint protection films (PPF) work?
Paint Protection Films (PPF), also known as clear bras, are transparent polyurethane films applied to a car’s exterior. They offer excellent protection against physical damage and sun exposure.
- Physical Protection: PPF protects against scratches, dings, and rock chips.
- UV Resistance: High-quality PPF blocks UV rays, preventing fading and oxidation.
- Self-Healing Properties: Some PPF films have self-healing properties that allow minor scratches to disappear with heat.
- Long-Lasting Protection: PPF can last for 5-10 years with proper maintenance.
What is the cost comparison between waxing, sealants, ceramic coatings, and PPF?
Here’s a cost comparison of different paint protection options:
| Protection Type | Cost | Longevity | Protection Level |
|---|---|---|---|
| Waxing | $20 – $50 per application | 1-3 Months | Low |
| Sealants | $50 – $150 per application | 6-12 Months | Medium |
| Ceramic Coatings | $500 – $2000 per application | 2-5 Years | High |
| PPF | $1000 – $5000+ per application | 5-10 Years | Very High |
8. Maximizing the Lifespan of Your Car’s Paint
What maintenance practices can extend the life of my car’s paint?
Proper maintenance is key to extending the lifespan of your car’s paint. Follow these practices:
- Regular Washing: Wash your car regularly (every 1-2 weeks) to remove dirt, grime, and pollutants.
- Use pH-Neutral Soap: Use a pH-neutral car wash soap to avoid damaging the paint.
- Two-Bucket Method: Use the two-bucket method (one for washing, one for rinsing) to prevent scratches.
- Dry with Microfiber Towels: Dry your car with clean, soft microfiber towels to avoid swirl marks.
- Clay Bar Treatment: Use a clay bar to remove embedded contaminants every 6-12 months.
- Regular Waxing or Sealant Application: Apply wax or sealant every 3-6 months to protect the paint.
- Address Damage Promptly: Repair any scratches, chips, or sun spots promptly to prevent further damage.
- Avoid Harsh Chemicals: Avoid using harsh chemicals or abrasive cleaners on your car’s paint.
- Park Smart: Park in shaded areas or use a car cover to protect against sun damage.
How does climate affect car paint?
Climate plays a significant role in the longevity of your car’s paint:
- Hot and Sunny Climates: Intense sunlight and high temperatures can accelerate the degradation of the clear coat, leading to fading and sun spots.
- Cold Climates: Freezing temperatures and road salt can damage the paint and promote rust formation.
- Coastal Climates: Salt air can corrode the paint and metal components.
- Rainy Climates: Acid rain and pollutants can damage the paint and cause water spots.
What are the best products for maintaining car paint?
Using high-quality products can make a significant difference in maintaining your car’s paint. Here are some recommended products:
- Car Wash Soap: Meguiar’s Gold Class Car Wash, Chemical Guys Honeydew Snow Foam
- Wax: Meguiar’s Ultimate Wax, Collinite 845 Insulator Wax
- Sealant: Jescar Power Lock Paint Sealant, Menzerna Power Lock Ultimate Protection
- Clay Bar: Meguiar’s Smooth Surface Clay Kit, Mothers California Gold Clay Bar Kit
- Microfiber Towels: Chemical Guys Microfiber Towels, The Rag Company Edgeless Microfiber Towels
- Detailing Spray: Meguiar’s Ultimate Detailer, Chemical Guys V7 Optical Select High Gloss Spray Detailer
9. The Role of Automotive Technology in Paint Care
How are advancements in paint technology improving durability?
Advancements in automotive paint technology are continuously improving the durability and longevity of car paint. Some key innovations include:
- Improved Clear Coats: Modern clear coats are formulated with advanced polymers and UV inhibitors that provide superior protection against sun damage and scratches.
- Self-Healing Paints: Some manufacturers are developing self-healing paints that can repair minor scratches with heat.
- Ceramic-Infused Paints: Ceramic-infused paints offer enhanced protection against UV rays, chemical contaminants, and scratches.
- Water-Based Paints: Water-based paints are more environmentally friendly and offer excellent color retention and durability.
- Improved Application Techniques: Advanced application techniques like electrostatic spraying ensure even coverage and better adhesion.
What are the benefits of using modern paint protection products?
Modern paint protection products offer numerous benefits in maintaining your car’s appearance and value:
- Superior UV Protection: They provide enhanced protection against fading and oxidation caused by UV rays.
- Enhanced Scratch Resistance: Modern products offer improved resistance to scratches, swirl marks, and minor abrasions.
- Chemical Resistance: They protect against acid rain, pollutants, and other chemical contaminants.
- Hydrophobic Properties: Modern products repel water and dirt, making the car easier to clean.
- Long-Lasting Protection: They offer longer-lasting protection compared to traditional waxes and sealants.
- Improved Gloss and Shine: Modern products enhance the paint’s gloss and shine, giving it a showroom-quality finish.
How can I stay updated on the latest paint care technologies?
Staying informed about the latest paint care technologies can help you make the best decisions for maintaining your car’s paint. Here are some tips:
- Follow Automotive Blogs and Websites: Stay updated on industry news and product reviews by following reputable automotive blogs and websites.
- Attend Car Shows and Events: Attend car shows and events to see the latest products and technologies firsthand.
- Join Online Forums and Communities: Participate in online forums and communities to discuss paint care techniques and products with other enthusiasts.
- Consult with Professional Detailers: Seek advice from professional detailers who are knowledgeable about the latest paint care technologies.
- Subscribe to Newsletters: Subscribe to newsletters from automotive paint suppliers and manufacturers to receive updates on new products and technologies.
10. DIY vs. Professional Repair: Making the Right Choice
What factors should I consider when deciding between DIY and professional repair?
Deciding between DIY and professional sun spot repair depends on several factors:
- Extent of Damage: Minor sun spots can often be repaired at home, while severe damage may require professional attention.
- Skill Level: If you have experience with automotive paint repair, you may be comfortable tackling the project yourself. If not, it’s best to seek professional help.
- Tools and Equipment: DIY repair requires investing in the necessary tools and equipment, which can be costly.
- Time Commitment: DIY repair can be time-consuming, especially if you’re not experienced.
- Desired Finish: If you want a flawless, showroom-quality finish, professional repair is the best option.
- Budget: DIY repair is typically more affordable than professional repair, but the cost can add up if you need to purchase tools and materials.
What are the benefits and drawbacks of DIY repair?
DIY sun spot repair offers several benefits:
- Cost Savings: DIY repair is typically more affordable than professional repair.
- Convenience: You can perform the repairs at your own pace and on your own schedule.
- Learning Experience: DIY repair can be a rewarding learning experience.
However, there are also some drawbacks:
- Time Commitment: DIY repair can be time-consuming.
- Risk of Mistakes: If you’re not experienced, you may make mistakes that can damage the paint.
- Tool Investment: DIY repair requires investing in the necessary tools and equipment.
- Quality of Finish: The quality of the finish may not be as good as professional repair.
What are the benefits and drawbacks of professional repair?
Professional sun spot repair offers several benefits:
- High-Quality Finish: Professionals have the skills and equipment to achieve a flawless, showroom-quality finish.
- Convenience: You can drop off your car and let the professionals handle the repairs.
- Expertise: Professionals have the expertise to properly assess the damage and recommend the best repair options.
- Warranty: Many professional auto body shops offer warranties on their work.
However, there are also some drawbacks:
- Cost: Professional repair is typically more expensive than DIY repair.
- Inconvenience: You’ll need to drop off your car and be without it for several days.
FAQ: Addressing Your Questions About Sun Spots on Cars
What exactly are sun spots on cars?
Sun spots are blemishes on your car’s paint caused by prolonged exposure to sunlight, leading to clear coat failure.
How do I identify early signs of sun spot damage?
Look for fading paint, chalky residue, small discolored patches, and loss of gloss.
What tools and materials do I need for sun spot repair?
You’ll need sandpaper, primer, automotive paint, clear coat, rubbing compound, polishing compound, microfiber cloths, and masking tape.
Which sandpaper grits are best for sun spot repair?
Use 400-600 grit for initial sanding, 800-1000 grit for smoothing, and 1500-2000 grit for final sanding.
Why is primer necessary before painting?
Primer creates a strong bond between the sanded surface and the new paint, protects against corrosion, and provides a smooth surface.
How do I match my car’s original paint color?
Find the paint color code on your car and use it to purchase matching automotive paint.
How many coats of clear coat should I apply?
Apply two to three coats of clear coat for optimal protection and shine.
How can I protect my car from future sun damage?
Park in the shade, use a car cover, apply wax regularly, and use UV protectant products.
When is professional help necessary for sun spot repair?
Consider professional help for extensive damage, deep clear coat failure, rust formation, or if you lack experience.
What are ceramic coatings, and how do they protect against sun spots?
Ceramic coatings are liquid polymers that create a hard, protective layer resistant to UV rays, scratches, and chemical contaminants.
Sun spots can be a frustrating issue for car owners, but with the right knowledge and tools, you can effectively address and prevent them. Whether you choose to tackle the repair yourself or seek professional help, understanding the causes, employing proper techniques, and taking preventative measures are crucial for maintaining your vehicle’s appearance and value.
At CARDIAGTECH.NET, we understand the