How To Fix The Paint On A Car Like A Pro
How to fix the paint on a car involves various techniques, from addressing minor scratches to more extensive repairs. At CARDIAGTECH.NET, we offer state-of-the-art tools and equipment to make auto paint repair seamless, providing solutions for both DIY enthusiasts and professional technicians. Whether you’re dealing with scratches, scrapes, or peeling paint, understanding the right approach can save you time and money, ensuring a flawless finish. Explore options like automotive paint touch-up and clear coat repair to restore your vehicle’s aesthetic appeal.
1. Understanding Different Types of Car Paint Damage
Before diving into the repair process, it’s crucial to identify the type of paint damage your car has sustained. This will determine the best course of action and the tools you’ll need. Here’s a breakdown of common types of car paint damage:
1.1. Peeling or Cracked Paint
Peeling or cracked paint occurs when the clear coat weakens and begins to separate from the base coat. This is often caused by prolonged exposure to sunlight, extreme temperature changes, or poor-quality resprays. Darker-colored cars are more susceptible due to their higher heat absorption.
- Cause: Sun damage, temperature fluctuations, low-quality paint jobs
- Appearance: Clear coat flaking or cracking
- Impact: Aesthetic degradation, potential for further damage if left untreated
1.1.1. Solutions for Peeling or Cracked Paint
The most effective solution for peeling or cracked paint is to have the affected area sanded down and resprayed. This can be done at a body shop or by a mobile spray paint service.
- Sanding: Removes the damaged clear coat and prepares the surface for new paint.
- Respraying: Applying a new layer of clear coat to match the original finish.
Although this method is thorough, it can be costly, particularly if the damage is widespread. If the car has high mileage or significant mechanical issues, it might not be a worthwhile investment.
1.2. Scratches
Scratches are a common type of car paint damage, ranging from superficial marks on the clear coat to deep gouges that penetrate the paint layers.
- Types of Scratches:
- Surface Scratches: These only affect the clear coat and can often be easily repaired.
- Deep Scratches: These go beyond the clear coat and require more extensive repair.
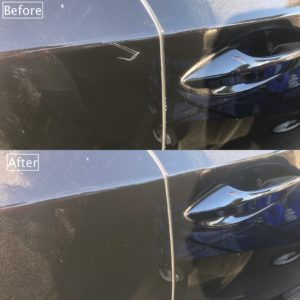
Nissan scratch repair near door handle before and after
1.2.1. Identifying Scratch Depth
A simple way to determine the depth of a scratch is to wet it with water, wax, or rubbing compound. If the scratch temporarily disappears, it’s likely only in the clear coat.
- Clear Coat Scratches: Disappear when wet, indicating they are superficial.
- Deeper Scratches: Remain visible when wet, indicating damage beyond the clear coat.
1.2.2. Surface Scratch Repair
For surface scratches, a gentle rubbing compound or car wax can be effective. Apply the compound to a soft cloth (like a t-shirt or microfiber cloth) and rub the scratch with moderate pressure.
- Materials: Rubbing compound, car wax, soft cloths
- Technique: Apply compound, rub with pressure, polish with wax
- Products: Meguiar’s ScratchX
1.2.3. Deep Scratch Repair
Deep scratches require more attention. A full repair involves sanding down the damaged panel and respraying it, which can cost around $350 per panel.
- Professional Respray: Sanding, priming, painting, and clear coating the damaged area.
- Cost: Approximately $350 per panel
For a more affordable solution, consider using a touch-up company. While not a perfect fix, a skilled technician can often conceal the scratch effectively, especially on darker-colored cars.
- Touch-Up: Applying paint to fill the scratch and blending it with the surrounding area.
- Effectiveness: More effective on darker colors; less so on bright metallic finishes.
1.3. Scrapes
Scrapes often occur on the front bumper due to its proximity to the road. These can result from hitting curbs, poles, or garage sides.
- Cause: Contact with curbs, poles, or other objects.
- Location: Typically on the front bumper.
- Repair: Paint touch-up is generally effective.
1.3.1. DIY Bumper Scrape Repair
You can repair bumper scrapes yourself using a touch-up kit. While it won’t look brand new, it can significantly improve the appearance.
- Touch-Up Kits: Contain paint matched to your car’s color code.
- Application: Clean the area, apply the paint, and blend it in.
For a more professional finish, consider using the Dr. Colorchip paint system. This system can often improve the appearance by 80-95% for around $150-$200, depending on the severity of the damage.
- Dr. Colorchip: A paint system designed for easy and effective touch-ups.
- Cost: $150-$200
If the bumper’s plastic or underlying metal is severely damaged, replacement may be necessary.
1.4. Dents
Dents can range from small, barely noticeable indentations to large, significant distortions of the car’s body panels.
- Cause: Impacts from other vehicles, objects, or weather events.
- Types: Small dents, large dents, and dents on body creases.
1.4.1. Paintless Dent Repair (PDR)
For dents without paint damage, Paintless Dent Repair (PDR) is an excellent option. This method involves using specialized tools to massage the metal back into its original shape without damaging the paint.
- Process: Using tools to manipulate the metal back to its original form.
- Cost: Around $75 per panel.
To find a reputable dent technician, ask your local car dealership for a referral. Dent technicians are often mobile, providing convenient on-site repairs at a lower cost than dealerships.
- Technician Referrals: Contact local dealerships for recommendations.
- Mobile Service: Technicians come to your location for repairs.
Dents located on a crease in the car’s design are more challenging to repair and require an experienced technician.
- Crease Dents: More difficult to repair, requiring specialized skills.
1.5. Paint Chips
Paint chips are small areas where the paint has been removed, often caused by rocks, debris, or other impacts.
- Cause: Road debris, rocks, and other impacts.
- Location: Commonly on the hood, front bumper, and door edges.
1.5.1. Door Edge Chips
Chips on the car door’s edge are relatively easy to fix with a touch-up kit. The Dr. Colorchip system is particularly effective for this type of damage.
- Touch-Up Kits: Ideal for small chips on door edges.
- Dr. Colorchip: Provides excellent results for door edge repairs.
1.5.2. Road Rash
Road rash refers to a collection of small chips on the hood and front bumper. Similar to other paint chip repairs, you can opt for a body shop respray, mobile touch-up, or DIY repair.
- Options: Body shop respray, mobile touch-up, or DIY repair.
- Dr. Colorchip: Recommended for DIY road rash repairs due to its ease of use and effectiveness.
The Dr. Colorchip system is designed to stick in the chips without adhering to the surrounding finish. It comes with a blending solution that allows you to remove excess paint, leaving a clean and seamless repair.
- Blending Solution: Removes excess paint for a clean finish.
- Effectiveness: Provides a professional-looking repair with minimal effort.
2. Essential Tools and Materials for Car Paint Repair
Having the right tools and materials is essential for achieving a successful car paint repair. Here’s a comprehensive list of what you’ll need:
2.1. Cleaning Supplies
- Car Wash Soap: To clean the area before starting the repair.
- Microfiber Cloths: For washing and drying the car without scratching the paint.
- Wax and Grease Remover: To remove any wax, grease, or contaminants from the surface.
- Detailing Clay: To remove embedded contaminants from the paint.
2.2. Sanding Tools
- Sandpaper: Various grits (e.g., 400, 800, 1500, 2000) for different stages of sanding.
- Sanding Block: To provide a flat and even surface for sanding.
- Wet/Dry Sandpaper: For wet sanding, which helps to prevent clogging and create a smoother finish.
2.3. Masking Supplies
- Masking Tape: To protect surrounding areas from overspray.
- Masking Paper or Plastic Sheeting: To cover larger areas.
2.4. Paint and Application Tools
- Primer: To prepare the surface for paint and improve adhesion.
- Base Coat Paint: Matched to your car’s color code.
- Clear Coat: To protect the paint and provide a glossy finish.
- Touch-Up Paint: For small repairs and paint chips.
- Paint Sprayer: For applying paint evenly over larger areas.
- Spray Can Nozzle: For a controlled spray pattern.
- Paint Brushes: For applying touch-up paint to small areas.
- Blending Solution: To blend touch-up paint with the surrounding area (e.g., Dr. Colorchip).
2.5. Polishing and Buffing Tools
- Rubbing Compound: To remove scratches and imperfections.
- Polishing Compound: To refine the finish after using rubbing compound.
- Buffing Pads: For use with a polishing machine.
- Polishing Machine: To buff the paint to a high shine.
- Microfiber Polishing Cloths: For hand polishing and buffing.
2.6. Safety Gear
- Safety Glasses: To protect your eyes from dust and chemicals.
- Respirator: To protect your lungs from paint fumes.
- Gloves: To protect your hands from chemicals and paint.
2.7. Additional Tools
- Heat Gun: To speed up drying times.
- Inspection Light: To identify imperfections in the paint.
- Mixing Cups and Sticks: For mixing paint and other materials.
- Detailing Swabs: For precise application of touch-up paint.
3. Step-by-Step Guide to Fixing Car Paint
3.1. Preparing the Surface
Before starting any paint repair, it’s essential to prepare the surface properly. This involves cleaning, sanding, and masking the area.
3.1.1. Cleaning
- Wash the Car: Use car wash soap and water to remove dirt and grime.
- Remove Contaminants: Use detailing clay to remove embedded contaminants.
- Degrease the Surface: Use wax and grease remover to ensure a clean surface.
3.1.2. Sanding
- Identify Damaged Areas: Determine the areas that need sanding.
- Choose Sandpaper Grit: Start with a coarser grit (e.g., 400) for removing damage and switch to finer grits (e.g., 800, 1500, 2000) for smoothing.
- Wet Sanding: Use wet/dry sandpaper with water to prevent clogging and create a smoother finish.
- Sanding Technique: Use a sanding block to ensure even pressure and avoid creating uneven surfaces.
3.1.3. Masking
- Apply Masking Tape: Cover the areas surrounding the repair area with masking tape.
- Use Masking Paper or Plastic: Cover larger areas to protect them from overspray.
- Ensure Clean Lines: Make sure the masking tape is applied smoothly and securely to prevent paint bleed.
3.2. Applying Primer
Primer is essential for creating a smooth surface for the paint to adhere to.
- Shake the Primer: Ensure the primer is well mixed.
- Apply Thin Coats: Apply several thin coats of primer, allowing each coat to dry before applying the next.
- Drying Time: Follow the manufacturer’s instructions for drying times.
- Sanding Primer: After the primer is dry, lightly sand it with fine-grit sandpaper (e.g., 2000) to create a smooth surface.
3.3. Applying Base Coat
The base coat provides the color for your car’s paint job.
- Match the Paint: Ensure the base coat paint matches your car’s color code.
- Shake the Paint: Mix the paint thoroughly.
- Apply Thin Coats: Apply several thin coats of base coat, allowing each coat to dry before applying the next.
- Overlapping Strokes: Use overlapping strokes to ensure even coverage.
- Drying Time: Allow the base coat to dry completely before applying clear coat.
3.4. Applying Clear Coat
Clear coat protects the base coat and provides a glossy finish.
- Shake the Clear Coat: Mix the clear coat thoroughly.
- Apply Thin Coats: Apply several thin coats of clear coat, allowing each coat to dry before applying the next.
- Wet Sanding (Optional): After the clear coat is dry, you can wet sand it with fine-grit sandpaper (e.g., 2000) to remove any imperfections.
- Drying Time: Allow the clear coat to dry completely before polishing.
3.5. Polishing and Buffing
Polishing and buffing are essential for achieving a smooth and glossy finish.
- Apply Rubbing Compound: Use a rubbing compound to remove any scratches or imperfections in the clear coat.
- Apply Polishing Compound: Use a polishing compound to refine the finish after using rubbing compound.
- Buffing: Use a polishing machine with a buffing pad to buff the paint to a high shine.
- Hand Polishing: Use microfiber polishing cloths for hand polishing and buffing.
3.6. Touch-Up Paint Application
For small paint chips and scratches, touch-up paint is an effective solution.
- Clean the Area: Clean the area thoroughly with wax and grease remover.
- Apply Touch-Up Paint: Use a fine-tipped brush or detailing swab to apply the touch-up paint to the chip or scratch.
- Allow to Dry: Let the paint dry completely.
- Blending Solution: Use a blending solution to blend the touch-up paint with the surrounding area.
- Polishing: Lightly polish the area to smooth out any imperfections.
4. Advanced Techniques for Professional Results
For those looking to achieve professional-quality results, here are some advanced techniques to consider:
4.1. Color Matching
Accurate color matching is crucial for seamless repairs.
- Use the Car’s Paint Code: Locate the paint code on your car and use it to purchase the correct paint.
- Blend the Paint: When applying the paint, blend it into the surrounding area to create a seamless transition.
- Spray Out: Practice spraying the paint on a test panel to ensure the color matches and the spray pattern is even.
4.2. Blending Clear Coat
Blending clear coat is essential for achieving a seamless finish.
- Tape Off the Area: Use masking tape to define the area to be clear coated.
- Apply Clear Coat: Apply several thin coats of clear coat, overlapping the edges of the taped area.
- Remove Tape: Carefully remove the tape while the clear coat is still slightly wet.
- Wet Sand and Polish: Wet sand and polish the area to blend the new clear coat with the existing finish.
4.3. Using a Paint Sprayer
A paint sprayer provides a more even and professional finish than aerosol cans.
- Choose the Right Sprayer: Select a paint sprayer that is suitable for automotive painting.
- Adjust the Settings: Adjust the sprayer’s settings to achieve the desired spray pattern and flow rate.
- Practice Spraying: Practice spraying on a test panel to get a feel for the sprayer and adjust the settings as needed.
- Apply Even Coats: Apply even coats of paint, overlapping each stroke by about 50%.
4.4. Wet Sanding Techniques
Wet sanding is essential for achieving a smooth and glossy finish.
- Use Fine-Grit Sandpaper: Use fine-grit sandpaper (e.g., 2000, 3000) for wet sanding.
- Use Plenty of Water: Keep the sandpaper and the surface wet while sanding.
- Sand in Circular Motions: Sand in circular motions to avoid creating straight lines or scratches.
- Rinse Frequently: Rinse the surface frequently to remove any sanding residue.
5. Common Mistakes to Avoid When Fixing Car Paint
- Skipping Surface Preparation: Failing to clean, sand, and mask the area properly can lead to poor results.
- Applying Too Much Paint: Applying too much paint at once can cause runs and drips.
- Not Allowing Enough Drying Time: Not allowing enough drying time between coats can lead to poor adhesion and a soft finish.
- Using the Wrong Materials: Using the wrong sandpaper grit, paint, or clear coat can lead to poor results.
- Not Wearing Safety Gear: Failing to wear safety glasses, a respirator, and gloves can expose you to harmful chemicals and dust.
6. The Benefits of Professional Car Paint Repair Services
While DIY car paint repair can be a cost-effective option, there are several benefits to using professional services:
- Expertise and Experience: Professional technicians have the knowledge and experience to achieve high-quality results.
- Access to Professional Tools and Materials: Professional shops have access to advanced tools and materials that are not available to the general public.
- Warranty: Professional services often come with a warranty, providing peace of mind.
- Time Savings: Professional services can save you time and effort.
According to a 2023 report by IBISWorld, the auto body repair industry in the US is worth over $20 billion, highlighting the demand for professional car paint repair services. The report also notes that the industry is expected to grow in the coming years due to the increasing number of vehicles on the road and the rising complexity of car paint finishes.
7. Maintaining Your Car’s Paint
Once you’ve repaired your car’s paint, it’s important to take steps to maintain it.
- Wash Your Car Regularly: Wash your car regularly to remove dirt, grime, and contaminants.
- Wax Your Car: Wax your car to protect the paint and provide a glossy finish.
- Park in the Shade: Park your car in the shade to protect it from the sun’s harmful UV rays.
- Use a Car Cover: Use a car cover to protect your car from the elements.
- Address Damage Promptly: Address any paint damage promptly to prevent it from worsening.
8. CARDIAGTECH.NET: Your Partner in Auto Paint Repair
At CARDIAGTECH.NET, we understand the importance of having the right tools and equipment for car paint repair. That’s why we offer a comprehensive range of high-quality products designed to meet the needs of both DIY enthusiasts and professional technicians.
8.1. Why Choose CARDIAGTECH.NET?
- Wide Selection: We offer a wide selection of tools and equipment, including paint sprayers, sanding tools, polishing machines, and more.
- High-Quality Products: Our products are sourced from leading manufacturers and are designed to provide reliable performance and long-lasting durability.
- Competitive Prices: We offer competitive prices to ensure you get the best value for your money.
- Expert Support: Our team of experts is available to provide technical support and guidance to help you choose the right tools and equipment for your needs.
- Convenient Shopping: Our online store makes it easy to shop for the products you need from the comfort of your own home.
8.2. Featured Products for Car Paint Repair
- Paint Sprayers: We offer a range of paint sprayers, from HVLP (High Volume Low Pressure) sprayers to airless sprayers, to suit different needs and budgets.
- Sanding Tools: Our selection of sanding tools includes orbital sanders, detail sanders, and sanding blocks, as well as a variety of sandpaper grits.
- Polishing Machines: We offer a range of polishing machines, from dual-action polishers to rotary polishers, to help you achieve a smooth and glossy finish.
- Touch-Up Kits: Our touch-up kits include everything you need to repair small paint chips and scratches, including paint, applicators, and blending solution.
8.3. Customer Success Stories
- John D., Auto Body Technician: “I’ve been using CARDIAGTECH.NET for years, and their tools have always been reliable and high-quality. Their paint sprayers are top-notch, and their customer service is excellent.”
- Sarah M., DIY Enthusiast: “I’m a beginner when it comes to car paint repair, but CARDIAGTECH.NET made it easy to find the right tools and equipment. Their touch-up kits are so easy to use, and they saved me a lot of money compared to going to a professional shop.”
9. The Importance of Staying Up-to-Date with Car Paint Technology
The automotive industry is constantly evolving, and so is car paint technology. Staying up-to-date with the latest trends and techniques is essential for achieving the best possible results.
9.1. New Paint Formulations
Manufacturers are constantly developing new paint formulations that are more durable, scratch-resistant, and environmentally friendly.
- Ceramic Coatings: These coatings provide a durable and long-lasting layer of protection for your car’s paint.
- Self-Healing Paints: These paints can repair minor scratches and swirl marks on their own.
- Water-Based Paints: These paints are more environmentally friendly than traditional solvent-based paints.
9.2. Advanced Repair Techniques
New repair techniques are constantly being developed to address different types of car paint damage.
- Laser Paint Repair: This technique uses lasers to remove scratches and imperfections from the paint.
- UV Curing: This technique uses UV light to cure paint quickly and efficiently.
- Robotic Painting: This technique uses robots to apply paint evenly and consistently.
9.3. Training and Certification
Attending training courses and obtaining certifications can help you stay up-to-date with the latest car paint technology and repair techniques.
- I-CAR: The Inter-Industry Conference on Auto Collision Repair (I-CAR) offers training courses and certifications for auto body technicians.
- ASE: The National Institute for Automotive Service Excellence (ASE) offers certifications for automotive professionals, including auto body technicians.
10. Answering Your Questions About Car Paint Repair (FAQ)
1. How much does it cost to fix the paint on a car?
The cost varies depending on the type and extent of the damage. Minor scratches can cost as little as $50 to $150 to repair, while more extensive damage can cost several hundred or even thousands of dollars.
2. Can I fix car paint myself?
Yes, you can fix minor car paint damage yourself with the right tools and materials. However, for more extensive damage, it’s best to consult a professional.
3. What is the best touch-up paint for cars?
Dr. Colorchip is widely regarded as one of the best touch-up paints for cars due to its ease of use and effectiveness.
4. How do I match the paint color on my car?
Locate the paint code on your car (usually found on the driver’s side door jamb or in the glove compartment) and use it to purchase the correct paint.
5. What is clear coat, and why is it important?
Clear coat is a transparent layer of paint that protects the base coat and provides a glossy finish. It’s essential for protecting the paint from UV rays, scratches, and other damage.
6. How do I prevent car paint damage?
Wash your car regularly, wax it, park in the shade, use a car cover, and address any damage promptly.
7. What is paintless dent repair (PDR)?
PDR is a technique that uses specialized tools to massage dents out of the car’s body without damaging the paint.
8. How do I remove scratches from my car’s paint?
Use a rubbing compound or polishing compound to remove scratches from the paint. For deeper scratches, you may need to sand the area and apply touch-up paint.
9. What is the difference between rubbing compound and polishing compound?
Rubbing compound is more abrasive and is used to remove scratches and imperfections. Polishing compound is less abrasive and is used to refine the finish after using rubbing compound.
10. How often should I wax my car?
You should wax your car every three to four months to protect the paint and provide a glossy finish.
Conclusion: Restore Your Car’s Beauty Today
Fixing the paint on your car can significantly enhance its appearance and protect it from further damage. Whether you choose to tackle the repairs yourself or enlist the help of a professional, understanding the different types of damage, the tools required, and the proper techniques is essential.
At CARDIAGTECH.NET, we are committed to providing you with the highest quality tools and equipment to make your car paint repair projects a success.
Ready to restore your car’s beauty and protect its value? Don’t let paint damage detract from your vehicle’s appearance any longer. Contact CARDIAGTECH.NET today at Whatsapp: +1 (641) 206-8880 or visit our website at CARDIAGTECH.NET for expert advice and the best tools and equipment for all your auto paint repair needs. Our team is ready to assist you with personalized recommendations and solutions tailored to your specific challenges and goals. Contact us today and let us help you achieve professional-quality results with ease.
Our Address: 276 Reock St, City of Orange, NJ 07050, United States.