Who Fix AC in Cars Near Me: Find Expert Repair
Is your car’s AC blowing hot air? Finding reliable “who fix AC in cars near me” can be frustrating. At CARDIAGTECH.NET, we empower you to diagnose and potentially fix AC problems yourself with the right tools and knowledge. Discover the common AC issues, repair costs, and how CARDIAGTECH.NET can equip you for success. Get ready to experience optimal cooling with cutting-edge automotive diagnostic equipment.
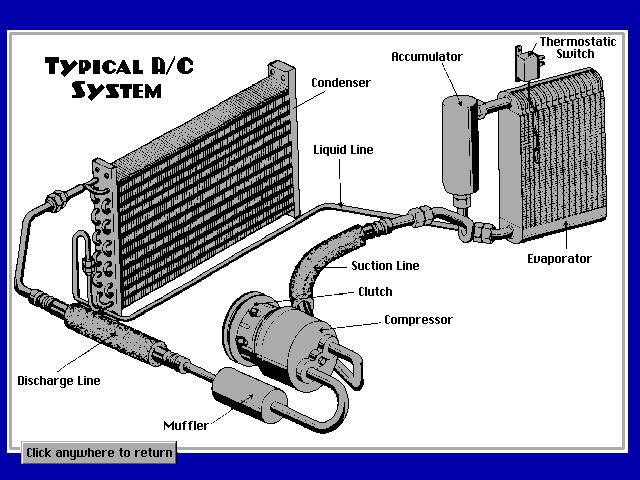
1. Understanding Your Car’s AC System
Before diving into repairs and searching “who fix AC in cars near me,” it’s essential to understand the basic components and how they work together. This knowledge empowers you to communicate effectively with technicians and make informed decisions about repairs.
- Compressor: The heart of the system, compressing refrigerant and circulating it throughout the system.
- Condenser: Rejects heat from the refrigerant, changing it from a high-pressure gas to a high-pressure liquid.
- Evaporator: Absorbs heat from the cabin air, changing the refrigerant from a low-pressure liquid to a low-pressure gas.
- Expansion Valve (or Orifice Tube): Meters the flow of refrigerant into the evaporator, creating a pressure drop that allows cooling.
- Refrigerant: The working fluid that carries heat throughout the system. R-134a is a common type, but newer vehicles use R-1234yf.
- Receiver/Drier (or Accumulator): Removes moisture and contaminants from the refrigerant.
The HVAC system, as it’s technically known, doesn’t just blow cold air. It performs a complex process of changing refrigerant from gas to liquid and back again.
- The compressor, driven by a belt connected to the crankshaft, compresses the refrigerant gas. This process generates heat and increases pressure.
- The heated, high-pressure gas flows to the condenser, where it’s cooled and converted into a liquid.
- The liquid refrigerant passes through the dryer, removing any moisture, and then flows to a flow control device such as a thermal expansion valve or an orifice tube.
- The liquid refrigerant moves through the flow control device to the evaporator. The liquid absorbs heat from the car’s interior and turns it from a liquid to a gas.
- A fan blows air from the outside through the evaporator. The fan can also recirculate interior air.
- From the evaporator, the gas returns to the compressor, and the process starts all over again.
Maintaining a clean and properly charged system is crucial for optimal AC performance.
2. Common Car AC Problems & Their Costs
Searching for “who fix AC in cars near me” often stems from encountering specific issues. Here’s a breakdown of common AC problems and their potential repair costs:
| Problem | Description | Estimated Cost (USD) |
|---|---|---|
| Refrigerant Leak | Loss of refrigerant, leading to reduced cooling. | $150 – $800+ |
| Compressor Failure | The compressor is no longer compressing refrigerant effectively. | $400 – $1200+ |
| Condenser Issues | Damage or blockage in the condenser, hindering heat dissipation. | $300 – $800+ |
| Evaporator Problems | Leaks or blockage in the evaporator, reducing cooling capacity. | $600 – $1500+ |
| Clogged Cabin Filter | Reduced airflow due to a dirty or clogged cabin filter. | $20 – $50 |
| Electrical Problems | Issues with wiring, fuses, or relays affecting AC components. | $100 – $500+ |
| Expansion Valve Issue | Malfunctioning expansion valve, disrupting refrigerant flow. | $200 – $600+ |
These costs are estimates and can vary based on location, vehicle type, and shop rates. According to RepairPal, the average AC repair cost ranges from $176 to $726.
3. Finding Reliable AC Repair Services Near You
When searching for “who fix AC in cars near me,” consider these factors:
- Reputation: Check online reviews on Google, Yelp, and other platforms.
- Certifications: Look for shops with ASE-certified technicians. ASE certification demonstrates a technician’s competence and knowledge.
- Experience: Inquire about the shop’s experience with your vehicle’s make and model.
- Warranty: Ask about the warranty offered on parts and labor.
- Diagnostic Capabilities: Ensure the shop has the equipment to accurately diagnose AC problems. CARDIAGTECH.NET offers state-of-the-art diagnostic tools to help you pinpoint the issue.
- Transparency: A reputable shop will provide a detailed estimate before starting any work.
4. Why DIY AC Repair Might Be Right For You
While professional repair is often necessary, some AC maintenance and repairs can be done yourself, saving you money and increasing your understanding of your vehicle. CARDIAGTECH.NET empowers you to take control of your car’s AC system.
4.1 Benefits of DIY AC Repair
- Cost Savings: Avoid labor costs by performing the repairs yourself.
- Convenience: Work on your car on your own schedule.
- Knowledge: Gain a deeper understanding of your car’s AC system.
- Satisfaction: Experience the satisfaction of fixing your car yourself.
4.2 When to DIY and When to Seek Professional Help
- DIY-Friendly Tasks:
- Replacing the cabin air filter
- Checking and topping off refrigerant (with proper tools and safety precautions)
- Cleaning condenser fins
- Tasks Requiring Professional Help:
- Compressor replacement
- Evaporator or condenser replacement
- Refrigerant leak repair (especially if the leak is significant)
- Electrical diagnosis
4.3 Essential Tools and Equipment from CARDIAGTECH.NET
CARDIAGTECH.NET provides the tools and equipment you need for successful DIY AC repair:
- Refrigerant Manifold Gauge Set: Measures pressure in the AC system to diagnose problems and monitor refrigerant levels.
- Vacuum Pump: Removes air and moisture from the AC system before recharging.
- Refrigerant Recovery Machine: Safely recovers refrigerant from the system. Important: Requires EPA certification to operate.
- Leak Detector: Identifies refrigerant leaks.
- UV Dye and Light: Helps locate leaks that are difficult to find with a standard leak detector.
- AC Flush Kit: Cleans contaminants from the AC system.
- Specialty Tools: Compressor clutch tools, fin combs, etc.
5. Step-by-Step Guide to Basic AC Maintenance
Here are some basic AC maintenance tasks you can perform yourself:
5.1 Replacing the Cabin Air Filter
- Locate the cabin air filter compartment (usually behind the glove box or under the dashboard).
- Remove the old filter.
- Install a new, clean filter.
- Ensure the filter is properly seated.
- Replace the compartment door.
5.2 Checking and Topping Off Refrigerant
- Safety First: Wear safety glasses and gloves. Work in a well-ventilated area.
- Identify Refrigerant Type: Check your vehicle’s AC sticker or owner’s manual to determine the correct refrigerant type (R-134a or R-1234yf).
- Connect Manifold Gauge Set: Connect the manifold gauge set to the high and low-pressure service ports.
- Read Pressure Readings: Compare the readings to the recommended pressure range for your vehicle and ambient temperature.
- Add Refrigerant (if needed): Use a refrigerant charging hose and add refrigerant slowly until the pressure readings are within the recommended range.
- Monitor Performance: Check the AC vent temperature to ensure it’s cooling properly.
5.3 Cleaning Condenser Fins
- Locate the condenser (usually in front of the radiator).
- Use a fin comb to straighten any bent fins.
- Gently clean the fins with a soft brush and mild detergent.
- Rinse with water.
6. Advanced AC Diagnostic Techniques
For more complex AC problems, advanced diagnostic techniques are required. CARDIAGTECH.NET offers the tools and resources to perform these techniques effectively.
6.1 Using a Refrigerant Manifold Gauge Set
The manifold gauge set is essential for diagnosing AC problems. Here’s how to interpret pressure readings:
- Low Pressure on Both Sides: Indicates a refrigerant leak or compressor failure.
- High Pressure on Both Sides: Indicates a blockage in the system.
- Low Pressure on the Low Side, High Pressure on the High Side: Indicates a restriction in the expansion valve or orifice tube.
6.2 Leak Detection Methods
- Electronic Leak Detector: A sensitive tool that detects refrigerant leaks.
- UV Dye and Light: Add UV dye to the AC system, and use a UV light to locate leaks.
- Soap and Water Solution: Spray a soap and water solution on suspected leak areas and look for bubbles.
6.3 Compressor Testing
- Visual Inspection: Check for leaks, damage, and unusual noises.
- Clutch Engagement Test: Verify that the compressor clutch engages when the AC is turned on.
- Pressure Test: Use a manifold gauge set to measure compressor pressure.
7. AC Recharge: A Detailed Look
Recharging your AC involves restoring the correct amount of refrigerant in the system. Here’s a detailed look at the process:
7.1 When to Recharge Your AC
- The AC is blowing warm air.
- The compressor is not cycling on.
- Pressure readings are low.
7.2 Step-by-Step Recharge Process
- Recover Refrigerant: Use a refrigerant recovery machine to safely recover any remaining refrigerant from the system. Requires EPA certification.
- Vacuum the System: Connect a vacuum pump to the system and evacuate it for at least 30 minutes to remove air and moisture.
- Check for Leaks: Monitor the vacuum gauge to ensure the system holds a vacuum. If the vacuum drops, there is a leak.
- Charge the System: Use a refrigerant charging hose and add refrigerant slowly until the pressure readings are within the recommended range.
- Monitor Performance: Check the AC vent temperature to ensure it’s cooling properly.
7.3 Safety Precautions
- Wear safety glasses and gloves.
- Work in a well-ventilated area.
- Use the correct refrigerant type.
- Do not overcharge the system.
8. Upgrading Your AC System for Better Performance
If you’re looking to improve your AC system’s performance, consider these upgrades:
- High-Performance Condenser: Improves heat dissipation for better cooling.
- Electric Cooling Fan: Provides more airflow over the condenser.
- Upgraded Compressor: Provides more cooling capacity.
- Thermal Expansion Valve (TXV): TXVs are more efficient than orifice tubes and can improve cooling performance.
9. Preventative Maintenance Tips for Long-Lasting AC Performance
- Regularly Check Refrigerant Levels: Use a manifold gauge set to monitor pressure readings.
- Replace the Cabin Air Filter: Change the cabin air filter every 15,000 – 30,000 miles.
- Inspect Belts and Hoses: Check for cracks, wear, and leaks.
- Clean Condenser Fins: Remove debris and straighten bent fins.
- Run the AC Regularly: Even in the winter, run the AC for a few minutes each month to keep the compressor lubricated.
- Schedule Professional Inspections: Have your AC system inspected by a professional technician every 1-2 years.
10. Addressing Specific AC Problems
10.1 AC Not Blowing Cold Air
- Possible Causes: Low refrigerant, compressor failure, blocked condenser, faulty expansion valve.
- Troubleshooting Steps: Check refrigerant levels, inspect the compressor, clean the condenser, test the expansion valve.
10.2 AC Blowing Warm Air
- Possible Causes: Low refrigerant, faulty compressor clutch, blocked evaporator.
- Troubleshooting Steps: Check refrigerant levels, test the compressor clutch, inspect the evaporator.
10.3 AC Making Unusual Noises
- Possible Causes: Compressor failure, worn compressor clutch, loose belts.
- Troubleshooting Steps: Inspect the compressor, check the compressor clutch, tighten or replace belts.
10.4 AC Smelling Bad
- Possible Causes: Mold or mildew in the evaporator, dirty cabin air filter.
- Troubleshooting Steps: Clean the evaporator, replace the cabin air filter.
11. The Future of Car AC Technology
Car AC technology is constantly evolving. Here are some trends to watch:
- R-1234yf Refrigerant: A more environmentally friendly refrigerant that is replacing R-134a in newer vehicles.
- Electric Compressors: Used in electric and hybrid vehicles, offering more efficient cooling.
- Smart AC Systems: Integrated with vehicle sensors to optimize cooling performance and energy efficiency.
- CO2 Refrigerant: Considered a long-term sustainable alternative to R-134a and R-1234yf.
12. Real-World Examples & Case Studies
Case Study 1: The Leaky O-Ring
- Problem: A customer complained that their AC was blowing warm air.
- Diagnosis: A refrigerant leak was detected using a leak detector. The leak was traced to a faulty O-ring on the compressor.
- Solution: The O-ring was replaced, and the AC system was recharged.
- Cost: $150
Case Study 2: The Clogged Cabin Filter
- Problem: A customer complained of reduced airflow from the AC vents.
- Diagnosis: The cabin air filter was heavily clogged with dirt and debris.
- Solution: The cabin air filter was replaced.
- Cost: $30
Case Study 3: The Failing Compressor
- Problem: A customer complained that their AC was making loud noises and not cooling.
- Diagnosis: The compressor was failing and needed to be replaced.
- Solution: The compressor was replaced, and the AC system was recharged.
- Cost: $800
13. CARDIAGTECH.NET: Your Partner in AC Repair
CARDIAGTECH.NET is your trusted partner for all your AC repair needs. We offer:
- High-Quality Tools and Equipment: Get the tools you need to diagnose and repair your AC system.
- Expert Advice: Our team of experts is available to answer your questions and provide guidance.
- Competitive Prices: We offer competitive prices on all our products.
- Fast Shipping: Get your tools and equipment quickly.
- Exceptional Customer Service: We are committed to providing exceptional customer service.
14. Addressing Customer Concerns
Concern 1: “I’m afraid of damaging my AC system if I try to repair it myself.”
- Our Response: Start with basic maintenance tasks like replacing the cabin air filter and cleaning the condenser. For more complex repairs, consult our experts at CARDIAGTECH.NET.
Concern 2: “I don’t have the time to repair my AC system myself.”
- Our Response: We understand. CARDIAGTECH.NET can help you find a reputable repair shop in your area.
Concern 3: “I’m not sure what tools I need to repair my AC system.”
- Our Response: Our team can help you select the right tools for your specific needs.
15. Call to Action: Take Control of Your Car’s AC
Don’t suffer through another hot summer! Take control of your car’s AC system with CARDIAGTECH.NET.
- Browse our selection of AC repair tools and equipment.
- Contact our experts for advice and guidance.
- Find a reputable repair shop in your area.
Contact Information:
- Address: 276 Reock St, City of Orange, NJ 07050, United States
- WhatsApp: +1 (641) 206-8880
- Website: CARDIAGTECH.NET
16. Expert Insights
According to the EPA, improper handling of refrigerants can harm the environment. Always recover refrigerant properly and dispose of it responsibly. CARDIAGTECH.NET offers refrigerant recovery machines to help you comply with EPA regulations.
17. Statistics and Trends
- The global automotive AC market is projected to reach $45.8 billion by 2027, according to a report by Global Industry Analysts Inc.
- The demand for electric vehicle AC systems is growing rapidly.
- The use of R-1234yf refrigerant is increasing due to environmental concerns.
18. Quick Tips for Optimal AC Performance
- Park in the shade to reduce heat buildup.
- Use a sunshade to protect your dashboard and seats.
- Vent the hot air out of your car before turning on the AC.
- Use the recirculate function to cool the cabin faster.
- Have your AC system inspected regularly.
19. Frequently Asked Questions (FAQ)
19.1 How often should I recharge my car’s AC?
It depends on the vehicle and the extent of any leaks, but generally, every 2-3 years is a good guideline. If you notice diminished cooling performance, it’s time to check.
19.2 Can I use R-134a in a system designed for R-1234yf?
No. These refrigerants are not compatible and using the wrong one can damage your AC system.
19.3 How do I know if my compressor is failing?
Signs include weak cooling, unusual noises, and the compressor not engaging.
19.4 What is the purpose of the cabin air filter?
It filters out dust, pollen, and other pollutants from the air entering the cabin.
19.5 Can I add too much refrigerant to my AC system?
Yes. Overcharging the system can damage the compressor and other components.
19.6 What is the difference between a receiver/drier and an accumulator?
Both remove moisture and contaminants, but a receiver/drier is used in systems with a thermal expansion valve, while an accumulator is used in systems with an orifice tube.
19.7 How can I find a refrigerant leak?
Use an electronic leak detector, UV dye and light, or a soap and water solution.
19.8 What is the best way to clean the condenser fins?
Use a fin comb and a soft brush with mild detergent.
19.9 Is it safe to mix different types of refrigerant?
No. Mixing refrigerants can damage your AC system and is illegal.
19.10 Where can I find more information about car AC repair?
CARDIAGTECH.NET offers a wealth of information on our website and through our expert team.
20. Resources and Further Reading
- EPA Section 609 Technician Certification: https://www.epa.gov/section608/section-609-mv-ac-technician-certification
- RepairPal: https://repairpal.com/
- Automotive Service Excellence (ASE): https://www.ase.com/
21. Staying Cool and Informed
Finding “who fix AC in cars near me” doesn’t have to be a stressful experience. With the right knowledge, tools, and resources, you can diagnose and potentially repair your car’s AC system yourself. CARDIAGTECH.NET is dedicated to empowering you with the tools and expertise you need. Stay cool, stay informed, and take control of your car’s AC today.
Are you facing challenges in your car’s AC repair process? Do you need specialized tools or equipment? Contact CARDIAGTECH.NET now for expert advice and solutions tailored to your specific needs. Let us help you enhance your efficiency, accuracy, and safety in AC repairs. Our team is ready to provide comprehensive support and innovative tools to elevate your service quality. Reach out today and let us help you transform your approach to automotive AC repair.