Decoding the 2510 Mercedes Fault Code: A Comprehensive Guide
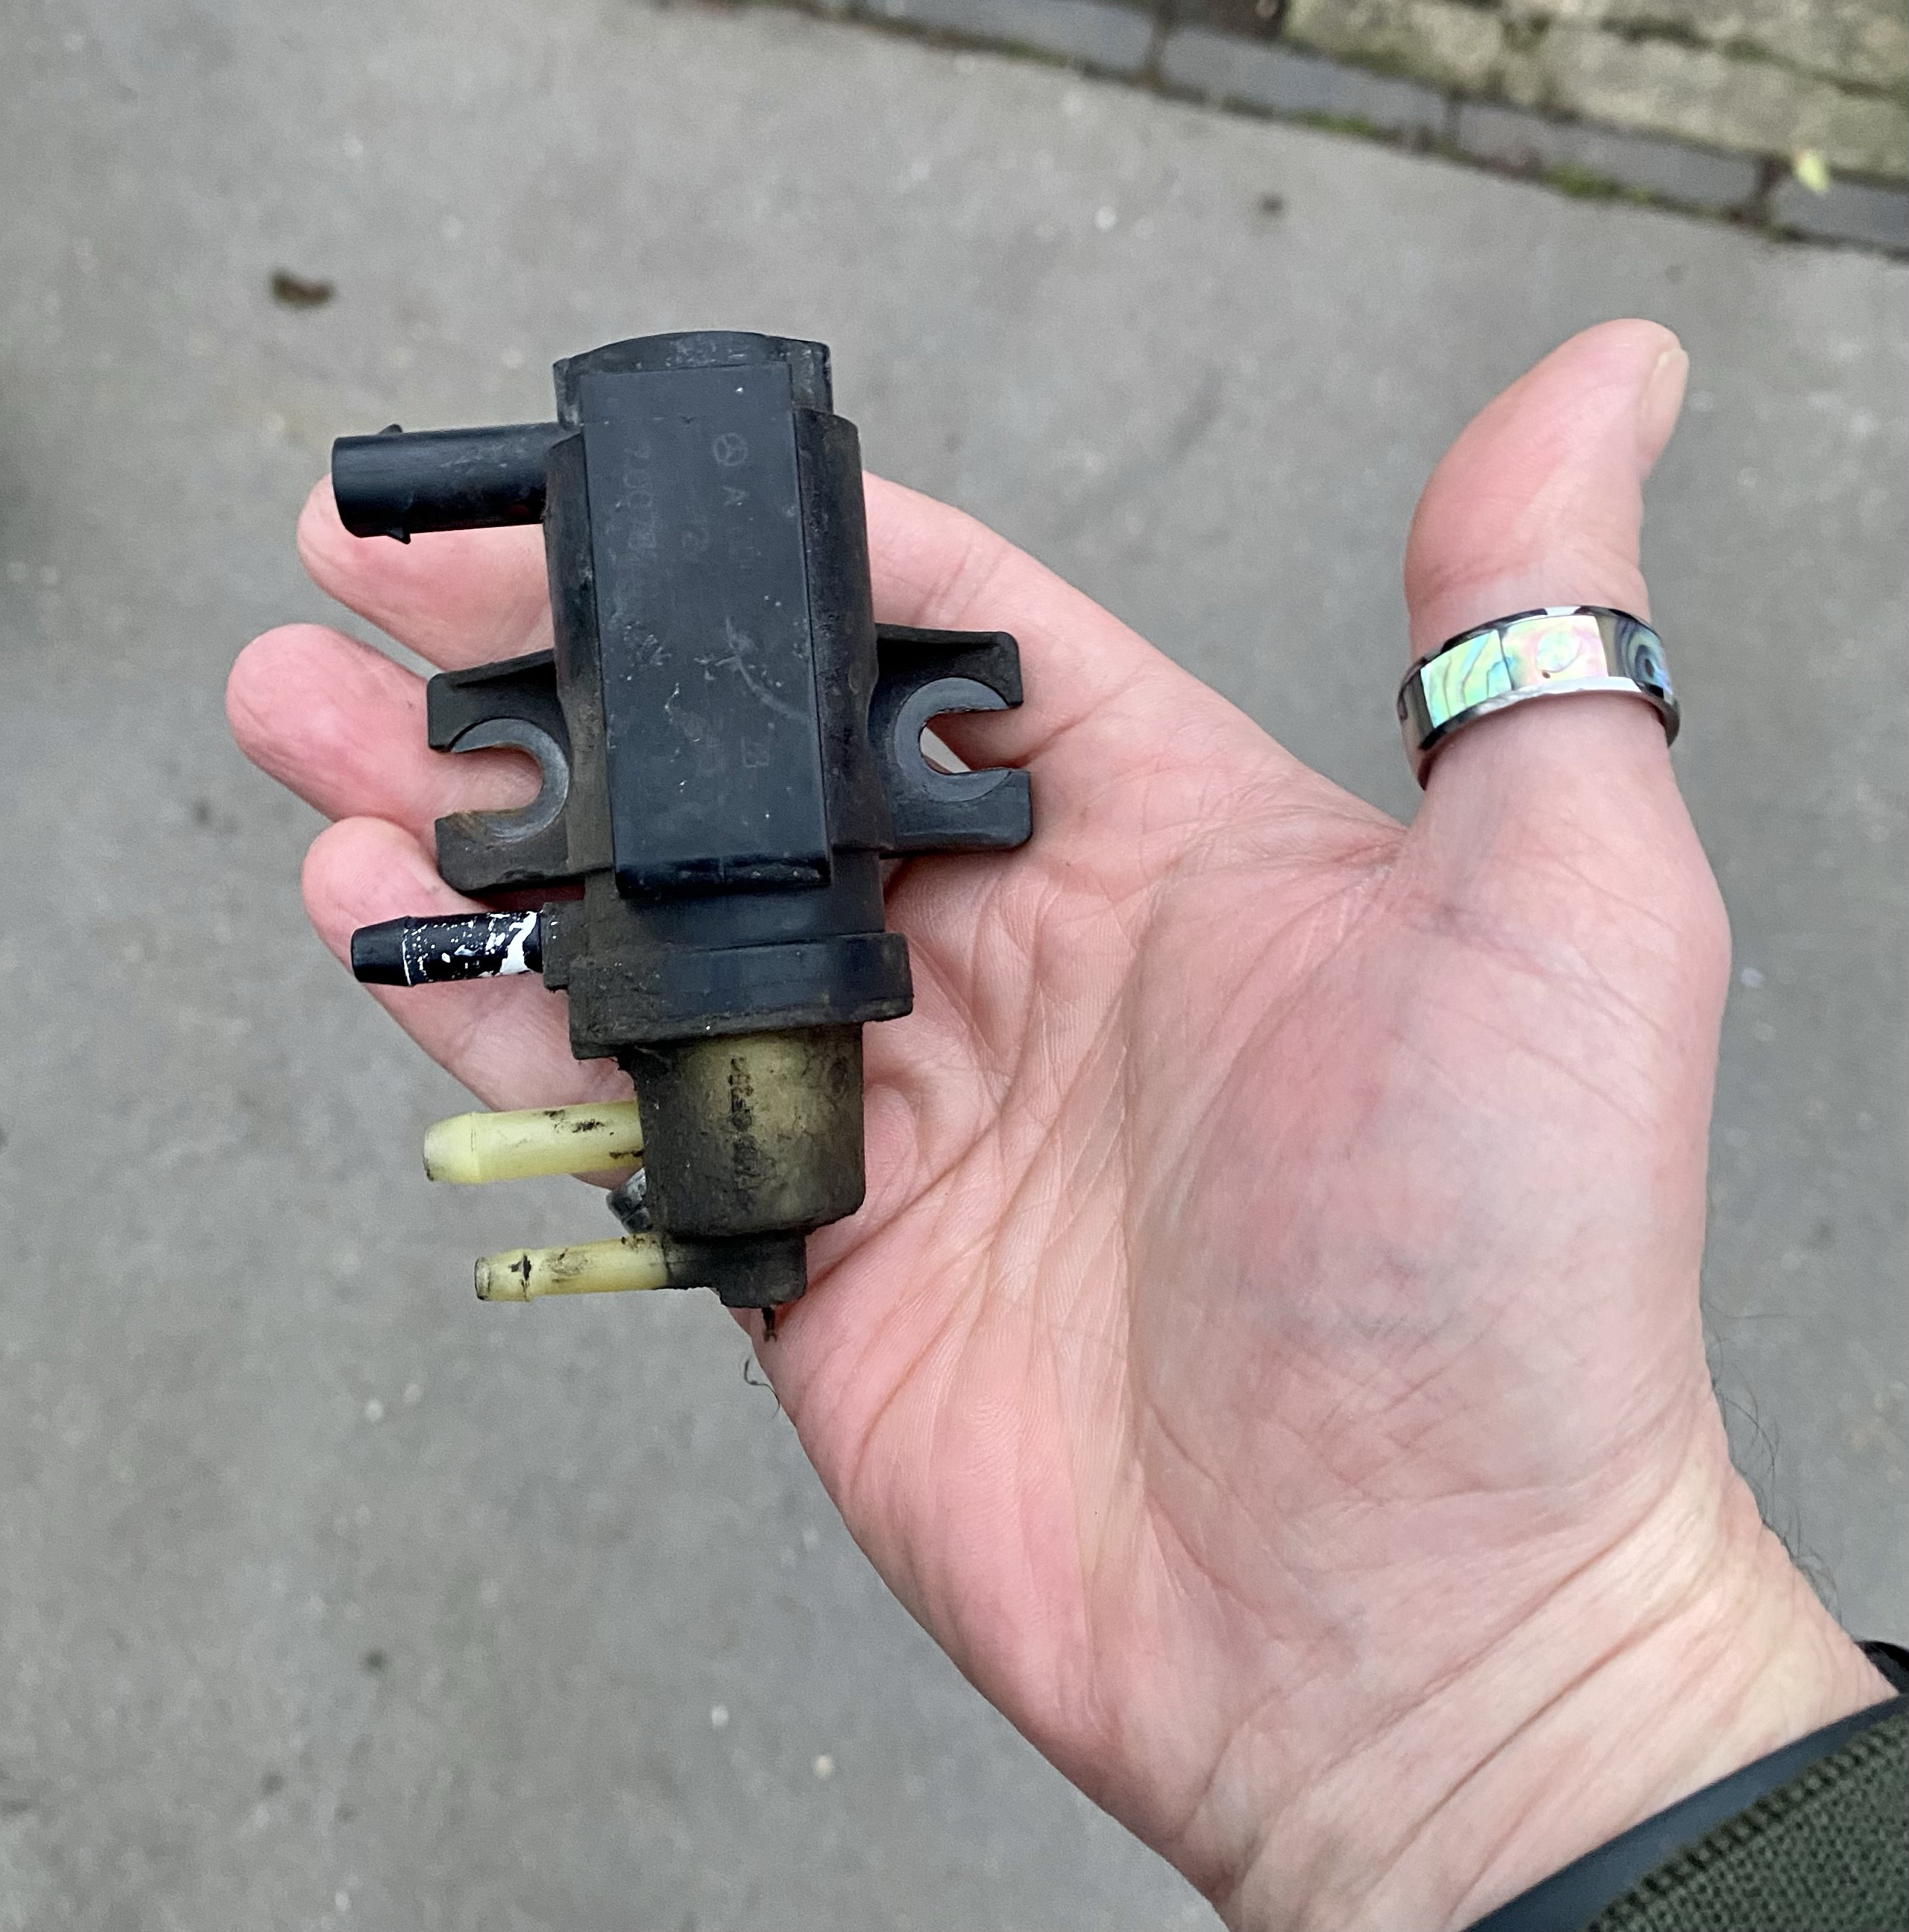
The 2510 Mercedes fault code indicates a problem with the boost pressure regulator, component Y77/1, often signaling a positioner fault. CARDIAGTECH.NET offers solutions for diagnosing and resolving this issue, potentially saving you significant repair costs. Understanding the intricacies of this fault code and its related components will empower you to address it effectively and ensure your Mercedes operates at peak performance, addressing common issues with intake port shutoff motor and turbocharger system malfunctions.
1. What Does the 2510 Mercedes Fault Code Mean?
The 2510 Mercedes fault code signifies a problem with the boost pressure regulator, specifically component Y77/1. This code, “Check component Y77/1 (Boost pressure regulator). Positioner signals fault,” suggests that the engine control unit (ECU) is receiving irregular signals from the boost pressure regulator, which manages the turbocharger’s performance. The boost pressure regulator is essential for controlling the amount of pressure generated by the turbocharger, thus influencing the engine’s power and efficiency.
1.1 Symptoms Associated with the 2510 Fault Code
Experiencing issues with your Mercedes-Benz and seeing the 2510 fault code? Here are a few indicators that can help verify the problem:
- Limp Mode: The vehicle’s computer restricts engine power to prevent damage, resulting in significantly reduced acceleration.
- Reduced Engine Power: Noticeable decrease in overall performance, especially when accelerating or climbing hills.
- Check Engine Light: The malfunction indicator lamp (MIL) illuminates on the dashboard.
- Irregular Turbocharger Operation: The turbocharger may not be functioning correctly, leading to inconsistent boost pressure.
- Increased Fuel Consumption: Inefficient combustion due to incorrect boost pressure can lead to higher fuel usage.
1.2 Boost Pressure Regulator: The Heart of the Issue
The boost pressure regulator, or component Y77/1, is crucial for controlling the turbocharger’s output, ensuring the engine receives the correct amount of air for optimal combustion. According to a study by Bosch, precise control of boost pressure can improve fuel efficiency by up to 10% and reduce emissions significantly. When this regulator malfunctions, it disrupts the balance, triggering the 2510 fault code.
1.3 Potential Causes of the 2510 Fault Code
The 2510 fault code can arise from several underlying issues:
- Defective Boost Pressure Regulator: The regulator itself may be faulty due to wear, electrical issues, or internal damage.
- Wiring Problems: Damaged, corroded, or disconnected wiring to the boost pressure regulator can cause signal disruptions.
- Vacuum Leaks: Leaks in the vacuum lines connected to the regulator can affect its ability to control boost pressure.
- Turbocharger Issues: Problems within the turbocharger, such as a malfunctioning wastegate, can indirectly trigger the fault code.
- ECU Malfunctions: In rare cases, the engine control unit (ECU) may be misinterpreting signals or have internal faults.
2. Diagnosing the 2510 Mercedes Fault Code
Proper diagnosis is essential to accurately identify and resolve the underlying issue causing the 2510 fault code. CARDIAGTECH.NET emphasizes a systematic approach to ensure no potential causes are overlooked.
2.1 Tools Needed for Diagnosis
To effectively diagnose the 2510 fault code, gather the following tools:
- OBD-II Scanner: Essential for reading and clearing fault codes.
- Multimeter: For testing electrical continuity and voltage.
- Vacuum Gauge: To check for vacuum leaks in the system.
- Wiring Diagrams: Helps in tracing and verifying electrical connections.
- Inspection Light: For visual inspection of components in hard-to-reach areas.
- Basic Hand Tools: Wrenches, sockets, and screwdrivers for accessing components.
2.2 Step-by-Step Diagnostic Process
Follow these steps to diagnose the 2510 fault code:
- Read the Fault Code: Use an OBD-II scanner to confirm the presence of the 2510 code and any other related codes.
- Visual Inspection: Inspect the boost pressure regulator (Y77/1) for any visible damage, such as cracks or broken connectors.
- Check Wiring and Connections: Examine the wiring and connectors leading to the regulator for corrosion, damage, or loose connections. Use a multimeter to check for continuity and proper voltage.
- Test Vacuum Lines: Use a vacuum gauge to check for leaks in the vacuum lines connected to the boost pressure regulator. Repair or replace any damaged lines.
- Actuation Test: Use the OBD-II scanner to perform an actuation test on the boost pressure regulator. Observe if the regulator moves freely and responds correctly to commands.
- Component Testing: If the above steps do not reveal the issue, use a multimeter to test the internal resistance of the boost pressure regulator. Compare the readings to the manufacturer’s specifications.
- Turbocharger Inspection: Inspect the turbocharger for any signs of damage or malfunction, such as a stuck or damaged wastegate.
2.3 Common Diagnostic Pitfalls to Avoid
- Ignoring Related Fault Codes: Address all related fault codes as they may provide additional clues to the underlying issue.
- Not Checking Wiring Thoroughly: Wiring issues are a common cause of the 2510 code, so ensure a comprehensive inspection.
- Skipping the Actuation Test: This test can quickly identify if the boost pressure regulator is functioning mechanically.
- Assuming the Regulator is Always the Problem: Other components, such as vacuum lines and the turbocharger itself, can also trigger the fault code.
- Neglecting Vacuum Leaks: Vacuum leaks can significantly impact the performance of the boost pressure regulator and should be thoroughly investigated.
3. Addressing the M55 (Inlet Port Shutoff Motor) Fault Code
The M55, or inlet port shutoff motor, is another critical component in Mercedes-Benz engines. A fault in this motor, indicated by code 2513-001, can often be related to issues with the boost pressure regulator.
3.1 What is the M55 (Inlet Port Shutoff Motor)?
The M55 motor controls the inlet port shutoffs, which optimize air intake into the engine cylinders. This helps improve combustion efficiency, especially at lower engine speeds. When the M55 motor fails, it can lead to rough idling, reduced power, and the triggering of fault codes.
3.2 Symptoms of a Faulty M55 Motor
- Rough Idling: Uneven engine operation when the vehicle is stationary.
- Reduced Engine Power: Noticeable decrease in acceleration and overall performance.
- Check Engine Light: Illumination of the malfunction indicator lamp on the dashboard.
- Fault Code 2513-001: Specific diagnostic code indicating a problem with the M55 motor.
- Increased Emissions: Inefficient combustion can lead to higher levels of pollutants.
3.3 Diagnosing the M55 Motor
- Read the Fault Code: Use an OBD-II scanner to confirm the presence of the 2513-001 code.
- Visual Inspection: Inspect the M55 motor and its wiring for any signs of damage or corrosion.
- Actuation Test: Perform an actuation test using the OBD-II scanner to see if the motor responds correctly to commands.
- Voltage and Continuity Test: Use a multimeter to check for proper voltage and continuity in the wiring leading to the M55 motor.
- Resistance Test: Measure the internal resistance of the M55 motor and compare it to the manufacturer’s specifications.
3.4 Common Causes of M55 Motor Failure
- Oil Contamination: Oil leaks from the intake can damage the M55 motor.
- Electrical Issues: Wiring problems, such as shorts or open circuits, can cause the motor to fail.
- Mechanical Failure: The internal components of the motor can wear out or break over time.
- Corrosion: Exposure to moisture and road salt can cause corrosion, leading to motor failure.
3.5 Steps to Replace the M55 Motor
- Disconnect the Battery: Disconnect the negative terminal of the battery to prevent electrical accidents.
- Remove the Turbo: Removing the turbo provides better access to the M55 motor.
- Disconnect Wiring: Disconnect the electrical connector from the M55 motor.
- Remove Mounting Bolts: Remove the bolts that secure the M55 motor to the engine.
- Install New Motor: Install the new M55 motor, ensuring it is properly aligned and secured.
- Reconnect Wiring: Reconnect the electrical connector to the new M55 motor.
- Reinstall Turbo: Reinstall the turbo, ensuring all bolts and gaskets are correctly in place.
- Reconnect Battery: Reconnect the negative terminal of the battery.
- Clear Fault Codes: Use an OBD-II scanner to clear any fault codes and perform a test drive to ensure the issue is resolved.
4. The Role of the Turbocharger in the 2510 Fault Code
The turbocharger plays a significant role in the 2510 fault code, as it is directly related to the boost pressure that the regulator controls. A malfunctioning turbocharger can cause the boost pressure regulator to work improperly, triggering the fault code.
4.1 Understanding Turbocharger Functionality
The turbocharger forces more air into the engine cylinders, increasing power output. It consists of a turbine and a compressor, both connected by a shaft. Exhaust gases drive the turbine, which in turn spins the compressor, drawing in and compressing air into the engine.
4.2 Common Turbocharger Issues
- Wastegate Problems: A malfunctioning wastegate can cause over or under boosting, leading to performance issues.
- Damaged Turbine or Compressor: Physical damage to these components can reduce the turbocharger’s efficiency.
- Oil Leaks: Leaks can lead to reduced lubrication and eventual turbocharger failure.
- Bearing Failure: Worn or damaged bearings can cause excessive play and eventual turbocharger failure.
- Clogged Oil Lines: Blocked oil lines can starve the turbocharger of lubrication, leading to overheating and damage.
4.3 Diagnosing Turbocharger Problems
- Visual Inspection: Check for any signs of damage, such as cracks, leaks, or worn components.
- Boost Pressure Test: Use a boost gauge to measure the turbocharger’s output and compare it to the manufacturer’s specifications.
- Wastegate Inspection: Ensure the wastegate is functioning correctly and moving freely.
- Shaft Play Check: Check for excessive play in the turbocharger shaft, which can indicate bearing failure.
- Oil Line Inspection: Inspect the oil lines for any signs of clogs or leaks.
4.4 Impact of Turbocharger Issues on the 2510 Fault Code
A malfunctioning turbocharger can cause the boost pressure regulator to compensate, leading to irregular signals and the 2510 fault code. Addressing turbocharger issues is essential to resolving the root cause of the problem.
5. Wiring and Electrical Issues
Wiring and electrical issues are common culprits behind the 2510 Mercedes fault code. Ensuring that all connections are secure and that the wiring is in good condition is essential for proper diagnosis and repair.
5.1 Common Wiring Problems
- Corrosion: Moisture and road salt can cause corrosion on connectors and wiring, leading to poor connections.
- Damaged Insulation: Heat, vibration, and abrasion can damage the insulation on wires, causing shorts and open circuits.
- Loose Connections: Vibration can loosen connectors, leading to intermittent or complete loss of electrical contact.
- Broken Wires: Wires can break due to stress or physical damage, disrupting electrical flow.
5.2 Tools for Diagnosing Wiring Issues
- Multimeter: Essential for testing continuity, voltage, and resistance.
- Wiring Diagrams: Helps in tracing and verifying electrical connections.
- Inspection Light: For visual inspection of wiring in hard-to-reach areas.
- Contact Cleaner: For cleaning corroded connectors.
- Wire Strippers and Crimpers: For repairing or replacing damaged wires and connectors.
5.3 Step-by-Step Wiring Diagnostic Process
- Visual Inspection: Inspect all wiring and connectors related to the boost pressure regulator and M55 motor for any signs of damage or corrosion.
- Continuity Test: Use a multimeter to check for continuity in the wiring, ensuring there are no breaks or open circuits.
- Voltage Test: Check for proper voltage at the connectors, ensuring the components are receiving the correct power.
- Ground Test: Verify that the ground connections are secure and free of corrosion.
- Connector Cleaning: Clean any corroded connectors with contact cleaner and ensure they are properly seated.
5.4 Repairing Wiring Issues
- Replacing Damaged Wires: Replace any wires with damaged insulation or breaks.
- Cleaning Corroded Connectors: Clean corroded connectors with contact cleaner and ensure they are properly seated.
- Securing Loose Connections: Secure any loose connections with new connectors or by crimping the existing connectors.
- Using Dielectric Grease: Apply dielectric grease to connectors to prevent corrosion and ensure good electrical contact.
6. Vacuum Leaks and Their Impact
Vacuum leaks can significantly impact the performance of the boost pressure regulator and trigger the 2510 fault code. A thorough inspection of the vacuum system is essential for proper diagnosis and repair.
6.1 Understanding the Vacuum System
The vacuum system in a Mercedes-Benz engine is used to control various components, including the boost pressure regulator, wastegate actuator, and other auxiliary systems. Vacuum leaks can disrupt the operation of these components, leading to performance issues and fault codes.
6.2 Common Sources of Vacuum Leaks
- Cracked or Broken Vacuum Lines: Rubber and plastic vacuum lines can become brittle and crack over time, leading to leaks.
- Loose Connections: Vacuum lines can become disconnected from their fittings, causing leaks.
- Damaged Vacuum Reservoirs: Vacuum reservoirs store vacuum and can develop leaks if damaged.
- Faulty Vacuum Pumps: Vacuum pumps provide vacuum to the system and can fail over time.
6.3 Diagnosing Vacuum Leaks
- Visual Inspection: Inspect all vacuum lines and connections for any signs of damage or disconnection.
- Vacuum Gauge Test: Use a vacuum gauge to measure the vacuum in the system and compare it to the manufacturer’s specifications.
- Smoke Test: Use a smoke machine to introduce smoke into the vacuum system and identify any leaks.
- Listening Test: Listen for hissing sounds, which can indicate a vacuum leak.
6.4 Repairing Vacuum Leaks
- Replacing Damaged Vacuum Lines: Replace any cracked or broken vacuum lines with new ones.
- Securing Loose Connections: Secure any loose connections with new fittings or by clamping the existing connections.
- Replacing Damaged Components: Replace any damaged vacuum reservoirs or faulty vacuum pumps.
7. Step-by-Step Repair Guide for the 2510 Fault Code
Addressing the 2510 fault code requires a systematic approach to ensure all potential issues are resolved. Here is a comprehensive step-by-step repair guide:
7.1 Preliminary Steps
- Gather Tools and Materials: Ensure you have all the necessary tools, including an OBD-II scanner, multimeter, vacuum gauge, wiring diagrams, and basic hand tools.
- Disconnect the Battery: Disconnect the negative terminal of the battery to prevent electrical accidents.
- Locate the Boost Pressure Regulator: Identify the location of the boost pressure regulator (Y77/1) on your specific Mercedes-Benz model.
7.2 Inspect and Test the Boost Pressure Regulator
- Visual Inspection: Inspect the regulator for any signs of damage, such as cracks or broken connectors.
- Wiring Inspection: Check the wiring and connectors leading to the regulator for corrosion, damage, or loose connections.
- Continuity and Voltage Test: Use a multimeter to check for continuity and proper voltage at the regulator’s connector.
- Actuation Test: Perform an actuation test using the OBD-II scanner to see if the regulator responds correctly to commands.
- Resistance Test: Measure the internal resistance of the regulator and compare it to the manufacturer’s specifications.
7.3 Check and Repair Vacuum Lines
- Visual Inspection: Inspect all vacuum lines connected to the regulator for any signs of damage or disconnection.
- Vacuum Gauge Test: Use a vacuum gauge to measure the vacuum in the system and identify any leaks.
- Replace Damaged Lines: Replace any cracked or broken vacuum lines with new ones.
- Secure Loose Connections: Secure any loose connections with new fittings or by clamping the existing connections.
7.4 Inspect and Test the Turbocharger
- Visual Inspection: Check the turbocharger for any signs of damage, such as cracks, leaks, or worn components.
- Boost Pressure Test: Use a boost gauge to measure the turbocharger’s output and compare it to the manufacturer’s specifications.
- Wastegate Inspection: Ensure the wastegate is functioning correctly and moving freely.
- Shaft Play Check: Check for excessive play in the turbocharger shaft, which can indicate bearing failure.
- Oil Line Inspection: Inspect the oil lines for any signs of clogs or leaks.
7.5 Address the M55 Motor (If Applicable)
- Inspect the M55 Motor: Check the M55 motor and its wiring for any signs of damage or corrosion.
- Actuation Test: Perform an actuation test using the OBD-II scanner to see if the motor responds correctly to commands.
- Replace the M55 Motor: If the motor is faulty, replace it following the steps outlined earlier in this guide.
7.6 Final Steps
- Reconnect the Battery: Reconnect the negative terminal of the battery.
- Clear Fault Codes: Use an OBD-II scanner to clear any fault codes.
- Test Drive: Perform a test drive to ensure the issue is resolved and the vehicle is performing correctly.
- Recheck Fault Codes: After the test drive, recheck for any new or recurring fault codes.
8. How CARDIAGTECH.NET Can Assist You
CARDIAGTECH.NET offers a wide range of diagnostic tools and equipment to help you resolve the 2510 Mercedes fault code and other automotive issues. Our products are designed to provide accurate and reliable results, saving you time and money.
8.1 OBD-II Scanners
Our OBD-II scanners are essential for reading and clearing fault codes, performing actuation tests, and monitoring live engine data. They support a wide range of Mercedes-Benz models and provide detailed diagnostic information.
8.2 Multimeters
Our multimeters are essential for testing electrical continuity, voltage, and resistance. They are durable, accurate, and easy to use, making them ideal for diagnosing wiring and electrical issues.
8.3 Vacuum Gauges
Our vacuum gauges are essential for checking for vacuum leaks in the system. They provide accurate readings and are easy to connect to vacuum lines.
8.4 Professional Support
At CARDIAGTECH.NET, we understand the challenges faced by auto repair professionals. The work is physically demanding, often involving exposure to oil, grease, and chemicals. Staying updated with the latest automotive technology is crucial, but it can be time-consuming. We also know that time is money, and the pressure to complete repairs quickly can be intense. That’s why we offer tools designed to:
- Increase Efficiency: Helping you complete repairs faster.
- Enhance Accuracy: Reducing the risk of errors.
- Improve Safety: Ensuring a safer working environment.
9. Preventative Measures to Avoid Future Issues
Preventative maintenance is key to avoiding future issues with the boost pressure regulator and other engine components. Here are some tips to keep your Mercedes-Benz running smoothly:
9.1 Regular Inspections
Perform regular inspections of the engine compartment, checking for any signs of damage, leaks, or corrosion.
9.2 Scheduled Maintenance
Follow the manufacturer’s recommended maintenance schedule, including oil changes, filter replacements, and spark plug replacements.
9.3 Vacuum Line Care
Inspect vacuum lines regularly and replace any that are cracked, brittle, or damaged.
9.4 Electrical System Maintenance
Check wiring and connectors for corrosion and ensure they are properly seated.
9.5 Turbocharger Maintenance
Follow the manufacturer’s recommendations for turbocharger maintenance, including oil changes and inspections.
9.6 Use Quality Parts
Use only high-quality replacement parts to ensure reliability and longevity.
10. Frequently Asked Questions (FAQ) About the 2510 Mercedes Fault Code
1. What does the 2510 Mercedes fault code mean?
The 2510 Mercedes fault code indicates a problem with the boost pressure regulator (component Y77/1), specifically a positioner fault. This means the engine control unit (ECU) is receiving irregular signals from the boost pressure regulator.
2. What are the common symptoms of the 2510 fault code?
Common symptoms include limp mode, reduced engine power, check engine light, irregular turbocharger operation, and increased fuel consumption.
3. What are the potential causes of the 2510 fault code?
Potential causes include a defective boost pressure regulator, wiring problems, vacuum leaks, turbocharger issues, and ECU malfunctions.
4. How can I diagnose the 2510 fault code?
Diagnose the fault code by reading the code with an OBD-II scanner, performing a visual inspection, checking wiring and connections, testing vacuum lines, performing an actuation test, and component testing.
5. What tools do I need to diagnose the 2510 fault code?
Tools needed include an OBD-II scanner, multimeter, vacuum gauge, wiring diagrams, inspection light, and basic hand tools.
6. What is the role of the M55 motor in relation to the 2510 fault code?
The M55 motor (inlet port shutoff motor) can be related to the 2510 fault code, as oil contamination or electrical issues in the M55 motor can indirectly affect the boost pressure regulator.
7. How do vacuum leaks affect the 2510 fault code?
Vacuum leaks can disrupt the operation of the boost pressure regulator, leading to irregular signals and the 2510 fault code.
8. Can a faulty turbocharger cause the 2510 fault code?
Yes, a malfunctioning turbocharger can cause the boost pressure regulator to compensate, leading to irregular signals and the 2510 fault code.
9. What preventative measures can I take to avoid the 2510 fault code?
Preventative measures include regular inspections, scheduled maintenance, vacuum line care, electrical system maintenance, turbocharger maintenance, and using quality parts.
10. How can CARDIAGTECH.NET help me resolve the 2510 fault code?
CARDIAGTECH.NET offers a wide range of diagnostic tools and equipment, including OBD-II scanners, multimeters, and vacuum gauges, to help you resolve the 2510 Mercedes fault code and other automotive issues.
By following this comprehensive guide, you can effectively diagnose and resolve the 2510 Mercedes fault code, ensuring your vehicle operates at peak performance. Remember to prioritize safety and use quality tools and parts for reliable repairs.
If you’re facing challenges with your Mercedes-Benz or need assistance with diagnostic tools, don’t hesitate to reach out to CARDIAGTECH.NET for expert advice and support. Contact us at 276 Reock St, City of Orange, NJ 07050, United States, or via WhatsApp at +1 (641) 206-8880. Visit our website at CARDIAGTECH.NET for more information.