B1010 Mercedes Code: Understanding, Diagnosis, and Solutions
The B1010 Mercedes code indicates a low supply voltage to a control unit, specifically an under-voltage issue. At CARDIAGTECH.NET, we provide expert insights and diagnostic tools to resolve automotive electrical problems and ensure optimal vehicle performance. Discover effective troubleshooting strategies and high-quality repair solutions.
1. Decoding the B1010 Mercedes Error Code
1.1 Understanding the B1010 Code
The B1010 error code in Mercedes-Benz vehicles signifies that the supply voltage to a particular control unit is insufficient. This under-voltage condition can impair the functionality of various systems within the car. According to a diagnostic reference by Mercedes-Benz, such voltage discrepancies often lead to operational anomalies.
1.2 Common Symptoms Associated with B1010
Several symptoms may arise when the B1010 code is present:
- Malfunctioning of power windows
- Erratic behavior of side mirrors
- Issues with central locking
- Problems with interior lighting
- Dashboard warning lights illuminating intermittently
For example, if you find that your power windows are slow to respond or that the side mirrors behave erratically, especially when adjusting them, it could be indicative of a B1010 error. These symptoms can be disruptive, making it essential to address the issue promptly.
1.3 Control Units Commonly Affected
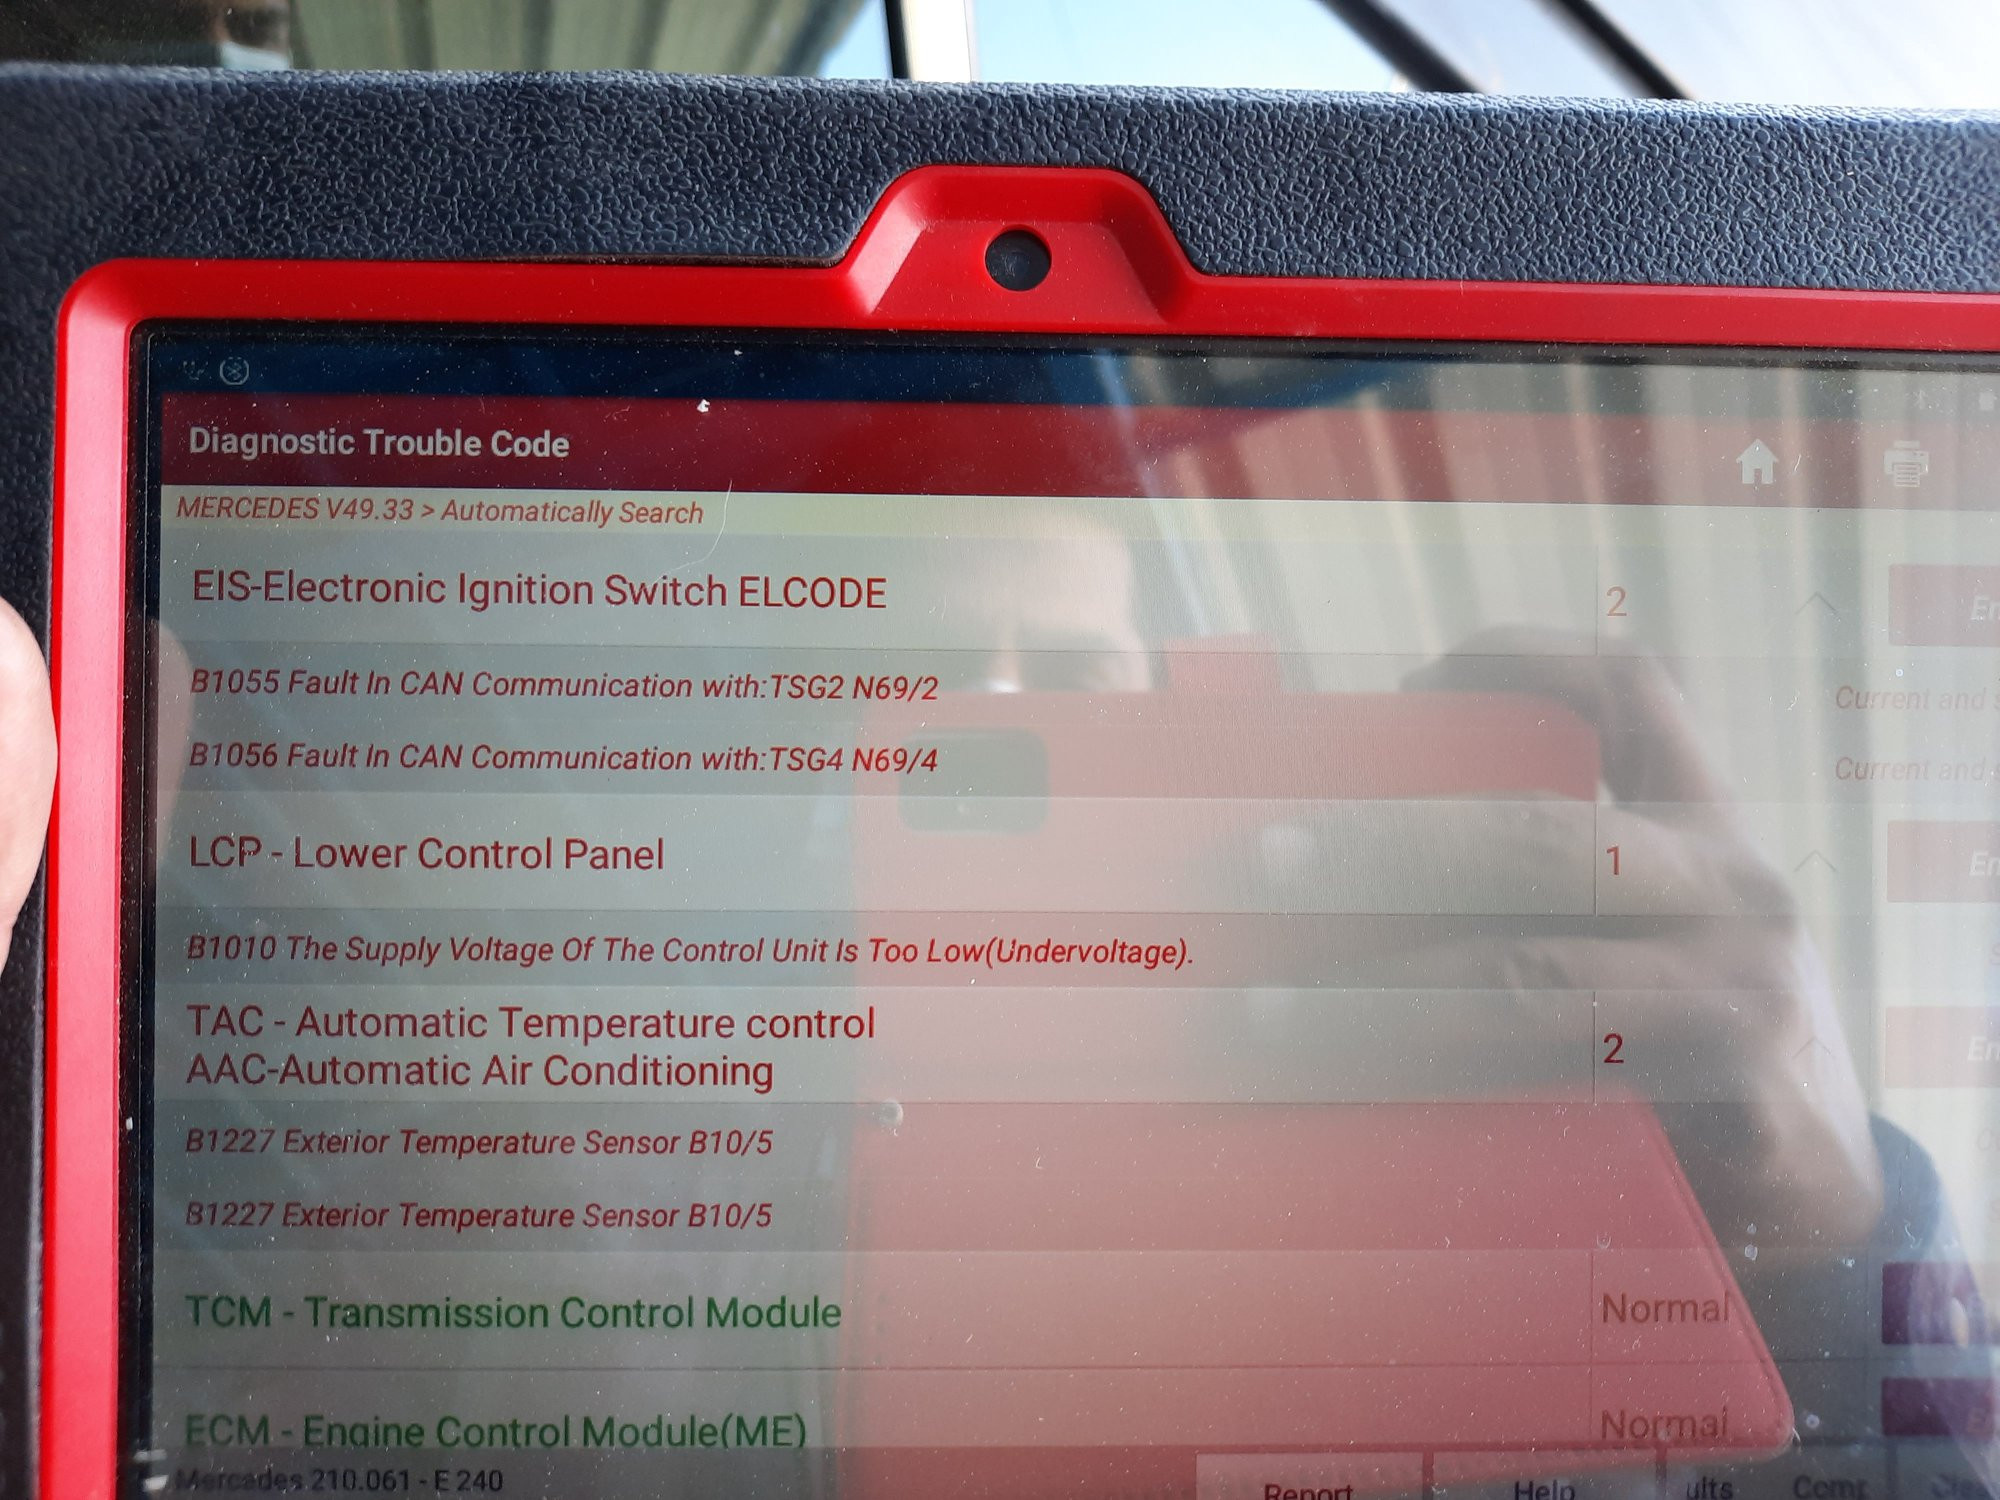
The B1010 code often affects the lower control panel but can also involve other control units, such as:
- Electronic Ignition Switch (EIS)
- Transmission Control Module (TCM)
- Engine Control Unit (ECU)
- Central Gateway (CGW)
When diagnosing a B1010 error, it’s crucial to identify all affected control units to ensure a comprehensive solution.
2. Potential Causes of the B1010 Error Code
2.1 Weak or Failing Battery
A primary suspect for the B1010 code is a weak or failing battery. A battery that cannot maintain the required voltage can cause under-voltage errors in various control units. A study by the AAA found that battery-related issues are a leading cause of vehicle breakdowns.
2.2 Corroded or Loose Battery Terminals
Corrosion or loose connections at the battery terminals can impede the flow of electricity, leading to voltage drops. These issues are easily overlooked but can significantly affect the electrical system’s performance.
2.3 Faulty Alternator
The alternator is responsible for charging the battery while the engine is running. If the alternator fails to provide sufficient charge, the battery voltage can drop, triggering the B1010 code. A faulty alternator can manifest through dimming headlights or a battery warning light on the dashboard.
2.4 Wiring Issues
Damaged, frayed, or poorly grounded wiring can cause voltage drops to control units. Inspecting the wiring harness for any signs of damage is crucial in diagnosing the B1010 error.
2.5 Faulty Ground Connections
Inadequate grounding can lead to voltage fluctuations and trigger the B1010 code. Ensure that all ground connections are clean, secure, and free from corrosion.
2.6 Control Unit Malfunction
In rare cases, the control unit itself may be faulty, causing it to misinterpret the voltage supply. This is usually diagnosed after ruling out all other potential causes.
3. Diagnosing the B1010 Error
3.1 Preliminary Checks
Before diving into advanced diagnostics, perform these preliminary checks:
- Visual Inspection: Check the battery terminals for corrosion or looseness.
- Battery Health: Test the battery’s voltage using a multimeter. A healthy battery should read around 12.6 volts.
- Alternator Output: With the engine running, the alternator should produce between 13.5 and 14.5 volts.
These initial steps can quickly identify common issues and save time in the diagnostic process.
3.2 Using a Multimeter
A multimeter is indispensable for diagnosing electrical issues. Follow these steps:
- Voltage Drop Test: Measure the voltage drop across various points in the circuit. A significant voltage drop indicates resistance, which can be due to corroded connections or damaged wiring.
- Continuity Test: Ensure that the wiring harness has continuity. Disconnect the battery before performing this test to prevent damage to the multimeter or vehicle components.
- Ground Connection Test: Verify that the ground connections are properly grounded by measuring the resistance between the ground point and the vehicle chassis.
3.3 Scanning for Error Codes
Use an OBD-II scanner to read and clear any stored error codes. While the B1010 code indicates a low voltage issue, other related codes may provide additional insights into the problem.
3.4 Checking CAN Bus Communication
The Controller Area Network (CAN) bus is critical for communication between various control units. Use an oscilloscope to check the CAN bus signals. Abnormal signals can indicate communication issues that may contribute to the B1010 error.
3.5 Testing Individual Components
Test individual components such as the alternator, battery, and control units to verify their functionality. Refer to the vehicle’s service manual for specific testing procedures.
4. Step-by-Step Guide to Fixing the B1010 Error
4.1 Battery Inspection and Replacement
- Inspect the Battery: Check for any signs of physical damage, such as cracks or leaks.
- Clean the Terminals: Remove any corrosion from the battery terminals using a wire brush and a baking soda solution.
- Test the Battery: Use a battery tester to assess the battery’s health. If the battery fails the test, replace it with a new one that meets the vehicle’s specifications.
Tool Recommendation: A reliable battery tester like the NOCO Genius GB70 can quickly determine the battery’s condition.
4.2 Checking and Cleaning Ground Connections
- Locate Ground Connections: Identify all ground connections related to the affected control units.
- Clean Ground Connections: Disconnect the ground connections and clean them with a wire brush to remove any corrosion.
- Reinstall Securely: Reinstall the ground connections, ensuring they are tight and secure.
Product Recommendation: Use a corrosion inhibitor spray to protect the ground connections from future corrosion.
4.3 Wiring Harness Inspection and Repair
- Inspect Wiring: Check the wiring harness for any signs of damage, such as frayed wires or cracked insulation.
- Repair Damaged Wires: Repair or replace any damaged wires using appropriate connectors and heat-shrink tubing.
- Check for Shorts: Use a multimeter to check for shorts between wires.
Tool Recommendation: A wire repair kit with various connectors and heat-shrink tubing is essential for wiring repairs.
4.4 Alternator Testing and Replacement
- Test Alternator Output: Use a multimeter to measure the alternator’s output voltage with the engine running.
- Inspect Alternator Components: Check the alternator’s brushes and slip rings for wear.
- Replace Alternator: If the alternator fails to provide the required voltage, replace it with a new or refurbished unit.
Product Recommendation: A high-quality alternator from a reputable brand ensures reliable charging performance.
4.5 Control Unit Replacement
- Confirm Faulty Unit: After ruling out all other potential causes, confirm that the control unit is indeed faulty.
- Replace Control Unit: Replace the faulty control unit with a new or refurbished unit.
- Programming: Program the new control unit to the vehicle’s specifications using a diagnostic tool.
Tool Recommendation: A diagnostic tool capable of programming control units, such as the Autel MaxiSys MS906BT, is necessary for this step.
5. Advanced Troubleshooting Techniques
5.1 Using an Oscilloscope for CAN Bus Diagnostics
An oscilloscope is an invaluable tool for analyzing CAN bus signals.
- Connect Oscilloscope: Connect the oscilloscope to the CAN high and CAN low wires.
- Analyze Waveforms: Analyze the waveforms for any abnormalities, such as missing signals or incorrect voltage levels.
- Identify Faulty Nodes: Use the oscilloscope to identify any faulty nodes on the CAN bus that may be causing communication issues.
Product Recommendation: A portable oscilloscope like the Hantek DSO2D15 is ideal for automotive diagnostics.
5.2 Voltage Drop Testing Under Load
Perform voltage drop testing under load to identify any hidden issues.
- Apply Load: Apply a load to the circuit, such as turning on the headlights or air conditioning.
- Measure Voltage Drop: Measure the voltage drop across various points in the circuit while the load is applied.
- Identify High Resistance: Identify any points with high resistance, which may indicate corroded connections or damaged wiring.
5.3 Checking for Parasitic Draws
Parasitic draws can drain the battery and cause under-voltage issues.
- Disconnect Battery: Disconnect the negative battery cable.
- Connect Multimeter: Connect a multimeter between the negative battery cable and the negative battery terminal.
- Measure Current Draw: Measure the current draw with all vehicle systems turned off. A normal current draw should be less than 50 milliamps.
- Identify Circuit: If the current draw is excessive, systematically disconnect circuits to identify the source of the parasitic draw.
6. Preventive Measures to Avoid the B1010 Code
6.1 Regular Battery Maintenance
- Check Battery Voltage: Regularly check the battery voltage and ensure it is within the recommended range.
- Clean Terminals: Clean the battery terminals regularly to prevent corrosion.
- Battery Load Testing: Perform battery load testing to assess the battery’s health.
6.2 Inspecting and Maintaining Ground Connections
- Check Ground Connections: Periodically check all ground connections to ensure they are tight and secure.
- Clean Ground Connections: Clean the ground connections to prevent corrosion.
- Apply Corrosion Inhibitor: Apply a corrosion inhibitor to the ground connections to protect them from future corrosion.
6.3 Monitoring Alternator Performance
- Check Alternator Output: Regularly check the alternator’s output voltage to ensure it is within the recommended range.
- Inspect Alternator Belt: Inspect the alternator belt for wear and replace it as needed.
- Alternator Testing: Perform alternator testing to assess its performance.
6.4 Routine Wiring Inspections
- Inspect Wiring Harness: Periodically inspect the wiring harness for any signs of damage.
- Repair Damaged Wires: Repair or replace any damaged wires to prevent electrical issues.
- Secure Wiring: Ensure that the wiring harness is properly secured to prevent chafing.
7. The Role of CARDIAGTECH.NET in Resolving B1010 Errors
7.1 High-Quality Diagnostic Tools
At CARDIAGTECH.NET, we offer a wide range of high-quality diagnostic tools to help you accurately diagnose and resolve B1010 errors. Our tools include:
- OBD-II Scanners: For reading and clearing error codes.
- Multimeters: For measuring voltage, current, and resistance.
- Oscilloscopes: For analyzing CAN bus signals.
- Battery Testers: For assessing battery health.
7.2 Expert Guidance and Support
Our team of experienced technicians is available to provide expert guidance and support to help you troubleshoot and resolve B1010 errors. We offer:
- Technical Support: Access to our technical support team for assistance with diagnostic procedures.
- Online Resources: A comprehensive library of articles, videos, and tutorials to help you learn about automotive diagnostics.
- Community Forum: A forum where you can connect with other technicians and share your experiences.
7.3 Comprehensive Repair Solutions
We provide comprehensive repair solutions, including:
- Replacement Parts: A wide selection of high-quality replacement parts, including batteries, alternators, and control units.
- Repair Kits: Complete repair kits with all the necessary components for common repairs.
- Programming Services: Programming services for control units to ensure they are properly configured to the vehicle’s specifications.
8. Understanding CAN Bus Systems in Mercedes-Benz Vehicles
8.1 Basics of CAN Bus Communication
The Controller Area Network (CAN) bus is a communication protocol that allows various electronic control units (ECUs) within a vehicle to communicate with each other without a host computer. According to Bosch, one of the pioneers of CAN bus technology, this system enhances reliability and reduces wiring complexity.
8.2 Importance of CAN Bus in Modern Vehicles
In modern vehicles, the CAN bus is essential for coordinating the functions of various systems, including the engine, transmission, ABS, and airbag systems. It allows for real-time data exchange, enabling advanced features such as adaptive cruise control and lane departure warning.
8.3 Troubleshooting CAN Bus Issues
Troubleshooting CAN bus issues requires specialized tools and knowledge. Common issues include:
- Wiring Problems: Damaged or corroded wiring can disrupt CAN bus communication.
- Faulty ECUs: A malfunctioning ECU can send erroneous data or fail to communicate altogether.
- Termination Resistors: Incorrect or missing termination resistors can cause signal reflections and communication errors.
Tool Recommendation: The CAN bus analyzer from Vector Informatik is a powerful tool for diagnosing and troubleshooting CAN bus issues.
8.4 Common CAN Bus Error Codes
Besides the B1010 code, other common CAN bus error codes include:
- U0100: Lost communication with ECM/PCM.
- U0155: Lost communication with instrument panel cluster (IPC).
- U0140: Lost communication with body control module (BCM).
Understanding these codes and their potential causes is crucial for effective diagnostics.
9. Advanced Tools for Diagnosing Electrical Issues
9.1 Digital Multimeters
Digital multimeters (DMMs) are indispensable for diagnosing electrical issues. They can measure voltage, current, resistance, and continuity.
Key Features:
- Auto-ranging: Automatically selects the appropriate range for the measurement.
- Data Logging: Records measurements over time for analysis.
- True RMS: Accurate measurement of non-sinusoidal waveforms.
Product Recommendation: The Fluke 117 is a reliable and versatile DMM for automotive use.
9.2 Oscilloscopes
Oscilloscopes are used to visualize electrical signals over time. They are essential for diagnosing CAN bus issues and other complex electrical problems.
Key Features:
- High Bandwidth: Captures high-frequency signals accurately.
- Multiple Channels: Allows simultaneous monitoring of multiple signals.
- Advanced Triggering: Captures specific events for analysis.
Product Recommendation: The Tektronix TBS2072B is a high-performance oscilloscope suitable for automotive diagnostics.
9.3 Diagnostic Scanners
Diagnostic scanners are used to read and clear error codes, as well as access live data from the vehicle’s ECUs.
Key Features:
- Wide Vehicle Coverage: Supports a wide range of vehicle makes and models.
- Advanced Functions: Includes functions such as component testing and ECU programming.
- User-Friendly Interface: Easy to use and navigate.
Product Recommendation: The Snap-on Zeus is a powerful diagnostic scanner with advanced capabilities.
9.4 Battery Load Testers
Battery load testers are used to assess the health and performance of the battery.
Key Features:
- Accurate Testing: Provides accurate and reliable test results.
- Easy to Use: Simple to operate and interpret the results.
- Multiple Test Modes: Supports various test modes, including load testing and charging system testing.
Product Recommendation: The Midtronics MDX-P300 is a professional-grade battery load tester.
10. Case Studies: Resolving B1010 Errors in Mercedes Vehicles
10.1 Case Study 1: W211 E-Class with B1010 Code
Vehicle: 2008 Mercedes-Benz E-Class (W211)
Symptoms: Intermittent power window operation and dashboard warning lights.
Diagnosis:
- Preliminary checks revealed a weak battery.
- Battery load testing confirmed the battery was failing.
- Replacement of the battery resolved the B1010 error.
Solution: Replacing the weak battery with a new one restored normal operation.
10.2 Case Study 2: W204 C-Class with B1010 Code
Vehicle: 2012 Mercedes-Benz C-Class (W204)
Symptoms: Erratic side mirror behavior and slow power window operation.
Diagnosis:
- Visual inspection revealed corroded ground connections.
- Cleaning and securing the ground connections improved the voltage supply.
- Testing the alternator output showed it was within the specified range.
Solution: Cleaning and securing the corroded ground connections resolved the B1010 error.
10.3 Case Study 3: W221 S-Class with B1010 Code
Vehicle: 2007 Mercedes-Benz S-Class (W221)
Symptoms: Intermittent central locking issues and interior lighting problems.
Diagnosis:
- Diagnostic scanning revealed the B1010 code along with other CAN bus communication errors.
- Using an oscilloscope, it was determined that there was a problem with the CAN bus signal.
- Further inspection revealed damaged wiring in the CAN bus harness.
Solution: Repairing the damaged wiring in the CAN bus harness resolved the communication errors and the B1010 code.
10.4 Case Study 4: W164 ML-Class with B1010 Code
Vehicle: 2010 Mercedes-Benz ML-Class (W164)
Symptoms: Dashboard warning lights and malfunctioning of the control unit.
Diagnosis:
- Checking the battery and the output of alternator were perfect
- After ruling out all other potential causes, it was confirmed that the control unit was indeed faulty.
- Replacing the faulty control unit with a new or refurbished unit.
Solution: Replacing the faulty control unit with a new or refurbished unit.
11. Frequently Asked Questions (FAQs) About B1010 Mercedes Code
-
What does the B1010 code mean on a Mercedes-Benz?
The B1010 code indicates that the supply voltage to a control unit is too low, causing an under-voltage condition.
-
What are the common symptoms associated with the B1010 error code?
Common symptoms include malfunctioning power windows, erratic side mirror behavior, central locking issues, and dashboard warning lights.
-
What are the potential causes of the B1010 code?
Potential causes include a weak or failing battery, corroded battery terminals, a faulty alternator, wiring issues, and faulty ground connections.
-
How can I diagnose the B1010 error code?
You can diagnose the B1010 error code by performing preliminary checks, using a multimeter, scanning for error codes, checking CAN bus communication, and testing individual components.
-
What tools are needed to fix the B1010 error code?
Tools needed include a multimeter, OBD-II scanner, oscilloscope, battery tester, wire repair kit, and diagnostic tool for programming control units.
-
Can a weak battery cause the B1010 code?
Yes, a weak battery that cannot maintain the required voltage is a primary cause of the B1010 code.
-
How do I check ground connections for the B1010 error?
Check ground connections by ensuring they are clean, secure, and free from corrosion. Use a multimeter to measure the resistance between the ground point and the vehicle chassis.
-
What is the role of the alternator in causing the B1010 code?
A faulty alternator that fails to provide sufficient charge can cause the battery voltage to drop, triggering the B1010 code.
-
How can I prevent the B1010 code from occurring?
Preventive measures include regular battery maintenance, inspecting and maintaining ground connections, monitoring alternator performance, and routine wiring inspections.
-
Is it possible to fix the B1010 code myself, or should I take it to a professional?
While some repairs, such as cleaning battery terminals, can be done DIY, complex issues like CAN bus problems may require a professional technician.
-
What is the Controller Area Network (CAN) bus?
The Controller Area Network (CAN) bus is a communication protocol that allows various electronic control units (ECUs) within a vehicle to communicate with each other without a host computer. This system enhances reliability and reduces wiring complexity.
12. Benefits of Choosing CARDIAGTECH.NET for Your Automotive Diagnostic Needs
12.1 Wide Range of Products
At CARDIAGTECH.NET, we offer an extensive selection of automotive diagnostic tools and equipment to meet all your needs. From OBD-II scanners to oscilloscopes and multimeters, we have everything you need to accurately diagnose and repair vehicle issues.
12.2 Expert Support and Guidance
Our team of experienced technicians is dedicated to providing expert support and guidance to help you troubleshoot and resolve complex automotive problems. We offer technical assistance, online resources, and a community forum where you can connect with other professionals.
12.3 Quality Assurance
We are committed to providing high-quality products that meet the highest standards of performance and reliability. All our products are sourced from reputable manufacturers and undergo rigorous testing to ensure they meet our stringent quality requirements.
12.4 Competitive Pricing
We offer competitive pricing on all our products, making it affordable for both professional technicians and DIY enthusiasts to access the tools they need.
12.5 Convenient Ordering and Fast Shipping
Our user-friendly website makes it easy to find and order the products you need. We offer fast shipping and convenient payment options to ensure a seamless shopping experience.
13. Why Immediate Action is Crucial
Ignoring the B1010 Mercedes code can lead to more severe issues. Voltage problems can affect multiple systems, causing unpredictable behavior and potential safety risks. For example, a malfunctioning ABS system due to voltage issues can compromise braking performance.
Take action now. Contact CARDIAGTECH.NET at +1 (641) 206-8880 or visit our website to explore our range of diagnostic tools and replacement parts. Our expert team is ready to assist you in resolving the B1010 error and ensuring your Mercedes-Benz operates at its best. Don’t wait for the problem to escalate – ensure your vehicle’s reliability and safety today. Reach out to us at 276 Reock St, City of Orange, NJ 07050, United States, and let us help you get back on the road with confidence.
Image
With the right tools and expertise from CARDIAGTECH.NET, resolving the B1010 Mercedes code becomes a manageable task, ensuring your vehicle’s long-term performance and reliability.
