1999 Mercedes Benz E320 Right Rear Window Regulator Replacement
The 1999 Mercedes Benz E320 right rear window regulator replacement can restore full functionality to your vehicle’s window system, ensuring smooth operation and preventing further damage. At CARDIAGTECH.NET, we offer solutions that not only address this specific issue but also enhance your overall car maintenance capabilities with our top-tier diagnostic tools and equipment. Equip yourself with the right tools and knowledge to tackle this replacement efficiently and effectively with our detailed guide and expert support, utilizing advanced auto repair technology.
Table of Contents
1. Identifying the Problem: Symptoms of a Failing Window Regulator
2. Essential Tools and Equipment for the Job
3. Step-by-Step Guide to Replacing the Rear Window Regulator
4. Removing the Door Panel
5. Disconnecting Electrical Components
6. Drilling Out the Old Rivets
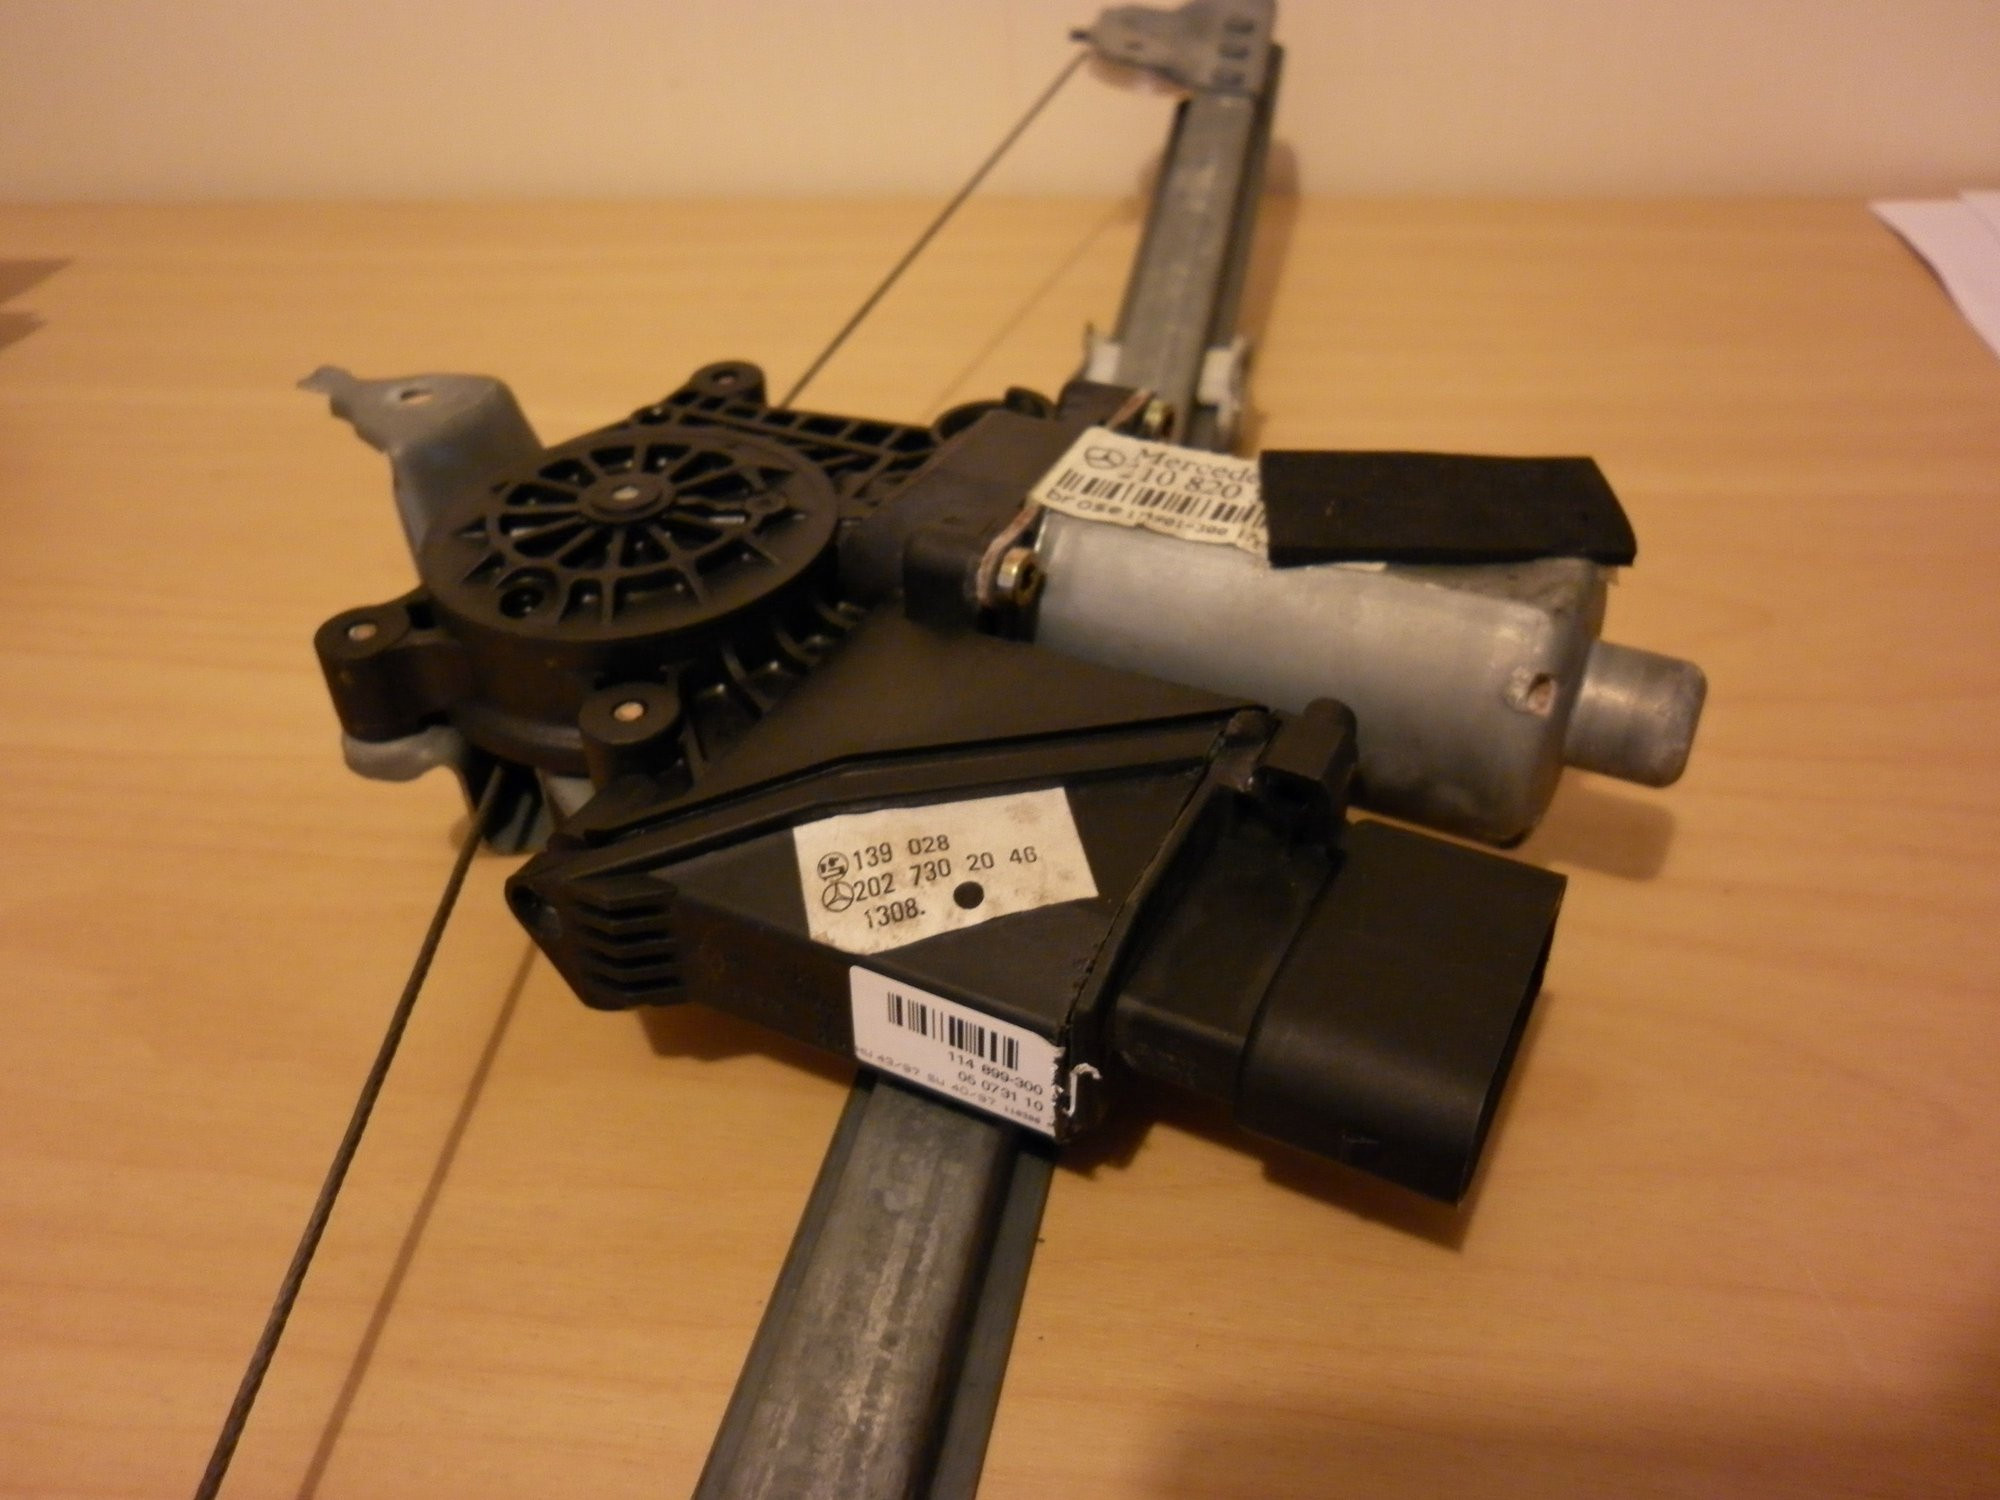
7. Installing the New Window Regulator
8. Reconnecting Electrical Components and Testing
9. Reinstalling the Door Panel
10. Tips for a Smooth Window Regulator Replacement
11. Common Mistakes to Avoid
12. Importance of Quality Replacement Parts
13. Maintenance Tips to Prolong Regulator Life
14. Addressing Related Issues: Window Motor and Switch Problems
15. Why Choose CARDIAGTECH.NET for Your Auto Repair Needs
16. Advanced Diagnostic Tools Available at CARDIAGTECH.NET
17. Customer Testimonials and Success Stories
18. Cost Analysis: DIY vs. Professional Repair
19. Safety Precautions During the Replacement Process
20. Understanding the Different Types of Window Regulators
21. The Role of Window Regulators in Vehicle Safety
22. Troubleshooting Common Window Problems
23. Environmental Considerations: Recycling Old Parts
24. Warranty Information on Replacement Parts
25. Future Trends in Window Regulator Technology
26. How to Find the Right Replacement Part for Your Car
27. Benefits of Regular Vehicle Maintenance
28. CARDIAGTECH.NET’s Commitment to Automotive Excellence
29. Frequently Asked Questions (FAQ)
30. Conclusion: Ensuring Smooth Window Operation with CARDIAGTECH.NET
1. Identifying the Problem: Symptoms of a Failing Window Regulator
A failing window regulator in your 1999 Mercedes Benz E320 can manifest in several ways. Recognizing these signs early can prevent further damage and ensure timely 1999 Mercedes Benz E320 right rear window regulator replacement. Here are the common symptoms:
- Slow or Erratic Window Movement: The window moves up or down much slower than usual, or the movement is jerky and uneven.
- Crunching or Grinding Noises: Unusual noises like crunching, grinding, or clicking when operating the window.
- Window Falling Inside the Door: The window suddenly drops inside the door panel.
- Window Tilting: The window tilts to one side as it moves.
- Complete Window Inoperability: The window does not move at all when the switch is activated.
- Sticking Window: The window gets stuck in either the up or down position.
These symptoms indicate that the window regulator is struggling or has already failed. Prompt attention and replacement of the 1999 Mercedes Benz E320 right rear window regulator can restore functionality and prevent further complications. Addressing these issues promptly ensures the longevity of your vehicle’s components.
2. Essential Tools and Equipment for the Job
Replacing the 1999 Mercedes Benz E320 right rear window regulator requires specific tools and equipment to ensure a successful and safe repair. Having the right tools on hand will make the process smoother and more efficient. Here’s a list of essential items:
| Tool/Equipment | Description |
|---|---|
| Torx and Hex Drivers | Needed to remove various screws and bolts holding the door panel and regulator in place. A set with multiple sizes is recommended. |
| Screwdrivers | Both flathead and Phillips head screwdrivers for removing smaller screws and prying off plastic trim pieces. |
| Rivet Gun | Required to install the new window regulator securely. Ensure it is compatible with the rivets provided with the replacement regulator. |
| Drill | Used to drill out the old rivets that hold the original regulator in place. |
| Drill Bits | A set of drill bits, including sizes suitable for drilling out rivets without damaging the surrounding metal. |
| Panel Removal Tools | Plastic tools designed to safely remove door panels and trim without scratching or damaging the paint. |
| Socket Set and Ratchet | Useful for removing any bolts or nuts that may be securing the regulator or door components. |
| Work Gloves | To protect your hands from sharp edges and debris. |
| Safety Glasses | To protect your eyes from debris while drilling and working on the car. |
| Multimeter | To test electrical connections and ensure the window motor is functioning correctly. |
| Shop Rags | For cleaning up any spills and keeping your workspace tidy. |
| New Window Regulator | A high-quality replacement regulator specifically designed for the 1999 Mercedes Benz E320 right rear window. |
| Replacement Rivets | New rivets to secure the replacement regulator. These usually come with the new regulator. |
| Battery Disconnect Tool | To safely disconnect the battery and prevent electrical shorts during the repair. |
Having these tools and equipment ready will ensure a smooth and efficient 1999 Mercedes Benz E320 right rear window regulator replacement. Ensure you purchase high-quality tools from CARDIAGTECH.NET for reliable and durable performance. Proper tools enhance efficiency and safety during the repair process.
3. Step-by-Step Guide to Replacing the Rear Window Regulator
Replacing the rear window regulator in a 1999 Mercedes Benz E320 can be a straightforward process if you follow these steps carefully. This guide provides a detailed walkthrough to help you complete the 1999 Mercedes Benz E320 right rear window regulator replacement effectively.
Step 1: Disconnect the Battery
Before starting any electrical work, disconnect the battery to prevent accidental shorts or airbag deployment. Locate the battery (typically under the rear seat or in the trunk) and disconnect the negative terminal using a wrench. Wait for about 30 minutes to allow the system to fully discharge.
Step 2: Gather Your Tools and Materials
Ensure you have all the necessary tools and materials listed in Section 2 within reach. This includes the new window regulator, rivet gun, drill, drill bits, screwdrivers, panel removal tools, and safety gear.
Step 3: Prepare the Work Area
Park the vehicle on a level surface and engage the parking brake. Open the rear door where you’ll be replacing the regulator to provide ample workspace.
Step 4: Remove the Door Panel
Carefully remove the door panel by following the steps outlined in Section 4. This typically involves removing screws, disconnecting electrical connectors, and using panel removal tools to pry the panel away from the door frame.
Step 5: Disconnect Electrical Components
After removing the door panel, disconnect all electrical components connected to the door, as detailed in Section 5. This includes the window motor, speaker wires, and any other electrical connectors.
Step 6: Remove Vapor Barrier
Carefully peel back the vapor barrier (plastic sheet) covering the inner door frame. Be gentle to avoid tearing it, as you’ll need to reattach it later.
Step 7: Lower the Window (If Possible)
If the window is still functional, lower it partially to access the regulator. If the window is stuck, manually try to move it to a position where you can access the regulator bolts or rivets.
Step 8: Drill Out the Old Rivets
Using the drill and appropriate drill bit, drill out the rivets holding the old window regulator in place, as described in Section 6. Be careful not to damage the surrounding metal.
Step 9: Remove the Old Window Regulator
Once the rivets are drilled out, carefully remove the old window regulator from the door frame. It may be necessary to maneuver it to clear any obstructions.
Step 10: Install the New Window Regulator
Position the new window regulator in the door frame and align it with the mounting holes. Secure it using new rivets and the rivet gun, as detailed in Section 7.
Step 11: Reconnect Electrical Components and Test
Reconnect all electrical components, including the window motor and any other connectors. Reconnect the battery and test the window to ensure it moves up and down smoothly. Refer to Section 8 for detailed instructions.
Step 12: Reinstall the Vapor Barrier
Carefully reattach the vapor barrier to its original position, ensuring it is sealed to prevent moisture from entering the door.
Step 13: Reinstall the Door Panel
Reinstall the door panel by reversing the removal process. Ensure all screws are tightened and electrical connectors are securely attached. See Section 9 for more details.
Step 14: Final Testing
Perform a final test to ensure the window operates smoothly and all electrical components are functioning correctly.
By following these steps, you can successfully complete the 1999 Mercedes Benz E320 right rear window regulator replacement. If you encounter any difficulties, consult a professional mechanic. CARDIAGTECH.NET provides the necessary tools and guidance for a successful repair.
4. Removing the Door Panel
Removing the door panel is a crucial step in the 1999 Mercedes Benz E320 right rear window regulator replacement process. Follow these detailed instructions to remove the door panel without causing damage:
Step 1: Gather Your Tools
You will need a panel removal tool, a screwdriver set (both Phillips and flathead), and a Torx driver set. These tools will help you remove the various fasteners and clips that hold the door panel in place.
Step 2: Locate and Remove Screws
Inspect the door panel for any visible screws. Common locations include:
- Door Handle Recess: Check behind the door handle.
- Armrest: Look under the armrest, often covered by a small plastic cap.
- Bottom Edge of the Panel: Screws may be located along the bottom edge of the door panel.
Remove all identified screws using the appropriate screwdriver or Torx driver.
Step 3: Remove the Door Handle Trim
Carefully pry off the trim piece around the door handle. Use a plastic panel removal tool to avoid scratching the surrounding surface. Gently work around the edges until the trim piece comes loose.
Step 4: Disconnect Electrical Connections
Before fully removing the door panel, disconnect any electrical connections. This typically includes the power window switch and the door lock switch. Gently squeeze the connectors and pull them apart.
Step 5: Pry Off the Door Panel
Using the panel removal tool, start prying the door panel away from the door frame. Begin at the bottom corner and work your way around the edges. The panel is held in place by plastic clips, so apply gentle but firm pressure to release them.
Step 6: Lift and Remove the Door Panel
Once all the clips are released, lift the door panel upward to disengage it from the top edge of the door frame. Carefully pull the panel away from the door.
Step 7: Inspect the Door Panel
After removing the door panel, inspect it for any broken clips or damaged components. Replace any damaged parts to ensure a secure fit when reinstalling the panel.
By following these steps, you can safely and effectively remove the door panel to access the window regulator. Proper door panel removal is essential for completing the 1999 Mercedes Benz E320 right rear window regulator replacement.
5. Disconnecting Electrical Components
Disconnecting electrical components is a critical safety measure during the 1999 Mercedes Benz E320 right rear window regulator replacement. This step prevents electrical shorts and ensures your safety while working on the vehicle. Here’s how to properly disconnect the electrical components:
Step 1: Identify Electrical Connectors
After removing the door panel, you will see several electrical connectors attached to various components, such as the window motor, door lock, speaker, and power window switch.
Step 2: Disconnect the Window Motor
Locate the connector for the window motor. It is typically a multi-pin connector. Gently squeeze the locking tab on the connector and pull it straight out to disconnect it.
Step 3: Disconnect the Door Lock Actuator
Find the connector for the door lock actuator. Like the window motor connector, squeeze the locking tab and pull the connector straight out.
Step 4: Disconnect the Speaker Wires
If there are speakers in the door, disconnect the speaker wires. These may be simple push-on connectors or more complex multi-pin connectors. Disconnect them carefully.
Step 5: Disconnect the Power Window Switch
The power window switch on the door panel will have a connector attached to it. Disconnect this connector by squeezing the locking tab and pulling it out.
Step 6: Label Connectors (Optional)
To avoid confusion during reassembly, you can label each connector with a piece of tape indicating its corresponding component. This can save time and prevent mistakes when reconnecting the components.
Step 7: Secure the Wires
Once all the connectors are disconnected, secure the wires to the door frame using tape or zip ties. This will keep them out of the way while you work on the window regulator.
Safety Tips:
- Disconnect the Battery: Always disconnect the battery before working on electrical components to prevent shorts.
- Gentle Handling: Handle connectors gently to avoid damaging the pins or locking tabs.
- Inspect Connectors: Before reconnecting, inspect the connectors for any signs of damage or corrosion. Clean or replace them as needed.
Properly disconnecting electrical components ensures a safe and efficient 1999 Mercedes Benz E320 right rear window regulator replacement. Following these steps will help you avoid electrical issues and ensure all components function correctly after reassembly.
6. Drilling Out the Old Rivets
Drilling out the old rivets is a necessary step in replacing the window regulator in your 1999 Mercedes Benz E320. This process requires precision to avoid damaging the surrounding metal. Here’s a detailed guide on how to drill out the rivets:
Step 1: Gather Your Tools
You will need a drill, a set of drill bits (including a size slightly larger than the rivet diameter), safety glasses, and work gloves.
Step 2: Prepare the Work Area
Ensure the area around the rivets is clean and free of obstructions. Wear safety glasses to protect your eyes from flying debris and gloves to protect your hands.
Step 3: Select the Correct Drill Bit
Choose a drill bit that is slightly larger than the diameter of the rivet. This will allow you to drill out the rivet without damaging the surrounding metal. Start with a smaller bit if you are unsure, and gradually increase the size until the rivet head comes off easily.
Step 4: Position the Drill
Place the tip of the drill bit directly in the center of the rivet head. Apply firm, steady pressure to keep the drill from slipping.
Step 5: Drill Out the Rivet Head
Begin drilling at a slow speed, gradually increasing the speed as you gain control. Apply consistent pressure and keep the drill perpendicular to the rivet. Drill until the head of the rivet separates from the body.
Step 6: Remove the Rivet Body
Once the rivet head is removed, use a punch or a small screwdriver to push the remaining rivet body out of the hole. If the rivet is stubborn, you may need to use a smaller drill bit to carefully drill out the remaining portion.
Step 7: Repeat for All Rivets
Repeat the process for all rivets holding the window regulator in place. Take your time and be careful not to damage the surrounding metal.
Safety Tips:
- Wear Safety Glasses: Always wear safety glasses to protect your eyes from flying metal debris.
- Use the Right Drill Bit: Using the correct size drill bit is crucial to avoid damaging the surrounding metal.
- Apply Steady Pressure: Apply consistent pressure to the drill to prevent it from slipping.
- Take Your Time: Rushing the process can lead to mistakes and potential damage.
By following these steps and safety tips, you can effectively drill out the old rivets and prepare for the installation of the new window regulator. Proper rivet removal is essential for a successful 1999 Mercedes Benz E320 right rear window regulator replacement.
7. Installing the New Window Regulator
Installing the new window regulator is a crucial step in restoring the functionality of your 1999 Mercedes Benz E320’s window. Follow these detailed instructions to ensure a successful installation:
Step 1: Prepare the New Regulator
Inspect the new window regulator to ensure it is the correct part for your vehicle and that it is free from any damage. Gather the necessary rivets and rivet gun.
Step 2: Position the New Regulator
Carefully position the new window regulator inside the door frame. Align the mounting holes on the regulator with the corresponding holes in the door frame.
Step 3: Secure the Regulator with Rivets
Insert a rivet into each mounting hole, ensuring that the rivet passes through both the regulator and the door frame. Use the rivet gun to secure the rivets in place. Follow the manufacturer’s instructions for operating the rivet gun.
Step 4: Check the Regulator’s Alignment
After securing the regulator with rivets, double-check its alignment to ensure it is properly seated in the door frame. Make any necessary adjustments before proceeding.
Step 5: Test the Window Operation
Before reassembling the door, temporarily reconnect the electrical connectors to the window motor and test the window operation. Ensure that the window moves smoothly up and down without any binding or unusual noises.
Step 6: Install Additional Rivets (If Necessary)
If the window operation is satisfactory, install any remaining rivets to fully secure the regulator in place.
Step 7: Reconnect Electrical Components
Disconnect the electrical connectors used for testing and prepare to reassemble the door.
Safety Tips:
- Use the Correct Rivets: Ensure that you are using the correct type and size of rivets for your vehicle.
- Follow Rivet Gun Instructions: Follow the manufacturer’s instructions for operating the rivet gun to avoid injury and ensure a secure installation.
- Check Alignment: Proper alignment of the regulator is crucial for smooth window operation.
Installing the new window regulator correctly will ensure the smooth and reliable operation of your 1999 Mercedes Benz E320’s window. By following these steps, you can complete the 1999 Mercedes Benz E320 right rear window regulator replacement with confidence.
8. Reconnecting Electrical Components and Testing
After installing the new window regulator, reconnecting the electrical components and testing the system is essential to ensure everything functions correctly. Follow these steps carefully:
Step 1: Gather Your Tools
Ensure you have all the necessary tools, including a multimeter (optional), work gloves, and the labeled connectors from the disconnection phase.
Step 2: Reconnect the Window Motor
Locate the window motor connector and carefully reconnect it to the motor. Ensure the connector clicks into place, indicating a secure connection.
Step 3: Reconnect the Door Lock Actuator
Find the door lock actuator connector and reconnect it, ensuring a secure fit.
Step 4: Reconnect the Speaker Wires
If you disconnected speaker wires, reconnect them now. Match the wires to their corresponding terminals and ensure they are firmly attached.
Step 5: Reconnect the Power Window Switch
Reconnect the power window switch on the door panel. Ensure the connector is securely attached.
Step 6: Reconnect the Battery
Go back to the battery and reconnect the negative terminal. Tighten the connection securely.
Step 7: Test the Window Operation
Turn the ignition to the “on” position without starting the engine. Test the window by using the power window switch. Ensure the window moves smoothly up and down without any unusual noises.
Step 8: Test the Door Lock
Test the door lock to ensure it functions correctly. Use the power door lock switch to lock and unlock the door.
Step 9: Test the Speaker
Turn on the car radio and test the speaker in the door to ensure it is functioning correctly.
Step 10: Verify All Connections
Double-check all the electrical connections to ensure they are secure and properly connected.
Step 11: Use a Multimeter (Optional)
If you have a multimeter, you can use it to test the voltage at the window motor connector to ensure it is receiving power when the window switch is activated.
Troubleshooting:
- Window Not Moving: Check the window motor connector and ensure it is securely connected. Check the fuse for the power windows.
- Door Lock Not Working: Check the door lock actuator connector and ensure it is securely connected.
- Speaker Not Working: Check the speaker wires and ensure they are properly connected.
By following these steps, you can successfully reconnect the electrical components and test the system to ensure everything is functioning correctly. Proper reconnection and testing are crucial for a successful 1999 Mercedes Benz E320 right rear window regulator replacement.
9. Reinstalling the Door Panel
Reinstalling the door panel is the final step in the 1999 Mercedes Benz E320 right rear window regulator replacement process. Follow these instructions carefully to ensure the door panel is securely attached and all components are functioning correctly:
Step 1: Prepare the Door Panel
Inspect the door panel for any broken clips or damaged components. Replace any damaged parts to ensure a secure fit.
Step 2: Align the Door Panel
Align the door panel with the door frame. Make sure all the electrical connectors are accessible and not pinched or obstructed.
Step 3: Reconnect Electrical Connections
Reconnect all the electrical connections that you disconnected during the removal process. This includes the power window switch, door lock switch, and speaker wires.
Step 4: Attach the Door Panel
Press the door panel firmly against the door frame, aligning the plastic clips with the corresponding holes. Apply even pressure to snap the clips into place. Work your way around the edges of the door panel until all the clips are securely attached.
Step 5: Reinstall Screws
Reinstall all the screws that you removed during the door panel removal process. Tighten the screws securely, but be careful not to overtighten them.
Step 6: Reinstall Door Handle Trim
Reinstall the trim piece around the door handle. Make sure it snaps securely into place.
Step 7: Test the Door Operation
Test the door operation to ensure that the window moves smoothly up and down, the door locks and unlocks properly, and the speaker is functioning correctly.
Step 8: Final Inspection
Inspect the door panel to ensure that it is securely attached and that there are no gaps or loose edges.
Troubleshooting:
- Door Panel Not Sitting Flush: Check to make sure all the clips are properly engaged and that there are no obstructions preventing the panel from sitting flush.
- Electrical Components Not Working: Double-check all the electrical connections to ensure they are securely attached.
By following these steps, you can successfully reinstall the door panel and complete the 1999 Mercedes Benz E320 right rear window regulator replacement. Proper door panel reinstallation ensures that all components are functioning correctly and the interior of your vehicle is protected.
10. Tips for a Smooth Window Regulator Replacement
Replacing a window regulator can be a complex task, but with the right preparation and approach, you can ensure a smooth and successful 1999 Mercedes Benz E320 right rear window regulator replacement. Here are some helpful tips:
- Preparation is Key: Before you begin, gather all the necessary tools and parts. Having everything within reach will save you time and reduce frustration.
- Read the Instructions: Familiarize yourself with the repair process by reading the service manual or watching instructional videos specific to your vehicle model.
- Take Photos: As you disassemble the door panel and other components, take photos to help you remember how everything goes back together.
- Label Everything: Label all electrical connectors and wires to ensure you reconnect them correctly.
- Use the Right Tools: Using the correct tools for the job can prevent damage to the vehicle and make the process easier.
- Be Patient: Take your time and avoid rushing. Rushing can lead to mistakes and potential damage.
- Work in a Clean Area: Keep your workspace clean and organized to avoid losing parts and to make the process more efficient.
- Disconnect the Battery: Always disconnect the battery before working on electrical components to prevent shorts.
- Test Before Reassembly: Before fully reassembling the door panel, test the window operation to ensure everything is working correctly.
- Seek Professional Help: If you are unsure about any part of the process, don’t hesitate to seek professional help.
By following these tips, you can increase your chances of a smooth and successful window regulator replacement. Proper preparation and attention to detail are essential for a job well done. CARDIAGTECH.NET is here to support you with top-quality tools and guidance for your auto repair needs.
11. Common Mistakes to Avoid
When performing a 1999 Mercedes Benz E320 right rear window regulator replacement, avoiding common mistakes can save you time, money, and frustration. Here are some pitfalls to watch out for:
- Not Disconnecting the Battery: Failing to disconnect the battery can lead to electrical shorts and potential injury.
- Using the Wrong Tools: Using incorrect tools can damage components and make the job more difficult.
- Forgetting to Label Connectors: Neglecting to label electrical connectors can cause confusion during reassembly.
- Rushing the Process: Rushing can lead to mistakes and potential damage to the vehicle.
- Over-tightening Screws: Over-tightening screws can strip threads and damage components.
- Damaging the Vapor Barrier: Tearing or damaging the vapor barrier can lead to moisture inside the door panel.
- Installing the Wrong Regulator: Installing the wrong regulator can result in improper fit and function.
- Ignoring Warning Signs: Ignoring unusual noises or resistance during window operation can lead to further damage.
- Forgetting to Test: Failing to test the window operation before reassembly can result in having to disassemble the door panel again.
- Neglecting Safety Precautions: Neglecting safety precautions can lead to injury.
By being aware of these common mistakes and taking steps to avoid them, you can ensure a smoother and more successful window regulator replacement. Proper attention to detail and adherence to safety guidelines are essential for a job well done.
12. Importance of Quality Replacement Parts
When it comes to the 1999 Mercedes Benz E320 right rear window regulator replacement, the quality of the replacement part is paramount. Using high-quality parts ensures longevity, reliability, and proper functionality of your vehicle’s window system. Here’s why quality matters:
- Durability: High-quality regulators are made from robust materials that can withstand the wear and tear of daily use.
- Reliability: Quality parts are less likely to fail prematurely, reducing the need for frequent replacements.
- Proper Fit: Genuine or OEM-quality regulators are designed to fit perfectly, ensuring smooth window operation.
- Performance: High-quality regulators provide consistent and reliable performance, ensuring the window moves smoothly up and down.
- Safety: A properly functioning window regulator is essential for safety, allowing you to quickly close the window in case of an emergency.
- Warranty: Reputable manufacturers offer warranties on their products, providing peace of mind and protection against defects.
Choosing a low-quality or generic regulator may save you money initially, but it can lead to problems down the road. These parts are often made from inferior materials, prone to failure, and may not fit correctly. This can result in further damage to your vehicle and additional repair costs.
Investing in a high-quality replacement regulator from a trusted supplier like CARDIAGTECH.NET ensures that you get a durable, reliable, and properly fitting part. This will not only restore the functionality of your window but also provide long-term value and peace of mind. Always prioritize quality when purchasing replacement parts for your vehicle.
13. Maintenance Tips to Prolong Regulator Life
To prolong the life of your new window regulator and ensure smooth operation, consider these maintenance tips. Consistent maintenance can prevent premature failure and save you from future 1999 Mercedes Benz E320 right rear window regulator replacement.
- Regular Cleaning: Keep the window tracks clean by wiping them down with a clean cloth. Remove any dirt, debris, or grime that can cause friction and strain on the regulator.
- Lubrication: Periodically lubricate the window tracks and regulator mechanism with a silicone-based lubricant. This reduces friction and helps the window move smoothly.
- Gentle Operation: Avoid forcing the window up or down if it encounters resistance. Forcing the window can strain the regulator and lead to premature failure.
- Check for Obstructions: Regularly check for any obstructions in the window tracks, such as leaves, ice, or other debris. Remove any obstructions to prevent them from interfering with window operation.
- Avoid Extreme Temperatures: Park your vehicle in the shade or in a garage to protect it from extreme temperatures. Extreme heat or cold can damage the regulator and other window components.
- Regular Inspections: Have your window regulator inspected regularly by a qualified mechanic. They can identify any potential problems early on and recommend appropriate maintenance or repairs.
- Proper Usage: Avoid repeatedly opening and closing the window unnecessarily. Excessive use can wear out the regulator and other window components.
By following these maintenance tips, you can prolong the life of your window regulator and ensure smooth, reliable window operation. Consistent maintenance is key to preventing premature failure and keeping your vehicle in top condition.
14. Addressing Related Issues: Window Motor and Switch Problems
While performing a 1999 Mercedes Benz E320 right rear window regulator replacement, it’s also wise to address related issues such as window motor and switch problems. These components work together, and a problem with one can affect the others. Here’s how to identify and address these issues:
Window Motor Problems:
- Symptoms: The window moves very slowly, makes unusual noises, or doesn’t move at all.
- Testing: Use a multimeter to check if the motor is receiving power when the window switch is activated. If there’s power but the motor isn’t working, the motor may be faulty.
- Solution: Replace the window motor if it’s faulty. Ensure the new motor is compatible with your vehicle.
Window Switch Problems:
- Symptoms: The window only works intermittently, doesn’t work at all, or works in the opposite direction.
- Testing: Use a multimeter to check if the switch is sending power to the motor when activated. If there’s no power, the switch may be faulty.
- Solution: Replace the window switch if it’s faulty. Ensure the new switch is compatible with your vehicle.
Addressing Related Issues:
- Inspect the Window Motor: Check the motor for any signs of damage or wear.
- Test the Window Switch: Use a multimeter to test the switch and ensure it’s functioning correctly.
- Clean Electrical Connections: Clean all electrical connections related to the window motor and switch to ensure good contact.
- Lubricate Moving Parts: Lubricate any moving parts in the window mechanism to reduce friction.
- Replace Faulty Components: Replace any faulty components, such as the window motor or switch, to ensure proper operation.
Addressing these related issues while replacing the window regulator can prevent future problems and ensure your window system functions smoothly. A comprehensive approach to window repair can save time and money in the long run.
15. Why Choose CARDIAGTECH.NET for Your Auto Repair Needs
When you’re tackling a 1999 Mercedes Benz E320 right rear window regulator replacement, choosing the right supplier for your tools and parts is crucial. CARDIAGTECH.NET stands out as a premier provider of high-quality automotive tools and equipment, offering numerous benefits for both professional mechanics and DIY enthusiasts.
1. Wide Selection of Tools and Equipment:
CARDIAGTECH.NET offers an extensive range of tools and equipment specifically designed for automotive diagnostics and repairs. From essential hand tools to advanced diagnostic scanners, you’ll find everything you need for a successful repair.
2. High-Quality Products:
Quality is a top priority at CARDIAGTECH.NET. All products are sourced from reputable manufacturers known for their durability, reliability, and performance. This ensures that you’re investing in tools and equipment that will last for years to come.
3. Expert Technical Support:
CARDIAGTECH.NET provides expert technical support to assist you with any questions or issues you may encounter. Their knowledgeable team can offer guidance on product selection, troubleshooting, and repair procedures.
4. Competitive Prices:
CARDIAGTECH.NET offers competitive prices on all its products, making it an affordable option for both professional mechanics and DIY enthusiasts. They also offer regular discounts and promotions to help you save even more.
5. Convenient Online Shopping:
CARDIAGTECH.NET’s user-friendly website makes it easy to browse and purchase the tools and equipment you need. With detailed product descriptions and customer reviews, you can make informed decisions and shop with confidence.
6. Fast and Reliable Shipping:
CARDIAGTECH.NET offers fast and reliable shipping to ensure that you receive your order quickly and efficiently. They also provide tracking information so you can monitor the progress of your shipment.
7. Customer Satisfaction Guarantee:
CARDIAGTECH.NET is committed to customer satisfaction. If you’re not completely satisfied with your purchase, they offer a hassle-free return policy.
By choosing CARDIAGTECH.NET for your auto repair needs, you can be confident that you’re getting high-quality products, expert support, and exceptional value. Trust CARDIAGTECH.NET to help you tackle your next auto repair project with ease and confidence.
16. Advanced Diagnostic Tools Available at CARDIAGTECH.NET
For those tackling a 1999 Mercedes Benz E320 right rear window regulator replacement, having access to advanced diagnostic tools can be invaluable. CARDIAGTECH.NET offers a range of cutting-edge diagnostic tools that can help you pinpoint issues quickly and accurately. Here are some of the advanced tools available:
1. OBD-II Scanners:
These scanners allow you to read and clear diagnostic trouble codes (DTCs) from your vehicle’s computer. They can help you identify the root cause of many automotive issues, including window regulator problems.
2. Multimeters:
A multimeter is an essential tool for testing electrical circuits. You can use it to check the voltage, current, and resistance of various components, such as the window motor and switch.
3. Oscilloscopes:
Oscilloscopes allow you to visualize electrical signals over time. This can be helpful for diagnosing intermittent problems or identifying issues with the window motor or switch.
4. Scan Tools:
These advanced scan tools offer a wide range of diagnostic capabilities, including reading and clearing DTCs, performing component tests, and accessing live data.
5. Programming Tools:
If you need to reprogram your vehicle’s computer, CARDIAGTECH.NET offers a variety of programming tools to help you get the job done.
Benefits of Using Advanced Diagnostic Tools:
- Accurate Diagnosis: Advanced diagnostic tools can help you pinpoint issues quickly and accurately, saving you time and money.
- Comprehensive Testing: These tools allow you to perform a wide range of tests to ensure that all components are functioning correctly.
- Real-Time Data: Accessing live data can help you identify intermittent problems or monitor the performance of various components.
- Efficient Repairs: By accurately diagnosing issues, you can perform repairs more efficiently and effectively.
Investing in advanced diagnostic tools from CARDIAGTECH.NET can empower you to tackle even the most challenging automotive repairs with confidence. These tools provide the accuracy and comprehensive testing needed for effective solutions.
17. Customer Testimonials and Success Stories
Hearing from other customers can provide valuable insights and confidence when choosing CARDIAGTECH.NET for your auto repair needs. Here are a few testimonials and success stories