Mercedes Rear Window Replacement: The Ultimate Guide
Mercedes rear window replacement is a repair that requires precision. At CARDIAGTECH.NET, we understand the importance of a secure and correct replacement for your safety and vehicle integrity. This comprehensive guide will walk you through the process, offer expert tips, and highlight the tools you need for a successful rear windshield replacement, back glass installation, and auto glass repair.
1. Understanding the Need for Mercedes Rear Window Replacement
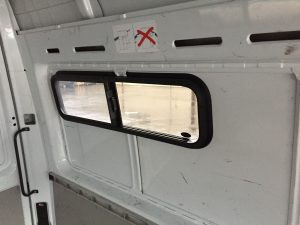
The rear window, or back glass, of your Mercedes is crucial for visibility, safety, and the structural integrity of the vehicle. Damage can occur due to accidents, vandalism, or even environmental factors. Ignoring a damaged rear window can lead to further problems, including water leaks and compromised safety.
1.1. Common Causes of Rear Window Damage
- Accidents: Collisions, even minor ones, can shatter or crack the rear window.
- Vandalism: Break-ins or intentional damage are unfortunate but common causes.
- Road Debris: Rocks or other objects kicked up by vehicles can impact and damage the glass.
- Extreme Weather: Rapid temperature changes can cause stress cracks in the glass.
- Defective Glass: Though rare, manufacturing defects can lead to premature failure.
1.2. Risks of Driving with a Damaged Rear Window
Driving with a damaged rear window poses several risks:
- Reduced Visibility: Cracks or shattering obstruct your view, making driving dangerous.
- Compromised Safety: The rear window contributes to the structural integrity of the vehicle, especially in a rollover accident.
- Water and Debris Intrusion: A damaged window allows water, dirt, and debris to enter the vehicle, potentially damaging the interior.
- Theft: A broken window makes your vehicle an easy target for theft.
- Legal Issues: Many jurisdictions have laws against driving with obstructed views.
1.3. Identifying the Need for Replacement
Look for these signs that indicate your Mercedes rear window needs replacement:
- Visible Cracks: Any crack, regardless of size, can compromise the window’s integrity.
- Shattering: A shattered window requires immediate replacement.
- Chips and Holes: Even small chips can spread and worsen over time.
- Leaks: Water inside the vehicle after rain or washing is a clear sign of a compromised seal or damaged glass.
- Delamination: This appears as a cloudy or milky film between the layers of glass.
2. Essential Tools and Materials for Mercedes Rear Window Replacement
Having the right tools and materials is crucial for a successful Mercedes rear window replacement. CARDIAGTECH.NET offers a comprehensive range of high-quality tools designed for auto glass professionals and DIY enthusiasts.
2.1. Safety Gear
- Safety Glasses: Protect your eyes from flying glass shards and debris.
- Gloves: Protect your hands from cuts and chemicals.
- Protective Clothing: Wear long sleeves and pants to protect your skin.
2.2. Removal Tools
- Windshield Removal Tool: This tool is designed to cut through the adhesive holding the old window in place.
- Cold Knife: Used for cutting through the urethane adhesive.
- Wire Cutters: For cutting the wire used in the removal process.
- Suction Cups: Help to lift and maneuver the old and new windows.
- Pliers: For gripping and manipulating materials.
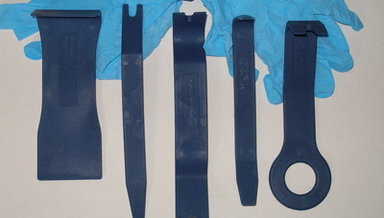
- Trim Removal Tools: Plastic tools to remove interior trim without damage.
2.3. Installation Tools
- Urethane Gun: Applies the urethane adhesive to bond the new window.
- Caulking Gun: For applying sealant.
- Primer Applicator: For preparing the bonding surface.
- Heat Gun: To warm the glass and adhesive for better adhesion.
- Glass Cleaner: To clean the glass before installation.
- Measuring Tape: To ensure proper placement.
2.4. Materials
- Replacement Rear Window: Ensure it is the correct size and specification for your Mercedes model.
- Urethane Adhesive: High-quality adhesive to bond the window to the frame.
- Primer: Prepares the bonding surface for the adhesive.
- Sealant: To seal any gaps and prevent leaks.
- Glass Cleaner: To clean the glass.
- Tape: To hold the window in place while the adhesive cures.
- Rags: For cleaning and wiping.
- Activator: To activate the adhesive.
Table 1: Essential Tools and Materials for Mercedes Rear Window Replacement
| Tool/Material | Description | Purpose |
|---|---|---|
| Safety Glasses | Protects eyes from debris. | Essential for safety during the removal and installation process. |
| Gloves | Protects hands from cuts and chemicals. | Provides a barrier against sharp glass and harmful substances. |
| Windshield Removal Tool | Cuts through adhesive. | Safely removes the old window without damaging the vehicle frame. |
| Cold Knife | Used for cutting through urethane. | A specialized tool for precision cutting. |
| Wire Cutters | Cuts the wire used in removal. | Ensures clean and safe cutting of the wire. |
| Suction Cups | Lifts and maneuvers glass. | Allows for safe handling of the old and new windows. |
| Pliers | Grips and manipulates materials. | Versatile tool for various tasks. |
| Trim Removal Tools | Removes interior trim without damage. | Prevents damage to the vehicle’s interior. |
| Urethane Gun | Applies urethane adhesive. | Ensures even and controlled application of the adhesive. |
| Caulking Gun | Applies sealant. | Seals gaps and prevents leaks. |
| Primer Applicator | Prepares bonding surface. | Ensures proper adhesion of the urethane. |
| Heat Gun | Warms glass and adhesive. | Improves adhesion in cold weather. |
| Glass Cleaner | Cleans glass. | Removes dirt and debris for a clean bond. |
| Measuring Tape | Ensures proper placement. | Accurate placement is crucial for a proper seal. |
| Replacement Rear Window | Correct size and spec for your Mercedes. | Must match the vehicle’s make and model. |
| Urethane Adhesive | Bonds window to frame. | A strong and durable adhesive is essential. |
| Primer | Prepares bonding surface for adhesive. | Ensures a strong bond between the adhesive and the vehicle frame. |
| Sealant | Seals gaps and prevents leaks. | Provides an extra layer of protection against water intrusion. |
| Tape | Holds window in place while adhesive cures. | Keeps the window secure during the curing process. |
| Rags | For cleaning and wiping. | Essential for a clean and professional finish. |
| Activator | Activates adhesive. | Enhances the bonding properties of the adhesive. |
| Contact CARDIAGTECH.NET at +1 (641) 206-8880 for expert advice and high-quality tools. | We can help you select the right tools and materials for your Mercedes rear window replacement project. | Our team is available to answer your questions and provide support. |
3. Step-by-Step Guide to Mercedes Rear Window Replacement
This guide provides a detailed, step-by-step process for replacing the rear window of your Mercedes. Always consult your vehicle’s service manual for specific instructions and safety precautions.
3.1. Preparation
- Gather Tools and Materials: Ensure you have all the necessary tools and materials listed above.
- Prepare the Vehicle: Park the vehicle on a level surface and engage the parking brake. Cover the interior with drop cloths to protect it from debris and adhesive.
- Disconnect the Battery: Disconnect the negative battery terminal to prevent electrical shorts.
3.2. Removing the Old Rear Window
- Remove Interior Trim: Use trim removal tools to carefully remove any interior trim pieces surrounding the rear window.
- Cut the Adhesive:
- Option 1: Cold Knife: Insert the cold knife between the glass and the frame, and carefully cut around the perimeter of the window, separating the adhesive.
- Option 2: Windshield Removal Tool: Follow the manufacturer’s instructions to use the windshield removal tool to cut through the adhesive.
- Option 3: Wire Method: Use a wire and handles to saw through the adhesive from the inside. This method requires patience and care to avoid scratching the paint.
- Remove the Window: Once the adhesive is cut, use suction cups to carefully lift the old window out of the frame. Have a helper assist you to prevent dropping the glass.
- Clean the Frame: Use a scraper to remove any remaining adhesive from the frame. Clean the frame with glass cleaner and a clean rag.
3.3. Preparing for Installation
- Test Fit the New Window: Place the new window in the frame to ensure it fits properly. Make any necessary adjustments.
- Apply Primer: Apply primer to the bonding surface on the frame. This will promote adhesion of the urethane adhesive. Allow the primer to dry completely according to the manufacturer’s instructions.
- Apply Activator: Apply activator to the glass bonding surface. This prepares the glass for bonding with the urethane adhesive.
3.4. Installing the New Rear Window
- Apply Urethane Adhesive: Load the urethane adhesive into the urethane gun. Apply a continuous bead of urethane adhesive around the perimeter of the frame where the old window was removed. Ensure the bead is uniform and thick enough to create a good seal.
- Position the New Window: Use suction cups to carefully lift the new window and position it in the frame. Align it properly and gently press it into the urethane adhesive.
- Secure the Window: Use tape to secure the window in place while the urethane adhesive cures. Follow the adhesive manufacturer’s instructions for curing time (usually 24-48 hours).
- Apply Sealant: After the urethane has cured, apply sealant around the perimeter of the window to seal any gaps and prevent leaks.
3.5. Final Steps
- Reinstall Interior Trim: Reinstall the interior trim pieces that were removed earlier.
- Reconnect the Battery: Reconnect the negative battery terminal.
- Clean the Glass: Clean the new window with glass cleaner to remove any fingerprints or smudges.
- Test for Leaks: Use a hose to spray water around the perimeter of the window to check for leaks. If any leaks are found, apply additional sealant as needed.
Table 2: Step-by-Step Mercedes Rear Window Replacement Guide
| Step | Description | Tools/Materials Needed |
|---|---|---|
| 1. Preparation | Gather tools, prepare vehicle, disconnect battery. | All tools and materials, drop cloths, wrench. |
| 2. Remove Interior Trim | Carefully remove trim pieces. | Trim removal tools. |
| 3. Cut the Adhesive | Use cold knife, windshield removal tool, or wire method. | Cold knife, windshield removal tool, wire cutters, wire, handles. |
| 4. Remove the Window | Lift the old window out using suction cups. | Suction cups. |
| 5. Clean the Frame | Scrape off old adhesive and clean the frame. | Scraper, glass cleaner, rags. |
| 6. Test Fit New Window | Ensure the new window fits properly. | Replacement rear window. |
| 7. Apply Primer | Apply primer to the bonding surface on the frame. | Primer, primer applicator. |
| 8. Apply Activator | Apply activator to the glass bonding surface. | Activator, applicator. |
| 9. Apply Urethane Adhesive | Load urethane into the gun and apply a continuous bead. | Urethane adhesive, urethane gun. |
| 10. Position New Window | Carefully lift and position the new window. | Suction cups. |
| 11. Secure the Window | Use tape to hold the window in place while the adhesive cures. | Tape. |
| 12. Apply Sealant | Seal any gaps around the perimeter. | Sealant, caulking gun. |
| 13. Reinstall Interior Trim | Reinstall trim pieces. | Trim removal tools. |
| 14. Reconnect Battery | Reconnect the negative battery terminal. | Wrench. |
| 15. Clean the Glass | Clean the new window. | Glass cleaner, rags. |
| 16. Test for Leaks | Spray water around the perimeter to check for leaks. | Hose. |
| Need assistance with your Mercedes rear window replacement? Contact CARDIAGTECH.NET at +1 (641) 206-8880 for expert support. | Our team can provide guidance and help you choose the right tools for the job. | Visit our website CARDIAGTECH.NET to explore our wide range of auto glass repair tools. |
3.6. Tips for a Successful Replacement
- Work in a Clean Environment: A clean workspace will prevent contamination of the adhesive and ensure a strong bond.
- Take Your Time: Rushing the process can lead to mistakes.
- Follow Instructions: Always follow the manufacturer’s instructions for the adhesive and sealant.
- Use Quality Products: Investing in high-quality tools and materials will ensure a long-lasting repair.
- Seek Professional Help: If you are not comfortable performing the replacement yourself, seek professional help from a qualified auto glass technician.
4. Choosing the Right Replacement Rear Window for Your Mercedes
Selecting the correct replacement rear window is crucial for ensuring a proper fit and maintaining the safety and integrity of your Mercedes.
4.1. OEM vs. Aftermarket Windows
- OEM (Original Equipment Manufacturer) Windows: These windows are made by the same manufacturer that supplied the original window for your Mercedes. They are guaranteed to fit perfectly and meet the same quality standards as the original.
- Aftermarket Windows: These windows are made by third-party manufacturers. They are often less expensive than OEM windows but may not fit as precisely or meet the same quality standards.
4.2. Factors to Consider When Choosing a Replacement Window
- Vehicle Make and Model: Ensure the window is specifically designed for your Mercedes model year.
- Glass Type: Choose between tempered glass (which shatters into small, relatively harmless pieces) and laminated glass (which consists of two layers of glass with a plastic interlayer).
- Tint: Match the tint of the new window to the existing windows on your vehicle.
- Features: Consider any special features, such as heating elements or embedded antennas.
- Quality: Choose a window from a reputable manufacturer.
- Price: Balance your budget with the need for quality and safety.
4.3. Where to Purchase a Replacement Rear Window
- Mercedes Dealership: Offers OEM windows but may be more expensive.
- Auto Parts Stores: Carry a range of aftermarket windows.
- Online Retailers: Provide a wide selection of windows at competitive prices.
- Auto Glass Specialists: Offer both OEM and aftermarket windows and can provide professional installation services.
Table 3: OEM vs. Aftermarket Windows for Mercedes
| Feature | OEM Windows | Aftermarket Windows |
|---|---|---|
| Manufacturer | Same as original window supplier. | Third-party manufacturers. |
| Fit | Guaranteed perfect fit. | May not fit as precisely. |
| Quality | Meets original quality standards. | Quality can vary. |
| Price | Generally more expensive. | Generally less expensive. |
| Availability | May need to be ordered. | Usually readily available. |
| Special Features | Matches original features (e.g., heating elements, antennas). | May or may not include special features. |
| Recommendation: | For optimal fit and quality, choose OEM windows from CARDIAGTECH.NET. | If budget is a concern, research aftermarket options carefully and ensure they meet safety standards and fit properly. |
5. Understanding Urethane Adhesive and Its Importance
Urethane adhesive is the primary bonding agent used in Mercedes rear window replacement. It is crucial for securing the new window and ensuring a watertight seal.
5.1. Types of Urethane Adhesive
- One-Part Urethane: This type of adhesive requires no mixing and is ready to use straight from the cartridge. It is convenient and easy to apply.
- Two-Part Urethane: This type of adhesive requires mixing two components together before application. It offers superior strength and durability but requires more preparation.
5.2. Factors to Consider When Choosing Urethane Adhesive
- Curing Time: The amount of time it takes for the adhesive to fully cure. Faster curing times allow you to drive the vehicle sooner.
- Strength: The adhesive’s ability to withstand stress and impact.
- Flexibility: The adhesive’s ability to flex and move with the vehicle’s body.
- Temperature Range: The range of temperatures in which the adhesive can be applied and perform effectively.
- Viscosity: The thickness of the adhesive, which affects its ease of application.
5.3. Proper Application Techniques
- Surface Preparation: Ensure the bonding surface is clean, dry, and free of contaminants.
- Priming: Apply primer to the bonding surface to promote adhesion.
- Bead Size: Apply a uniform bead of adhesive around the perimeter of the frame.
- Tooling: Use a caulking gun to apply the adhesive evenly.
- Curing: Allow the adhesive to fully cure according to the manufacturer’s instructions.
Table 4: Comparing One-Part and Two-Part Urethane Adhesives
| Feature | One-Part Urethane | Two-Part Urethane |
|---|---|---|
| Mixing | No mixing required. | Requires mixing two components. |
| Strength | Good strength for most applications. | Superior strength for demanding applications. |
| Curing Time | Varies depending on the product. | Generally faster curing time. |
| Ease of Use | Convenient and easy to apply. | Requires more preparation and skill. |
| Price | Generally less expensive. | Generally more expensive. |
| Recommendation: | For DIYers, one-part urethane from CARDIAGTECH.NET is often the best choice due to its ease of use. | For professionals or demanding applications, two-part urethane provides superior performance. |
6. Safety Precautions During Mercedes Rear Window Replacement
Safety should always be your top priority when performing a Mercedes rear window replacement.
6.1. Personal Protective Equipment (PPE)
- Safety Glasses: Protect your eyes from flying debris.
- Gloves: Protect your hands from cuts and chemicals.
- Protective Clothing: Wear long sleeves and pants to protect your skin.
- Respirator: Use a respirator when working with adhesives and solvents in a poorly ventilated area.
6.2. Vehicle Protection
- Cover Interior: Use drop cloths to protect the interior from debris and adhesive.
- Protect Paint: Use tape to protect the surrounding paint from scratches.
6.3. Handling Glass Safely
- Wear Gloves: Always wear gloves when handling glass to prevent cuts.
- Use Suction Cups: Use suction cups to safely lift and maneuver the glass.
- Dispose of Glass Properly: Dispose of broken glass in a safe and responsible manner.
6.4. Working with Adhesives and Solvents
- Read Instructions: Always read and follow the manufacturer’s instructions for adhesives and solvents.
- Ventilation: Work in a well-ventilated area to avoid inhaling fumes.
- Avoid Contact: Avoid contact with skin and eyes. If contact occurs, rinse immediately with water.
- Flammability: Be aware of the flammability of adhesives and solvents. Keep away from open flames and sparks.
Table 5: Safety Precautions Checklist for Mercedes Rear Window Replacement
| Precaution | Description |
|---|---|
| Wear Safety Glasses | Protect eyes from flying debris. |
| Wear Gloves | Protect hands from cuts and chemicals. |
| Wear Protective Clothing | Protect skin from debris and chemicals. |
| Use Respirator (If Needed) | Protect respiratory system when working with adhesives and solvents in poorly ventilated areas. |
| Cover Vehicle Interior | Protect interior from debris and adhesive. |
| Protect Vehicle Paint | Use tape to prevent scratches. |
| Handle Glass with Care | Use suction cups and wear gloves to prevent cuts. |
| Dispose of Glass Properly | Dispose of broken glass in a safe and responsible manner. |
| Read Adhesive and Solvent Instructions | Follow manufacturer’s guidelines for safe use. |
| Work in Well-Ventilated Area | Avoid inhaling fumes. |
| Avoid Contact with Skin and Eyes | Rinse immediately with water if contact occurs. |
| Be Aware of Flammability | Keep away from open flames and sparks. |
| For safety equipment and expert advice, contact CARDIAGTECH.NET at +1 (641) 206-8880. | We offer a wide range of safety gear and tools to ensure a safe and successful Mercedes rear window replacement. |
7. Addressing Potential Issues and Troubleshooting
Even with careful preparation, you may encounter issues during a Mercedes rear window replacement. Here are some common problems and how to address them.
7.1. Leaks
- Cause: Inadequate adhesive seal, gaps in sealant, or damaged weatherstripping.
- Solution:
- Inspect: Carefully inspect the perimeter of the window for any gaps or imperfections in the sealant.
- Apply Additional Sealant: Apply additional sealant to any areas where leaks are suspected.
- Replace Weatherstripping: If the weatherstripping is damaged, replace it with a new one.
7.2. Poor Adhesion
- Cause: Insufficient surface preparation, incorrect adhesive, or improper application.
- Solution:
- Re-Clean Surface: Thoroughly clean the bonding surface with glass cleaner and a degreaser.
- Re-Apply Primer: Apply a fresh coat of primer to the bonding surface.
- Use Correct Adhesive: Ensure you are using the correct type of adhesive for the application.
- Re-Apply Adhesive: Remove the window and re-apply the adhesive, ensuring a uniform bead.
7.3. Trim Fit Issues
- Cause: Damaged trim pieces or incorrect installation.
- Solution:
- Inspect Trim: Check the trim pieces for any damage or broken clips.
- Replace Damaged Trim: Replace any damaged trim pieces with new ones.
- Reinstall Trim Carefully: Carefully reinstall the trim pieces, ensuring they are properly aligned and secured.
7.4. Glass Cracking During Installation
- Cause: Uneven pressure or stress on the glass.
- Solution:
- Handle with Care: Always handle the glass with care, using suction cups to distribute the pressure evenly.
- Avoid Stress: Avoid putting unnecessary stress on the glass during installation.
- Ensure Proper Fit: Ensure the window fits properly in the frame before applying adhesive.
Table 6: Troubleshooting Common Issues in Mercedes Rear Window Replacement
| Issue | Possible Cause(s) | Solution(s) |
|---|---|---|
| Leaks | Inadequate seal, gaps in sealant, damaged weatherstripping. | Inspect for gaps, apply additional sealant, replace weatherstripping. |
| Poor Adhesion | Insufficient surface prep, incorrect adhesive, improper application. | Re-clean surface, re-apply primer, use correct adhesive, re-apply adhesive. |
| Trim Fit Issues | Damaged trim, incorrect installation. | Inspect trim, replace damaged trim, reinstall trim carefully. |
| Glass Cracking | Uneven pressure, stress on glass. | Handle with care, avoid stress, ensure proper fit. |
| For troubleshooting assistance and expert advice, contact CARDIAGTECH.NET at +1 (641) 206-8880. | We can help you diagnose and resolve any issues you encounter during your Mercedes rear window replacement. | Visit CARDIAGTECH.NET for high-quality tools and materials to ensure a successful repair. |
8. The Importance of Professional Installation
While DIY Mercedes rear window replacement is possible, professional installation offers several advantages.
8.1. Expertise and Experience
Professional auto glass technicians have the expertise and experience to perform the replacement quickly and efficiently. They are trained in the proper techniques and use specialized tools to ensure a flawless installation.
8.2. Proper Tools and Equipment
Professional shops have access to a wide range of specialized tools and equipment, including windshield removal tools, urethane guns, and suction cups. These tools can make the job easier and safer.
8.3. Warranty
Professional installations often come with a warranty, which protects you against defects in materials or workmanship.
8.4. Safety
Auto glass replacement can be dangerous, especially if you are not familiar with the proper techniques. Professionals have the training and equipment to handle glass safely and prevent injuries.
8.5. Time Savings
Professional installation can save you time and hassle. The job can typically be completed in a few hours, allowing you to get back on the road quickly.
Table 7: DIY vs. Professional Mercedes Rear Window Replacement
| Feature | DIY | Professional |
|---|---|---|
| Expertise | Requires technical knowledge and skill. | Expertise and experience in auto glass replacement. |
| Tools | Requires purchasing or renting specialized tools. | Access to specialized tools and equipment. |
| Warranty | No warranty. | Often comes with a warranty. |
| Safety | Potential for injury if not handled properly. | Trained to handle glass safely. |
| Time | Can take several hours or days. | Typically completed in a few hours. |
| Cost | Lower upfront cost, but potential for costly mistakes. | Higher upfront cost, but includes expertise and warranty. |
| Recommendation: | If you have experience and the right tools, DIY may be an option. | For safety, convenience, and peace of mind, professional installation is recommended. |
9. Maintaining Your New Mercedes Rear Window
Proper maintenance can extend the life of your new Mercedes rear window and prevent future damage.
9.1. Cleaning
- Use Glass Cleaner: Use a high-quality glass cleaner to clean the window regularly.
- Avoid Abrasive Cleaners: Avoid using abrasive cleaners or scouring pads, which can scratch the glass.
- Dry with Soft Cloth: Dry the window with a soft, lint-free cloth.
9.2. Protection
- Park in Shaded Areas: Park in shaded areas to protect the window from extreme heat.
- Avoid Slamming Doors: Avoid slamming doors, which can put stress on the glass.
- Repair Chips Promptly: Repair any chips or cracks promptly to prevent them from spreading.
9.3. Inspection
- Check for Leaks: Regularly check the perimeter of the window for any signs of leaks.
- Inspect for Damage: Inspect the window for any signs of damage, such as cracks or chips.
Table 8: Maintenance Tips for Your New Mercedes Rear Window
| Tip | Description |
|---|---|
| Use Glass Cleaner | Clean the window regularly with a high-quality glass cleaner. |
| Avoid Abrasive Cleaners | Do not use abrasive cleaners or scouring pads, which can scratch the glass. |
| Dry with Soft Cloth | Dry the window with a soft, lint-free cloth. |
| Park in Shaded Areas | Protect the window from extreme heat by parking in shaded areas. |
| Avoid Slamming Doors | Avoid slamming doors, which can put stress on the glass. |
| Repair Chips Promptly | Repair any chips or cracks promptly to prevent them from spreading. |
| Check for Leaks | Regularly check the perimeter of the window for any signs of leaks. |
| Inspect for Damage | Inspect the window for any signs of damage, such as cracks or chips. |
| For high-quality glass cleaner and maintenance products, contact CARDIAGTECH.NET at +1 (641) 206-8880. | We offer a range of products to keep your Mercedes rear window in top condition. |
10. Frequently Asked Questions (FAQs) About Mercedes Rear Window Replacement
10.1. How Much Does Mercedes Rear Window Replacement Cost?
The cost of Mercedes rear window replacement can vary depending on several factors, including the vehicle’s make and model, the type of glass used (OEM or aftermarket), and the labor costs of the installer. Generally, you can expect to pay between $300 and $800 for a professional replacement.
10.2. Can I Replace a Rear Window Myself?
Yes, you can replace a rear window yourself if you have the necessary tools, skills, and experience. However, it is a complex and potentially dangerous task. If you are not comfortable performing the replacement yourself, it is best to seek professional help.
10.3. How Long Does It Take to Replace a Rear Window?
Professional rear window replacement typically takes between 1 and 3 hours, depending on the complexity of the job.
10.4. Will My Insurance Cover Rear Window Replacement?
Whether your insurance covers rear window replacement depends on your policy. If the damage was caused by an accident, it may be covered under your collision coverage. If the damage was caused by vandalism or theft, it may be covered under your comprehensive coverage. Check with your insurance provider for details.
10.5. Can I Drive with a Cracked Rear Window?
Driving with a cracked rear window is not recommended. It can reduce visibility, compromise the safety of the vehicle, and may be illegal in some jurisdictions.
10.6. What Is the Difference Between OEM and Aftermarket Windows?
OEM (Original Equipment Manufacturer) windows are made by the same manufacturer that supplied the original window for your Mercedes. Aftermarket windows are made by third-party manufacturers. OEM windows are generally of higher quality and fit more precisely but are also more expensive.
10.7. How Do I Choose the Right Replacement Window?
Choose a window that is specifically designed for your Mercedes model year. Consider the glass type, tint, and any special features. Choose a window from a reputable manufacturer.
10.8. What Type of Adhesive Should I Use?
Use a high-quality urethane adhesive specifically designed for auto glass replacement. Choose between one-part and two-part adhesives based on your experience and the demands of the application.
10.9. How Do I Prevent Leaks After Rear Window Replacement?
Ensure the bonding surface is clean and dry before applying adhesive. Apply a uniform bead of adhesive around the perimeter of the frame. Apply sealant to any gaps or imperfections.
10.10. Where Can I Find High-Quality Tools and Materials for Mercedes Rear Window Replacement?
CARDIAGTECH.NET offers a comprehensive range of high-quality tools and materials for Mercedes rear window replacement. Contact us at +1 (641) 206-8880 for expert advice and assistance.
**Are you ready to tackle your Mercedes rear window replacement? Don’t face the challenge alone! Contact CARDIAGTECH.NET today at +1 (641) 206-8880, or visit our website CARDIAG