Mercedes Sprinter Van Side Windows: The Ultimate Guide
Mercedes Sprinter van side windows are a vital component for van conversions and upgrades. CARDIAGTECH.NET provides comprehensive insights into selecting and installing the right windows for your Sprinter van. Discover the benefits and options available to enhance your vehicle’s functionality and aesthetics, complemented by information on aftermarket services such as mobile auto repair and diagnostic tools, helping you make informed decisions.
1. Understanding Mercedes Sprinter Van Side Windows
Mercedes Sprinter van side windows are more than just glass; they are integral to the comfort, safety, and utility of your vehicle. Whether you’re converting your van into a camper, a mobile workshop, or simply want to improve its functionality, the right side windows can make a significant difference. This guide explores various aspects of Mercedes Sprinter van side windows, including types, installation tips, and maintenance, ensuring you make the best choice for your needs.
1.1. Types of Mercedes Sprinter Van Side Windows
Selecting the right type of side window is crucial for your Mercedes Sprinter van. Different types cater to specific needs and preferences, affecting both the aesthetics and functionality of your vehicle. Here’s a breakdown of the most common types:
| Window Type | Description | Advantages | Disadvantages | Best For |
|---|---|---|---|---|
| Fixed Windows | Non-opening windows that provide a clear view and natural light. | Cost-effective, secure, and offer unobstructed views. | Limited ventilation, cannot be opened for fresh air. | Basic conversions, cargo vans, situations where ventilation is not a priority. |
| Sliding Windows | Windows with a movable panel that slides horizontally to open. | Excellent ventilation, easy to operate, and provide a good balance between security and airflow. | Can be noisier than fixed windows, may require more maintenance. | Camper vans, mobile offices, providing ventilation and a connection to the outdoors. |
| Awning Windows | Windows that hinge at the top and swing outward from the bottom. | Great for ventilation even in light rain, provide privacy, and are easy to operate. | Can obstruct views, may not be suitable for all climates. | Camper vans, allowing ventilation in various weather conditions. |
| Bunk Windows | Small, horizontally oriented windows typically placed near sleeping areas. | Provide light and ventilation in sleeping areas, often with integrated screens. | Limited view, may not provide sufficient ventilation for larger spaces. | Camper vans, specifically for enhancing comfort in sleeping areas. |
| Privacy Windows | Windows with tinted glass that reduces visibility from the outside. | Enhanced privacy, reduced glare, and can help regulate interior temperature. | May reduce visibility from the inside, can darken the interior. | Conversions where privacy is a priority, such as camper vans and mobile offices. |
| Dual-Pane Windows | Windows consisting of two panes of glass with an air gap in between. | Superior insulation, reduced condensation, and noise reduction. | More expensive, heavier than single-pane windows. | Conversions in extreme climates, providing better temperature control and noise insulation. |
| OEM Sliding Windows | Factory-made windows designed specifically for Mercedes Sprinter vans. | Perfect fit, high quality, and designed to match the vehicle’s aesthetics. | Can be more expensive, may require professional installation. | Replacements for existing windows, conversions aiming for a factory-like finish. |
| Aftermarket Windows | Windows produced by third-party manufacturers. | Variety of styles and features, often more affordable than OEM windows. | Quality can vary, may not fit as perfectly as OEM windows. | Conversions on a budget, offering a wide range of options to choose from. |
| Tinted Windows | Windows with a dark tint to reduce sunlight and enhance privacy. | Helps to keep the interior cool, reduces glare, and provides added privacy. | Can reduce visibility at night, may not be legal in all areas depending on the darkness of the tint. | Those wanting more privacy, reduce glare, and keep the interior cooler. |
| Vent Windows | Small windows that can be opened to allow airflow. | Provides better ventilation than fixed windows but less than sliding or awning windows. | Limited opening size, may not be sufficient for significant airflow. | Situations where a small amount of ventilation is needed, like in cargo areas. |
| Frameless Windows | Windows that are installed without a visible frame. | Sleek and modern appearance, provides a cleaner look. | Can be more difficult to install, may be more prone to leaks if not properly sealed. | Those prioritizing aesthetics and want a modern, seamless look. |
| Louvered Windows | Windows with adjustable slats that can be opened or closed to control airflow and light. | Excellent control over ventilation and light, can be adjusted to suit different conditions. | Can be complex to operate, may require more maintenance than other types of windows. | Those wanting precise control over light and ventilation. |
| Tempered Glass Windows | Windows made from tempered glass, which is stronger and safer than regular glass. | Increased safety due to the glass breaking into small, blunt pieces rather than sharp shards, higher resistance to impacts. | Can be more expensive than regular glass. | Those wanting a safer, more durable window option. |
| Acrylic Windows | Windows made from acrylic, a type of plastic. | Lightweight, durable, and shatter-resistant. | Can scratch more easily than glass, may not offer the same level of clarity as glass. | Those wanting a lightweight, durable window option, especially for off-road or rugged use. |
| Panoramic Windows | Large windows that offer an expansive view. | Maximizes natural light and offers unobstructed views of the surroundings. | Can be more expensive, may require additional structural support, and offer less privacy. | Those prioritizing views and natural light, such as in luxury camper vans. |
1.2. Key Considerations When Choosing Side Windows
Selecting the right side windows for your Mercedes Sprinter van involves careful consideration of several factors. These factors will help ensure that the windows meet your specific needs and preferences, enhancing the overall functionality and comfort of your vehicle.
-
Size and Placement:
- Measure the Available Space: Accurately measure the dimensions of the area where you plan to install the windows. Consider the height, width, and any obstructions that may affect the window size.
- Determine Optimal Placement: Think about the interior layout of your van. Place windows to maximize natural light, ventilation, and views from seating or sleeping areas.
-
Material and Durability:
- Glass vs. Acrylic: Glass provides better clarity and scratch resistance, while acrylic is lighter and more impact-resistant. Choose based on your priorities and usage conditions.
- Tempered Glass: Opt for tempered glass for safety, as it breaks into small, blunt pieces rather than sharp shards.
- UV Protection: Ensure the windows have UV protection to reduce heat and prevent fading of interior materials.
-
Insulation and Climate Control:
- Single vs. Dual Pane: Dual-pane windows offer superior insulation, reducing heat transfer and condensation. Consider this for extreme climates.
- Tinting: Tinted windows help reduce glare and heat, improving comfort and energy efficiency. Check local regulations for legal tint levels.
-
Ventilation:
- Fixed vs. Opening Windows: Decide if you need windows that can open for ventilation. Sliding, awning, and louvered windows offer different levels of airflow.
- Screens: If you choose opening windows, consider adding screens to keep insects out.
-
Privacy:
- Tinted Windows: Choose tinted windows to enhance privacy and reduce visibility from the outside.
- Privacy Glass: Opt for privacy glass that obscures the view without significantly reducing light transmission.
-
Installation:
- DIY vs. Professional: Assess your skills and comfort level with installation. Professional installation ensures proper sealing and fit.
- Tools and Materials: Gather all necessary tools and materials, such as adhesive, primer, cutting tools, and edge molding.
-
Aesthetics:
- Framed vs. Frameless: Frameless windows offer a modern, sleek look, while framed windows can provide a more traditional appearance.
- Matching Vehicle Style: Choose windows that complement the overall style and color of your Mercedes Sprinter van.
-
Cost:
- Budget: Set a budget that includes the cost of the windows, installation materials, and labor if you opt for professional installation.
- Long-Term Value: Consider the long-term benefits of higher-quality windows, such as improved insulation and durability.
-
Regulations and Compliance:
- Local Laws: Check local laws regarding window tinting, safety standards, and any other regulations that may apply to your vehicle.
- Safety Standards: Ensure the windows meet or exceed safety standards for automotive use.
By carefully considering these factors, you can select the perfect side windows for your Mercedes Sprinter van, enhancing its functionality, comfort, and aesthetics. Remember to prioritize safety, durability, and compliance with local regulations to ensure a successful and enjoyable conversion or upgrade.
1.3. Benefits of Upgrading to High-Quality Side Windows
Upgrading to high-quality side windows in your Mercedes Sprinter van offers numerous benefits, enhancing comfort, security, and overall value. Investing in quality windows can make a significant difference in your van conversion or modification project.
-
Enhanced Comfort:
- Better Insulation: High-quality windows, especially dual-pane options, provide superior insulation. This helps maintain a comfortable interior temperature, reducing the need for excessive heating or cooling.
- Reduced Noise: Quality windows minimize external noise, creating a quieter and more peaceful environment inside the van. This is particularly beneficial for camper vans and mobile offices.
-
Improved Security:
- Durable Materials: High-quality windows are made from robust materials like tempered glass or impact-resistant acrylic, increasing resistance to breakage and theft.
- Secure Installation: Professional installation ensures a tight seal and secure fit, reducing the risk of forced entry.
-
Increased Natural Light:
- Clear Views: Quality windows offer excellent clarity, allowing more natural light to enter the van. This creates a brighter and more inviting interior.
- UV Protection: High-quality windows often come with UV protection, which reduces glare and prevents fading of interior materials.
-
Better Ventilation:
- Functional Designs: Upgrading to windows that open, such as sliding or awning windows, provides better ventilation. This helps circulate fresh air and reduce condensation.
- Integrated Screens: Quality opening windows often include integrated screens to keep insects out while allowing airflow.
-
Aesthetic Appeal:
- Sleek Designs: High-quality windows are available in various stylish designs, including frameless options, that enhance the overall look of your van.
- Customization: You can choose windows that match your van’s color and style, creating a cohesive and professional appearance.
-
Long-Term Value:
- Durability: Quality windows are built to last, reducing the need for frequent replacements. This saves you money in the long run.
- Increased Resale Value: Upgrading to high-quality windows can increase the resale value of your Mercedes Sprinter van, making it a worthwhile investment.
-
Energy Efficiency:
- Reduced Energy Consumption: Better insulation reduces the need for heating and cooling, saving energy and lowering utility costs if you use the van for mobile living.
- Climate Control: High-quality windows help maintain a stable interior temperature, improving the efficiency of your van’s climate control system.
-
Safety:
- Tempered Glass: Quality windows often use tempered glass, which breaks into small, blunt pieces rather than sharp shards, reducing the risk of injury in case of breakage.
- Emergency Exit: Some window designs include emergency exit features, providing an additional safety measure for occupants.
-
Compliance and Regulations:
- Meets Standards: High-quality windows are designed to meet or exceed safety standards and regulations, ensuring compliance with local laws.
- Professional Installation: Professional installation ensures that the windows are installed correctly and meet all applicable standards.
By upgrading to high-quality side windows, you enhance the comfort, security, and value of your Mercedes Sprinter van. These benefits make the investment worthwhile, providing a better overall experience for both everyday use and specialized conversions.
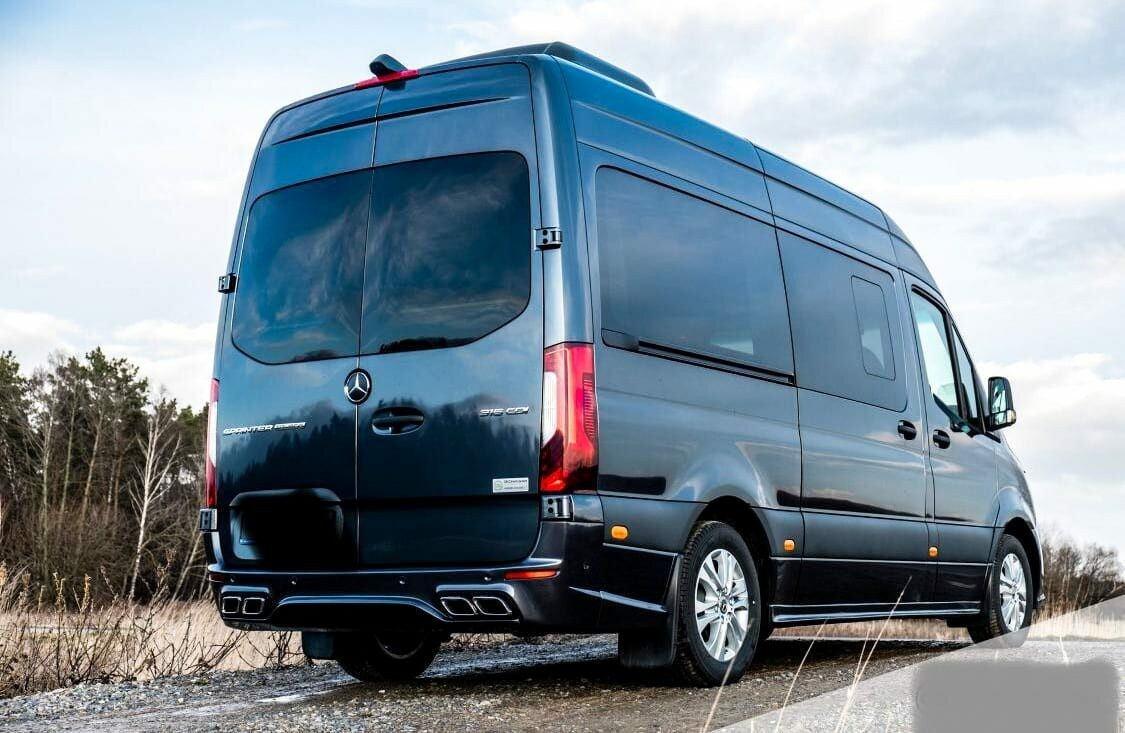
Mercedes Sprinter Conversion with Windows
2. Installation Guide for Mercedes Sprinter Van Side Windows
Installing side windows on your Mercedes Sprinter van can significantly enhance its functionality and aesthetics. Whether you’re adding windows to a cargo van or replacing existing ones, this step-by-step guide will help you through the process. Proper installation ensures a secure, weather-tight fit, so follow these instructions carefully.
2.1. Essential Tools and Materials
Before you begin the installation, gather all the necessary tools and materials. Having everything on hand will make the process smoother and more efficient.
| Tool/Material | Description | Purpose |
|---|---|---|
| Safety Glasses | Protective eyewear to shield your eyes from debris and chemicals. | Ensures eye safety during cutting and adhesive application. |
| Gloves | Chemical-resistant gloves to protect your hands from adhesives and solvents. | Protects skin from irritation and chemical exposure. |
| Measuring Tape | Accurate measuring tape to ensure precise cuts and placement. | Measures the window opening and marks cutting lines. |
| Marker or Grease Pencil | Marks cutting lines and reference points on the van’s exterior. | Clearly marks the area to be cut for window installation. |
| Cutting Tool (e.g., Jigsaw, Nibbler) | A power tool with a metal-cutting blade to cut the van’s sheet metal. | Creates the window opening in the van’s body. |
| Metal File or Grinder | Removes sharp edges and smooths the cut metal. | Ensures a clean and safe edge for window installation and trim application. |
| Rust Primer | Prevents rust on the exposed metal edges. | Protects the cut edges from corrosion, extending the life of the van. |
| Automotive Urethane Adhesive | A strong adhesive specifically designed for bonding automotive glass. | Secures the window to the van’s body, creating a weather-tight seal. |
| Urethane Primer | Prepares the bonding surface for the urethane adhesive. | Enhances adhesion of the urethane to the van’s surface. |
| Caulking Gun | Dispenses the urethane adhesive evenly. | Applies the urethane adhesive around the window opening. |
| Glass Cleaner | Cleans the window and surrounding area. | Removes dirt, grease, and contaminants for better adhesion. |
| Clamps or Painter’s Tape | Holds the window in place while the adhesive cures. | Keeps the window aligned and secure during the curing process. |
| Trim-Lok Edge Molding (Optional) | Covers the raw cut edge for a cleaner appearance. | Provides a finished look and protects the edge from damage. |
| Putty Knife or Scraper | Removes excess adhesive and smooths the sealant. | Cleans up the adhesive application for a professional finish. |
| Rags or Paper Towels | Cleans surfaces and wipes up spills. | Keeps the work area clean and tidy. |
| Heat Gun (Optional) | Warms the urethane for easier application. | Makes the urethane more pliable, especially in colder temperatures. |
| Window Installation Kit (Optional) | A pre-packaged kit containing most of the necessary materials. | Provides convenience and ensures you have all the required items. |
2.2. Step-by-Step Installation Process
Follow these steps to ensure a successful installation of your Mercedes Sprinter van side windows.
-
Preparation:
- Clean the Area: Thoroughly clean the exterior of the van where the window will be installed. Remove any dirt, wax, or debris.
- Mark the Cut Line: Use measuring tape and a marker to outline the window opening. Ensure the dimensions match the window size. Double-check your measurements to avoid mistakes.
-
Cutting the Opening:
- Drill Pilot Holes: Drill pilot holes at each corner of the marked area. These holes will guide your cutting tool.
- Cut Along the Lines: Use a jigsaw or nibbler to carefully cut along the marked lines. Wear safety glasses and gloves during this process.
- Support the Metal: As you cut, support the metal to prevent it from vibrating and creating jagged edges.
-
Finishing the Edges:
- File the Edges: Use a metal file or grinder to smooth the cut edges. Remove any sharp burrs to ensure a clean, safe surface.
- Apply Rust Primer: Apply rust primer to the exposed metal edges to prevent corrosion. Allow the primer to dry completely.
-
Preparing the Window:
- Clean the Window: Clean the window with glass cleaner to remove any dirt or fingerprints.
- Apply Urethane Primer: Apply urethane primer to the perimeter of the window where the adhesive will be applied. Follow the manufacturer’s instructions for drying time.
-
Applying the Adhesive:
- Load the Caulking Gun: Load the automotive urethane adhesive into the caulking gun.
- Apply the Adhesive: Apply a continuous bead of urethane adhesive around the perimeter of the window opening on the van. Ensure the bead is consistent in thickness.
-
Installing the Window:
- Position the Window: Carefully position the window into the opening. Align it with the edges and press firmly to ensure good contact with the adhesive.
- Secure the Window: Use clamps or painter’s tape to hold the window in place while the adhesive cures. Follow the adhesive manufacturer’s instructions for curing time, typically 24-48 hours.
-
Finishing Touches:
- Remove Excess Adhesive: Once the adhesive is fully cured, remove any excess adhesive with a putty knife or scraper.
- Install Edge Molding (Optional): If desired, install Trim-Lok edge molding around the window opening to cover the raw cut edge. This provides a cleaner, more finished look.
- Clean the Area: Clean the window and surrounding area with glass cleaner to remove any remaining residue.
2.3. Tips for a Professional Finish
To achieve a professional-looking installation, consider these tips:
- Take Your Time: Rushing the installation can lead to mistakes. Work carefully and methodically.
- Ensure Proper Sealing: Proper sealing is crucial to prevent leaks. Apply a consistent bead of urethane adhesive and ensure the window is firmly pressed into place.
- Use Quality Materials: Investing in high-quality materials, such as automotive-grade urethane adhesive and rust primer, ensures a long-lasting and durable installation.
- Follow Manufacturer’s Instructions: Always follow the manufacturer’s instructions for all materials and tools.
- Get Help if Needed: If you’re not comfortable with any part of the installation process, seek professional help. A professional installer can ensure a proper fit and seal, preventing costly problems down the road.
2.4. Addressing Common Installation Challenges
Even with careful planning, you may encounter challenges during the installation process. Here are some common issues and how to address them:
- Uneven Cuts: If the cut edges are uneven, use a metal file or grinder to smooth them out. Take your time to achieve a clean, straight edge.
- Adhesive Squeeze-Out: Excess adhesive may squeeze out when the window is installed. Remove it carefully with a putty knife or scraper after the adhesive has cured.
- Window Misalignment: If the window is misaligned, carefully remove it before the adhesive cures and reposition it. Use clamps or tape to hold it in place while the adhesive cures.
- Leaks: If you notice leaks after the installation, apply additional urethane adhesive around the perimeter of the window to seal any gaps.
By following these steps and tips, you can successfully install side windows on your Mercedes Sprinter van, enhancing its functionality and appearance. Remember to prioritize safety, use quality materials, and seek professional help if needed.
3. Maintaining Your Mercedes Sprinter Van Side Windows
Proper maintenance of your Mercedes Sprinter van side windows is essential for ensuring their longevity, clarity, and functionality. Regular care can prevent common issues such as leaks, scratches, and reduced visibility. This section provides comprehensive guidance on how to maintain your side windows, keeping them in top condition for years to come.
3.1. Regular Cleaning Practices
Consistent cleaning is the first line of defense against damage and deterioration. Follow these practices to keep your windows clean and clear.
- Frequency: Clean your side windows at least once a month, or more often if you frequently drive in dusty or dirty conditions.
- Materials: Use a soft microfiber cloth and a non-abrasive glass cleaner. Avoid using harsh chemicals or abrasive materials that can scratch the glass.
- Technique:
- Rinse: Start by rinsing the windows with water to remove loose dirt and debris.
- Apply Cleaner: Spray the glass cleaner evenly over the surface of the window.
- Wipe: Use the microfiber cloth to wipe the window in a circular motion, ensuring you cover the entire surface.
- Dry: Use a clean, dry microfiber cloth to dry the window, preventing streaks and water spots.
- Special Considerations:
- Tinted Windows: Use a glass cleaner specifically formulated for tinted windows to avoid damaging the tint.
- Hard Water Spots: If you have hard water spots, use a solution of equal parts white vinegar and water to remove them. Apply the solution, let it sit for a few minutes, then wipe clean.
- Bug Splatter: Remove bug splatter as soon as possible to prevent it from etching into the glass. Use a bug and tar remover or a solution of baking soda and water.
3.2. Preventing Scratches and Damage
Protecting your side windows from scratches and damage is crucial for maintaining their clarity and appearance.
- Avoid Abrasive Materials: Never use abrasive materials such as steel wool, scouring pads, or harsh brushes to clean your windows.
- Proper Cleaning Tools: Always use soft microfiber cloths to clean your windows. Replace them regularly to ensure they remain free of dirt and debris.
- Park Strategically: When possible, park your van in a covered area or away from trees to avoid scratches from branches and debris.
- Protective Films: Consider applying a protective film to your windows. These films can help prevent scratches and chips from road debris.
- Avoid Pressure Washing: Avoid using a pressure washer to clean your windows, as the high pressure can cause damage.
- Regular Inspections: Regularly inspect your windows for small chips or cracks. Address them promptly to prevent them from spreading.
3.3. Inspecting and Maintaining Seals
The seals around your side windows are critical for preventing leaks and maintaining insulation. Regular inspection and maintenance can help keep them in good condition.
- Regular Inspections: Inspect the window seals at least twice a year, looking for signs of damage such as cracks, gaps, or deterioration.
- Cleaning the Seals: Clean the seals with a mild soap and water solution to remove dirt and debris. Avoid using harsh chemicals that can damage the rubber.
- Lubrication: Apply a silicone-based lubricant to the seals to keep them flexible and prevent them from drying out.
- Repairing Minor Damage:
- Small Cracks: Use a rubber sealant to fill small cracks in the seals.
- Loose Seals: Re-adhere loose seals with a weather-resistant adhesive.
- Replacing Damaged Seals: If the seals are severely damaged or deteriorated, replace them promptly. Contact a professional for assistance if needed.
3.4. Addressing Leaks and Water Damage
Leaks can lead to significant water damage inside your van. Addressing them promptly is essential to prevent further issues.
- Identifying Leaks: Look for signs of water intrusion, such as dampness, stains, or mold growth around the windows.
- Locating the Source: Use a hose to spray water around the window while someone inside the van looks for the source of the leak.
- Repairing Leaks:
- Seal Gaps: Apply a weather-resistant sealant to any gaps or cracks in the window seals.
- Replace Damaged Seals: If the seals are damaged, replace them promptly.
- Check Drainage Holes: Ensure that drainage holes in the window frame are clear and free of debris.
- Preventing Water Damage:
- Dry Wet Areas: If you find water inside your van, dry the area thoroughly to prevent mold growth.
- Improve Ventilation: Increase ventilation to help prevent moisture buildup.
- Use Dehumidifiers: Use dehumidifiers to reduce moisture levels inside the van.
3.5. Seasonal Maintenance Tips
Different seasons bring different challenges for maintaining your side windows. Here are some seasonal maintenance tips:
- Summer:
- UV Protection: Use window coverings or tint to protect the interior from UV damage.
- Ventilation: Maximize ventilation to reduce heat buildup inside the van.
- Winter:
- De-Icing: Use a plastic scraper to remove ice and snow from the windows. Avoid using metal scrapers, which can scratch the glass.
- Prevent Freezing: Apply a de-icing solution to the windows to prevent them from freezing.
- Fall:
- Leaf Removal: Regularly remove leaves and debris from around the windows to prevent moisture buildup.
- Seal Inspection: Inspect the window seals for damage before the onset of cold weather.
- Spring:
- Cleaning: Thoroughly clean the windows to remove dirt and grime accumulated during the winter.
- Seal Lubrication: Lubricate the window seals to keep them flexible and prevent them from drying out.
By following these maintenance tips, you can keep your Mercedes Sprinter van side windows in excellent condition, ensuring their longevity, clarity, and functionality. Regular care not only enhances the appearance of your van but also prevents costly repairs and replacements.
4. Mercedes Sprinter Van Side Window Replacement
Replacing side windows on your Mercedes Sprinter van can be necessary due to damage, wear, or the desire for an upgrade. This section provides a detailed guide on when and how to replace your side windows, ensuring a seamless and effective process.
4.1. Identifying When to Replace Your Side Windows
Recognizing the signs that your side windows need replacement is crucial for maintaining the safety, security, and comfort of your Mercedes Sprinter van. Here are some key indicators:
-
Visible Cracks or Chips:
- Any visible cracks, regardless of size, can compromise the structural integrity of the glass. Small chips can also spread over time due to temperature changes and vibrations.
-
Leaks:
- If you notice water inside your van after rain or washing, it could indicate a failing window seal. Leaks can lead to mold growth, rust, and damage to the interior.
-
Fogging or Condensation Between Panes:
- In dual-pane windows, fogging or condensation between the panes indicates a broken seal. This reduces insulation and visibility.
-
Excessive Scratches or Cloudiness:
- Over time, windows can accumulate scratches and become cloudy, reducing visibility and aesthetic appeal.
-
Damage from Accidents or Break-Ins:
- Any damage from accidents or break-ins necessitates immediate replacement to ensure safety and security.
-
Deteriorated Seals:
- Cracked, dry, or crumbling window seals can lead to leaks and reduced insulation.
-
Difficulty Opening or Closing:
- If your windows are difficult to open or close, the hardware may be damaged or worn, requiring replacement.
-
Upgrading for Better Performance:
- Consider upgrading to dual-pane windows for better insulation, tinted windows for enhanced privacy, or windows with UV protection for increased comfort.
4.2. Choosing the Right Replacement Windows
Selecting the appropriate replacement windows is crucial for ensuring a proper fit, functionality, and aesthetic appeal. Consider the following factors:
-
OEM vs. Aftermarket:
- OEM (Original Equipment Manufacturer): OEM windows are made by the same manufacturer as the original windows and guarantee a perfect fit and finish.
- Aftermarket: Aftermarket windows are produced by third-party manufacturers and can be more affordable. Ensure they meet quality standards and are specifically designed for your Mercedes Sprinter van model and year.
-
Window Type:
- Fixed Windows: Non-opening windows that provide a clear view and natural light.
- Sliding Windows: Windows with a movable panel that slides horizontally to open, offering excellent ventilation.
- Awning Windows: Windows that hinge at the top and swing outward from the bottom, providing ventilation even in light rain.
- Bunk Windows: Small, horizontally oriented windows typically placed near sleeping areas.
- Privacy Windows: Windows with tinted glass that reduces visibility from the outside.
- Dual-Pane Windows: Windows consisting of two panes of glass with an air gap in between, offering superior insulation.
-
Material:
- Glass: Provides better clarity and scratch resistance.
- Acrylic: Lighter and more impact-resistant, suitable for off-road or rugged use.
-
Tinting:
- Choose the appropriate tint level to enhance privacy and reduce glare. Check local regulations for legal tint levels.
-
Size and Fit:
- Ensure the replacement windows match the exact dimensions of the original windows. Measure the opening carefully and compare it to the window specifications.
-
Features:
- Consider additional features such as UV protection, integrated screens, and emergency exit options.
4.3. Step-by-Step Replacement Process
Replacing side windows on your Mercedes Sprinter van requires careful attention to detail. Follow these steps for a successful replacement:
-
Preparation:
- Gather Tools and Materials: Ensure you have all the necessary tools and materials, including safety glasses, gloves, a cutting tool, urethane adhesive, primer, a caulking gun, and replacement windows.
- Protect the Area: Cover the interior of the van with drop cloths or plastic sheeting to protect it from debris and adhesive.
-
Removing the Old Window:
- Cut the Adhesive: Use a specialized window removal tool or a utility knife to carefully cut through the adhesive around the perimeter of the window. Work slowly to avoid damaging the van’s body.
- Remove the Window: Once the adhesive is cut, gently push the window out from the inside. Have someone outside the van to catch it to prevent it from falling.
- Clean the Opening: Use a scraper to remove any remaining adhesive from the window opening. Clean the surface with a solvent to ensure proper adhesion of the new window.
-
Preparing the New Window:
- Clean the Window: Clean the new window with glass cleaner to remove any dirt or fingerprints.
- Apply Primer: Apply urethane primer to the perimeter of the window where the adhesive will be applied. Follow the manufacturer’s instructions for drying time.
-
Installing the New Window:
- Apply Adhesive: Load the automotive urethane adhesive into the caulking gun and apply a continuous bead around the perimeter of the window opening on the van.
- Position the Window: Carefully position the new window into the opening. Align it with the edges and press firmly to ensure good contact with the adhesive.
- Secure the Window: Use clamps or painter’s tape to hold the window in place while the adhesive cures. Follow the adhesive manufacturer’s instructions for curing time, typically 24-48 hours.
-
Finishing Touches:
- Remove Excess Adhesive: Once the adhesive is fully cured, remove any excess adhesive with a putty knife or scraper.
- Inspect the Seal: Check the seal around the window to ensure there are no gaps or leaks. Apply additional sealant if necessary.
- Clean the Area: Clean the window and surrounding area with glass cleaner to remove any remaining residue.
4.4. When to Seek Professional Help
While it is possible to replace side windows on your Mercedes Sprinter van yourself, there are situations where professional help is recommended:
- Lack of Experience: If you have no prior experience with window replacement, it is best to hire a professional to ensure a proper fit and seal.
- Specialized Tools: Window replacement requires specialized tools, such as window removal tools and caulking guns. If you do not have these tools, hiring a professional may be more cost-effective.
- Complex Installations: If the window replacement involves complex modifications or custom installations, a professional can ensure the job is done correctly and safely.
- Warranty Concerns: Professional installers often provide warranties on their work, giving you peace of mind in case of any issues.
5. Optimizing Your Mercedes Sprinter Van with Accessories
Enhancing your Mercedes Sprinter van with the right accessories can significantly improve its functionality, comfort, and aesthetic appeal. From window screens to storage solutions, this section explores essential accessories that can optimize your van for various purposes.
5.1. Essential Accessories for Side Windows
Enhancing your Mercedes Sprinter van side windows with the right accessories can significantly improve comfort, privacy, and functionality. Here are some essential accessories to consider:
-
Window Screens:
- Purpose: Keep insects out while allowing fresh air to circulate.
- Types: Available in various styles, including magnetic, roll-up, and sliding screens.
- Benefits:
- Improved Ventilation: Allows you to keep windows open without worrying about bugs.
- Enhanced Comfort: Creates a more pleasant interior environment.
- Considerations: Ensure the screens fit your specific window type and size.
-
Window Coverings:
- Purpose: Provide privacy, block out light, and offer insulation.
- Types:
- Reflectix: Reflective material that blocks light and heat.