Mercedes Sprinter Window Conversion: The Ultimate Guide
Mercedes Sprinter window conversion is a game-changer for van enthusiasts, offering enhanced comfort, natural light, and ventilation. At CARDIAGTECH.NET, we provide the expertise and tools you need for a seamless window installation, turning your Sprinter into the ultimate adventure van. Let’s explore premium aftermarket windows and van customization essentials.
1. Understanding Mercedes Sprinter Window Conversion
Mercedes Sprinter window conversion is the process of adding or replacing windows in your Mercedes Sprinter van. This can be done for a variety of reasons, including improving ventilation, adding natural light, and enhancing the overall aesthetics and functionality of the van. Whether you’re converting your Sprinter into a camper van, a mobile office, or simply want to upgrade its features, understanding the intricacies of window conversion is essential.
1.1. Why Convert Your Sprinter Van Windows?
- Enhanced Natural Light: Windows bring natural light into your van, making the interior feel more spacious and inviting.
- Improved Ventilation: Operable windows allow for better airflow, reducing condensation and improving air quality.
- Aesthetic Appeal: Upgrading or adding windows can significantly enhance the overall look of your van.
- Increased Functionality: Windows can be strategically placed to improve visibility and create a more comfortable living space.
- Resale Value: A well-executed window conversion can increase the resale value of your Sprinter van.
1.2. Types of Windows for Sprinter Van Conversion
Choosing the right type of window is crucial for a successful Sprinter van conversion. Here are some popular options:
- Awning Windows: Hinged at the top and swing outward, providing ventilation even in light rain.
- Sliding Windows: Feature a sliding panel for adjustable ventilation.
- Fixed Windows: Non-operable windows that provide natural light without ventilation.
- T-Slider Windows: A combination of fixed and sliding sections, offering both light and adjustable airflow.
- Bunk Windows: Smaller windows typically installed in sleeping areas for ventilation and light.
Alt text: Mercedes Sprinter van with multiple windows installed, showcasing a camper conversion setup.
2. Planning Your Mercedes Sprinter Window Conversion
Effective planning is essential for a successful window conversion. Key considerations include:
2.1. Determining Window Placement
Strategically plan the placement of your windows to maximize natural light, ventilation, and privacy. Consider the layout of your van and how you intend to use the space. Common locations include:
- Side Door: Enhances visibility and ventilation.
- Rear Quarter Panels: Adds light and improves the overall aesthetic.
- Front Quarter Panels: Provides additional light and ventilation for the driver and passenger.
2.2. Measuring and Marking Cutouts
Accurate measurements are crucial for a precise and professional installation. Follow these steps:
- Measure the Window Dimensions: Obtain the exact dimensions of the window you plan to install.
- Mark the Cutout Area: Use a template or the window itself to mark the cutout area on the van’s panel. Ensure the area is level and properly aligned.
- Double-Check Measurements: Before cutting, double-check all measurements to avoid costly mistakes.
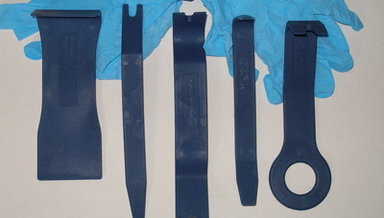
2.3. Essential Tools and Materials
Gather the necessary tools and materials before starting your window conversion project:
- Safety Glasses: Protect your eyes from debris.
- Gloves: Protect your hands.
- Masking Tape: Protect the surrounding paint and provide a clean cutting line.
- Drill: For creating pilot holes.
- Jigsaw or Metal Cutting Saw: For cutting the window opening.
- File or Sandpaper: For smoothing the edges of the cutout.
- Primer and Paint: To protect the exposed metal from rust.
- Window Sealant: To create a waterproof seal.
- Clamp Rings: For securing the window in place.
- Screws: For installing the clamp rings.
2.4. Safety Precautions
Prioritize safety throughout the window conversion process:
- Wear Safety Gear: Always wear safety glasses and gloves.
- Ventilate the Area: Ensure proper ventilation when cutting and applying sealants.
- Use Caution with Power Tools: Follow the manufacturer’s instructions and use power tools with care.
- Protect Your Vehicle: Use masking tape to protect the surrounding paint and bodywork.
- Work in a Safe Environment: Ensure the work area is well-lit and free of obstructions.
3. Step-by-Step Guide to Mercedes Sprinter Window Conversion
Follow these detailed steps to install your new windows:
3.1. Preparing the Van’s Surface
- Clean the Area: Thoroughly clean the area where the window will be installed. Remove any dirt, grease, or debris.
- Apply Masking Tape: Apply masking tape around the marked cutout area to protect the paint.
- Mark the Cutout: Ensure the cutout is clearly marked and aligned correctly.
3.2. Cutting the Window Opening
- Drill Pilot Holes: Drill pilot holes at each corner of the marked cutout area.
- Insert the Saw Blade: Insert the jigsaw or metal cutting saw blade into one of the pilot holes.
- Cut Along the Marked Line: Carefully cut along the marked line, following the perimeter of the cutout.
- Remove the Cut Panel: Once the cutting is complete, remove the panel from the van.
3.3. Smoothing and Protecting the Cut Edges
- File or Sand the Edges: Use a file or sandpaper to smooth the sharp edges of the cutout.
- Apply Primer: Apply a layer of primer to the exposed metal to prevent rust.
- Paint the Edges: Once the primer is dry, apply a layer of paint to match the van’s exterior.
3.4. Installing the Window
- Apply Sealant: Apply a generous bead of window sealant around the perimeter of the cutout.
- Position the Window: Carefully position the window in the cutout, ensuring it is properly aligned.
- Secure the Window: Use clamp rings and screws to secure the window in place. Tighten the screws evenly to create a tight seal.
- Remove Excess Sealant: Remove any excess sealant with a plastic scraper or a clean cloth.
3.5. Final Touches and Inspection
- Inspect the Seal: Ensure the window is properly sealed and there are no gaps.
- Clean the Window: Clean the window with a glass cleaner to remove any smudges or fingerprints.
- Test the Window: If it’s a sliding or awning window, test the mechanism to ensure it operates smoothly.
4. Choosing the Right Windows for Your Sprinter
Selecting the appropriate windows for your Sprinter van conversion involves several factors:
4.1. Window Size and Placement Considerations
- Optimal Dimensions: Select window sizes that complement the van’s body and interior layout.
- Strategic Placement: Position windows to maximize natural light and ventilation while maintaining privacy.
- Symmetry: Consider the aesthetic balance when placing windows on both sides of the van.
4.2. Material and Durability
- Tempered Glass: Opt for tempered glass for safety and durability. It’s designed to shatter into small, harmless pieces upon impact.
- Aluminum Frames: Aluminum frames are lightweight, rust-resistant, and provide excellent structural support.
- Powder Coating: A powder-coated finish adds an extra layer of protection and enhances the window’s appearance.
4.3. Tinting and Privacy Options
- Tinted Windows: Tinted windows reduce glare and heat, enhancing comfort and privacy.
- Privacy Glass: Offers a higher level of privacy, ideal for sleeping areas.
- Window Coverings: Consider adding curtains or shades for additional privacy and light control.
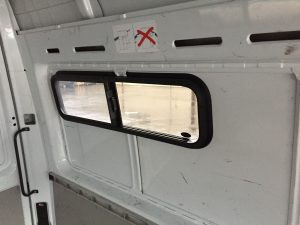
sprinter van windows
Alt text: Interior view of a Sprinter van with a sliding window installed, showing the screen and interior finish.
5. Maintaining Your Sprinter Van Windows
Proper maintenance will keep your Sprinter van windows in excellent condition:
5.1. Regular Cleaning and Inspection
- Clean Regularly: Clean your windows regularly with a mild soap and water solution.
- Inspect Seals: Periodically inspect the window seals for any signs of damage or wear.
- Check Hardware: Ensure all screws and clamp rings are tight and secure.
5.2. Addressing Common Issues
- Leaks: If you notice any leaks, reapply sealant around the window perimeter.
- Cracks: Replace cracked or damaged windows immediately to prevent further issues.
- Sticking Windows: Lubricate sliding window tracks with a silicone-based lubricant for smooth operation.
5.3. Seasonal Maintenance Tips
- Winter: Clear snow and ice from windows to prevent damage.
- Summer: Use window coverings to reduce heat and protect the interior from UV rays.
- All Seasons: Regularly clean windows to remove dirt, grime, and road salt.
6. Enhancing Your Van with Additional Accessories
Complete your Sprinter van conversion with these accessories:
6.1. Window Coverings and Shades
- Curtains: Add privacy and block out light with custom-fit curtains.
- Shades: Roller shades or pleated shades offer adjustable light control and insulation.
- Reflective Covers: Reflective window covers can help keep the van cool in hot weather.
6.2. Ventilation Solutions
- Roof Vents: Install a roof vent to improve airflow and reduce condensation.
- Fans: Add a fan to circulate air and keep the interior comfortable.
- Screens: Ensure all operable windows have screens to keep insects out.
6.3. Interior Finishing Options
- Trim Panels: Install trim panels around the windows for a clean, professional look.
- Insulation: Insulate the walls and ceiling to improve temperature control and reduce noise.
- Upholstery: Add upholstery to the walls and ceiling for a comfortable and inviting interior.
7. Common Mistakes to Avoid During Window Conversion
Avoid these common mistakes to ensure a successful window conversion:
7.1. Incorrect Measurements
- Double-Check: Always double-check your measurements before cutting.
- Use Templates: Use templates to ensure accurate cutouts.
- Account for Frame: Account for the window frame when measuring the cutout area.
7.2. Improper Sealing
- Apply Enough Sealant: Apply a generous bead of sealant around the window perimeter.
- Ensure Full Coverage: Ensure the sealant fully covers the cutout area to prevent leaks.
- Smooth the Sealant: Smooth the sealant for a professional finish and a watertight seal.
7.3. Using the Wrong Tools
- Use Metal Cutting Tools: Use a jigsaw or metal cutting saw designed for cutting metal.
- Sharp Blades: Use sharp blades to ensure clean, precise cuts.
- Avoid Dull Blades: Avoid using dull blades, as they can damage the metal and create jagged edges.
7.4. Neglecting Safety Precautions
- Wear Safety Gear: Always wear safety glasses and gloves.
- Ventilate the Area: Ensure proper ventilation when cutting and applying sealants.
- Follow Instructions: Follow the manufacturer’s instructions for all tools and materials.
8. Mercedes Sprinter Window Options at CARDIAGTECH.NET
At CARDIAGTECH.NET, we understand the needs of Sprinter van owners and offer a wide range of high-quality window options to suit any conversion project. Our selection includes:
8.1. Sprinter-SS Windows
- SKU: Sprinter-SS
- Position: Driver or Passenger
- Interior Frame Dimensions: 35-3/4″ x 9-3/4″
- Exterior Flange Dimensions: 37-1/4″ x 11-1/4″
- Price: $315.00 ea.
Alt text: Side view of a Sprinter van showcasing the compact size and sleek design, ideal for various conversion projects.
8.2. 144″ Wheel Base Windows
- 144-1 (Passenger Side Door T-Slider)
- Position: Passenger
- Interior Frame Dimensions: 42″ x 23-1/2″
- Exterior Flange Dimensions: 43-1/2″ x 25″
- Price: $548.00 ea.
- 144-2 (Driver Front Quarter Panel T-Slider)
- Position: Driver
- Interior Frame Dimensions: 42″ x 23-1/2″
- Exterior Flange Dimensions: 43-1/2″ x 25″
- Price: $548.00 ea.
- 144-3 (Rear Quarter Panel T-Slider)
- Position: Driver or Passenger
- Interior Frame Dimensions: 51-3/16″ x 23-1/2″
- Exterior Flange Dimensions: 52-11/16″ x 25″
- Price: $532.00 ea.
8.3. 170″ Wheel Base Windows
- 170-1 (Passenger Side Door T-Slider)
- Position: Passenger
- Interior Frame Dimensions: 42″ x 23-1/2″
- Exterior Flange Dimensions: 43-1/2″ x 25″
- Price: $548.00 ea.
- 170-2 (Front Quarter Panel T-Slider)
- Position: Driver
- Interior Frame Dimensions: 42″ x 23-1/2″
- Exterior Flange Dimensions: 43-1/2″ x 25″
- Price: $548.00 ea.
- 170-3 (Middle or Rear Quarter Panel T-Slider)
- Position: Driver or Passenger
- Interior Frame Dimensions: 36-7/8″ x 23-3/8″
- Exterior Flange Dimensions: 38-3/8″ x 24-7/8″
- Price: $464.00 ea.
9. Why Choose CARDIAGTECH.NET for Your Window Conversion Needs?
CARDIAGTECH.NET is your trusted partner for Mercedes Sprinter window conversion, offering a wide range of benefits:
9.1. Expert Guidance and Support
Our team of experts provides personalized guidance and support to help you select the perfect windows for your Sprinter van conversion project. We understand the unique challenges and requirements of van conversions and are committed to helping you achieve your vision.
9.2. High-Quality Products
We offer only the highest quality windows, made from durable materials and designed to withstand the rigors of daily use. Our windows are rigorously tested to ensure they meet our strict standards for performance and reliability.
9.3. Competitive Pricing
We offer competitive pricing on all our windows, making it easy to stay within your budget without compromising on quality. Our goal is to provide you with the best value for your money.
9.4. Comprehensive Selection
Whether you’re looking for sliding windows, awning windows, or fixed windows, we have a wide selection to choose from. Our comprehensive selection ensures you’ll find the perfect windows to meet your specific needs.
9.5. Easy Installation
Our windows are designed for easy installation, with detailed instructions and all the necessary hardware included. Even if you’re not an experienced DIYer, you can easily install our windows with confidence.
10. Frequently Asked Questions (FAQs)
10.1. Can I install windows on my Sprinter van myself?
Yes, installing windows on your Sprinter van is a manageable DIY project with the right tools and preparation. Following a step-by-step guide and taking necessary safety precautions is essential.
10.2. What type of windows is best for a camper van conversion?
Sliding windows and awning windows are popular choices for camper van conversions due to their ventilation capabilities. Fixed windows are great for adding natural light without ventilation.
10.3. How do I prevent leaks after installing windows?
Proper sealing is crucial. Use high-quality window sealant, apply it generously around the perimeter of the cutout, and ensure full coverage. Smoothing the sealant will also help create a watertight seal.
10.4. What tools do I need for window installation?
Essential tools include safety glasses, gloves, masking tape, a drill, a jigsaw or metal cutting saw, a file or sandpaper, primer and paint, window sealant, clamp rings, and screws.
10.5. How do I maintain my Sprinter van windows?
Regular cleaning with mild soap and water, inspecting seals for damage, and ensuring hardware is tight are key maintenance steps. Lubricate sliding window tracks as needed.
10.6. Can I tint the windows after installation?
Yes, you can tint the windows after installation. Consider professional tinting services for the best results and to ensure compliance with local regulations.
10.7. What should I do if I find a crack in my Sprinter van window?
Replace cracked or damaged windows immediately to prevent further issues. Contact CARDIAGTECH.NET for replacement options and expert advice.
10.8. How do window coverings enhance my van conversion?
Window coverings add privacy, block out light, and help regulate the temperature inside the van. Options include curtains, shades, and reflective covers.
10.9. Are there specific window types recommended for different climates?
In colder climates, consider windows with good insulation properties. In hotter climates, opt for tinted windows and reflective covers to reduce heat.
10.10. Where can I find expert advice on Sprinter van window conversion?
CARDIAGTECH.NET provides expert guidance and support for all your Sprinter van window conversion needs. Contact us for personalized advice and assistance.
Ready to start your Mercedes Sprinter window conversion? Contact CARDIAGTECH.NET today for expert advice and premium window solutions. Enhance your van’s comfort, functionality, and style with our high-quality windows and accessories.
Contact Information:
- Address: 276 Reock St, City of Orange, NJ 07050, United States
- WhatsApp: +1 (641) 206-8880
- Website: CARDIAGTECH.NET
Don’t wait, transform your Sprinter van into the ultimate adventure vehicle now with CARDIAGTECH.NET! Call us or message us on Whatsapp today +1 (641) 206-8880