Mercedes W123 Window Seals: Your Ultimate Guide
Mercedes W123 Window Seals are essential for maintaining the integrity and comfort of your classic vehicle. At CARDIAGTECH.NET, we understand the importance of high-quality window seals in preserving your car’s value and ensuring a comfortable driving experience. Discover top-notch replacement options and expert advice to keep your W123 in pristine condition, plus explore the best tools for the job!
1. Understanding the Importance of Mercedes W123 Window Seals
Mercedes W123 Window Seals are more than just aesthetic components; they play a crucial role in protecting your vehicle’s interior and ensuring a comfortable ride. These seals, typically made from high-quality rubber, create a barrier against the elements, reducing wind noise, preventing water leaks, and maintaining optimal cabin temperature. Over time, however, these seals can degrade due to exposure to UV rays, temperature fluctuations, and general wear and tear. When window seals fail, it can lead to several problems, including water damage, rust formation, increased wind noise, and reduced energy efficiency.
1.1. What are Mercedes W123 Window Seals?
Mercedes W123 window seals are rubber components designed to fit snugly around the edges of your car’s windows. They create a tight barrier between the window glass and the vehicle’s frame, preventing water, wind, and debris from entering the cabin. These seals are essential for maintaining a comfortable and dry interior, reducing noise levels, and preventing rust and corrosion.
1.2. Key Functions of Window Seals
Window seals perform several critical functions:
- Weather Protection: They keep rain, snow, and other elements out of the vehicle.
- Noise Reduction: They minimize wind noise, creating a quieter cabin.
- Temperature Regulation: They help maintain a consistent interior temperature by preventing drafts.
- Prevention of Rust and Corrosion: By keeping water out, they protect the vehicle’s metal components from rust.
- Structural Integrity: They provide additional support to the window glass, preventing vibrations and potential damage.
1.3. Common Issues with Aging Window Seals
As Mercedes W123 window seals age, they can develop several issues:
- Cracking and Dry Rot: Exposure to UV rays and temperature changes can cause the rubber to crack and deteriorate.
- Shrinking and Warping: Over time, the seals may shrink and lose their original shape, creating gaps.
- Loss of Elasticity: The rubber can harden, losing its ability to create a tight seal.
- Mold and Mildew Growth: Moisture trapped in the seals can lead to mold and mildew, causing unpleasant odors and health issues.
Addressing these issues promptly is crucial to maintaining your Mercedes W123 in top condition. Regular inspection and timely replacement of worn-out seals can prevent more significant problems down the road.
2. Identifying the Need for Replacement
Recognizing the signs of failing Mercedes W123 window seals is crucial for timely replacement and preventing further damage to your vehicle. Regular inspection can help you identify issues early and take corrective action.
2.1. Signs of Deterioration
Several signs indicate that your Mercedes W123 window seals may need replacement:
- Visible Cracks and Tears: Inspect the seals for any visible cracks, tears, or breaks in the rubber.
- Hardening or Brittleness: If the rubber feels hard and brittle instead of soft and pliable, it’s likely deteriorated.
- Shrinkage or Warping: Look for gaps between the seal and the window or frame, indicating shrinkage or warping.
- Mold or Mildew Growth: Check for any signs of mold or mildew on the seals, which can cause odors and health issues.
- Water Leaks: Water stains on the interior of your car, especially after rain, indicate a compromised seal.
2.2. Common Leak Locations
Water leaks can occur in several common areas:
- Windshield and Rear Window: Check the top and bottom edges for leaks.
- Door Windows: Inspect the seals along the top and sides of the door windows.
- Sunroof: If your W123 has a sunroof, check the surrounding seals for any signs of leakage.
- Trunk Seal: Although not a window seal, a damaged trunk seal can also let water into the vehicle.
2.3. Impact of Damaged Seals
Driving with damaged window seals can have several negative impacts:
- Water Damage: Leaks can cause water to accumulate inside the car, leading to rust, corrosion, and damage to upholstery and electronics.
- Increased Wind Noise: Gaps in the seals can significantly increase wind noise, making for an uncomfortable driving experience.
- Reduced Energy Efficiency: Drafts can make it harder to heat or cool the car, reducing fuel efficiency.
- Mold and Mildew Growth: Moisture can create a breeding ground for mold and mildew, posing health risks.
Addressing these issues promptly by replacing damaged window seals can protect your vehicle and ensure a more comfortable driving experience. Contact CARDIAGTECH.NET at +1 (641) 206-8880 for expert advice and high-quality replacement seals.
3. Selecting the Right Replacement Seals
Choosing the correct replacement Mercedes W123 window seals is essential for ensuring a proper fit and long-lasting performance. With various options available, understanding the different types and factors to consider can help you make the best choice.
3.1. Types of Window Seals
There are several types of window seals available for the Mercedes W123, each designed for specific locations and purposes:
- Windshield Seals: These seals are designed to fit around the windshield, providing a watertight barrier.
- Rear Window Seals: Similar to windshield seals, these fit around the rear window, protecting the back of the vehicle.
- Door Window Seals: These seals fit along the top and sides of the door windows, preventing water and wind from entering the cabin.
- Sunroof Seals: For W123 models with a sunroof, these seals prevent leaks around the sunroof opening.
3.2. Material Quality and Durability
The material quality of the window seals significantly impacts their durability and performance. Look for seals made from high-quality rubber compounds that are resistant to UV rays, temperature changes, and general wear and tear. EPDM (ethylene propylene diene monomer) rubber is a popular choice due to its excellent weather resistance and longevity.
3.3. Ensuring Proper Fit
Proper fit is crucial for effective sealing. When selecting replacement seals, ensure they are specifically designed for your Mercedes W123 model and year. Check the product description for compatibility information, and consider reading customer reviews to gauge the fit accuracy. Purchasing from reputable suppliers like CARDIAGTECH.NET ensures you receive high-quality seals that fit correctly.
3.4. OEM vs. Aftermarket Options
You have the option of choosing between OEM (Original Equipment Manufacturer) and aftermarket window seals. OEM seals are made by the same manufacturer that supplied the original parts for your vehicle, ensuring a perfect fit and quality. Aftermarket seals can be more affordable but may vary in quality and fit. When choosing aftermarket seals, research the brand and read reviews to ensure you are getting a reliable product.
| Feature | OEM Seals | Aftermarket Seals |
|---|---|---|
| Quality | High, guaranteed by the manufacturer | Varies; can be high or low depending on brand |
| Fit | Perfect, designed for the specific model | May require adjustments |
| Price | Generally more expensive | Generally more affordable |
| Brand Reputation | Trusted, original manufacturer | Varies by brand |
Selecting the right replacement Mercedes W123 window seals requires careful consideration of the type, material quality, fit, and brand. By doing your research and choosing reputable suppliers, you can ensure a successful replacement and maintain the integrity of your vehicle. Contact CARDIAGTECH.NET at 276 Reock St, City of Orange, NJ 07050, United States, for expert advice and high-quality replacement seals.
4. Essential Tools for Window Seal Replacement
Replacing Mercedes W123 window seals requires specific tools to ensure a clean and damage-free installation. Having the right tools on hand can make the process smoother and more efficient.
4.1. Basic Hand Tools
- Screwdrivers: A set of screwdrivers (both flathead and Phillips) is essential for removing any screws or fasteners holding the old seals in place.
- Pliers: Pliers are useful for gripping and manipulating the seals, as well as removing any stubborn clips or fasteners.
- Socket Set: A socket set can be used to remove any bolts that may be securing the window frame or trim.
- Utility Knife: A sharp utility knife is helpful for cutting away old, hardened seals.
4.2. Specialized Tools
- Window Seal Removal Tool: This tool is designed to safely remove old window seals without damaging the glass or surrounding body panels.
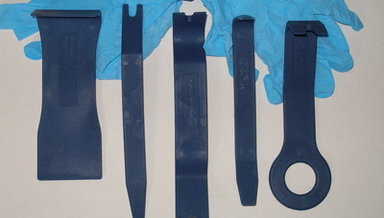
- Trim Removal Tool: Trim removal tools are essential for removing interior and exterior trim pieces without causing scratches or breakage. The All Models Trim and Moulding Tool Set from CARDIAGTECH.NET prevents damage to paint and parts and is made out of plastic so it will not mar or scratch paint, glass, chrome trim, etc.
- Glass Suction Cups: These suction cups can be used to securely grip and lift the window glass, making it easier to install new seals.
- Seam Scraper: A seam scraper is useful for cleaning any residual adhesive or sealant from the window frame before installing the new seals.
4.3. Safety Equipment
- Gloves: Wearing gloves protects your hands from sharp edges, chemicals, and dirt.
- Safety Glasses: Safety glasses are essential for protecting your eyes from debris and chemicals.
4.4. Recommended Tools from CARDIAGTECH.NET
CARDIAGTECH.NET offers a range of high-quality tools specifically designed for automotive repair and maintenance. Some recommended tools for Mercedes W123 window seal replacement include:
- Trim and Moulding Tool Set: Prevents damage to paint and parts. This 5 piece set is made out of plastic so it will not mar or scratch paint, glass, chrome trim, etc.
- Window Seal Installation Kit: Includes a variety of tools for removing and installing window seals.
- Professional-Grade Pliers and Screwdrivers: Durable and reliable tools for various tasks.
| Tool | Description | Benefits |
|---|---|---|
| Trim and Moulding Tool Set | A set of plastic tools designed to remove trim pieces without causing damage. | Prevents scratches and damage to paint, glass, and chrome trim. |
| Window Seal Removal Tool | A specialized tool for safely removing old window seals. | Minimizes the risk of damaging the glass or body panels. |
| Glass Suction Cups | Used to securely grip and lift window glass. | Makes it easier to install new seals and prevents accidental drops. |
| Professional-Grade Pliers | Durable and reliable pliers for various tasks. | Provides a secure grip and long-lasting performance. |
Having the right tools can significantly simplify the Mercedes W123 window seal replacement process. Investing in quality tools from CARDIAGTECH.NET ensures you have the equipment needed to do the job right. For more information on tool selection and availability, contact CARDIAGTECH.NET at +1 (641) 206-8880.
Trim and Moulding Tool Set
5. Step-by-Step Replacement Guide
Replacing Mercedes W123 window seals can be a straightforward process if you follow the right steps. This guide provides a detailed, step-by-step approach to help you successfully replace your window seals.
5.1. Preparation
- Gather Your Tools and Materials: Ensure you have all the necessary tools and materials, including new window seals, trim removal tools, a window seal removal tool, glass suction cups, a utility knife, seam scraper, gloves, and safety glasses.
- Prepare the Vehicle: Park your Mercedes W123 in a well-lit, clean, and dry area. Cover the surrounding body panels with painter’s tape or protective sheeting to prevent scratches.
- Review Instructions: Familiarize yourself with the installation instructions provided with your new window seals.
5.2. Removing the Old Seals
- Remove Interior Trim: Use a trim removal tool to carefully remove any interior trim pieces that are attached to the window frame. Take your time and be gentle to avoid breaking any clips or fasteners.
- Detach Exterior Trim: Similarly, remove any exterior trim pieces using the trim removal tool. Pay close attention to how the trim is attached, as you’ll need to reinstall it later.
- Cut the Old Seal: Use a utility knife to carefully cut away the old window seal. Start by making small, shallow cuts to avoid damaging the glass or body panels.
- Remove the Old Seal: Use the window seal removal tool to gently pry the old seal away from the window frame. Work slowly and carefully to avoid damaging the surrounding area.
- Clean the Frame: Use a seam scraper to remove any residual adhesive or sealant from the window frame. Ensure the surface is clean and smooth for the new seal to adhere properly.
5.3. Installing the New Seals
- Prepare the New Seal: Clean the new window seal with a mild detergent and water to remove any dirt or debris. Allow it to dry completely before installation.
- Apply Adhesive (If Necessary): Some window seals require adhesive to hold them in place. If this is the case, apply a thin, even layer of adhesive to the window frame where the seal will be installed. Follow the manufacturer’s instructions for the recommended adhesive.
- Position the New Seal: Carefully position the new window seal onto the window frame, ensuring it is properly aligned.
- Press the Seal into Place: Gently press the seal into place, working your way around the entire perimeter. Use your fingers or a plastic installation tool to ensure the seal is fully seated and flush with the frame.
- Reinstall Trim: Reinstall the interior and exterior trim pieces, ensuring they are securely attached.
5.4. Final Checks and Adjustments
- Inspect the Seal: Carefully inspect the new window seal to ensure it is properly installed and there are no gaps or leaks.
- Test for Leaks: Use a garden hose to spray water around the window, checking for any leaks inside the vehicle. If you find any leaks, carefully adjust the seal as needed.
- Clean Up: Remove any protective sheeting or painter’s tape from the vehicle. Clean the windows and surrounding area with a glass cleaner.
5.5. Visual Aids
Refer to these instructions for replacing the Mercedes W123 Window Seals
- Care MUST be used when removing the bottom lower anodized aluminum trim. If not you can bend the trim and scratch the body paint. These digital 3 page PDF instructions are illustrated with 9 pictures and will show you how to remove and replace the seals without damaging your body and trim.
Following these steps carefully will help you successfully replace your Mercedes W123 window seals and maintain the integrity of your vehicle. If you encounter any difficulties or have questions, contact CARDIAGTECH.NET at 276 Reock St, City of Orange, NJ 07050, United States, or call +1 (641) 206-8880 for expert assistance.
6. Tips for a Successful Installation
Replacing Mercedes W123 window seals can be a rewarding DIY project. Here are some essential tips to ensure a successful installation and prolong the life of your new seals.
6.1. Working in Optimal Conditions
- Temperature: Install window seals in a temperature range of 65-75°F (18-24°C). Extreme temperatures can affect the flexibility and adhesion of the seals.
- Dry Environment: Ensure the working area is dry and free from moisture. Moisture can prevent proper adhesion and lead to premature seal failure.
- Clean Surface: Thoroughly clean the window frame and the seal itself to remove any dirt, grease, or debris that could interfere with adhesion.
6.2. Using the Right Techniques
- Gentle Removal: When removing the old seals, use gentle, controlled movements to avoid damaging the glass or surrounding body panels.
- Proper Alignment: Ensure the new seal is properly aligned before pressing it into place. Misalignment can lead to leaks and premature wear.
- Even Pressure: Apply even pressure when pressing the seal into place to ensure a uniform seal. Avoid using excessive force, which could damage the seal.
6.3. Choosing the Right Adhesive
- Compatibility: Use an adhesive that is specifically designed for automotive window seals. Check the manufacturer’s recommendations to ensure compatibility with the seal material.
- Application: Apply the adhesive in a thin, even layer to avoid gaps or clumps that could compromise the seal.
- Curing Time: Allow the adhesive to cure completely before exposing the seal to moisture or extreme temperatures. Check the manufacturer’s instructions for the recommended curing time.
6.4. Maintaining New Seals
- Regular Cleaning: Clean the window seals regularly with a mild detergent and water to remove dirt, grime, and debris.
- UV Protection: Apply a UV protectant to the seals to prevent cracking and fading from sun exposure.
- Inspection: Inspect the seals regularly for any signs of damage or wear, such as cracks, tears, or gaps. Address any issues promptly to prevent further damage.
6.5. Addressing Common Challenges
- Sticking Seals: If the seals are sticking to the glass, apply a thin layer of silicone lubricant to reduce friction.
- Gaps or Leaks: If you notice any gaps or leaks after installation, carefully adjust the seal as needed. You may need to reapply adhesive in certain areas.
- Trim Fitment: Ensure the trim pieces fit properly after installing the new seals. You may need to adjust the trim clips or fasteners to achieve a snug fit.
By following these tips, you can ensure a successful Mercedes W123 window seal replacement and enjoy a comfortable, leak-free ride. Remember, CARDIAGTECH.NET is here to support you with high-quality tools and expert advice. Contact us at +1 (641) 206-8880 for any questions or assistance.
7. Maintaining and Prolonging Seal Life
Proper maintenance is essential for prolonging the life of your Mercedes W123 window seals. Regular care and attention can prevent premature wear and ensure your seals continue to perform optimally for years to come.
7.1. Regular Cleaning Practices
- Frequency: Clean your window seals at least once a month, or more frequently in harsh weather conditions.
- Cleaning Solution: Use a mild detergent and water solution. Avoid harsh chemicals or abrasive cleaners that can damage the rubber.
- Application: Apply the cleaning solution with a soft cloth or sponge. Gently scrub the seals to remove dirt, grime, and debris.
- Rinsing: Rinse the seals thoroughly with clean water to remove any residual soap.
- Drying: Dry the seals with a clean, dry cloth to prevent water spots and mildew growth.
7.2. Protecting Against UV Damage
- UV Protectant: Apply a UV protectant specifically designed for rubber and vinyl surfaces. This will help prevent cracking, fading, and hardening caused by sun exposure.
- Application: Follow the manufacturer’s instructions for applying the UV protectant. Typically, you will spray or wipe the protectant onto the seals and allow it to dry.
- Frequency: Reapply the UV protectant every 2-3 months, or more frequently in hot, sunny climates.
7.3. Preventing Physical Damage
- Avoid Sharp Objects: Be careful not to scratch or puncture the seals with sharp objects, such as keys, screwdrivers, or knives.
- Gentle Handling: When cleaning or inspecting the seals, use gentle movements to avoid tearing or stretching the rubber.
- Proper Storage: If you remove the seals for any reason, store them in a cool, dry place away from direct sunlight and extreme temperatures.
7.4. Addressing Minor Issues Promptly
- Small Cracks: If you notice any small cracks or tears in the seals, repair them promptly with a rubber sealant or adhesive.
- Loose Seals: If the seals are coming loose, reapply adhesive to secure them in place.
- Leaks: If you notice any leaks, inspect the seals for damage and address any issues promptly to prevent water damage.
7.5. Seasonal Maintenance
- Winter: In cold climates, apply a silicone lubricant to the seals to prevent them from freezing and sticking to the glass.
- Summer: In hot climates, park your car in the shade whenever possible to reduce sun exposure and heat buildup.
By following these maintenance tips, you can prolong the life of your Mercedes W123 window seals and ensure they continue to provide reliable protection for years to come. CARDIAGTECH.NET is committed to providing you with the highest quality products and expert advice for maintaining your vehicle. Contact us at 276 Reock St, City of Orange, NJ 07050, United States, or call +1 (641) 206-8880 for any questions or assistance.
8. Cost Considerations for Replacement
Replacing Mercedes W123 window seals involves various cost factors, including the price of the seals themselves, tools required, and labor expenses if you choose professional installation. Understanding these costs can help you budget effectively and make informed decisions.
8.1. Cost of Replacement Seals
- OEM vs. Aftermarket: OEM (Original Equipment Manufacturer) seals are generally more expensive than aftermarket seals. OEM seals can range from $50 to $150 per seal, while aftermarket seals may range from $20 to $80 per seal.
- Type of Seal: The cost can vary depending on the type of seal, such as windshield seals, door window seals, or sunroof seals. Larger seals or those with more complex designs may be more expensive.
- Material Quality: Seals made from high-quality materials, such as EPDM rubber, tend to be more expensive but offer better durability and longevity.
8.2. Tool Expenses
- Basic Tools: If you already have basic hand tools like screwdrivers, pliers, and a socket set, you may not need to purchase them.
- Specialized Tools: Specialized tools like trim removal tools, window seal removal tools, and glass suction cups can range from $10 to $50 each. A complete set of specialized tools may cost between $50 and $200.
- Tool Kits: Consider purchasing a tool kit that includes all the necessary tools for window seal replacement. These kits can range from $50 to $300, depending on the quality and number of tools included.
8.3. Professional Installation Costs
- Labor Rates: Labor rates for automotive repairs vary depending on your location and the mechanic’s experience. On average, labor rates range from $80 to $150 per hour.
- Installation Time: The time required to replace window seals can vary depending on the complexity of the job and the number of seals being replaced. A typical window seal replacement may take 2 to 4 hours.
- Total Cost: The total cost for professional installation can range from $200 to $600, depending on the labor rates and installation time.
8.4. DIY vs. Professional Installation
- DIY: Choosing to replace the window seals yourself can save you money on labor costs. However, it requires having the necessary tools, skills, and time.
- Professional Installation: Professional installation ensures the job is done correctly and can provide peace of mind. However, it can be more expensive due to labor costs.
8.5. Cost-Saving Tips
- Shop Around: Compare prices from different suppliers to find the best deals on replacement seals and tools.
- Buy in Bulk: If you need to replace multiple seals, consider buying them in bulk to save money.
- Use Coupons and Discounts: Look for coupons and discounts from automotive supply stores and online retailers.
- Rent Tools: If you only need specialized tools for a one-time job, consider renting them instead of buying them.
| Item | Estimated Cost Range | Notes |
|---|---|---|
| Replacement Seals (each) | $20 – $150 | Varies depending on OEM vs. Aftermarket and type of seal |
| Specialized Tools (each) | $10 – $50 | Includes trim removal tools, window seal removal tools, glass suction cups, etc. |
| Tool Kit | $50 – $300 | Includes a set of necessary tools for window seal replacement |
| Professional Installation | $200 – $600 | Includes labor costs, which can vary depending on location and complexity of the job |
By considering these cost factors and following these tips, you can effectively budget for your Mercedes W123 window seal replacement project. For high-quality replacement seals and tools, visit CARDIAGTECH.NET or contact us at +1 (641) 206-8880 for expert advice and assistance.
9. Where to Buy Mercedes W123 Window Seals
Finding the right place to purchase Mercedes W123 window seals is crucial for ensuring quality and reliability. Here are some recommended options for buying your replacement seals:
9.1. Online Retailers
- CARDIAGTECH.NET: CARDIAGTECH.NET offers a wide selection of high-quality Mercedes W123 window seals and tools. With a reputation for excellent customer service and reliable products, CARDIAGTECH.NET is a trusted source for automotive parts.
- Amazon: Amazon is a popular online retailer that offers a variety of Mercedes W123 window seals from different brands. Be sure to read customer reviews and check the seller’s reputation before making a purchase.
- eBay: eBay can be a good source for finding deals on Mercedes W123 window seals, especially for vintage or hard-to-find parts. However, it’s important to carefully review the seller’s feedback and product description before buying.
9.2. Local Auto Parts Stores
- NAPA Auto Parts: NAPA Auto Parts is a well-known auto parts store that offers a range of Mercedes W123 window seals. NAPA is known for its knowledgeable staff and quality products.
- AutoZone: AutoZone is another popular auto parts store that carries a variety of Mercedes W123 window seals. AutoZone offers competitive prices and a wide selection of parts.
- Advance Auto Parts: Advance Auto Parts is a reliable auto parts store that offers a range of Mercedes W123 window seals. Advance Auto Parts provides helpful customer service and a rewards program for frequent shoppers.
9.3. Specialty Mercedes-Benz Parts Suppliers
- Pelican Parts: Pelican Parts specializes in Mercedes-Benz parts and offers a wide selection of Mercedes W123 window seals. Pelican Parts is known for its detailed product descriptions and helpful technical articles.
- Mercedes-Benz Classic Center: The Mercedes-Benz Classic Center is the official source for OEM Mercedes-Benz parts. While the prices may be higher, you can be assured of the quality and fit of the parts.
9.4. Factors to Consider When Buying
- Quality: Look for seals made from high-quality materials like EPDM rubber for durability and longevity.
- Fit: Ensure the seals are specifically designed for your Mercedes W123 model and year to guarantee a proper fit.
- Price: Compare prices from different suppliers to find the best deals, but don’t sacrifice quality for price.
- Warranty: Check if the seals come with a warranty to protect against defects in materials and workmanship.
- Customer Reviews: Read customer reviews to get an idea of the quality and reliability of the seals.
| Retailer | Pros | Cons |
|---|---|---|
| CARDIAGTECH.NET | High-quality products, excellent customer service, reliable reputation | May not have the lowest prices |
| Amazon | Wide selection, competitive prices, convenient shopping experience | Quality can vary, may need to carefully review seller’s reputation |
| eBay | Potential for finding deals, especially on vintage parts | Requires careful review of seller’s feedback and product description |
| NAPA Auto Parts | Knowledgeable staff, quality products | May not have the lowest prices |
| Pelican Parts | Specializes in Mercedes-Benz parts, detailed product descriptions | Prices may be higher than other retailers |
| Mercedes-Benz Classic Center | Official source for OEM parts, guaranteed quality and fit | Highest prices, may not be the most convenient option |
When buying Mercedes W123 window seals, consider your priorities and choose a retailer that offers the best combination of quality, price, and customer service. CARDIAGTECH.NET is committed to providing you with the best products and support for your automotive needs. Visit our website or contact us at +1 (641) 206-8880 for expert advice and assistance.
10. Benefits of Upgrading to High-Quality Seals
Investing in high-quality Mercedes W123 window seals offers numerous benefits, enhancing your driving experience and preserving the value of your classic vehicle.
10.1. Enhanced Weather Protection
- Superior Sealing: High-quality seals provide a tighter, more reliable barrier against rain, snow, and other elements, preventing water damage and rust.
- Optimal Cabin Comfort: Upgraded seals eliminate drafts and maintain a consistent interior temperature, ensuring a comfortable ride in all weather conditions.
- Prevention of Mold and Mildew: By keeping moisture out, high-quality seals prevent the growth of mold and mildew, improving air quality and reducing odors.
10.2. Reduced Noise Levels
- Minimized Wind Noise: High-quality seals significantly reduce wind noise, creating a quieter and more enjoyable driving experience.
- Improved Acoustics: Upgraded seals enhance the overall acoustics of your vehicle, making it easier to hear music, conversations, and navigation instructions.
10.3. Increased Energy Efficiency
- Draft Reduction: High-quality seals eliminate drafts, reducing the workload on your vehicle’s heating and cooling systems.
- Fuel Savings: By improving energy efficiency, upgraded seals can help you save money on fuel costs over time.
10.4. Preservation of Vehicle Value
- Protection Against Rust and Corrosion: High-quality seals protect your vehicle’s metal components from rust and corrosion, preserving its structural integrity and appearance.
- Maintained Interior Condition: Upgraded seals prevent water damage and fading, helping to maintain the condition of your vehicle’s upholstery, carpets, and trim.
- Enhanced Resale Value: By keeping your Mercedes W123 in top condition, high-quality seals can increase its resale value.
10.5. Long-Term Cost Savings
- Durability: High-quality seals are made from durable materials that resist cracking, shrinking, and warping, ensuring long-lasting performance.
- Reduced Maintenance: Upgraded seals require less maintenance and fewer repairs, saving you time and money in the long run.
- Prevention of Costly Damage: By preventing water damage, rust, and mold, high-quality seals can help you avoid costly repairs and replacements.
10.6. Environmental Benefits
- Reduced Energy Consumption: Improved energy efficiency reduces your vehicle’s carbon footprint, contributing to a cleaner environment.
- Longer Product Lifespan: Durable seals reduce the need for frequent replacements, minimizing waste and conserving resources.
| Benefit | Description | Impact |
|---|---|---|
| Enhanced Weather Protection | Superior sealing against rain, snow, and elements | Prevents water damage, rust, and mold, ensuring a comfortable and dry ride |
| Reduced Noise Levels | Minimizes wind noise and improves acoustics | Creates a quieter and more enjoyable driving experience |
| Increased Energy Efficiency | Eliminates drafts and reduces the workload on heating and cooling systems | Saves money on fuel costs and reduces your vehicle’s carbon footprint |
| Preservation of Vehicle Value | Protects against rust, corrosion, and interior damage | Maintains the structural integrity, appearance, and resale value of your Mercedes W123 |
| Long-Term Cost Savings | Durable materials and reduced maintenance | Saves time and money on repairs and replacements |
| Environmental Benefits | Reduced energy consumption and longer product lifespan | Minimizes waste, conserves resources, and contributes to a cleaner environment |
Investing in high-quality Mercedes W123 window seals is a smart choice that offers numerous benefits, from enhanced weather protection and reduced noise levels to increased energy efficiency and preservation of vehicle value. CARDIAGTECH.NET is committed to providing you with the best products and expert advice for maintaining your classic vehicle. Contact us at 276 Reock St, City of Orange, NJ 07050, United States, or call +1 (641) 206-8880 for any questions or assistance.
FAQ: Mercedes W123 Window Seals
1. What are Mercedes W123 window seals and why are they important?
Mercedes W123 window seals are rubber components designed to create a tight barrier between the window glass and the vehicle’s frame. They are important for preventing water leaks, reducing wind noise, and maintaining optimal cabin temperature.
2. How do I know if my Mercedes W123 window seals need replacement?
Signs of deterioration include visible cracks, hardening, shrinkage, mold growth, and water leaks inside the car.
3. What are the different types of window seals available for the Mercedes W123?
There are windshield seals, rear window seals, door window seals, and sunroof seals, each designed for specific locations on the vehicle.
4. Should I choose OEM or aftermarket window seals for my Mercedes W123?
OEM seals offer guaranteed fit and quality but are generally more expensive. Aftermarket seals can be more affordable but may vary in quality. Research and choose reputable brands.
5. What tools do I need to replace Mercedes W123 window seals?
Essential tools include screwdrivers, pliers, a socket set, a utility knife, a window seal removal tool, trim removal tools, glass suction cups, and safety equipment.
6. Can I replace Mercedes W123 window seals myself, or should I hire a professional?
Replacing window seals can be a DIY project if you have the necessary tools and skills. However, professional installation ensures the job is done correctly.
7. How much does it cost to replace Mercedes W123 window seals?
The cost varies depending on the type of seals, the quality, and whether you choose DIY or professional installation. It can range from $200 to $600.
8. Where can I buy Mercedes W123 window seals?
You can buy them from online retailers like CARDIAGTECH.NET, Amazon, and eBay, as well as local auto parts stores like NAPA and AutoZone.
**9. How can