How to Replace a Blower Motor: A Comprehensive Guide
Replacing a blower motor is a straightforward task that can restore comfort to your vehicle. CARDIAGTECH.BIZ offers the tools and equipment you need to get the job done efficiently, saving you time and money while ensuring optimal performance of your vehicle’s heating and cooling system with quality replacement parts. Learn how to replace your blower motor, troubleshoot common issues, and maintain your HVAC system.
1. What is a Blower Motor and Why Replace It?
A blower motor is an essential component of your vehicle’s heating, ventilation, and air conditioning (HVAC) system. Its primary function is to circulate air through the vents, providing both heating and cooling to the cabin. According to a study by the National Renewable Energy Laboratory, HVAC systems can account for up to 30% of a vehicle’s energy consumption, highlighting the importance of maintaining this system for optimal efficiency.
1.1. Common Symptoms of a Failing Blower Motor
Recognizing the signs of a failing blower motor can help you address the issue before it leads to further complications. Here are some common symptoms:
- Weak Airflow: The air coming from the vents is significantly weaker than usual, even at the highest fan setting.
- No Airflow: No air comes out of the vents, regardless of the fan speed setting.
- Unusual Noises: Strange sounds such as squealing, grinding, or rattling coming from the blower motor area.
- Intermittent Operation: The blower motor works sporadically, sometimes functioning correctly and other times not at all.
- Burning Smell: A distinct burning odor emanating from the vents, indicating potential electrical or mechanical issues within the motor.
1.2. Tools and Parts Needed for Replacement
Before starting the replacement process, gather the necessary tools and parts to ensure a smooth and efficient repair. Here’s a list of what you’ll typically need:
- New Blower Motor: Purchase a replacement blower motor that is compatible with your vehicle’s make and model. CARDIAGTECH.BIZ provides a wide selection of high-quality blower motors.
- Screwdrivers: Both Phillips head and flathead screwdrivers of various sizes will be needed to remove and install screws and clips.
- Socket Set: A set of sockets and a ratchet can be useful for removing any bolts that secure the blower motor assembly.
- Pliers: Needle-nose pliers can help with disconnecting electrical connectors and removing stubborn clips.
- Multimeter: A multimeter can be used to test the electrical connections and ensure that the new blower motor is receiving power.
- Work Gloves: Protect your hands from dirt and sharp edges by wearing work gloves.
- Safety Glasses: Safety glasses will protect your eyes from debris that may fall during the replacement process.
- Knee Pads: Using knee pads will provide comfort while working in the often cramped footwell area.
- Blower Motor Resistor (Optional): If the blower motor resistor is faulty, replace it at the same time to ensure proper fan speed control.
- Cabin Air Filter (Optional): Consider replacing the cabin air filter to improve air quality and airflow.
2. Step-by-Step Guide on How to Replace a Blower Motor
Replacing a blower motor can be accomplished with a few basic tools and some patience. Here’s a detailed step-by-step guide to help you through the process:
2.1. Step 1: Preparation and Safety Measures
- Gather Your Tools and Parts: Ensure you have all the necessary tools and the new blower motor and resistor (if needed).
- Disconnect the Battery: Before starting any electrical work, disconnect the negative terminal of your vehicle’s battery to prevent electrical shock and protect the vehicle’s electrical system. According to the Electrical Safety Foundation International (ESFI), disconnecting power sources is a fundamental safety practice when working with electrical components.
- Locate the Blower Motor: The blower motor is typically located behind the glove compartment on the passenger side of the vehicle. Consult your vehicle’s repair manual for the exact location.
- Clear the Work Area: Remove any items from the passenger side footwell to provide ample space to work.
2.2. Step 2: Accessing the Blower Motor
- Remove the Glove Compartment:
- Open the glove compartment and empty its contents.
- Detach the glove compartment damper (if equipped). This is usually a small arm that connects the glove compartment to the dashboard.
- Squeeze the sides of the glove compartment to release the retaining clips or hinges.
- Gently lower the glove compartment and remove it completely.
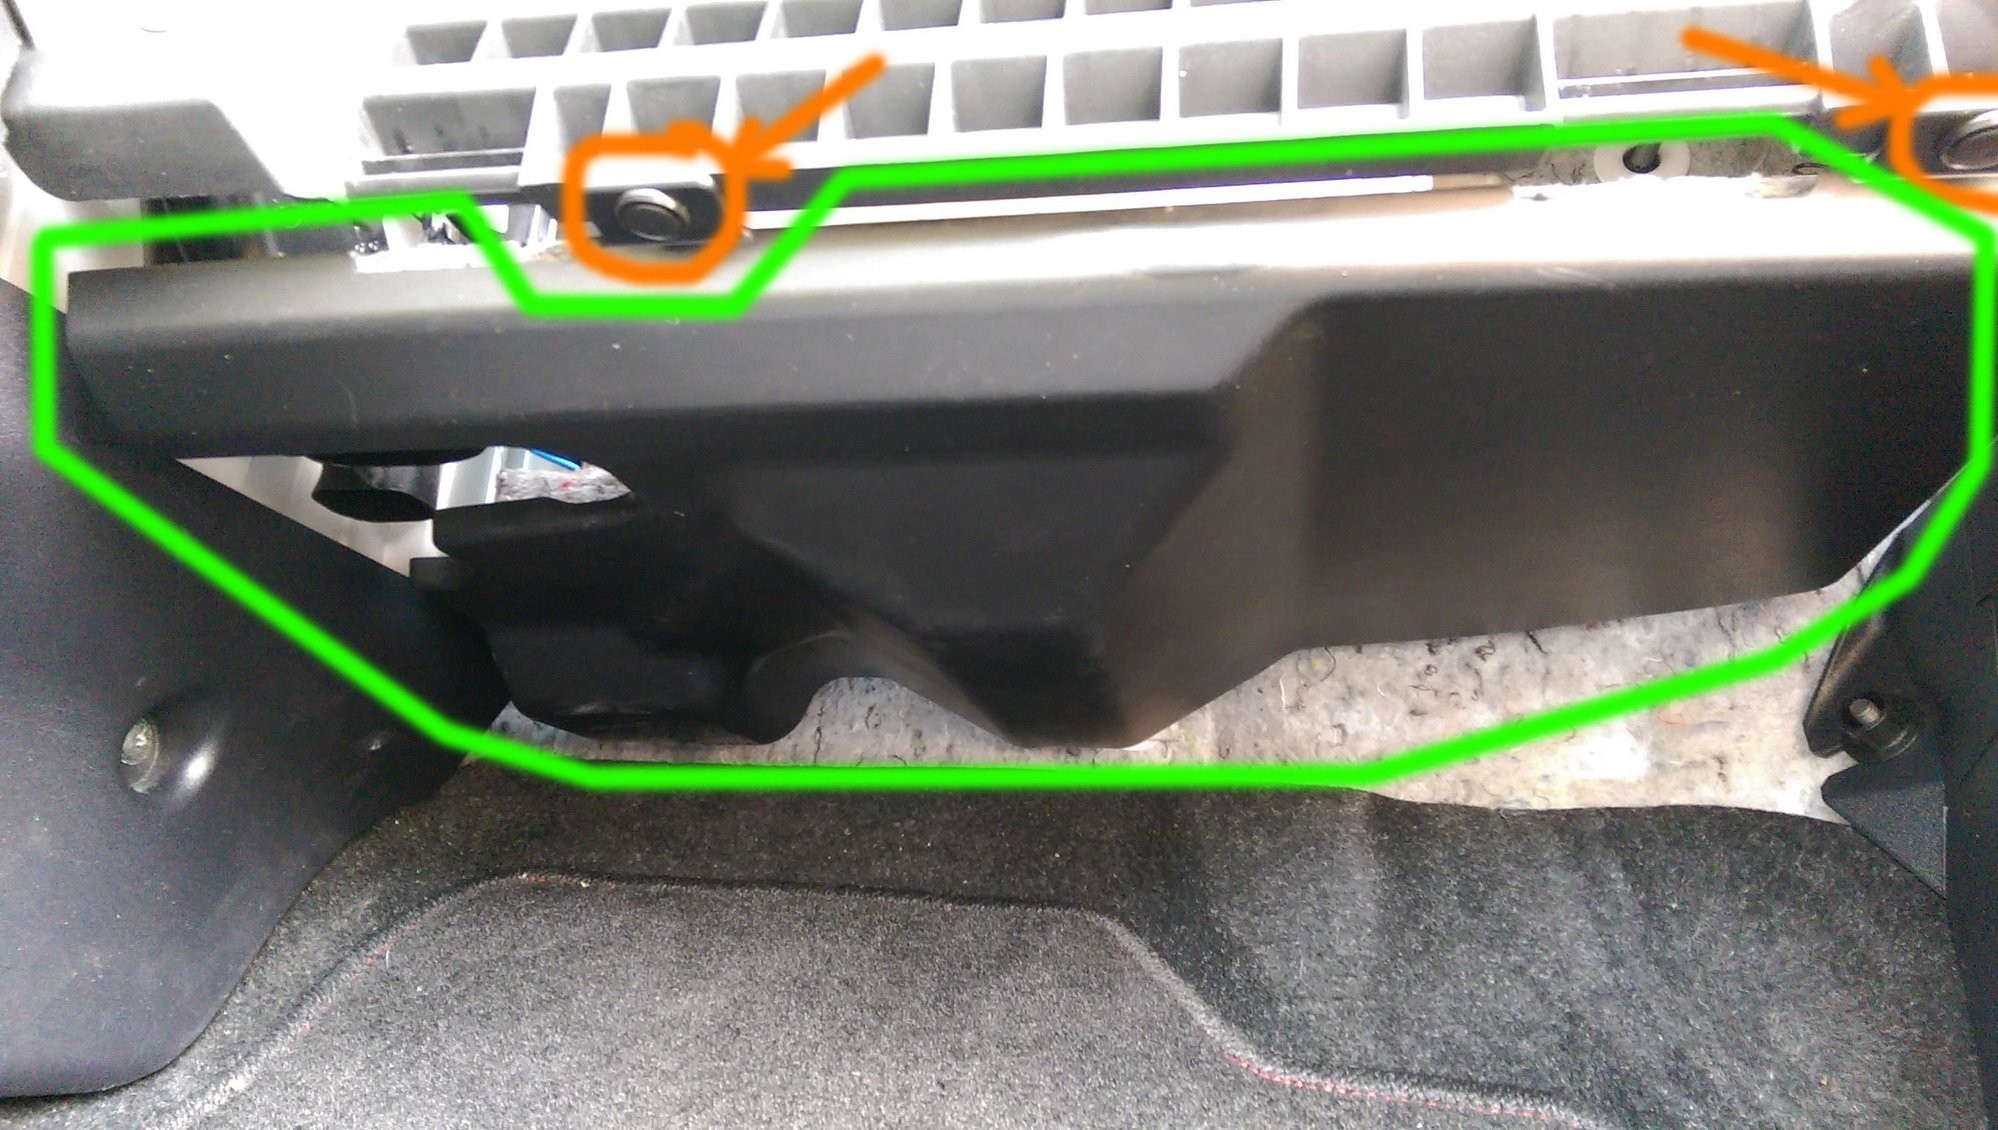
- Remove the Access Panel:
- Behind the glove compartment, you’ll find an access panel that covers the blower motor.
- Remove any screws or clips securing the access panel. These are often plastic clips that can be pried out with a flathead screwdriver.
- Carefully remove the access panel to expose the blower motor and resistor.
Remove Panel
2.3. Step 3: Removing the Blower Motor Resistor
- Locate the Blower Motor Resistor: The resistor is usually mounted near the blower motor and has an electrical connector attached to it.
- Disconnect the Electrical Connector: Gently disconnect the electrical connector from the resistor.
- Remove the Resistor: Remove the screws or bolts holding the resistor in place.
- Set Aside: Carefully remove the resistor and set it aside.
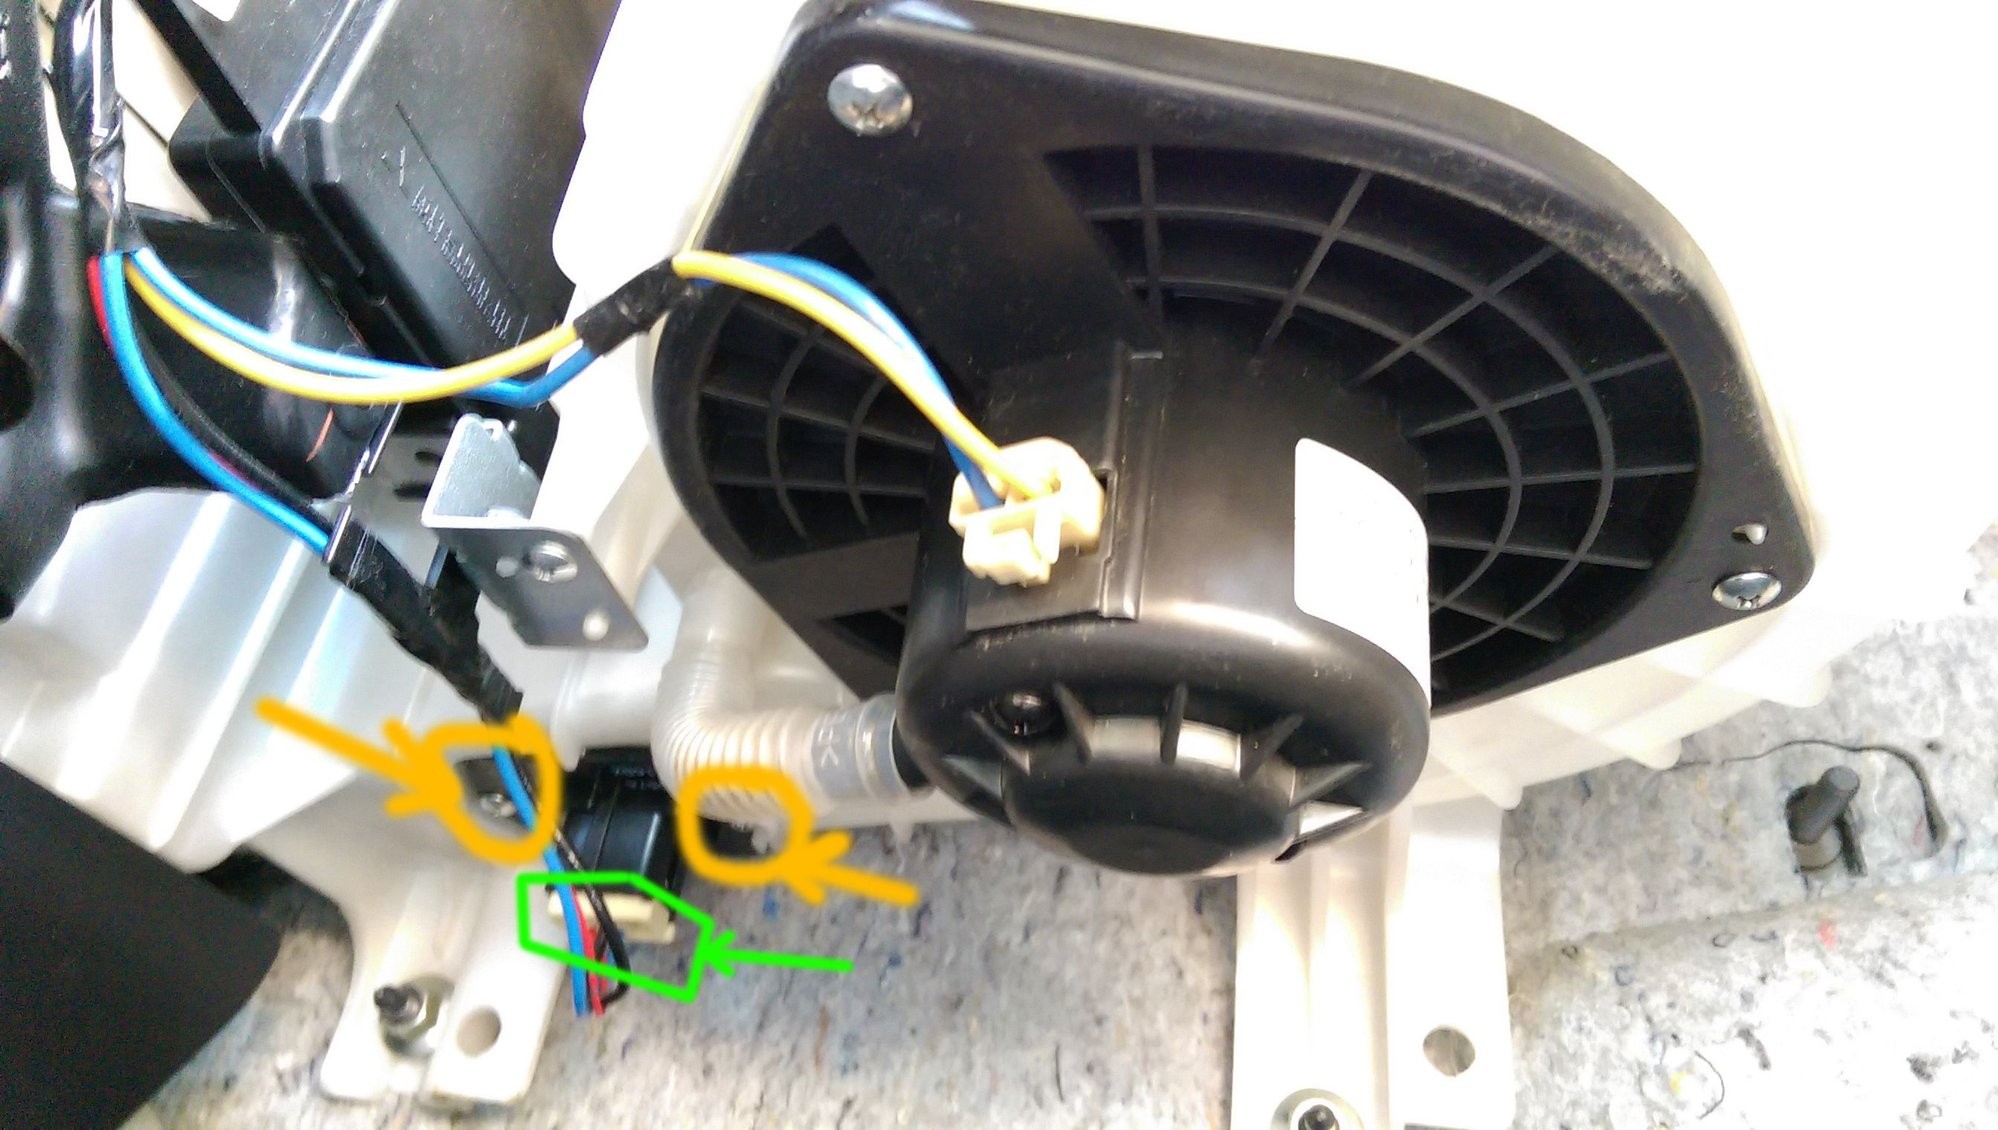 Remove Resistor
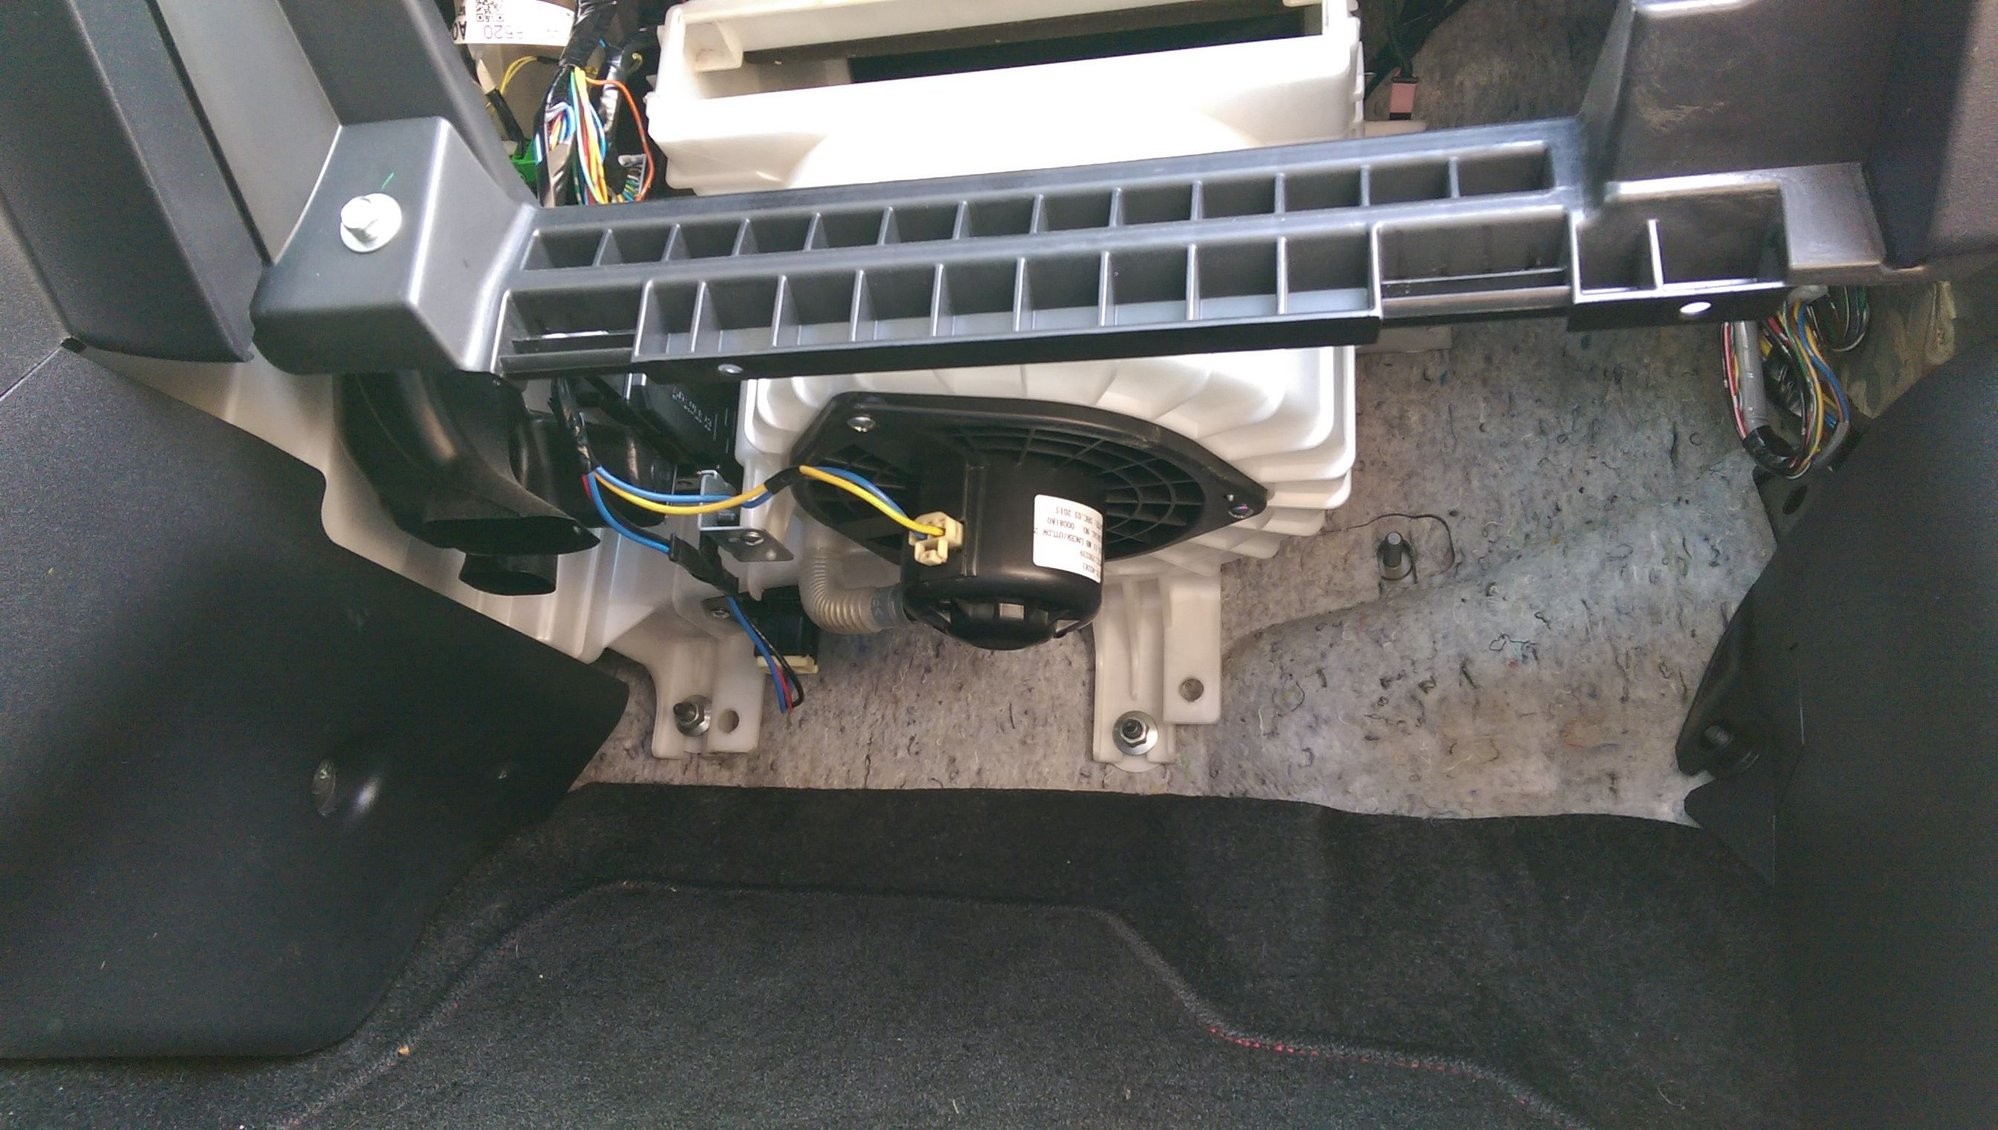
2.4. Step 4: Removing the Blower Motor
- Disconnect the Blower Motor Connector: Disconnect the electrical connector attached to the blower motor.
- Remove Mounting Screws: Locate the screws that secure the blower motor to the housing. These are typically Phillips head screws.
- Remove the Blower Motor: Carefully remove the screws and gently twist the blower motor to detach it from the housing. It may be necessary to maneuver the motor to clear any obstructions.
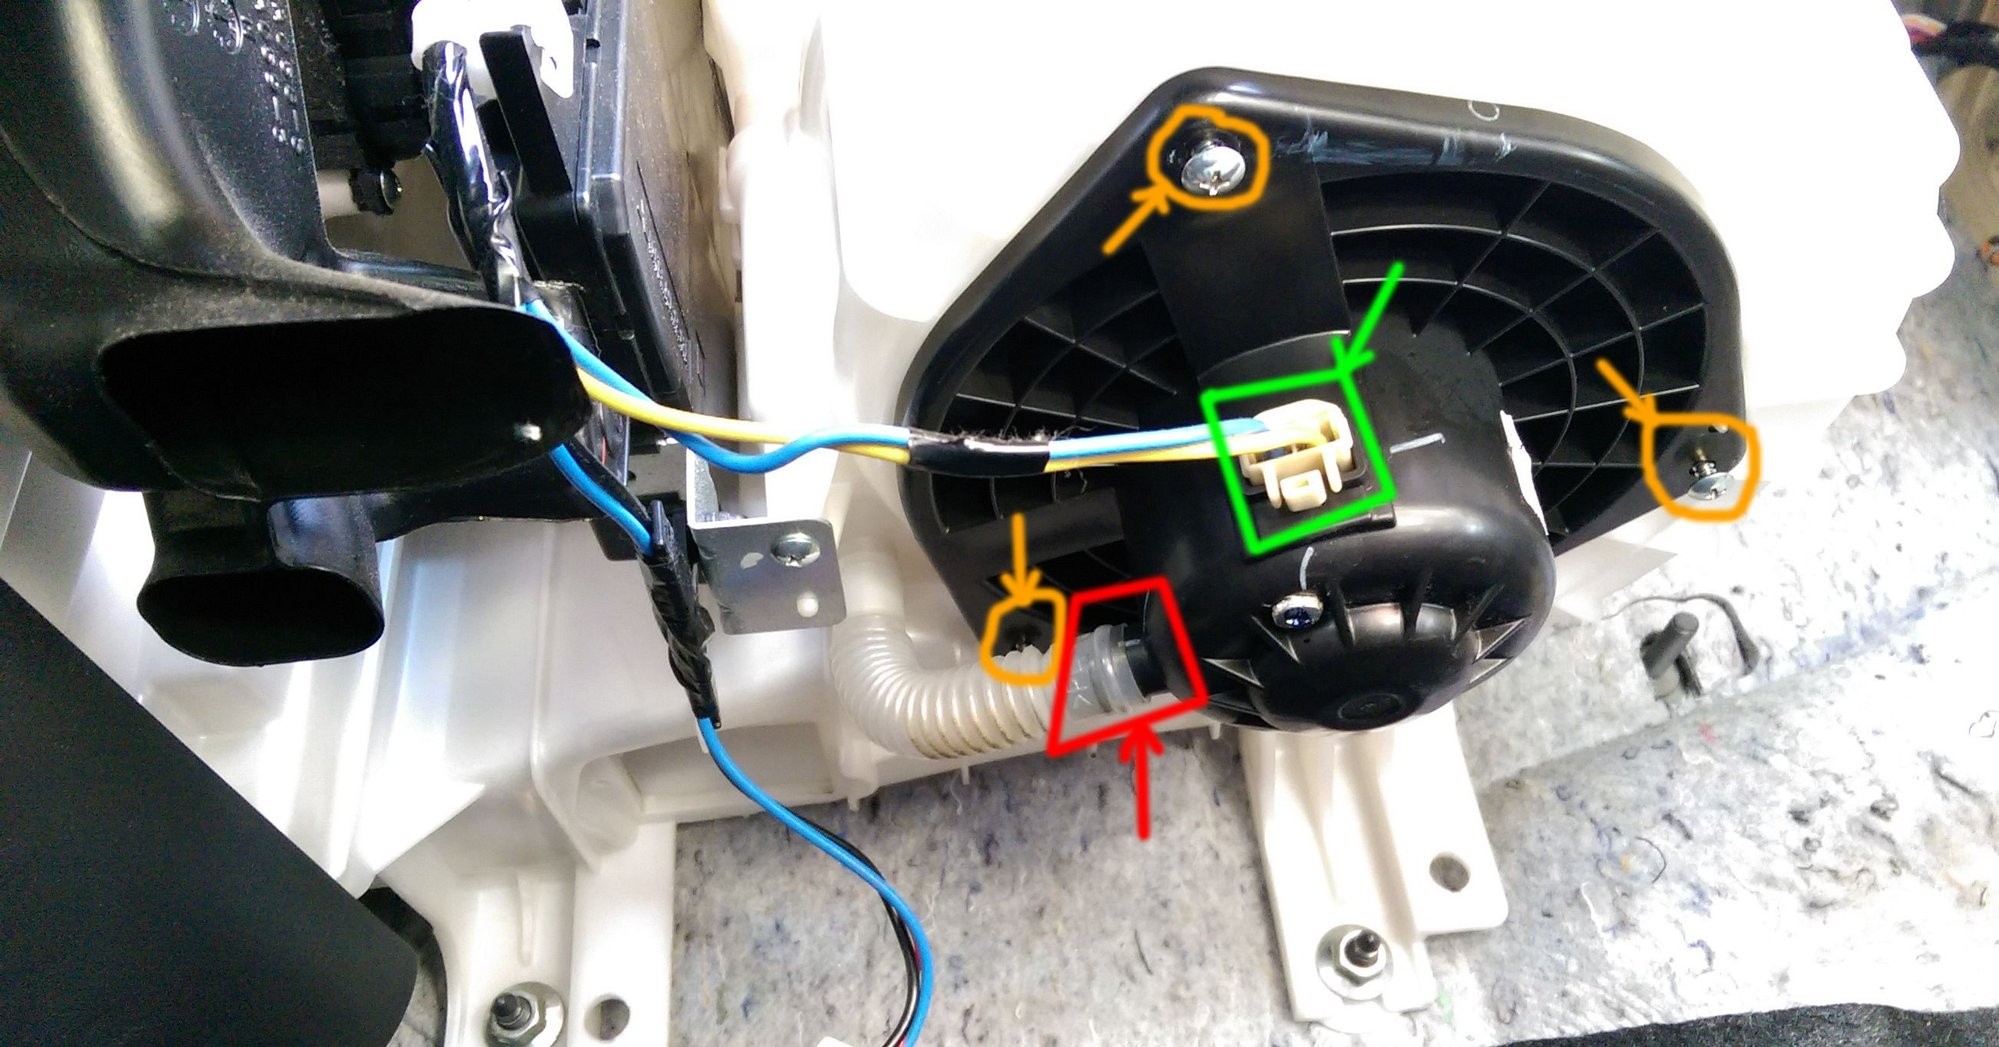 Remove Blower Motor Fan
2.5. Step 5: Installing the New Blower Motor and Resistor
- Install the New Blower Motor:
- Align the new blower motor with the housing and ensure it fits properly.
- Secure the motor with the screws you removed earlier.
- Connect the electrical connector to the new blower motor.
- Install the New Blower Motor Resistor (if replaced):
- Align the new resistor with the mounting holes.
- Secure the resistor with the screws or bolts.
- Connect the electrical connector to the new resistor.
 New Parts, Plugged In & Screwed back into place.
2.6. Step 6: Reassembling the Components
- Reinstall the Access Panel:
- Place the access panel back into position, ensuring it aligns correctly.
- Secure the panel with the screws or clips you removed earlier.
- Reinstall the Glove Compartment:
- Align the glove compartment with the dashboard.
- Reattach the retaining clips or hinges.
- Reattach the glove compartment damper (if equipped).
- Reconnect the Battery: Reconnect the negative terminal of your vehicle’s battery.
2.7. Step 7: Testing the System
- Start the Vehicle: Turn on your vehicle and test the blower motor by adjusting the fan speed settings.
- Check Airflow: Ensure that air is flowing properly from the vents at different speeds.
- Verify Temperature: Check that both the heating and cooling functions are working correctly.
3. Troubleshooting Common Issues After Blower Motor Replacement
Even after a successful replacement, you may encounter some issues. Here are some common problems and how to troubleshoot them:
3.1. No Airflow After Replacement
If there is still no airflow after replacing the blower motor, consider the following:
- Check the Electrical Connections: Ensure that all electrical connectors are securely attached to the blower motor and resistor.
- Inspect the Fuse: Check the fuse for the blower motor in the fuse box. A blown fuse can prevent the motor from operating. Replace the fuse if necessary. According to the National Electrical Code (NEC), fuses are designed to protect electrical circuits from overloads.
- Test the Voltage: Use a multimeter to test the voltage at the blower motor connector. If there is no voltage, there may be a wiring issue or a problem with the HVAC control module.
3.2. Weak Airflow Despite New Motor
If the airflow is weak even with a new blower motor, consider these potential causes:
- Clogged Cabin Air Filter: A dirty or clogged cabin air filter can restrict airflow. Replace the cabin air filter to improve airflow.
- Blocked Vents: Check the vents for any obstructions that may be blocking the airflow.
- Damaged Ductwork: Inspect the ductwork for any leaks or damage that may be reducing airflow.
3.3. Unusual Noises Persist
If you still hear unusual noises after replacing the blower motor, consider the following:
- Debris in the Blower Motor Housing: Check the blower motor housing for any debris that may be causing the noise.
- Improper Installation: Ensure that the blower motor is properly installed and securely mounted.
- Damaged Fan Blades: Inspect the fan blades for any damage or warping that may be causing the noise.
4. Maintaining Your Vehicle’s HVAC System
Proper maintenance of your vehicle’s HVAC system can extend its lifespan and ensure optimal performance. Here are some essential maintenance tips:
4.1. Regular Cabin Air Filter Replacement
Replace the cabin air filter regularly to maintain good air quality and airflow. A clean cabin air filter prevents dust, pollen, and other contaminants from entering the vehicle’s cabin. The Environmental Protection Agency (EPA) recommends checking and replacing filters regularly to improve air quality.
4.2. Inspecting and Cleaning the Blower Motor
Periodically inspect the blower motor for any signs of wear or damage. Clean the blower motor housing to remove any debris that may accumulate over time.
4.3. Checking and Maintaining Refrigerant Levels
Ensure that the refrigerant levels in your vehicle’s air conditioning system are adequate. Low refrigerant levels can reduce the cooling efficiency of the system. According to the U.S. Department of Energy, maintaining proper refrigerant levels can improve energy efficiency.
4.4. Professional HVAC System Servicing
Schedule regular servicing of your vehicle’s HVAC system by a qualified technician. Professional servicing can identify and address any potential issues before they become major problems.
5. Benefits of Using Quality Replacement Parts from CARDIAGTECH.BIZ
When replacing a blower motor or any other HVAC component, it’s essential to use high-quality parts to ensure reliability and longevity. CARDIAGTECH.BIZ offers a wide range of quality replacement parts that provide numerous benefits:
5.1. Durability and Longevity
Quality replacement parts are designed to withstand the rigors of daily use and provide long-lasting performance. CARDIAGTECH.BIZ sources parts from reputable manufacturers known for their durability and reliability.
5.2. Optimal Performance
Using quality parts ensures that your vehicle’s HVAC system operates at its optimal performance level, providing consistent and efficient heating and cooling.
5.3. Cost Savings
While quality parts may have a higher upfront cost, they can save you money in the long run by reducing the need for frequent repairs and replacements.
5.4. Warranty Protection
Many quality replacement parts come with a warranty, providing added protection and peace of mind. CARDIAGTECH.BIZ offers warranty options on many of its products.
5.5. Wide Selection
CARDIAGTECH.BIZ offers a wide selection of tools and equipment. Whatever your needs are, you’ll find a suitable option.
6. How CARDIAGTECH.BIZ Can Help You
At CARDIAGTECH.BIZ, we understand the challenges faced by auto repair technicians and shop owners. Our goal is to provide you with the tools, equipment, and support you need to enhance your efficiency, accuracy, and profitability.
6.1. High-Quality Products
We offer a comprehensive range of high-quality auto repair tools and equipment, including diagnostic tools, scan tools, and specialized instruments. Our products are sourced from trusted manufacturers and are designed to meet the demands of professional auto repair environments.
6.2. Expert Support and Guidance
Our team of experienced professionals is dedicated to providing you with expert support and guidance. Whether you need help selecting the right tools or troubleshooting technical issues, we’re here to assist you every step of the way.
6.3. Competitive Pricing
We understand the importance of cost-effectiveness, so we offer competitive pricing on all our products without compromising on quality.
6.4. Convenient Ordering and Fast Shipping
Our user-friendly website makes it easy to browse and order the tools and equipment you need. We offer fast shipping to get your order to you as quickly as possible.
7. The Importance of E-E-A-T and YMYL in Auto Repair Content
In the auto repair industry, where safety and reliability are paramount, adhering to the principles of Expertise, Experience, Authoritativeness, and Trustworthiness (E-E-A-T) and Your Money or Your Life (YMYL) is crucial. Here’s why:
7.1. Ensuring Safety and Reliability
Auto repair content often deals with critical aspects of vehicle maintenance and repair. Incorrect or misleading information can lead to unsafe practices and potentially dangerous outcomes. By prioritizing E-E-A-T and YMYL, we ensure that the information we provide is accurate, reliable, and safe to follow.
7.2. Building Trust and Credibility
Demonstrating expertise, experience, and authoritativeness helps build trust with our audience. When technicians and shop owners know they can rely on our content, they are more likely to use our products and services.
7.3. Complying with Google’s Quality Guidelines
Google’s quality guidelines place a strong emphasis on E-E-A-T and YMYL, particularly for topics that can impact a person’s health, safety, or financial well-being. Adhering to these guidelines helps improve our search engine rankings and ensures that our content reaches a wider audience.
8. Optimizing for Google Discovery
To ensure our content appears on Google Discovery, we focus on creating visually appealing and engaging content that meets Google’s guidelines. Here are some key strategies:
8.1. Visual Appeal
Use high-quality images and videos to illustrate key points and engage the audience. Visual content is more likely to capture the attention of users scrolling through their Google Discovery feed.
8.2. Compelling Headlines
Craft headlines that are both informative and intriguing. A well-crafted headline can entice users to click and read the full article.
8.3. Relevant and Timely Content
Focus on topics that are relevant to the interests of auto repair technicians and shop owners. Keep the content fresh and up-to-date to maintain user engagement.
8.4. Mobile-Friendliness
Ensure that the content is optimized for mobile devices. Google Discovery is primarily used on mobile devices, so a mobile-friendly design is essential.
9. Call to Action: Contact CARDIAGTECH.BIZ Today
Are you ready to enhance your auto repair capabilities with high-quality tools and equipment? Contact CARDIAGTECH.BIZ today to learn more about our products and services. Our team is here to help you find the perfect solutions for your needs.
- Address: 276 Reock St, City of Orange, NJ 07050, United States
- WhatsApp: +1 (641) 206-8880
- Website: CARDIAGTECH.BIZ
Don’t let outdated or unreliable equipment hold you back. Invest in the best tools and equipment from CARDIAGTECH.BIZ and take your auto repair business to the next level. Contact us now and experience the difference that quality and expertise can make.
10. Frequently Asked Questions (FAQs) About Blower Motor Replacement
Here are some frequently asked questions about blower motor replacement to help you better understand the process and its importance.
10.1. What Does a Car Blower Motor Do?
The blower motor is responsible for circulating air through your vehicle’s heating and air conditioning vents. It pushes air across the heater core or evaporator coil, providing warm or cool air into the cabin.
10.2. How Much Does It Cost to Replace a Blower Motor?
The cost to replace a blower motor can vary depending on the vehicle’s make and model, as well as the labor rates at your chosen repair shop. Generally, the cost ranges from $150 to $450, including parts and labor.
10.3. Can I Replace a Blower Motor Myself?
Yes, replacing a blower motor is a task that many DIYers can accomplish. However, it requires some mechanical knowledge and the right tools. If you’re not comfortable working on your vehicle, it’s best to seek professional assistance.
10.4. How Long Does It Take to Replace a Blower Motor?
The replacement process typically takes between 1 to 2 hours, depending on the vehicle and your experience level.
10.5. What Happens if I Don’t Replace My Blower Motor?
If you don’t replace a failing blower motor, you may experience reduced airflow, no heating or cooling, and potential damage to other components of the HVAC system. Additionally, driving without proper ventilation can be uncomfortable and unsafe.
10.6. How Do I Know if My Blower Motor Resistor Is Bad?
Symptoms of a bad blower motor resistor include the blower motor only working on certain speeds or not working at all. If you experience these issues, it’s a good idea to test or replace the resistor.
10.7. Where Is the Blower Motor Located?
The blower motor is typically located behind the glove compartment on the passenger side of the vehicle. However, the exact location may vary depending on the make and model of your vehicle.
10.8. What Tools Do I Need to Replace a Blower Motor?
Common tools needed for blower motor replacement include screwdrivers, socket set, pliers, multimeter, work gloves, and safety glasses.
10.9. How Often Should I Replace My Cabin Air Filter?
It’s generally recommended to replace your cabin air filter every 12,000 to 15,000 miles, or once a year. However, if you drive in dusty or polluted conditions, you may need to replace it more frequently.
10.10. Can a Bad Blower Motor Drain My Battery?
Yes, a failing blower motor can potentially drain your battery if it’s drawing excessive current or if it’s stuck in an “on” position. It’s essential to address any issues with the blower motor promptly to prevent battery drain.
By addressing these common questions and providing accurate information, we aim to empower our audience and build trust in our expertise.