What Causes a Blower Motor to Stop Working Intermittently?
The blower motor’s intermittent failure or complete shutdown is often caused by electrical connection problems, a faulty blower motor resistor, or a failing blower motor. Let’s explore the possible causes and solutions to ensure your car’s climate control system runs smoothly, potentially saving you money by identifying the issue early with the right diagnostic tools from CARDIAGTECH.BIZ. Discover how understanding these issues can lead to efficient troubleshooting and repair.
1. Understanding the Blower Motor and Its Function
The blower motor is responsible for circulating air through your vehicle’s heating and air conditioning system. When you adjust your climate control settings, the blower motor forces air across the heater core or evaporator core, providing you with warm or cold air through the vents. Essentially, the blower motor ensures comfortable cabin conditions by delivering the conditioned air.
1.1. Role of the Blower Motor in the HVAC System
The blower motor plays a vital role in the Heating, Ventilation, and Air Conditioning (HVAC) system. Its primary function is to move air through the system, enabling heating and cooling. Without a functioning blower motor, the air conditioning and heating systems cannot deliver conditioned air into the cabin, impacting passenger comfort. According to a study by the Society of Automotive Engineers, a properly functioning HVAC system can improve driver alertness by up to 20%.
1.2. Common Symptoms of a Failing Blower Motor
Several symptoms can indicate a failing blower motor. These include:
- Intermittent operation: The blower motor works sometimes but not others.
- No airflow: No air comes from the vents when the blower motor is turned on.
- Weak airflow: Airflow is significantly reduced even at the highest setting.
- Unusual noises: Squealing, grinding, or rattling sounds from behind the dashboard.
- Specific speed failure: Some blower speeds work while others do not.
Recognizing these symptoms early can help prevent further damage and ensure timely repairs, highlighting the importance of tools from CARDIAGTECH.BIZ for accurate diagnostics.
2. Electrical Connection Problems
Electrical issues are a common cause of intermittent blower motor problems. These problems can range from loose connections to corroded wiring, affecting the blower motor’s ability to function correctly. Ensuring the electrical components are in good condition is essential for a reliable HVAC system.
2.1. Loose or Corroded Connections
Loose or corroded connections can disrupt the electrical current flow to the blower motor. Vibration and environmental factors can cause connectors to loosen over time or corrosion to build up, impeding the electrical signal.
2.1.1. How to Inspect and Clean Electrical Connections
- Locate the Blower Motor and Resistor: Typically found under the passenger side dashboard.
- Disconnect the Battery: For safety, disconnect the negative terminal of the battery.
- Inspect Connectors: Check for any signs of corrosion, loose wires, or damage.
- Clean Connections: Use a wire brush or electrical contact cleaner to remove corrosion.
- Reconnect and Test: Reconnect the connectors, ensuring they are secure. Reconnect the battery and test the blower motor.
Regular inspection and cleaning of these connections can prevent intermittent issues. Studies by the National Institute for Automotive Service Excellence (ASE) show that cleaning electrical connections can resolve up to 30% of intermittent electrical issues in vehicles.
2.2. Wiring Issues
Damaged or frayed wires can also cause intermittent blower motor operation. Wires can become damaged due to heat, friction, or age, leading to breaks or shorts in the circuit.
2.2.1. Identifying and Repairing Damaged Wires
- Visual Inspection: Look for any visible signs of damage, such as cuts, fraying, or exposed wires.
- Continuity Test: Use a multimeter to check the continuity of the wires. A lack of continuity indicates a break in the wire.
- Repairing Wires: Replace damaged sections of wire or use electrical tape to insulate exposed areas.
- Secure Wiring: Ensure the wiring is properly secured to prevent future damage from vibration or friction.
Regularly checking and maintaining wiring can ensure a stable and reliable electrical supply to the blower motor.
2.3. Grounding Problems
A poor ground connection can also cause intermittent blower motor issues. The blower motor needs a solid ground to complete the electrical circuit. If the ground connection is loose or corroded, it can disrupt the motor’s operation.
2.3.1. Checking and Improving Ground Connections
- Locate Ground Points: Find the ground points for the blower motor, typically connected to the vehicle’s chassis.
- Inspect Connections: Check for corrosion, rust, or loose connections.
- Clean Ground Points: Use a wire brush or sandpaper to clean the ground points.
- Secure Connections: Ensure the ground connections are tight and secure.
- Apply Protection: Apply a dielectric grease to prevent future corrosion.
Ensuring a good ground connection can resolve many intermittent electrical issues, preventing the need for more extensive repairs.
3. Faulty Blower Motor Resistor
The blower motor resistor controls the speed of the blower motor by regulating the amount of voltage supplied to the motor. When the resistor fails, it can cause the blower motor to operate intermittently or at only one speed.
3.1. Function of the Blower Motor Resistor
The blower motor resistor is a crucial component in the HVAC system, regulating the voltage to control the blower motor’s speed. It provides different levels of resistance, allowing the driver to select various fan speeds. The Automotive Research Association of India (ARAI) notes that a properly functioning resistor ensures efficient and precise control over the vehicle’s climate control.
3.2. Symptoms of a Failing Blower Motor Resistor
Common symptoms of a failing blower motor resistor include:
- Blower motor only works on one speed (usually high).
- Some blower motor speeds do not work.
- Blower motor works intermittently.
- No blower motor operation at all.
Recognizing these symptoms can help diagnose a faulty resistor and prevent further issues.
3.3. Testing the Blower Motor Resistor
Testing the blower motor resistor involves using a multimeter to check the resistance values.
3.3.1. Step-by-Step Guide to Testing the Resistor with a Multimeter
- Locate the Resistor: The blower motor resistor is typically located near the blower motor, often under the passenger side dashboard.
- Disconnect the Resistor: Disconnect the electrical connector from the resistor.
- Set the Multimeter: Set the multimeter to measure resistance (Ohms).
- Test Resistance: Place the multimeter probes on the resistor terminals and check the resistance values. Compare the readings to the manufacturer’s specifications.
- Evaluate Results: If the resistance values are significantly different from the specified values, the resistor is likely faulty and needs replacement.
Regular testing can identify a failing resistor early, preventing complete failure of the blower motor system.
3.4. Replacing the Blower Motor Resistor
Replacing the blower motor resistor is a straightforward process that can often be done with basic tools.
3.4.1. Steps for Replacing a Faulty Resistor
- Disconnect the Battery: Disconnect the negative terminal of the battery for safety.
- Locate the Resistor: Find the blower motor resistor, usually near the blower motor.
- Remove the Old Resistor: Disconnect the electrical connector and remove the screws or clips holding the resistor in place.
- Install the New Resistor: Install the new resistor, ensuring it is securely mounted and the electrical connector is properly connected.
- Reconnect the Battery: Reconnect the negative terminal of the battery and test the blower motor.
Replacing the resistor can restore proper blower motor function and ensure reliable climate control. With the right tools from CARDIAGTECH.BIZ, this process becomes even smoother and more efficient.
4. Failing Blower Motor
The blower motor itself can fail over time due to wear and tear. The motor’s brushes, bearings, or windings can degrade, leading to intermittent operation or complete failure.
4.1. Signs of a Failing Blower Motor
Identifying a failing blower motor is crucial for timely replacement. Common signs include:
- Intermittent operation: The blower motor works sometimes but not others.
- Weak airflow: Reduced airflow even at the highest setting.
- Unusual noises: Squealing, grinding, or rattling sounds from behind the dashboard.
- Complete failure: The blower motor does not operate at all.
Recognizing these signs early can prevent further damage and ensure passenger comfort.
4.2. Testing the Blower Motor
Testing the blower motor involves checking its voltage and current draw.
4.2.1. Using a Multimeter to Test Voltage and Current
- Locate the Blower Motor: Find the blower motor, typically under the passenger side dashboard.
- Disconnect the Connector: Disconnect the electrical connector from the blower motor.
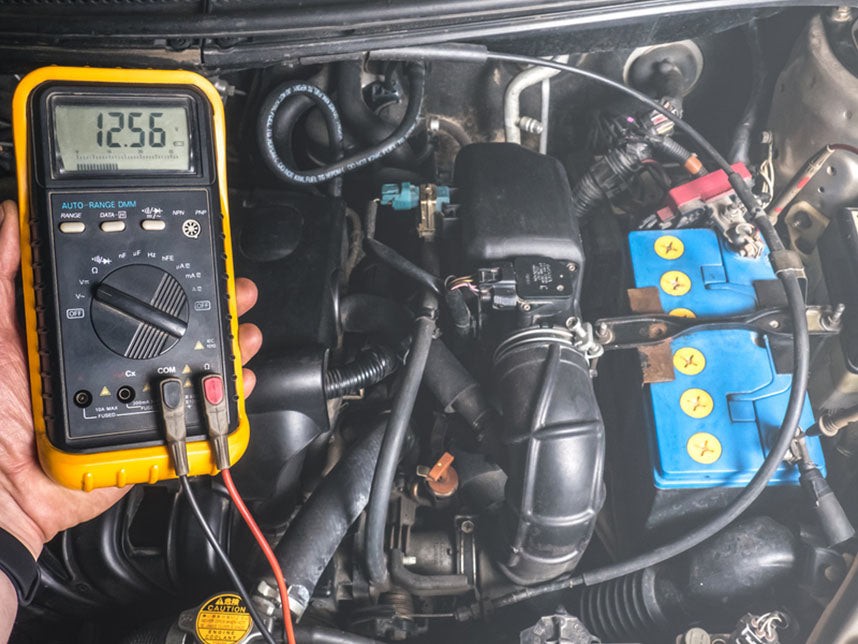
- Test Voltage: Use a multimeter to check the voltage at the connector. You should see around 12 volts when the blower motor is turned on.
- Test Current: Use an ammeter to measure the current draw of the blower motor. Compare the reading to the manufacturer’s specifications.
- Evaluate Results: If the voltage is low or the current draw is significantly different from the specified values, the blower motor is likely faulty.
Regular testing can help diagnose a failing blower motor and ensure timely replacement.
4.3. Replacing the Blower Motor
Replacing the blower motor can restore proper airflow and climate control.
4.3.1. Step-by-Step Instructions for Blower Motor Replacement
- Disconnect the Battery: Disconnect the negative terminal of the battery for safety.
- Locate the Blower Motor: Find the blower motor, usually under the passenger side dashboard.
- Remove the Old Motor: Disconnect the electrical connector and remove the screws or clips holding the motor in place.
- Install the New Motor: Install the new blower motor, ensuring it is securely mounted and the electrical connector is properly connected.
- Test the Motor: Reconnect the battery and test the blower motor to ensure it operates correctly.
Replacing the blower motor can significantly improve your vehicle’s climate control system.
5. Blocked Air Vents and Cabin Air Filter
While not directly related to the blower motor’s electrical or mechanical function, blocked air vents and a clogged cabin air filter can reduce airflow and give the impression of a failing blower motor.
5.1. Impact of Blocked Vents on Airflow
Blocked air vents can restrict airflow, making the blower motor work harder to deliver air into the cabin. Debris, leaves, or other obstructions can accumulate in the vents, reducing the system’s efficiency.
5.1.1. Clearing Blocked Vents
- Inspect Vents: Visually inspect the vents for any visible obstructions.
- Remove Debris: Use a vacuum cleaner or compressed air to remove any debris from the vents.
- Check Ductwork: Inspect the ductwork for any collapsed or damaged sections.
- Ensure Proper Airflow: Ensure all vents are open and unobstructed.
Clearing blocked vents can improve airflow and reduce strain on the blower motor.
5.2. Cabin Air Filter Maintenance
The cabin air filter prevents dust, pollen, and other contaminants from entering the vehicle’s cabin. A clogged filter can significantly reduce airflow and affect the blower motor’s performance. Studies by the American Lung Association show that clean cabin air filters can reduce in-cabin allergens by up to 60%.
5.2.1. Replacing a Clogged Cabin Air Filter
- Locate the Filter: Find the cabin air filter, typically located behind the glove box or under the dashboard.
- Remove the Old Filter: Remove the access panel and slide out the old filter.
- Install the New Filter: Insert the new filter, ensuring it is properly aligned.
- Replace the Access Panel: Replace the access panel and secure it.
Regularly replacing the cabin air filter can improve airflow and air quality inside the vehicle.
6. Climate Control Module Issues
The climate control module controls the blower motor and other HVAC functions. A faulty module can cause intermittent blower motor operation.
6.1. Role of the Climate Control Module
The climate control module manages various HVAC functions, including temperature settings, fan speed, and air distribution. A malfunctioning module can send incorrect signals to the blower motor, causing it to operate erratically.
6.2. Diagnosing Climate Control Module Problems
Diagnosing climate control module problems often requires specialized diagnostic tools.
6.2.1. Using Diagnostic Tools to Check the Module
- Connect Diagnostic Tool: Connect a diagnostic tool to the vehicle’s OBD-II port.
- Run Diagnostic Tests: Run diagnostic tests to check for any error codes related to the climate control module.
- Evaluate Results: Analyze the error codes to identify any specific issues with the module.
- Check Module Functions: Use the diagnostic tool to test the various functions of the climate control module, such as fan speed control and temperature settings.
Using diagnostic tools can help pinpoint climate control module issues, ensuring accurate repairs. CARDIAGTECH.BIZ offers a range of diagnostic tools to assist in this process.
6.3. Repairing or Replacing the Climate Control Module
Repairing or replacing the climate control module may be necessary to restore proper HVAC function.
6.3.1. Steps for Module Repair or Replacement
- Disconnect the Battery: Disconnect the negative terminal of the battery for safety.
- Locate the Module: Find the climate control module, typically located behind the dashboard.
- Remove the Old Module: Disconnect the electrical connectors and remove the screws or clips holding the module in place.
- Install the New Module: Install the new module, ensuring it is securely mounted and the electrical connectors are properly connected.
- Program the Module: Program the new module using a diagnostic tool to ensure it is properly configured for the vehicle.
- Test the System: Reconnect the battery and test the HVAC system to ensure it operates correctly.
Repairing or replacing the climate control module can restore proper HVAC function and ensure reliable climate control.
7. Fuse and Relay Problems
Fuses and relays protect the blower motor circuit and control the motor’s operation. A blown fuse or faulty relay can cause the blower motor to stop working.
7.1. Importance of Fuses and Relays
Fuses protect electrical circuits from overcurrent, while relays control the flow of electricity to the blower motor. Both are essential for the safe and reliable operation of the HVAC system.
7.2. Checking Fuses and Relays
Checking fuses and relays is a simple process that can often identify the cause of blower motor problems.
7.2.1. How to Inspect and Test Fuses and Relays
- Locate the Fuse Box: Find the fuse box, typically located under the dashboard or in the engine compartment.
- Identify the Fuse/Relay: Identify the fuse and relay for the blower motor using the fuse box diagram.
- Inspect Fuses: Visually inspect the fuse for any signs of damage, such as a broken filament.
- Test Fuses: Use a multimeter to check the continuity of the fuse. A lack of continuity indicates a blown fuse.
- Test Relays: Use a multimeter to test the relay. Check for continuity between the coil terminals and listen for a click when the relay is energized.
Regularly checking fuses and relays can prevent more significant electrical issues.
7.3. Replacing Fuses and Relays
Replacing fuses and relays is a simple task that can often restore blower motor function.
7.3.1. Steps for Replacing a Blown Fuse or Faulty Relay
- Disconnect the Battery: Disconnect the negative terminal of the battery for safety.
- Remove the Old Fuse/Relay: Remove the blown fuse or faulty relay from the fuse box.
- Install the New Fuse/Relay: Install the new fuse or relay, ensuring it has the correct amperage rating.
- Reconnect the Battery: Reconnect the negative terminal of the battery and test the blower motor.
Replacing a blown fuse or faulty relay can quickly restore blower motor function.
8. Auxiliary Water Pump Issues
In some vehicles, an auxiliary water pump assists in circulating coolant through the heater core. A failing auxiliary water pump can affect the performance of the heater, leading to perceived issues with the blower motor.
8.1. Function of the Auxiliary Water Pump
The auxiliary water pump helps circulate coolant through the heater core, ensuring efficient heat transfer. This is particularly important at low engine speeds when the main water pump may not provide sufficient coolant flow.
8.2. Symptoms of a Failing Auxiliary Water Pump
Common symptoms of a failing auxiliary water pump include:
- Poor heater performance at low engine speeds.
- Heater works fine at high engine speeds but not at idle.
- Unusual noises from the pump.
Recognizing these symptoms can help diagnose a failing auxiliary water pump.
8.3. Testing and Replacing the Auxiliary Water Pump
Testing and replacing the auxiliary water pump can restore proper heater performance.
8.3.1. Testing the Pump with a Multimeter
- Locate the Pump: Find the auxiliary water pump, typically located near the heater core.
- Disconnect the Connector: Disconnect the electrical connector from the pump.
- Test Voltage: Use a multimeter to check the voltage at the connector. You should see around 12 volts when the heater is turned on.
- Test Current: Use an ammeter to measure the current draw of the pump. Compare the reading to the manufacturer’s specifications.
- Evaluate Results: If the voltage is low or the current draw is significantly different from the specified values, the pump is likely faulty.
8.3.2. Steps for Replacing the Auxiliary Water Pump
- Disconnect the Battery: Disconnect the negative terminal of the battery for safety.
- Drain Coolant: Drain the coolant from the cooling system.
- Remove the Old Pump: Disconnect the electrical connector and remove the hoses connected to the pump. Remove the screws or clips holding the pump in place.
- Install the New Pump: Install the new pump, ensuring it is securely mounted and the hoses and electrical connector are properly connected.
- Refill Coolant: Refill the cooling system with coolant.
- Test the System: Reconnect the battery and test the heater to ensure it operates correctly.
Replacing the auxiliary water pump can restore proper heater performance, ensuring a comfortable cabin environment.
9. Software and Computer Glitches
In modern vehicles, software and computer glitches can sometimes cause intermittent issues with the blower motor. These glitches can affect the signals sent to the blower motor, causing it to operate erratically.
9.1. How Software Issues Affect Blower Motor Operation
Software issues can interfere with the signals sent from the climate control module to the blower motor, leading to unpredictable operation. This is more common in vehicles with complex electronic control systems.
9.2. Diagnosing Software Problems
Diagnosing software problems requires specialized diagnostic tools and expertise.
9.2.1. Using Diagnostic Tools to Check for Software Glitches
- Connect Diagnostic Tool: Connect a diagnostic tool to the vehicle’s OBD-II port.
- Check for Error Codes: Run diagnostic tests to check for any error codes related to the climate control system.
- Update Software: Check for any available software updates for the climate control module and update the software as needed.
- Evaluate Results: Analyze the error codes and software versions to identify any potential issues.
Using advanced diagnostic tools can help identify and resolve software-related blower motor issues. CARDIAGTECH.BIZ provides a range of diagnostic tools for this purpose.
9.3. Resolving Software Issues
Resolving software issues may involve updating the vehicle’s software or reflashing the control module.
9.3.1. Steps for Updating or Reflashing the Control Module
- Connect Diagnostic Tool: Connect a diagnostic tool to the vehicle’s OBD-II port.
- Follow Prompts: Follow the prompts on the diagnostic tool to update or reflash the control module.
- Ensure Stable Power: Ensure the vehicle has a stable power supply during the update process to prevent interruptions.
- Verify Operation: Verify the operation of the blower motor and climate control system after the update is complete.
Updating or reflashing the control module can resolve software glitches and restore proper blower motor operation.
10. Seeking Professional Help
If you are unable to diagnose or repair the intermittent blower motor issue yourself, seeking professional help from a qualified mechanic is recommended.
10.1. When to Consult a Mechanic
Consult a mechanic if:
- You are uncomfortable working with electrical systems.
- You lack the necessary diagnostic tools.
- You have tried the above steps and the issue persists.
A professional mechanic can accurately diagnose and repair the problem, ensuring the blower motor operates correctly.
10.2. Benefits of Professional Diagnosis and Repair
Professional diagnosis and repair offer several benefits:
- Accurate diagnosis: Mechanics have the expertise and tools to accurately identify the cause of the problem.
- Reliable repairs: Mechanics can perform reliable repairs, ensuring the blower motor operates correctly.
- Warranty: Professional repairs often come with a warranty, providing peace of mind.
Seeking professional help can save time and money in the long run by ensuring the issue is resolved correctly.
FAQ: Troubleshooting Blower Motor Issues
1. Why does my car’s blower motor only work sometimes?
Intermittent operation can stem from loose electrical connections, a failing blower motor resistor, or a worn-out blower motor. Check these components for damage or corrosion.
2. How do I test my car’s blower motor?
Use a multimeter to check the voltage and current draw of the blower motor. Compare your readings with the manufacturer’s specifications to identify any discrepancies.
3. What does a blower motor resistor do?
The blower motor resistor controls the fan speed by regulating the voltage supplied to the blower motor. If it fails, you may only have one fan speed or none at all.
4. Can a bad fuse cause intermittent blower motor operation?
Yes, a loose or corroded fuse can cause the blower motor to work intermittently. Inspect the fuse and its connection to ensure it is in good condition.
5. How often should I replace my cabin air filter?
Replace your cabin air filter every 12,000 to 15,000 miles, or as recommended by your vehicle’s manufacturer, to maintain optimal airflow.
6. What are the signs of a bad blower motor?
Signs of a bad blower motor include weak airflow, unusual noises (squealing or grinding), intermittent operation, or complete failure.
7. Is it difficult to replace a blower motor resistor?
Replacing a blower motor resistor is typically a straightforward process that can be done with basic tools, often located under the passenger side dashboard.
8. How can I improve the airflow in my car’s HVAC system?
Ensure that the air vents are clear of obstructions and replace the cabin air filter regularly to maintain optimal airflow.
9. What diagnostic tools can help identify blower motor problems?
A multimeter can help test voltage, current, and resistance. Diagnostic scan tools can check for error codes related to the climate control system, and CARDIAGTECH.BIZ provides reliable options.
10. Can software glitches affect the blower motor?
Yes, in modern vehicles, software glitches can sometimes cause intermittent issues with the blower motor. Updating or reflashing the control module may resolve these issues.
Don’t let a faulty blower motor ruin your driving experience. By understanding the common causes and solutions for intermittent blower motor operation, you can keep your car’s climate control system running smoothly. Early diagnosis using tools from CARDIAGTECH.BIZ can save you time and money, ensuring your comfort on the road.
Facing blower motor issues? Don’t sweat it! Contact CARDIAGTECH.BIZ at 276 Reock St, City of Orange, NJ 07050, United States or WhatsApp us at +1 (641) 206-8880 for expert advice and the best diagnostic tools. Visit CARDIAGTECH.BIZ today and get your AC blowing cold again! Let CARDIAGTECH.BIZ help you diagnose and fix the problem quickly, so you can get back to enjoying your ride.