Mercedes Reversing Camera Retrofit: A Comprehensive Guide
Mercedes reversing camera retrofit enhances vehicle safety and convenience. At CARDIAGTECH.NET, we offer expert solutions for seamless integration, ensuring optimal functionality and improved driver assistance. Explore our range of retrofit options to modernize your Mercedes with cutting-edge reversing camera technology. Considering the complexity of these systems, proper diagnostic tools and expert knowledge are essential, highlighting the importance of professional installation and support from CARDIAGTECH.NET.
1. Understanding the Basics of Mercedes Reversing Camera Retrofit
What is a Reversing Camera Retrofit?
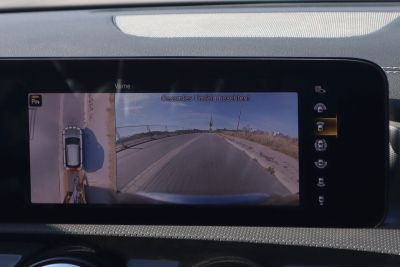
A reversing camera retrofit involves adding an aftermarket or OEM (Original Equipment Manufacturer) camera system to a Mercedes vehicle that did not originally come equipped with one. This upgrade enhances safety by providing a clear view of the area behind the car, aiding in parking and maneuvering.
Why Consider a Reversing Camera Retrofit?
- Enhanced Safety: Reduces blind spots and prevents accidents.
- Parking Assistance: Makes parking easier and more precise.
- Increased Vehicle Value: Adds a modern feature that can increase resale value.
- Convenience: Simplifies maneuvering in tight spaces.
2. Identifying Your Needs and Options
Assessing Your Mercedes Model and Compatibility
Before starting a retrofit, ensure the chosen camera system is compatible with your specific Mercedes model and year. Compatibility issues can arise due to differences in wiring, software, and mounting points.
OEM vs. Aftermarket Reversing Cameras
| Feature | OEM Reversing Cameras | Aftermarket Reversing Cameras |
|---|---|---|
| Integration | Seamless integration with the vehicle’s existing system. | May require additional adapters or interfaces. |
| Quality | Typically higher quality and durability. | Varies widely in quality; research and choose reputable brands. |
| Cost | Generally more expensive. | More affordable options available. |
| Installation | May require professional installation and coding. | Can be DIY-friendly but professional installation is recommended for optimal performance. |
| Features | Often includes dynamic guidelines and integration with the vehicle’s display screen. | Features vary; some offer advanced features like night vision or wide-angle views. |
| Warranty | Usually covered under the vehicle’s warranty if installed by an authorized dealer. | Warranty depends on the manufacturer and vendor. |
| Availability | Can be harder to source for older models, often requiring salvage parts or specialized dealers. | Generally readily available through online retailers and auto parts stores. |
| Aesthetics | Designed to match the vehicle’s original design, maintaining a factory-installed appearance. | Aesthetics can vary; some aftermarket cameras are designed to blend in, while others may have a more generic appearance. |
| Complexity | Installation can be more complex, often involving software updates and integration with existing systems. | Installation complexity varies; some kits are designed for easy DIY installation, while others require professional expertise. |
| Reliability | Generally more reliable due to stringent testing and quality control standards. | Reliability can vary; choosing reputable brands and ensuring proper installation are crucial for optimal performance. |
| Customization | Limited customization options as the system is designed to work specifically with the vehicle’s existing setup. | Offers more customization options, such as adjustable viewing angles, different display settings, and compatibility with various aftermarket display screens. |
| Integration | Full integration with the vehicle’s electronic systems, allowing for features like automatic activation when the vehicle is in reverse. | Integration may be limited, requiring manual activation or separate wiring for power and display connections. |
| Software | Software updates are typically handled by the dealership, ensuring compatibility with the vehicle’s systems. | Software updates may be less frequent or require manual installation, potentially leading to compatibility issues over time. |
Key Features to Look For
- High Resolution: Ensures a clear and detailed image.
- Wide Viewing Angle: Provides a broader view of the area behind the vehicle.
- Night Vision: Enhances visibility in low-light conditions.
- Waterproof: Protects the camera from the elements.
- Dynamic Guidelines: Moving lines that adjust based on steering input.
3. Essential Tools and Materials for the Retrofit
Necessary Tools
- Socket Set: For removing and installing bolts and screws.
- Wiring Kit: Includes wires, connectors, and terminals.
- Wire Strippers and Crimpers: For preparing and connecting wires.
- Multimeter: For testing electrical connections.
- Plastic Trim Removal Tools: To avoid damaging interior panels.
- Drill: For mounting the camera (if necessary).
- OBD-II Scanner: For coding and activating the system.
- Heat Gun: For heat shrinking connections for better insulation.
- Soldering Iron: For making secure and durable wire connections.
- Protective Gear: Safety glasses and gloves to protect yourself during the installation process.
Required Materials
- Reversing Camera Kit: Includes the camera, wiring harness, and mounting hardware.
- Display Screen: If not using the existing Mercedes screen.
- CAN Bus Adapter: For integrating the camera with the vehicle’s system.
- Fuses: To protect the electrical circuits.
- Zip Ties: For securing wires and cables.
- Electrical Tape: For insulating connections.
- Mounting Brackets: Ensuring stable and secure camera placement.
- Connectors: High-quality connectors to ensure reliable electrical connections.
- Wiring Harness: A vehicle-specific wiring harness for easier installation and integration.
- Adhesive Pads: For temporarily holding components in place during installation.
4. Step-by-Step Installation Guide
Step 1: Preparation
Disconnecting the Battery
Before starting any electrical work, disconnect the negative terminal of the battery to prevent electrical shocks and damage to the vehicle’s electrical system.
Gathering Tools and Materials
Ensure all necessary tools and materials are readily available to streamline the installation process. This includes the camera kit, wiring, connectors, and any specific tools required for your Mercedes model.
Reviewing the Vehicle’s Wiring Diagram
Consult the vehicle’s wiring diagram to understand the existing electrical system and identify the correct points for connecting the new camera system. This will help prevent wiring errors and potential damage to the vehicle’s electronics.
Step 2: Removing Interior Panels
Identifying Panel Locations
Locate and identify the interior panels that need to be removed to access the wiring routes. These typically include trunk linings, dashboard components, and door sill covers.
Using Trim Removal Tools
Use plastic trim removal tools to gently pry off the panels. Be careful not to damage the panels or the clips that hold them in place. Work slowly and methodically to avoid breaking any components.
Storing Panels Safely
Store the removed panels in a safe place to prevent scratches or damage. Organize the panels and their corresponding hardware (screws, clips) to ensure easy reassembly later on.
Step 3: Mounting the Reversing Camera
Determining the Camera Location
Decide on the optimal location for the camera. Common locations include above the license plate, in the trunk lid handle, or in a custom-made bracket. Consider the viewing angle and potential obstructions when choosing the location.
Drilling (If Necessary)
If drilling is required, use a drill bit that is the correct size for the camera mount. Drill slowly and carefully to avoid damaging the vehicle’s body. Apply rust-preventative paint to any exposed metal to prevent corrosion.
Securing the Camera
Secure the camera using the provided mounting hardware. Ensure the camera is firmly attached and properly aligned for the best view. Test the camera’s position before fully tightening the screws to make any necessary adjustments.
Step 4: Wiring the Camera
Routing the Wiring
Route the camera’s wiring harness through the vehicle, following existing wiring paths where possible. Use zip ties to secure the wiring and keep it away from moving parts or hot surfaces.
Connecting to Power and Ground
Connect the camera’s power wire to a suitable 12V power source, such as the reverse light circuit. Connect the ground wire to a solid grounding point on the vehicle’s chassis. Use a multimeter to verify the correct voltage and ground connections.
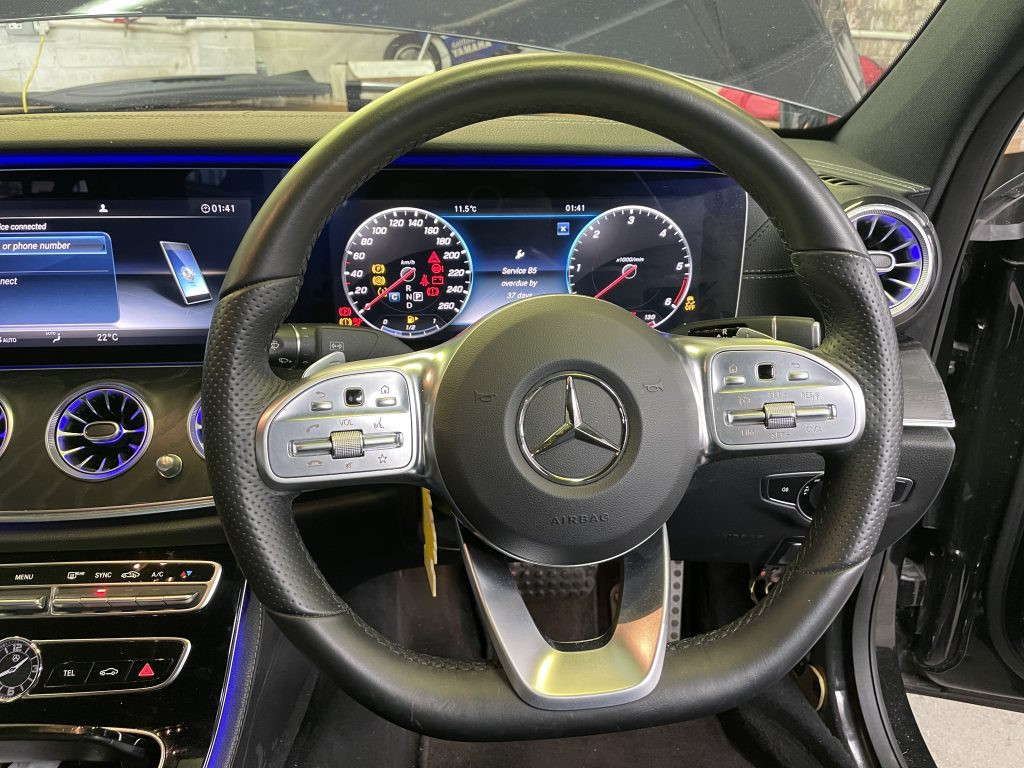
Connecting to the Display Screen
Connect the video signal wire to the display screen, whether it’s the existing Mercedes screen or an aftermarket unit. Ensure the connection is secure and properly insulated.
Step 5: Connecting to the CAN Bus (If Necessary)
Identifying the CAN Bus Wires
Locate the CAN bus wires in the vehicle’s wiring harness. These wires are typically twisted together and may be located near the radio or instrument cluster.
Using a CAN Bus Adapter
Use a CAN bus adapter to interface the camera system with the vehicle’s CAN bus network. This allows the camera to communicate with the vehicle’s computer and display information on the screen.
Connecting the Adapter
Connect the CAN bus adapter to the CAN bus wires, following the adapter’s instructions. Ensure the connections are secure and properly insulated.
Step 6: Coding and Activation
Using an OBD-II Scanner
Connect an OBD-II scanner to the vehicle’s diagnostic port. This scanner must be capable of coding and activating the reversing camera system.
Accessing the Vehicle’s Computer
Use the scanner to access the vehicle’s computer and navigate to the section for coding and activating new features. This process may vary depending on the scanner and the vehicle’s software.
Activating the Reversing Camera
Follow the scanner’s instructions to activate the reversing camera system. This may involve entering specific codes or selecting options from a menu.
Verifying Functionality
After activation, test the reversing camera to ensure it is working correctly. Shift the vehicle into reverse and check that the camera image appears on the display screen.
Step 7: Reassembling Interior Panels
Reattaching Panels
Reattach the interior panels in the reverse order of removal. Ensure all clips and screws are properly aligned and securely fastened.
Checking for Gaps or Loose Ends
Check for any gaps or loose ends in the panels. Adjust as necessary to ensure a clean and professional finish.
Ensuring Proper Fit
Ensure all panels fit snugly and securely, with no rattles or vibrations. Test the operation of any components that were removed, such as lights or switches.
Step 8: Final Testing and Adjustments
Testing Camera Functionality
Perform a thorough test of the reversing camera system. Check the image quality, viewing angle, and any additional features such as dynamic guidelines or night vision.
Adjusting Camera Angle
Adjust the camera angle as needed to provide the best possible view. This may involve loosening the mounting screws and repositioning the camera slightly.
Verifying All Connections
Verify that all electrical connections are secure and properly insulated. Use a multimeter to check for any voltage drops or shorts in the wiring.
Road Test
Take the vehicle for a road test to ensure the reversing camera system works correctly under real-world conditions. Check that the camera activates automatically when the vehicle is shifted into reverse and that the image is clear and stable.
5. Common Issues and Troubleshooting
Camera Not Displaying Image
- Check Wiring: Ensure all wiring connections are secure and properly connected.
- Verify Power: Use a multimeter to check that the camera is receiving power.
- Inspect Video Cable: Check the video cable for damage or loose connections.
- Check Fuses: Ensure the fuse for the camera system is not blown.
Poor Image Quality
- Clean the Lens: Clean the camera lens with a soft, lint-free cloth.
- Adjust Camera Angle: Adjust the camera angle for optimal viewing.
- Check for Obstructions: Ensure there are no obstructions blocking the camera’s view.
- Verify Resolution Settings: Check the resolution settings on the display screen.
Interference or Distortion
- Check Grounding: Ensure the camera and display screen are properly grounded.
- Route Wires Away from Interference: Route the wiring away from other electrical components that may cause interference.
- Use Shielded Cables: Use shielded cables to reduce interference.
Camera Not Activating in Reverse
- Check Reverse Light Wiring: Ensure the camera is properly connected to the reverse light circuit.
- Verify CAN Bus Connection: Check the CAN bus connection and ensure the adapter is functioning correctly.
- Recode the System: Use an OBD-II scanner to recode the system and ensure the camera is properly activated.
Error Messages on the Display
- Check CAN Bus Adapter: Ensure the CAN bus adapter is compatible with the vehicle and functioning correctly.
- Scan for Error Codes: Use an OBD-II scanner to scan for error codes and troubleshoot accordingly.
- Update Software: Update the vehicle’s software to ensure compatibility with the reversing camera system.
6. Maintaining Your Reversing Camera System
Regular Cleaning
Clean the camera lens regularly with a soft, lint-free cloth to ensure clear visibility. Remove any dirt, debris, or water spots that may accumulate on the lens.
Checking Wiring
Periodically check the wiring connections to ensure they are secure and free from corrosion. Use electrical contact cleaner to clean any corroded connections.
Software Updates
Keep the system software updated to ensure compatibility and optimal performance. Check for updates regularly and install them as needed.
Professional Inspections
Schedule regular professional inspections to ensure the system is functioning correctly. A qualified technician can identify and address any potential issues before they become major problems.
Protecting the Camera
Use a protective cover or shield to protect the camera from damage. This can help prevent scratches, cracks, and other damage that can affect the camera’s performance.
Avoiding Harsh Chemicals
Avoid using harsh chemicals or abrasive cleaners on the camera lens or housing. These can damage the camera and reduce its lifespan.
Checking the Display
Regularly check the display screen for any signs of damage or malfunction. Ensure the screen is clean and free from scratches or cracks.
7. The Benefits of Professional Installation with CARDIAGTECH.NET
Expertise and Experience
CARDIAGTECH.NET offers professional installation services with experienced technicians who have extensive knowledge of Mercedes vehicles. Our expertise ensures the reversing camera system is installed correctly and functions optimally.
Proper Coding and Activation
Our technicians use advanced diagnostic tools to properly code and activate the reversing camera system, ensuring seamless integration with the vehicle’s existing systems.
Warranty and Support
CARDIAGTECH.NET provides a warranty on our installation services, giving you peace of mind. We also offer ongoing support to address any questions or issues that may arise.
Avoiding Potential Issues
Professional installation helps avoid potential issues such as wiring errors, compatibility problems, and damage to the vehicle’s electrical system.
Saving Time and Effort
Professional installation saves you time and effort, allowing you to enjoy the benefits of a reversing camera system without the hassle of DIY installation.
Ensuring Safety
Proper installation ensures the reversing camera system is safe and reliable, providing you with enhanced safety and peace of mind.
Custom Solutions
CARDIAGTECH.NET offers custom solutions tailored to your specific needs and preferences. We can help you choose the right camera system and installation options for your Mercedes vehicle.
Up-to-Date Knowledge
Our technicians stay up-to-date with the latest technology and installation techniques, ensuring you receive the best possible service.
Diagnostic Capabilities
CARDIAGTECH.NET has advanced diagnostic capabilities to identify and address any potential issues with the vehicle’s electrical system or CAN bus network.
8. Cost Considerations
Component Costs
- Reversing Camera Kit: $100 – $500
- Display Screen (if needed): $100 – $300
- CAN Bus Adapter: $50 – $200
- Wiring and Connectors: $20 – $50
Installation Costs
- DIY Installation: $0 (excluding tools)
- Professional Installation: $200 – $500
Additional Costs
- Coding and Activation: $50 – $150
- Troubleshooting: Varies depending on the issue
Total Estimated Cost
- DIY Installation: $170 – $1050 (excluding tools)
- Professional Installation: $370 – $1650
9. Legal and Insurance Implications
Compliance with Local Laws
Ensure the reversing camera system complies with local laws and regulations. Some jurisdictions may have specific requirements regarding camera placement and functionality.
Impact on Insurance
Check with your insurance provider to determine if the reversing camera retrofit affects your insurance premiums. Some insurers may offer discounts for vehicles equipped with safety features like reversing cameras.
Disclosure Requirements
Disclose the reversing camera retrofit to your insurance provider to ensure you have adequate coverage in the event of an accident. Failure to disclose modifications may void your insurance policy.
Liability Considerations
Understand the liability considerations associated with using a reversing camera system. While the camera can enhance safety, it is not a substitute for careful driving and observation.
Documentation
Keep records of the reversing camera retrofit, including receipts, installation instructions, and any warranty information. This documentation may be required for insurance claims or vehicle inspections.
Impact on Vehicle Warranty
Be aware that installing an aftermarket reversing camera system may affect your vehicle’s warranty. Check with the manufacturer or dealer to determine if the retrofit voids any part of the warranty.
Safety Standards
Ensure the reversing camera system meets applicable safety standards and certifications. This can help ensure the system is reliable and performs as expected.
10. Future Trends in Reversing Camera Technology
High-Definition Cameras
Expect to see more high-definition cameras with improved image quality and clarity. These cameras will provide a more detailed and accurate view of the area behind the vehicle.
Wireless Connectivity
Wireless reversing camera systems will become more prevalent, eliminating the need for extensive wiring. These systems will offer easier installation and greater flexibility.
Integration with Advanced Driver-Assistance Systems (ADAS)
Reversing cameras will be increasingly integrated with ADAS features such as automatic emergency braking and lane departure warning. This integration will provide a more comprehensive safety system.
3D and Surround View
3D and surround-view camera systems will become more common, providing a complete view of the vehicle’s surroundings. These systems will enhance safety and convenience, particularly in tight spaces.
Artificial Intelligence (AI) Integration
AI will be used to enhance reversing camera systems, providing features such as object detection and pedestrian recognition. This technology will help drivers avoid accidents and improve safety.
Improved Night Vision
Night vision technology will continue to improve, providing better visibility in low-light conditions. This will enhance safety during nighttime driving and parking.
Augmented Reality (AR) Overlays
AR overlays will be used to provide drivers with additional information and guidance. This technology will overlay virtual lines and markers on the camera image, making parking and maneuvering easier.
Self-Cleaning Lenses
Self-cleaning lenses will become more common, reducing the need for manual cleaning. These lenses will use hydrophobic coatings to repel water and dirt, ensuring clear visibility at all times.
11. Real-World Examples and Case Studies
Case Study 1: Upgrading an Older Mercedes C-Class
- Vehicle: 2010 Mercedes-Benz C-Class
- Challenge: Limited visibility due to the absence of a reversing camera.
- Solution: Installation of an aftermarket reversing camera kit with a high-resolution camera and dynamic guidelines.
- Result: Improved parking and maneuvering, enhanced safety, and increased vehicle value.
Case Study 2: Integrating with the Existing Mercedes Display
- Vehicle: 2015 Mercedes-Benz E-Class
- Challenge: Seamlessly integrating a reversing camera with the vehicle’s existing display screen.
- Solution: Use of a CAN bus adapter to interface the camera with the vehicle’s system.
- Result: Full integration with the vehicle’s display, maintaining a factory-installed appearance.
Case Study 3: Overcoming Wiring Challenges
- Vehicle: 2012 Mercedes-Benz S-Class
- Challenge: Complex wiring and limited access to wiring routes.
- Solution: Professional installation with experienced technicians who navigated the wiring challenges.
- Result: Successful installation with secure and reliable wiring connections.
Case Study 4: Addressing Compatibility Issues
- Vehicle: 2018 Mercedes-Benz GLC
- Challenge: Compatibility issues with the chosen reversing camera kit.
- Solution: Selection of a compatible camera kit and use of advanced diagnostic tools to ensure proper coding and activation.
- Result: Fully functional reversing camera system with seamless integration.
12. Expert Tips for a Successful Retrofit
Research Thoroughly
Research different reversing camera kits and choose one that is compatible with your Mercedes model and meets your specific needs.
Plan Carefully
Plan the installation process carefully, taking into account the vehicle’s wiring and interior panel locations.
Use Quality Components
Use high-quality components, including wiring, connectors, and adapters, to ensure reliable performance.
Follow Instructions
Follow the installation instructions carefully and pay attention to detail.
Test Thoroughly
Test the reversing camera system thoroughly after installation to ensure it is working correctly.
Seek Professional Help
Seek professional help if you are unsure about any part of the installation process.
Protect Your Vehicle
Protect your vehicle’s interior and exterior surfaces during the installation process to prevent damage.
Take Your Time
Take your time and avoid rushing the installation process.
Verify Compatibility
Verify the compatibility of all components before starting the installation.
Double-Check Connections
Double-check all wiring connections to ensure they are secure and properly insulated.
13. Frequently Asked Questions (FAQ)
- Is it possible to retrofit a reversing camera on any Mercedes model?
Yes, but compatibility depends on the model and year. Research thoroughly to ensure compatibility. - Can I install a reversing camera myself, or do I need professional help?
DIY installation is possible, but professional installation is recommended for optimal performance and to avoid potential issues. - What is the cost of retrofitting a reversing camera on a Mercedes?
The cost ranges from $170 to $1650, depending on the components and installation method. - Will retrofitting a reversing camera affect my vehicle’s warranty?
It may affect your warranty; check with the manufacturer or dealer. - What are the benefits of using a CAN bus adapter?
A CAN bus adapter allows the camera to communicate with the vehicle’s system, enabling seamless integration. - How do I choose the right reversing camera kit for my Mercedes?
Consider the camera’s resolution, viewing angle, night vision capabilities, and compatibility with your vehicle. - What tools do I need for a DIY reversing camera installation?
You’ll need a socket set, wiring kit, wire strippers, multimeter, trim removal tools, and a drill (if necessary). - How do I maintain my reversing camera system?
Clean the lens regularly, check wiring connections, and keep the system software updated. - What should I do if my reversing camera is not displaying an image?
Check the wiring, verify power, inspect the video cable, and check the fuses. - Are wireless reversing camera systems reliable?
Yes, but ensure the system has a strong and stable connection to avoid interference.
Conclusion: Enhance Your Mercedes with a Reversing Camera Retrofit
A Mercedes reversing camera retrofit is a valuable upgrade that enhances safety, convenience, and vehicle value. Whether you choose a DIY installation or professional services from CARDIAGTECH.NET, the benefits are significant. By understanding the basics, identifying your needs, and following the steps outlined in this guide, you can ensure a successful retrofit. Modernize your Mercedes and enjoy the peace of mind that comes with improved visibility and parking assistance.
Ready to enhance your Mercedes with a state-of-the-art reversing camera system? Contact CARDIAGTECH.NET today at 276 Reock St, City of Orange, NJ 07050, United States or call us on Whatsapp at +1 (641) 206-8880 for expert advice and professional installation services. Let us help you transform your driving experience with the latest in automotive technology. Visit our website CARDIAGTECH.NET now!